We’ve all felt the frustration of trying to cook, store, and move in a kitchen that seems to shrink around us. Tiny kitchen solutions aren’t about settling for less, they’re about applying smart layout thinking so a small space feels efficient, calm, and even a little luxurious. In this text we’ll walk through the core design principles that govern successful tiny kitchens, show layouts that work for very small footprints, and give practical tactics for storage, surfaces, lighting, and visual tricks you can carry out now. Whether you’re renovating a studio, reconfiguring a galley, or fitting a kitchen into an odd nook, these ideas are proven in real homes and adaptable to different budgets. Let’s get started, and let’s make your small kitchen do more for you.
Core Design Principles For Tiny Kitchens
When we design for small kitchens, a few principles guide every decision. First: prioritize function over form. That doesn’t mean aesthetics get ignored, it means every beautiful choice must also earn its keep. We focus on sightlines, circulation, and workflow before choosing finishes.
Simplicity is another central idea. Clean lines, limited material palettes, and consistent hardware reduce visual clutter and make the space feel larger. In practice we might limit cabinet door styles to one profile, use the same countertop edge throughout, and keep trim minimal.
Scale matters. Appliances, sinks, and islands should be chosen to match the room’s proportions, oversized items will dominate and erode usable space. We favor compact appliances (24″ or smaller) and shallow cabinets for narrow areas.
Zoning is subtle but powerful: define prep, cooking, and cleanup zones so tasks don’t overlap. Even in a tiny footprint, a clear zone layout prevents traffic jams. We layer storage by frequency of use, everyday items at arm’s reach, infrequently used gear higher or lower.
Finally, think adaptability. Tiny kitchens must meet changing needs: drop-in cutting boards, removable shelves, or reversible islands extend the kitchen’s usefulness. If we build with adaptability in mind, the kitchen evolves instead of forcing us to rework it.
Best Layouts For Very Small Kitchens
Choosing the right layout is the biggest lever we have in a tight space. The proven options are galley, single-wall, compact L-shaped, and corridor variations. Each has trade-offs tied to circulation and storage.
Single-wall layouts maximize openness but require disciplined storage, we compensate with tall cabinets, open shelving, and smart appliance placement. Galley and corridor formats deliver excellent workflow because the work triangle is tight: they can feel cramped unless we optimize sightlines and lighting. Compact L-shapes with a slim island or peninsula give a bit more counter area and can create a social edge without consuming square footage.
When we compare layouts, we test for: unobstructed paths (at least 30 inches of clear walkway where possible), counter adjacency between sink and cooktop, and vertical storage potential. For very small kitchens we often hybridize layouts, a short run of cabinets plus a narrow peninsula, for example, to balance prep space and circulation.
Below we cover the two most common, effective small-kitchen variants and how to make them work in real life.
Adapting The Work Triangle For Tight Footprints
The classic work triangle (sink, stove, refrigerator) still matters, but in tiny kitchens we adapt it into a line or small polygon rather than a wide triangle. Our goal is to minimize steps and avoid cross-traffic.
In single-wall kitchens the triangle becomes a linear workflow: we arrange primary tasks left-to-right or right-to-left based on plumbing and ventilation. For galley kitchens the triangle tightens between the two runs: we make sure paths don’t cross by scheduling zones, prep near the sink, cooking on one side, cleanup consolidated.
We pay attention to functional distances: ideally, no leg of of the adapted triangle exceeds about 8–12 feet in larger small kitchens: in very compact spaces 3–6 feet is common. If the fridge is far from the prep area, we create a mini landing station near the fridge with a cutting board and small drawer for utensils to prevent repeated trips.
We also consider vertical workflow: place frequently used items (pots, oils, utensils) in reachable drawers or open shelves adjacent to the cooktop. For safety and speed, maintain clear counter space beside the stove for staging and cooling. Where possible, we incorporate pull-out surfaces that extend work area temporarily without stealing permanent room.
High-Impact Storage Strategies For Maximum Function
Storage is the battleground where small kitchens win or lose. We prioritize solutions that increase usable capacity without making the room feel crowded: think vertical, pull-out, and hidden storage.
Start by mapping every item you own and grouping by frequency of use. That informs whether something belongs in a drawer, cabinet, or elsewhere. We often eliminate duplicate gadgets and adopt multifunctional tools, a single good food processor replaces several niche appliances and frees shelf space.
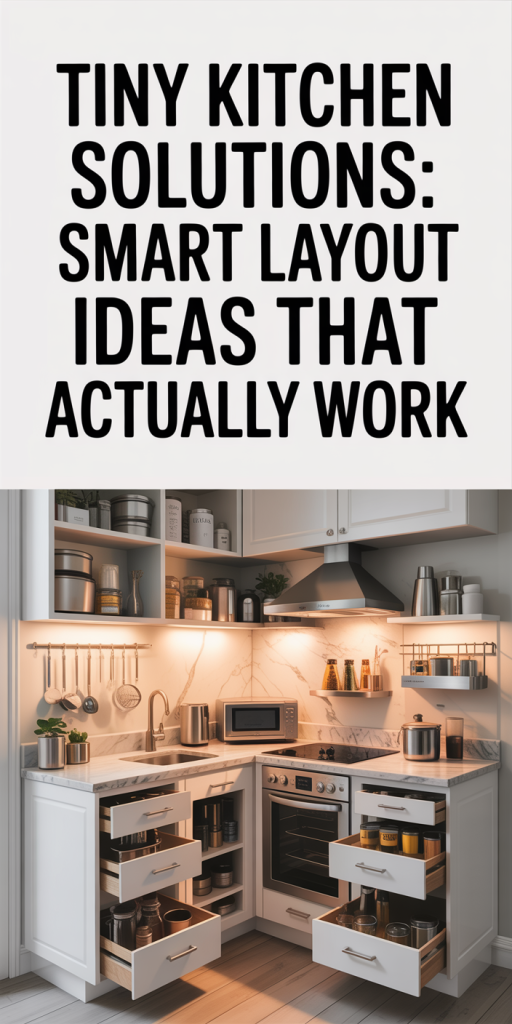
Investing in customized inserts and pull-outs yields huge returns. Drawer organizers, roll-out trays in lower cabinets, and tilt-out sink trays make all the difference. Pull-out pantries and narrow sliding cabinets tucked beside appliances turn dead space into valuable storage.
Consider open shelving strategically: it keeps everyday items accessible and lightens visual weight, but it requires discipline. Use matching containers and limit what’s displayed. For rarely used items, higher cabinets or ceiling-mounted racks (for pots) reclaim otherwise unused vertical real estate.
We also recommend using cabinet doors for storage: magnetic knife strips, spice racks, or small baskets mounted behind doors keep counters clear. Finally, if built-ins aren’t an option, look for furniture with storage, benches, narrow buffets, or wall-mounted cabinets that don’t intrude on flow.
Multi-Functional Surfaces And Flexible Furniture
We’re big proponents of surfaces that do double or triple duty. In a small kitchen every inch of counter is precious, so islands, tables, and counters should serve multiple roles.
A drop-leaf or flip-top counter can expand when we need extra prep or seating and fold down when we don’t. Pull-out cutting boards that tuck under counters are practically invisible until they’re needed. Integrated dish-draining racks over the sink free counter space and speed cleanup.
Flexible furniture helps too. A slim, mobile island with lockable casters becomes extra prep, a buffet, or a coffee station that moves out of the way. Nesting stools slide under counters for seating without taking permanent floor space. We prefer pieces with built-in storage: drawers, shelves, or hooks.
Multifunctional appliances also reduce clutter. Two-burner induction cooktops with an integrated griddle, combination microwave-convection ovens, and under-counter dishwashers conserve space and maintain capability. When selecting multiuse items, prioritize quality, we’d rather have one reliable combo appliance than several fragile single-use gadgets.
Finally, design for temporary expansion. A rollaway table can host a holiday buffet: a wall-mounted drop-leaf table creates a dining spot that disappears when not needed. These small mechanisms give us the feeling of a larger kitchen without demanding permanent square footage.
Lighting, Color, And Visual Tricks To Make Space Feel Bigger
Perception can be as influential as actual square footage. Thoughtful lighting, color, and visual tricks make tiny kitchens read as bigger and airier.
We layer lighting into ambient, task, and accent. Bright, even ambient light eliminates shadows that make spaces feel cramped: under-cabinet task lighting opens up work areas: and accent lights (inside glass-front cabinets or along toe kicks) add depth and dimension. Use warm-white LEDs for a welcoming feel and flexible dimming to change moods.
Color choices matter: light, neutral tones with selective contrast work best. We usually recommend a dominant pale hue on walls and ceilings, a slightly darker durable counter, and strategic contrast in cabinetry or backsplash to add personality without narrowing the room. Glossy or semi-gloss finishes reflect light: matte finishes hide wear but can absorb light, so balance accordingly.
Mirrors and reflective surfaces are classic tricks, mirrored backsplashes or glass-front cabinets reflect light and extend sightlines. Vertical patterns or long horizontal subway tiles laid in a stacked bond can visually lengthen or widen a kitchen depending on placement. Keeping the ceiling a shade lighter than walls also lifts the room.
Finally, minimize visual clutter. Keep countertops clear, conceal small appliances when not in use, and choose a consistent hardware finish. Those small restraints make the room read as intentional and roomy rather than just small.
Conclusion
Tiny kitchen solutions aren’t a checklist, they’re a design mindset. When we apply core principles, choose the right layout, adapt the work triangle, and prioritize storage, a small kitchen becomes highly functional and enjoyable. Light, color, and flexible surfaces amplify the effect. Start by mapping how you actually use your kitchen, pick one layout change or storage upgrade, and test it for a month. Small tweaks compound quickly: a pull-out pantry, a slim island, or better lighting will change how the space works for you. With thoughtful choices, tiny kitchens don’t limit us, they invite smarter living.
Leave a Reply