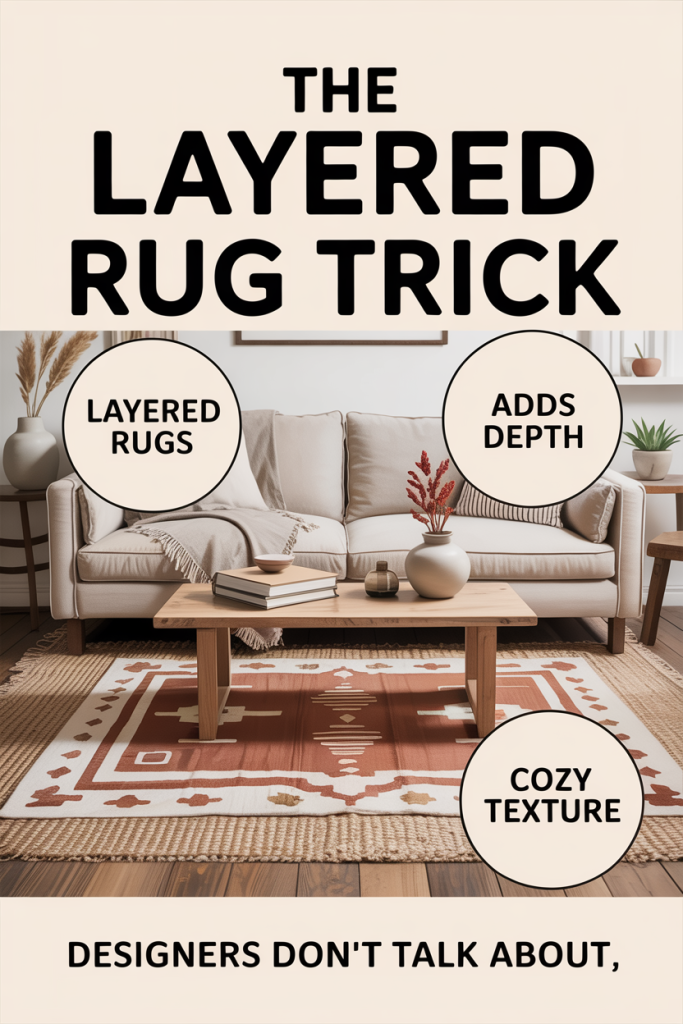
Layering rugs used to be a fringe decorator move reserved for high-end showrooms and daring stylists. In 2026 it’s mainstream, and for good reason. When done right, layered rugs add depth, temperature, sound control, and a tactile complexity that a single rug rarely achieves. We’ll walk through why the trend works, where it genuinely improves a space, how to execute it step-by-step, and the practical rules that keep layered rugs looking intentional rather than chaotic. This guide is for people who want bold, lived-in rooms that feel curated but comfortable, no mystifying jargon, just clear rules and creative options you can try this weekend.
Why Layered Rugs Work: The Design Principles Behind The Trend
Layering rugs isn’t just a visual trick, it’s grounded in basic design principles that affect proportion, texture, color, and the way we move through space. First, layering creates depth. Much like a vignette of furniture or a gallery wall, overlapping surfaces signal intentionality: our eyes read multiple planes as richness rather than clutter.
Second, layered rugs enhance scale and proportion. A small rug on a large floor can feel lost: placing a smaller, patterned rug over a larger neutral one anchors seating areas without forcing a single oversized piece. This solves a common problem in rooms with unconventional dimensions.
Third, texture contrast is powerful. Combining a low-pile jute with a plush wool or a flatweave with a knotted rug builds tactile interest. Texture cues tell our brain what area is for lounging, what’s transitional, and what’s decorative.
Fourth, acoustic and thermal benefits are real. Layered rugs add insulation in cold climates and reduce echo in open-plan homes, practical reasons beyond aesthetics. And finally, layering lets us mix price points: an affordable washable rug can take the daily wear while a more expensive antique or artisanal piece provides pattern and character.
Taken together, these principles explain why designers have quietly adopted rug layering: it’s a flexible, cost-effective way to solve multiple problems at once, visual, functional, and lived-in comfort.
Rooms And Layouts Where Layering Actually Makes Sense
Layered rugs aren’t for every room or every homeowner. We recommend they when they solve clear spatial or functional needs.
Living rooms: This is the most obvious candidate. In open-plan living, a base rug can define the zone while a secondary rug creates a focal area around the coffee table or seating cluster. In sectional layouts, layering allows the front legs of furniture to sit on a larger neutral layer while a smaller patterned rug marks the conversation area.
Dining rooms: Layering under a dining table can work if there’s a larger flatweave underneath to protect floors and a smaller, patterned rug centered under the table to add character. But ensure chair movement won’t catch on fringe or thick piles, the top layer should be low-profile or tacked down.
Bedrooms: Layering works beautifully here. Place a large neutral rug under the bed with a cozy, textured runner or small rug at the foot or bedside. It creates a hotel-like feel and soft landing spots for bare feet.
Entryways and hallways: Layering in transitional spaces helps with wear management. A robust base rug handles traffic: a decorative runner on top provides style. This approach also helps visually guide circulation paths.
Home offices and reading nooks: Layering can delineate a work zone inside a larger room. Use a neutral base to anchor furniture with a smaller patterned piece beneath a desk or chair to add personality without overwhelming the workspace.
Where to avoid layering: Small rooms with limited floor area, very high-traffic spots where rug edges will be a trip hazard, and rooms with delicate furniture that can’t accommodate mixed pile heights. If the floor itself is an architectural highlight (polished concrete, vintage hardwood), layering can obscure that character, so proceed only if the rug enhances, not hides, the room.
How To Layer Rugs: A Step-By-Step Practical Guide
We prefer a pragmatic, rule-based approach. Follow these steps to layer rugs confidently.
Step 1, Define the purpose. Are you creating a seating anchor, adding warmth, protecting floors, or introducing pattern? Your purpose shapes size and material choices.
Step 2, Start with a base rug. Choose something larger than the intended focal zone. Neutral colors and simple weaves work well as foundational layers because they recede visually and allow the top rug to pop.
Step 3, Pick the top rug for character. This is where pattern, color, and texture come in. Smaller, patterned, or higher-pile rugs tend to read as the decorative layer. Make sure the edges of the top rug sit comfortably within the base, typically leaving a 6–18 inch border of the base visible depending on room size.
Step 4, Test placement physically. We like to use painter’s tape to outline rug dimensions before committing. Move furniture pieces and see how legs interact with the layered rugs, front legs on the top rug often feel most anchored.
Step 5, Secure and stabilize. Use rug pads that add grip between layers to prevent slipping. For top rugs, consider double-sided rug tape in high-traffic areas. If the top rug has fringe, trim or tuck it to avoid catching on chairs.
Step 6, Adjust scale and balance. If the arrangement feels top-heavy, switch to a wider base border or a lower-contrast top rug. Conversely, if it reads flat, introduce a textured or brighter top layer.
Step 7, Live with it for a week. Rugs settle and rooms feel different with daily use. We recommend living with the configuration and making minor tweaks (rotation, repositioning) after a few days.
Following these steps gives a repeatable pathway from concept to confident execution, so layering feels intentional, not accidental.
Choosing Rug Sizes, Shapes, And Placement Rules
Size and shape matter more than most people realize, these choices determine how the eye reads a room.
Rule 1, Anchor first, accent second. The base rug should anchor the major furniture group (sofa, chairs, coffee table). For living rooms, that commonly means a rug size that allows at least the front legs of major seating pieces to sit on it, 8×10 or 9×12 for larger rooms, 5×8 or 6×9 for smaller spaces. The top rug should be noticeably smaller to create a visible border.
Rule 2, Keep proportional borders. In small rooms, leave a 6–8 inch border of base visible. In medium rooms aim for 10–12 inches. Large rooms can show 12–18 inches. The visible border creates breathing space and keeps the composition balanced.
Rule 3, Play with shapes. Don’t be afraid to mix shapes, an oval or round top rug over a rectangular base introduces movement. We love circular rugs under round dining tables layered onto rectangular bases for visual tension.
Rule 4, Consider furniture relationship. Dining chairs should remain on the base rug when pulled out: if layering would cause chairs to catch the top layer, either skip the top layer or use a low-profile flatweave.
Rule 5, Use symmetry and intentional offset. Centering the top rug works for formal layouts: offset placement feels more relaxed and contemporary. Try shifting the top rug toward the seating cluster or doorway to emphasize flow.
Rule 6, Scale patterns to room size. Large-scale patterns require larger rug areas to “read.” If your top rug has a bold motif, ensure it’s big enough to show the repeat: otherwise, a busy pattern will feel cramped.
These rules keep layering purposeful, each dimension and shape choice should support how the room functions and feels.
Materials, Texture Pairings, And Practical Durability Tips
Material selection is where design meets lifecycle. We want rugs that look good and stand up to real life.
Base rug materials: For the base layer prioritize durability and flat profile. Jute, sisal, wool flatweaves, and durable synthetic blends are excellent. They resist crushing, perform well under furniture, and provide a tactile grounding without competing with the top layer.
Top rug materials: This is the playground for pattern and plush. Hand-knotted wool, hand-tufted shag, vintage Persian or Anatolian rugs, and even indoor/outdoor synthetics can work depending on use. For high-traffic zones choose low to medium pile with tighter knots: for bedrooms or sitting nooks, we’ll often go for plusher textures.
Texture pairings that work:
Flatweave base + plush wool top: soft on the feet, visually layered.
Low-pile base + high-pile top: creates a luxurious island effect.
Durability tips:
Always use a rug pad between layers. It prevents slippage, reduces wear, and protects hardwood. Choose rubber or felt depending on the rug materials and floor type.
Rotate rugs periodically to even out wear, especially the top layer.
For spills, know your material’s cleaning needs. Wool tolerates spot-cleaning well: natural fibers like jute can stain and may be harder to clean.
In dining areas prefer washables or synthetics for ease of maintenance, or keep the decorative layer small and easily removable.
By matching materials to function, and using simple maintenance habits, we keep layered rugs both beautiful and practical.
Color, Pattern, And Scale: Creating Visual Harmony
Layering rugs gives us a rare chance to mix patterns and colors without overwhelming a room. The trick is control.
Start with a dominant palette: Pull two or three colors from the room (wall color, sofa, or artwork). Let the base rug be a neutral or a muted tone from that palette. Reserve brighter or more complex patterns for the top rug so it reads as an accent.
Pattern hierarchy: Treat patterns like voices. The base rug sings a low note, subtle geometric weaves, tonal stripes, or faded vintage fields. The top rug can be louder: a saturated kilim, a floral Persian medallion, or a bold modern abstract. If both rugs are highly patterned, scale them differently, large-scale motif on the base, small repeat motif up top, to prevent pattern fighting.
Contrast and cohesion: Contrasting textures or colors create interest, but cohesion keeps the look intentional. Use a shared color across both layers, a navy line in the base that appears in the top rug’s accent color ties them together. Metallic accents and small accessories that echo rug colors reinforce the tie.
Light and value: Consider value (lightness/darkness) before hue. A very dark top rug on a dark base will disappear: a very light top rug on a light base will float. We aim for mid-value differences so shapes read clearly. For example, a mid-gray sisal base with a faded rust patterned top rug offers readable contrast without jarring the eye.
Finally, use scale to your advantage. In big rooms, large pattern repeats feel appropriate: in small rooms, tight repeats and finer detail read better. When in doubt, photograph the layered setup to check how patterns read from different angles and distances.
Common Mistakes, Quick Fixes, And When To Avoid Layering
There are predictable pitfalls, let’s call them out and give straight fixes.
Mistake 1, Too-similar patterns. When both rugs fight for attention the result feels chaotic. Fix: swap one for a solid or tonal weave, or choose a top rug with a single accent color that ties to the base.
Mistake 2, Wrong scale. Small rugs on tiny bases or tiny patterns on huge areas look awkward. Fix: Ensure the top rug is proportionate to the furniture cluster, follow the border width rules we outlined earlier.
Mistake 3, Slippage and safety hazards. Rugs that slide are both annoying and dangerous. Fix: use layered rug pads and double-sided tape in high-traffic spots.
Mistake 4, Fringe and chair movement. Fringe can catch. Fix: remove fringe, tuck it, or avoid fringed rugs in dining areas.
Mistake 5, Hiding beautiful floors. If your floors are a feature, layering can be counterproductive. Fix: limit layers to small areas or use transparent rug materials sparingly.
When to avoid layering altogether:
Extremely small rooms where layers will make the space feel crowded.
Rooms with too many competing patterns or textures already, layering can tip the balance toward chaos.
Spaces with heavy machinery or furniture that needs stable, even flooring (e.g., certain workshop-like home gyms).
With quick fixes and awareness, most layering problems are reversible. The goal is to enhance, not complicate, the room.
Maintenance, Care, And Long-Term Planning For Layered Rugs
Layering requires a maintenance plan to protect both rugs and floors. Here’s what we recommend for practical long-term care.
Routine care:
Vacuum both layers weekly. Use a suction-only setting on delicate top layers: rotate rugs periodically to reduce uneven wear.
Spot clean immediately. Blot spills with a clean cloth: avoid rubbing which pushes stains deeper.
Deep cleaning and professional care:
For wool and vintage rugs, schedule professional cleaning every 2–3 years depending on traffic. Natural fiber bases like jute may not tolerate heavy professional wet-cleaning: instead, use dry methods and spot care.
If the top rug is washable, remove it seasonally and launder according to label directions. This reduces grit transfer to the base and floor.
Protecting floors and prolonging life:
Use a quality rug pad sized to the base layer. The pad should prevent migration, allow ventilation, and protect hardwood finishes from trapped moisture.
Avoid prolonged sun exposure, rotate rugs seasonally to minimize fading.
Inspect edges and fringe annually. Repair minor frays before they worsen: small repairs extend lifespan.
Storage tips:
Clean rugs before storage to prevent moths and staining.
Roll (don’t fold) with acid-free paper and store in a climate-controlled space. Avoid attics and basements prone to humidity.
Budgeting for longevity:
Plan for replacement cycles: high-traffic top rugs may need replacement every 3–7 years: durable bases last longer. Factor this into your décor budget so the layered look remains fresh without surprise costs.
A small maintenance routine makes layered rugs not only beautiful but sustainable over time.
Conclusion
Layered rugs are a quietly transformative design tool, practical, expressive, and surprisingly forgiving when we apply a few core rules. We’ve covered why layering works, where it’s most effective, and how to choose sizes, materials, and patterns so the outcome feels intentional rather than accidental. Start with purpose, anchor with a durable base, pick a characterful top rug, and secure everything with the right padding. With minimal upkeep and a little experimentation, layered rugs will give any room dimension, warmth, and personality we can live with for years.
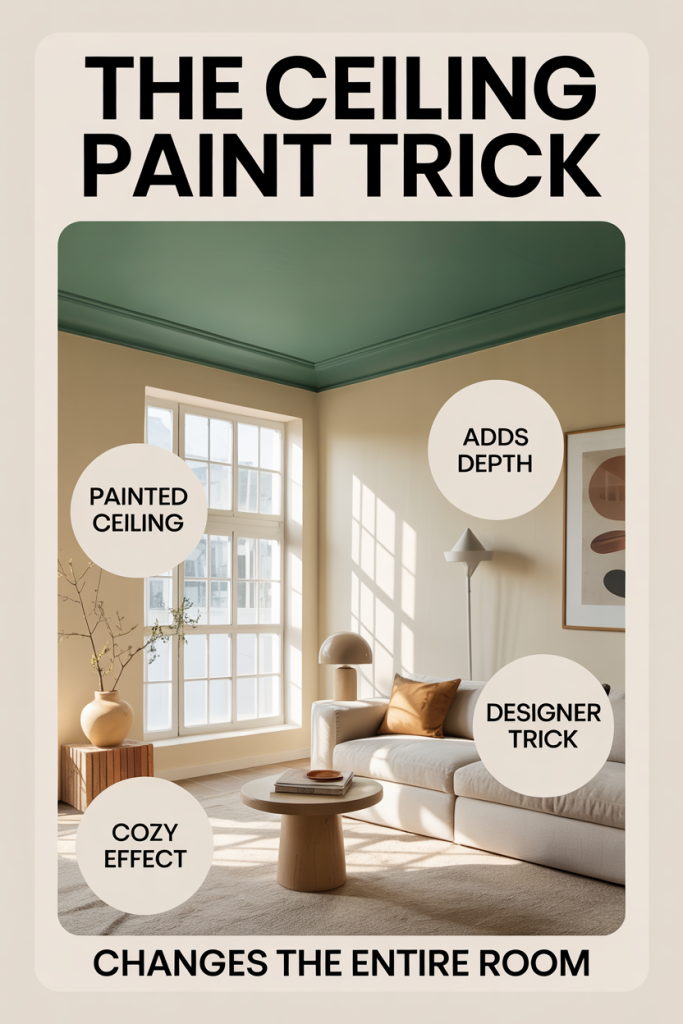
We often focus on walls, furniture, and flooring when updating a room, but the ceiling quietly governs how a space feels, its light, height, and emotional tone. The ceiling paint trick we’re about to walk through is simple: pick the right color and finish and you can make a low ceiling feel taller, brighten a dim room, or create a cozy, enveloping atmosphere without spending a fortune. In this text we’ll explain why ceiling color matters, how paint finish and hue change perception, practical painting techniques, design strategies for pairing ceiling color with walls and trim, and common mistakes to avoid. Whether you’re painting a studio apartment, a formal dining room, or a nursery, our guidance will help you make a thoughtful choice that transforms the entire room.
Why Ceiling Color Matters More Than You Think
Most people treat the ceiling as background, something to keep plain and forgettable. But the ceiling is a visual plane that interacts with light and color to shape perception. When we change ceiling color, we’re not just altering an overhead surface: we’re modifying how light bounces, where our eyes travel, and how the room’s proportions read. A pale, reflective ceiling throws light back into the room, making it feel airy. A darker ceiling absorbs light and visually pulls the plane downward, creating intimacy. That matters because mood and utility in a room are tightly linked to light and scale. Natural light behaves differently depending on ceiling tone and finish, and even artificial light fixtures reveal different personalities when set against a colored overhead. Beyond atmosphere, ceiling color can correct architectural quirks: we can visually raise soffits, soften harsh angles, or hide imperfections with a considered hue. In short, the ceiling is an opportunity, a kind of architectural punctuation mark that can shift a room’s story with one decisive stroke of paint.
Choose The Right Ceiling Paint Finish And Tone
Selecting the appropriate finish and tone for ceiling paint is as important as choosing the color itself. Ceilings traditionally get flat or matte finishes because they minimize glare and mask imperfections. We generally recommend an eggshell to flat sheen range for most ceilings: flat for hiding flaws in older homes, and a low-sheen eggshell or matte for modern spaces where durability and washability matter. The tone, warm, cool, neutral, will change how the room reads. Warm whites lean cream or ivory and add coziness: cool whites (with bluish or gray undertones) read crisp and airy. Undertones are sneaky: two paints labeled “white” can look dramatically different side by side, especially under different light sources. Test swatches on the ceiling itself and observe them at different times of day. If you’re leaning toward color rather than white, aim for a hue that’s slightly lighter and less saturated than the walls to avoid making the ceiling overpowering. Balance finish, tone, and the room’s lighting when making your choice, those three variables together determine the final effect.
How Ceiling Paint Affects Perceived Height And Light
Perception of height and light depends on contrast, value, and how our eyes draw boundaries. A high-contrast ceiling, dark against light walls, makes the ceiling feel lower because our eye stops at that darker band. Conversely, when the ceiling is noticeably lighter than the walls, it visually recedes, making the room feel taller. We can exploit this to solve design problems: in a room with a low ceiling but tall, heavy furnishings, a pale ceiling paired with slightly darker walls creates an airy balance. Light distribution is also heavily influenced by ceiling color. Light-colored, reflective ceilings return more of both natural and artificial light into the space, reducing the need for intense fixtures. Darker ceilings absorb light, which is ideal when you want to soften glare, create a cozy lounge vibe, or disguise ductwork and beams in industrial spaces. One subtle trick we like is painting the ceiling a fraction warmer or cooler than the walls to manipulate how light “warms” the room throughout the day. Small shifts in value, 20–30% difference in lightness, produce noticeable changes without feeling contrived.
Practical Techniques For Painting Ceilings
Knowing the theory is vital, but the execution makes the difference between a pro finish and a patchy ceiling. We always start by planning the sequence: prep, cut-in, roll, and touch-up. Choose a high-quality ceiling paint formulated for minimal splatter and good coverage. Use a roller with a short to medium nap (3/8″ to 1/2″) for smooth ceilings and a slightly thicker nap for textured ones. Begin with thorough surface prep, wash away grease, patch cracks, and prime stains. When cutting in, use a good-angle sash brush and create a perimeter band of about 2–3 inches. For rolling, attach an extension pole so you can maintain a consistent pressure and avoid stepping on ladders mid-roll. Overlap each pass slightly and maintain a wet edge to prevent lap marks. If you’re painting a darker color over white, multiple coats or a tinted primer will be required. For color-matched ceilings, get tint added to the primer to reduce the number of topcoats. Work in natural light or with good daylight-balanced bulbs so you can see true color and sheen while you paint.
Prepping, Tools, And Safety Tips
Proper prep shortens the project and improves the outcome. Start by removing or covering furniture, taping off trim, and protecting floors with a canvas drop cloth. Inspect for mold or moisture damage, if found, address the source before painting. Tools we recommend: an angled 2–2.5″ sash brush for crisp edges, a high-quality roller frame, extension pole, roller covers sized to your room, a paint tray with a grid, spackle for small repairs, and a respirator or mask rated for paint fumes. For safety, use a sturdy stepladder and have a helper when possible. If the ceiling is textured (popcorn or heavy stipple), consider whether you want to preserve the texture: painting can make texture more pronounced. For high ceilings, extendable poles and a stable, wide-base ladder are essential. Ventilation is crucial, open windows and use fans to move fumes outside. If you’re working around electrical fixtures, turn power off at the circuit and remove fixtures before painting. Finally, wear old clothes and eye protection: ceiling paint tends to splatter even though best efforts.
When To Use White Or Off-White
White and off-white ceilings are classic for a reason: they maximize perceived height and bounce light. We choose pure white (with neutral undertones) when the goal is maximum brightness, hallways, kitchens, and small bathrooms benefit most. Off-white variants, ivory, cream, or warm beige, are ideal in rooms where a slightly cozier feel is desired without losing light. Use warm off-white ceilings in living rooms and bedrooms that have warm wall colors or wood tones to harmonize the palette. In rooms with cool-toned walls or lots of natural light, a cool white (with faint blue or gray undertones) feels crisp and modern. Remember that what appears white on a paint card can shift dramatically under different lighting: always test a large swatch on the actual ceiling and view it at morning, midday, and evening light. For rental properties or open-concept homes, we often recommend a neutral white with minimal undertone so it pairs easily with varied wall colors and furnishings.
Using Color On The Ceiling To Add Depth
Painting the ceiling a color, not just white, can add sophistication and depth. A soft, muted color like pale blue or sage green can make a room feel larger by suggesting an extension of the sky or landscape. For dramatic effect, a deep navy or charcoal ceiling in a dining room or home theater creates an enveloping, luxurious feel. When using color, keep saturation moderate: highly saturated ceilings can feel oppressive if the walls aren’t balanced correctly. A popular technique is the ‘slightly lighter ceiling’ approach: pick a ceiling color that’s one to two shades lighter than the walls’ base color. That keeps harmony while creating dimensional layering. We also recommend considering adjacent rooms, if you have an open floor plan, use ceiling color to delineate zones without changing wall colors. Finally, metallic or pearlescent paints can subtly reflect light and add glamour when used sparingly, such as on coffered ceilings or architectural details.
Design Strategies: Matching Ceiling Color With Walls And Trim
Harmonizing ceiling color with walls and trim requires strategy. The traditional approach pairs a white or off-white ceiling with colored walls and matching trim, creating a clean delineation. But intentional continuity can also work, painting trim the same color as the ceiling can blur edges and make a room feel larger. We often suggest the following rules of thumb: if you want a room to feel taller, choose a ceiling several shades lighter than the walls: if you want a cozy, cocooned environment, pick a ceiling slightly darker. Consider undertones: if your walls have warm undertones, choose a ceiling with complementary warmth to avoid visual discord. For rooms with crown molding, painting the crown and ceiling the same color while contrasting the wall can be an elegant move that emphasizes architectural detail. In open plans, subtle continuity, like keeping ceiling color consistent across connected spaces, maintains flow while wall colors define each area. Finally, test how trim looks when painted in either ceiling or wall color: small changes in trim can dramatically shift the perceived balance.
Common Mistakes And How To Avoid Them
Even experienced DIYers make ceiling-paint mistakes, but most are avoidable. One frequent error is ignoring undertones: choosing a ‘white’ that clashes with wall tones can make colors look off. Avoid this by testing large swatches. Another mistake is using the wrong finish, high gloss on ceilings will highlight imperfections: stick to flat or low-sheen finishes. Poor prep causes flaking and uneven texture: take time to clean, patch, and prime. Lap marks happen when the paint edge dries before the next pass: maintain a wet edge and work in small sections. Skimping on primer when transitioning from dark to light will cost time, prime first. Overly saturated ceiling colors without balancing wall hues can feel heavy: if you want a dramatic ceiling, pair it with neutral or lighter walls. Finally, bad lighting choices during painting can mislead color perception. Use daylight-balanced bulbs while painting and review swatches at different times of day before committing. Taking these precautions saves time and delivers the polished result we all want.
We’ve seen trends come and go, but the arched mirror has earned a permanent place in interiors for a reason: it’s an easy, high-impact move that changes how a room feels without a major renovation. In this guide we’ll explain why arched and curved mirrors work so well, the little placement and proportion tricks that make them read as intentional rather than accidental, and how to choose frames, finishes, and sizes that complement your home. Whether you want to add height to a low-ceilinged entry, double the daylight in a dim living room, or give a bedroom a quietly elegant focal point, the arched mirror trick is one of the simplest design investments with outsized returns. Read on, we’ll walk through practical rules, styling tips, common mistakes, and where to buy reliable options from budget-friendly to splurge-worthy.
Why Arched Mirrors Work So Well In Any Room
Arched mirrors succeed because they tap into several visual cues our brains use to read space: curvature suggests softness and motion, verticality implies height, and reflective surfaces amplify light and depth. Put together, these qualities make a compact object, one mirror, perform several design jobs at once.
Curves are psychologically approachable. Unlike a square or rectangle, an arch introduces a gentle, human-scale line that feels more organic and luxe. That soft silhouette is why arched mirrors frequently read as designer features even when they’re budget purchases. We find our eyes naturally trace the arch upward, which creates an impression of increased ceiling height and graceful flow.
On a practical level, curved mirrors reflect and redistribute light differently than flat-edged shapes. The arch’s top reaches into higher sight lines, catching and returning daylight or ambient light in ways that help brighten corners and hallways. In narrow spaces, an arched mirror placed thoughtfully can create a sense of depth without cluttering sightlines.
Finally, arched mirrors offer versatility. They play well with many styles, from traditional and French-country to modern minimalism and Japandi, because the shape is both historic and contemporarily relevant. That versatility makes them a safe, strategic choice when we want a single object to elevate an entire room’s aesthetic.
The Arched Mirror Trick Explained: Placement, Reflection, And Visual Weight
When we talk about the arched mirror trick, we mean more than “hang a pretty mirror and call it a day.” The trick is about thoughtful placement, using reflection intentionally, and balancing the mirror’s visual weight within the room.
Placement: The most powerful placements are opposite windows, near entryways, or behind seating. Opposite a window, an arched mirror doubles daylight and draws the outdoors inward, that’s instant ambiance. Near an entry, it introduces presence and checks sightlines so guests step into a space that feels larger and curated. Behind a sofa or console, the arch creates a focal layer that elevates even the simplest furniture arrangement.
Reflection: What the mirror reflects matters. We should avoid reflecting cluttered areas or unattractive elements. Instead, aim mirrors toward appealing views, garden layers, vignettes, architectural details, or interesting light fixtures. The arch’s curvature tends to soften the reflected image, which can be forgiving and flattering for portraits or dressing areas.
Visual weight: Arched mirrors carry a certain visual gravity. A large, dark-framed arch will anchor a wall like a piece of art: a slim, metallic arch will read lighter and more decorative. We balance that weight by considering scale and surrounding elements: pair a heavy arch with minimal furniture to prevent crowding, or use a lighter arch to add interest without dominating a small room. The trick is to make the mirror feel intentional, part of the design story, rather than an afterthought.
Choosing The Right Size, Shape, And Frame For Your Space
Selecting the correct size, shape, and frame is where the arched mirror moves from decorative to transformative. We start with size: generally, larger mirrors create more impact, but scale must respect the wall and furniture they accompany. A good rule of thumb is that a mirror over a console, mantel, or bed should be about two-thirds to three-quarters the width of the furniture beneath it. For full-height arches meant to visually raise ceilings, choose a mirror that reaches within 8–12 inches of the floor and tops out comfortably below any crown molding.
Shape nuances matter. A strict semicircular arch reads traditional and formal: a softer elongated arch with more vertical rise looks modern and elegant. Consider the proportions of the room: short, wide rooms can benefit from broader arches that emphasize horizontal space, while tall skinny rooms respond well to elongated arches that accentuate height.
Frame choices define the mood. Wood frames warm a space and pair well with natural or rustic interiors: painted frames can either blend into walls for a subtle look or contrast for a graphic statement. Metal frames, brass, blackened iron, or polished chrome, deliver a sleek, contemporary edge and reflect light off the frame itself, adding shimmer. Then there are frameless arched mirrors, which offer a minimalist, gallery-like presence and are excellent in modern bathrooms or dressing areas.
We also think about finish and detail. Antiqued mirrors with slight mottling add character and work beautifully in vintage or eclectic settings. Meanwhile, thin metal borders with mitred corners signal modernity. When in doubt, match the frame material to prominent metals in the room, lighting, hardware, or furniture legs, to keep the palette cohesive.
Measuring And Placement Rules To Maximize Impact
Accurate measuring prevents disappointment. Before you buy or hang an arched mirror, we measure both the wall and the furniture it’s meant to relate to, and mentally map the sightlines. A few straightforward placement rules help us squeeze maximum effect from every mirror.
Rule 1: Eye-line and focal relationship. When hanging a mirror for everyday use, in a dressing area or entryway, the center of the reflective surface should sit roughly 57–65 inches from the floor, which aligns with average eye level. For purely decorative mirrors where practical viewing isn’t necessary, placing the top of the arch closer to the ceiling can maximize perceived height.
Rule 2: Leave breathing room. Avoid cramming the arch into a crowded composition. Leave 2–4 inches between the mirror and moldings or adjacent artwork, and allow a proportional gap between the mirror and any furniture beneath it. Overly tight spacing makes a mirror feel like a worldly sticker: adequate spacing gives it presence.
Rule 3: Respect sightlines. Don’t place a mirror where it will reflect unattractive utilities, small TVs, or chaotic corners. Instead, angle or site the mirror to reflect light and architecture. In many cases, the most intentional placement is slightly off-center from a piece of furniture to create a layered, editorial look rather than a matched-for-museum symmetry.
Rule 4: Consider wall material and reinforcement. Large arched mirrors can be heavy: drywall anchors or studs are necessary. We always check backing and use appropriate hanging hardware rated above the mirror’s weight.
These measuring and placement rules give predictable results, but small adjustments, a few inches higher or lower, slightly left or right, can shift the perception of an entire room. We recommend dry-mounting paper templates to the wall to test positions before drilling.
Living Room And Entryway Placement Strategies
Because living rooms and entryways are social and functional zones, the arched mirror strategy focuses on light, first impressions, and focal balance. In an entryway, a single, well-placed arch directly opposite or adjacent to the door creates a gracious welcome. If space allows, pair the mirror with a narrow console, a tray for keys, and a small lamp: the mirror multiplies both light and vignette.
In living rooms, we often place an arched mirror above a mantel or sofa. Above a mantel, a centered arch reads like a framed artwork and adds seasonal flexibility: change the mantel vignette and the mirror keeps the composition grounded. Over a sofa, slight off-centering can feel more editorial. If you have a sectional, consider a tall arched mirror on the longest wall to balance the low, horizontal mass of seating.
In both rooms, use the mirror to capture an appealing reflection, a window view, art wall, or pendant fixture. When the arch reflects a window, it creates a layered view that expands the perceived depth. For living rooms with low ceilings, an arched mirror that extends vertically can be far more effective than installing new lighting: it visually lifts the room.
Practical tip: If you’re concerned about a mirror appearing too heavy over furniture, choose a slim metal or wood frame with a warm finish to keep the look grounded but not overwhelming.
Bedroom, Bathroom, And Dressing-Area Placement Strategies
Bedrooms and dressing areas call for a balance of beauty and utility. In bedrooms, the arched mirror often functions as both a decorative anchor and a practical dressing mirror. Over a dresser, choose a mirror that’s wide enough to create proportion with the dresser, again, roughly two-thirds to three-quarters the width, and place it so the top of the arch sits comfortably below any ceiling detail.
Full-length arched mirrors are invaluable for dressing areas. If you don’t have space for a built-in wardrobe mirror, lean an oversized arched mirror against a wall at a slight angle. Leaned mirrors bring casual elegance: they create a soft vignette and are easier to reposition than wall-mounted options. Ensure the bottom sits on a stable floor protector to avoid slipping.
Bathrooms are trickier due to moisture and scale. A large arched mirror above a double vanity makes the room feel larger and elevates a simple vanity to a design moment. Use a properly sealed or humidity-rated mirror and hardware to prevent corrosion. For small powder rooms, a single dramatic arched mirror can replace multiple decor items and make the space feel like a boutique bath.
Lighting considerations: In dressing areas and bedrooms, lighting at eye level is essential. If the mirror reflects a window, it will help with daylight: for evening routines, flank the arch with sconces or integrate LED backlighting to avoid harsh top-down shadows. We prefer soft, warm light for dressing, around 2700K to 3000K, which is flattering to skin tones and fabrics.
Safety note: If you’re leaning a heavy arched mirror, secure it to the wall with an anti-tip device. That small precaution prevents accidents and keeps the look intentional rather than precarious.
Hanging And Styling Tips For A Polished, Cohesive Look
Hanging and styling an arched mirror well turns it from an object into a room-defining element. We approach hanging like framing a painting: level, centered to the composition, and at an appropriate height. For heavy mirrors, use two hanging points attached to studs or quality anchors to prevent shifting.
Styling around the mirror is where personality comes in. Keep the area beneath the mirror clean and purposeful: a console with a single lamp and one or two curated objects looks better than a crowded tabletop. Mirrors pair beautifully with layered textures, a woven basket, a stack of books, or a sculptural ceramic. We aim for contrast in scale and texture: a slim-framed arch against plastered walls, or a heavy wooden arch softened with a linen runner.
Anchoring the mirror with lighting enhances its effect. Wall sconces mounted at about two-thirds of the mirror’s height, or a pair flanking the arch, create symmetry and illuminate the reflected view. If you prefer a more modern look, backlit mirrors provide soft, haloed light that’s both functional and atmospheric.
Another stylistic lever is repetition. If you have multiple small rooms or a long hallway, repeating small arched mirrors at intervals creates rhythm and a cohesive thread throughout the home. But don’t overdo it: varied frames or slight differences in size prevent the look from feeling like a factory.
Finally, embrace the mirror’s reflective power in decor choices. Position plants near the mirror to double their presence: use it to showcase an art wall from another angle: or let it capture evening candlelight for a warm, enveloping glow. When we style mirrors, we think in layers, the mirrored surface is just one layer that interacts with furniture, lighting, and accessories to create atmosphere.
Common Mistakes To Avoid When Using Arched Mirrors
Arched mirrors are forgiving, but a few common missteps can blunt their impact. We’ve seen these mistakes in real homes, and avoiding them will save time and money.
Mistake 1: Choosing the wrong scale. Too small and the mirror looks like an afterthought: too big and it overwhelms the space. Always measure and visualize with templates before purchase.
Mistake 2: Reflecting the wrong thing. Mirrors that bounce back clutter, utility boxes, or unattractive HVAC units defeat their purpose. Pretend you’re framing a photograph, what you reflect should be as considered as any artwork.
Mistake 3: Ignoring mounting specifications. A heavy arched mirror hung on inadequate anchors is both unsafe and likely to tilt over time. Use hardware rated above the mirror’s weight and secure to studs when possible.
Mistake 4: Mismatched style. While arched mirrors are versatile, pairing a highly ornate gold arch with ultra-minimalist décor can feel dissonant. We recommend aligning the mirror’s material and finish with key elements in the room: lighting fixtures, cabinet hardware, or furniture legs.
Mistake 5: Poor lighting. Mirrors amplify light, but they don’t replace proper task lighting. Don’t rely on a mirrored surface to do the work of vanity lighting or reading lamps, instead, use the mirror to enhance existing light sources.
Avoiding these errors will keep an arched mirror reading as a purposeful design decision rather than a styling shortcut.
Where To Buy Arched Mirrors And Budget-To-Splurge Options
We like to recommend retailers and makers across a range of budgets, so you can find a quality arched mirror whether you’re decorating a rental or outfitting a new build.
Budget-friendly options: Big-box and fast-furniture stores now offer handsome arched mirrors at accessible price points. Look for retailers that provide verified customer photos, they’re invaluable for judging true scale and finish. For a budget arc, choose a simple, thin metal or molded composite frame: these are lightweight, easier to hang, and often come in multiple finishes.
Mid-range: Specialty home retailers and online boutiques typically offer better materials and craftsmanship. Here you’ll find solid wood or genuine metal frames, hand-finished details, and tempered glass. These options balance durability with design-forward shapes and are ideal for living rooms, entryways, and bathrooms where the mirror will be central to the composition.
Splurge and artisanal: For a statement piece, consider working with a small studio or artisan maker who can customize dimensions, frame material, and glass treatments (such as antiqueing or low-iron glass). Custom mirrors are worth the investment when scale or finish will make or break the room’s design. High-end furniture showrooms and local framers often offer bespoke services and installation.
Sourcing tips: Always request a sample of the frame finish when possible, and check the glass specification (low-iron for the truest reflection, tempered or sealed for bathrooms). For online shopping, verify return policies and delivery protection, large mirrors can be damaged in transit. We also recommend reading reviews specifically about hanging and durability: a beautiful mirror that warps or hangs crooked will cost more in frustration than a slightly pricier, sturdier alternative.
Brands and places we’ve had consistent success with include a mix of national retailers and smaller workshops. If you want tailored recommendations based on your specific room dimensions and style, we’re happy to suggest options after a quick room description.
Conclusion
The arched mirror trick is simple but strategic: the right arch, placed thoughtfully, amplifies light, suggests height, and injects instant style. We’ve covered why curved mirrors resonate, how to choose scale and frame, practical measuring and hanging rules, room-specific placement strategies, common pitfalls, and where to buy. When we approach mirrors as deliberate design tools, not just decorative afterthoughts, they repay us with atmosphere and function.
If you’re decorating a room, start with a template on the wall and test a few placements. Lean on the mirror to frame a great view, pair it with complementary finishes, and use lighting to make the reflection sing. With a little care, an arched mirror will lift a space dramatically, often for a fraction of the cost of structural changes. We can’t promise it will fix everything, but it will change how the room feels, and that’s the whole point.
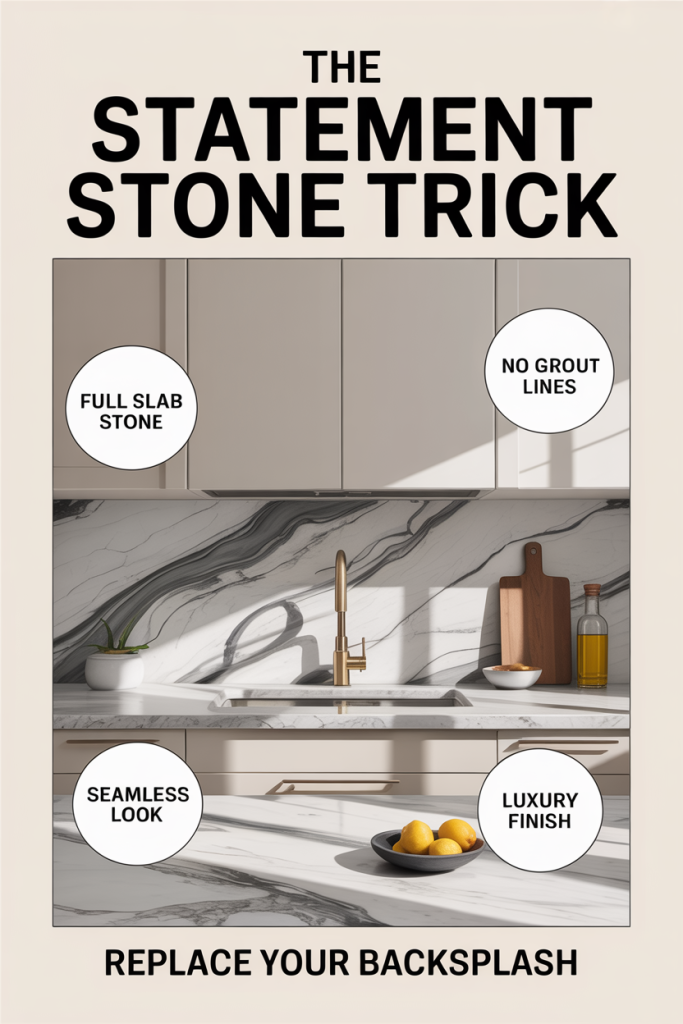
We’re in a moment where less can be more, especially in kitchen design. Instead of layering a separate backsplash material over the wall, more homeowners and designers are letting the countertop reach up the wall as a single, dramatic plane: what we’re calling the statement stone trick. It’s bold, clean, and remarkably practical. In 2026, with better fabrication techniques and wider stone options, using a full-height or partial-height stone application to replace a traditional tile or subway backsplash is one of the fastest ways to modernize a kitchen and add long-term value.
In the sections that follow, we’ll explain what the statement stone trick is and why it works, compare it to traditional backsplashes, break down the best materials and edge treatments, walk through installation options and substrate needs, and give design-forward tips so the look reads cohesive rather than contrived. Whether you’re planning a full remodel or a targeted refresh, we’ll help you make your countertop do the heavy lifting, literally and visually.
The Statement Stone Trick: What It Is And Why It Works
The statement stone trick is simple in concept but powerful in effect: extend the countertop material up the wall behind the sink and cooktop to replace a separate backsplash. That extension can be a full-height slab running from counter to ceiling, a mid-height splash (commonly 12″–24″), or a continuous waterfall that wraps the countertop edge and climbs the wall. The idea is to rely on one continuous material to create a strong visual anchor rather than piecing multiple surfaces together.
Why it works now: fabrication and transport advances let us work with larger, lighter slabs and tighter seams than a decade ago. Engineered stones and large-format porcelain mimic natural veining while offering greater consistency, useful when you want a dramatic, book-matched slab. From a design standpoint, a single stone plane reads as less busy and more luxe: it simplifies the silhouette, highlights veining or veined book-matching, and provides a practical, wipe-clean surface in the most splash-prone area.
Functionally, statement stone is durable and hygienic. Solid, non-porous engineered quartz and some porcelains resist staining and microbial growth better than grout-lined tile. Even natural stones like honed marble or leathered granite perform well if sealed properly and used in the right applications. Finally, the statement stone trick reduces maintenance headaches: fewer grout lines, no caulk that’s constantly failing, and a unified surface that’s easy to keep looking new.
Benefits Over Traditional Backsplashes
Choosing statement stone instead of traditional tile backsplashes delivers benefits across aesthetics, durability, and resale value. Aesthetic benefits are immediate: a full slab behind the work zones reads as high-end, creates visual continuity, and allows veining or pattern to become the room’s focal point. We often see this in modern open-plan kitchens where the backsplash is visible from living spaces, the uninterrupted stone reads like art.
From a durability and maintenance standpoint, stone reduces porous surfaces and eliminates grout lines where dirt, grease, and mildew accumulate. This is especially valuable behind the range and sink. Engineered materials typically come with manufacturer care guidelines and warranties that outpace older backsplash installations. For households that cook frequently, that’s a real time-saver.
On the value side, cohesive material selections tend to fetch higher appraisals. Buyers perceive continuous slabs as intentional, premium choices. When we compare kitchens with tiled backsplashes to those with integrated stone, the latter often scores better in listings and staging scenarios. Also, water infiltration issues related to failed backsplash caulk are less likely when the material runs into a properly prepped substrate, reducing potential long-term repair costs.
There are trade-offs, cost and the potential for a colder look if overused, but we find that with thoughtful pairing of texture and color, the benefits generally outweigh the downsides for most mid- to high-end projects.
Best Materials, Finishes, And Edge Treatments For Statement Stone
Material choice is the single biggest decision when using the statement stone trick. Here’s what we recommend based on performance and aesthetics:
Engineered quartz: Low maintenance, high consistency, and excellent for bold veining or uniform colors. Many manufacturers now produce slabs in generous sizes suitable for full-height runs. Quartz is non-porous, which makes it ideal behind sinks and ranges.
Large-format porcelain: Extremely resilient to heat and scratching, porcelain is available in very large panels and can convincingly mimic marble, fossil, or concrete. It’s lighter than many natural stones and resists staining without sealing.
Natural stone (marble, granite, quartzite): Marble offers unmatched beauty for dramatic veining and book-matching, but it’s more maintenance-heavy and requires proper sealing. Granite and quartzite are tougher and more heat resistant: quartzite’s veining can be stunning when finished properly.
Sintered stone (e.g., Neolith): Highly durable and heat-resistant with wide format options, great for full-height applications and exterior uses.
Finishes to consider:
Polished: Reflective and elegant: shows veining clearly but can reveal water spots.
Honed: Softer, matte finish that hides smudges and gives a warmer look.
Leathered: Textured surface that reduces fingerprints and adds tactile interest, works well for casual, layered kitchens.
Edge treatments:
Simple eased or beveled edges keep the look modern and let the slab speak.
A waterfall edge continuing down to the floor is dramatic and pairs well with island focal points.
Integrated sinks and undermount detail reduce visual seams and reinforce the monolithic appearance.
When choosing material and finish, we balance the visual impact with day-to-day use. For heavy-cooking households we lean toward porcelain, quartzite, or engineered quartz: for show-stopping design statements we might choose book-matched marble with a honed or leathered finish to minimize wear visibility.
Installation Options And What Each Entails
There are several installation strategies for executing a statement stone backsplash, and each comes with different costs, skill requirements, and lead times. We break them into three practical pathways: full-height slab installations, waterfall integrations, and panel systems. Selecting the right method depends on slab size availability, structural wall conditions, and budget.
Key factors that influence choice include: slab format and availability (larger slabs reduce seams), substrate flatness (walls often require furring or backerboard), and site logistics, can the slab be transported and maneuvered through the home? We recommend consulting your fabricator early so slab selection and templating can be coordinated with cabinetry trades to minimize seams and ensure continuous pattern flows.
Below, we cover surface prep and substrate requirements as well as common attachment methods so you can weigh options with contractors and suppliers.
Surface Prep And Substrate Requirements
(This section is an H3 subordinate to “Installation Options And What Each Entails”)
Proper surface preparation is non-negotiable. Walls behind countertops are rarely perfectly flat or plumb: small deviations magnify when you apply a slab. We always start by assessing the substrate: drywall over studs, cement board, existing tile, or masonry each requires different prep.
Typical steps include:
Remove loose finishes and old tile backer where necessary. You want a stable, flat plane.
Install a rigid, water-resistant backer such as cement board or a gypsum-based tile backer for heavy slabs. For thin porcelain paneling, manufacturers often allow directly fastening to studs with appropriate blocking.
Add blocking where heavy anchoring is required, especially at seam lines, upper supports, and around extractor hoods.
Confirm the wall is plumb and shim where necessary: fabricators rely on very tight tolerances for edge spans and seam alignment.
We also pay attention to penetration points like faucets, electrical outlets, and range hoods. Pre-place blocking and coordinate heights to avoid awkward seams or exposed mechanical work. For wet areas, we’ll specify a moisture barrier behind the backerboard to prevent long-term issues.
A clear, detailed template taken by the fabricator after cabinets are installed is essential: it’s the roadmap that prevents costly mistakes and ensures tight seams and pattern alignment.
Design And Styling Tips For A Cohesive Look
Treat the statement stone as a design centerpiece and plan the room’s other elements around it. We aim for balance: when the wall is visually heavy, cabinets, hardware, and lighting should either recede or complement without competing. Consider scale, proportion, and contrast, those three moves will keep the room grounded rather than visually top-heavy.
Practical starting points:
Decide whether the stone will be the feature or a background. If it’s the feature, keep cabinet colors softer and hardware minimal. If the stone is a backdrop (subtle veining, neutral color), you can introduce stronger cabinet contrast or patterned tile on adjacent walls.
Use repetition. Pull a color from the stone’s veins into a pendant finish, cabinet paint, or open shelving to create intentional repetition that reads as curated.
Be mindful of appliances. Stainless, black stainless, or paneled appliances each interact differently with the stone’s finish. We often advise mockups or swatches installed near the space to test shifting light.
Below we break down pairing scale, color and pattern considerations, then get specific about lighting, trims, and seams to help you elevate the finish.
Conclusion
The statement stone trick gives us a smart way to simplify kitchen surfaces and amplify style. In 2026, better materials and panel systems make it easier and more cost-effective than before to let the countertop do the heavy lifting. When we choose the right material and finish, prep the substrate carefully, and coordinate lighting and seams, a single stone plane becomes a durable, low-maintenance, high-impact solution.
If you’re remodeling, start conversations early with your fabricator and cabinetmaker, get slabs chosen before finalizing cabinet heights so patterns align and seams fall where they’re least visible. The result is a kitchen that reads as cohesive, modern, and thoughtfully detailed, exactly what buyers and homeowners want today.
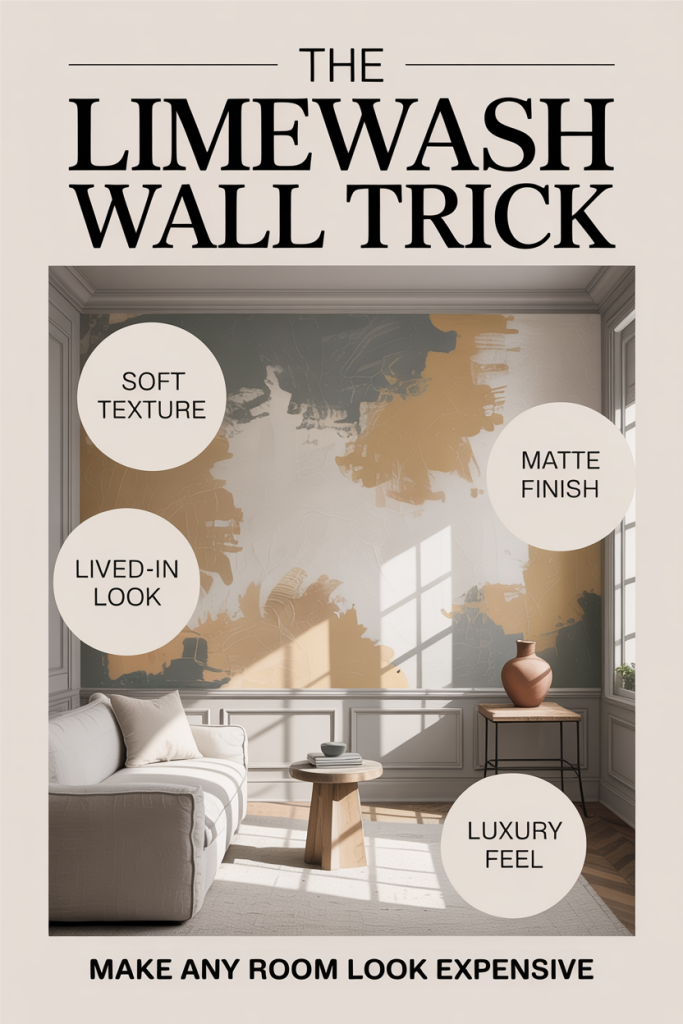
We’ve all seen those photos: soft, layered walls that look like they were lifted from a high-end hotel or a centuries-old Mediterranean villa. The secret behind that lived-in, luxurious depth isn’t always pricey paint or custom plaster, it’s limewash. The limewash wall trick that makes any room look expensive is as much about texture and subtlety as it is about color. In this guide we’ll explain why limewash elevates a room, how it differs from paint, the exact tools and safety steps you need, and step-by-step application techniques to get a layered, bespoke finish. We’ll also cover color blending, maintenance, and troubleshooting so you can avoid common pitfalls. Whether you’re a DIYer tackling a weekend project or a pro refining a signature look, we’ll walk through how to achieve a high-end finish that’s both durable and unmistakably elegant.
Why Limewash Instantly Elevates A Room
Limewash elevates a room because it creates depth and nuance in a way flat paint rarely can. Instead of a uniform single tone, limewash absorbs light differently across tiny surface variations, producing a soft glow and gentle tonal shifts that read as intentional ageing or artisan texture. That subtle, non-reflective finish reads as expensive for a few reasons we should understand.
First, limewash is translucent. It doesn’t sit on the surface like latex paint: it penetrates and bonds chemically with mineral substrates (lime + masonry). That bond makes the finish part of the wall, not an applied layer, and produces variations in tone as the material soaks up pigment differently across the surface.
Second, limewash pairs texture with tonality. Small irregularities, trowel marks, micro-roughness, joins, aren’t flaws here: they create visual interest. High-end interior design often uses this kind of subtle imperfection to avoid the plastic look of modern finishes.
Third, limewash has historical and material associations. It’s been used for centuries across Europe and the Mediterranean. That connection to craft and time-worn surfaces conveys authenticity and permanence that instantly uplifts a space.
Finally, limewash’s matte, breathable finish complements natural materials, wood, stone, brass, allowing those elements to take center stage. Instead of competing with glossy paint, limewashed walls provide a calm, sophisticated backdrop that reads as curated and expensive.
What Limewash Actually Is And How It Differs From Paint
Limewash is a traditional wall finish made from slaked lime (calcium hydroxide) often mixed with water and natural pigments. When applied, the lime reacts with carbon dioxide in the air to form calcium carbonate, essentially a mineralized, breathable layer that becomes part of the substrate. That chemical reaction is key: limewash doesn’t just sit on the surface: it transforms into a durable, mineral finish.
How it differs from paint:
Composition: Conventional paint uses acrylic or alkyd binders to form a film. Limewash is binder-free (or uses minimal natural binders) and relies on a carbonation process to set.
Breathability: Limewash is vapor-permeable, allowing moisture to pass through. This quality reduces issues in older masonry and is preferable in humid or historic settings. Most modern paints form impermeable films that can trap moisture.
Appearance: Paint typically gives uniform color and either a glossy or matte film. Limewash provides a matte, soft, stone-like patina with natural variations and layering effects.
Longevity and upkeep: Limewash, when used on suitable substrates, can last for many years and weathers gracefully, often becoming more attractive over time. Painted films may peel, chalk, or require sanding and stripping when failing.
Important caveats: limewash works best on porous, mineral-based surfaces, lime plaster, cement render, brick, and some unglazed surfaces. It’s not ideal for glossy primed drywall or previously painted walls unless those coatings are removed or properly prepared. Modern limewash products sometimes include acrylic additives for adhesion on more surfaces, so read labels and choose the appropriate formulation for interiors.
Tools, Materials, And Safety You’ll Need
Before we start, gather everything so the job flows. Working with lime requires attention to safety and the right materials for a consistent finish.
Essential materials:
Hydrated lime putty or powdered hydrated lime (Type S or same grade recommended for interior finishes)
Distilled or clean water
Mineral pigments (iron oxides, umbers) or pre-tinted limewash base
Optional: small percentage of natural binder (casein or light acrylic modifier) if applying to less-porous surfaces
Tools:
Large mixing bucket and paddle mixer (or a drill with mixing attachment)
Masonry brush (stiff, natural bristle) for traditional brushing techniques
Trowel and hawk for application on plastered surfaces
Soft bristle brushes and foam brushes for blending and softening
Rags, sea sponges, and natural fiber cloths for ragging and patina
Sandpaper (fine grit) and a sanding block for light smoothing between layers
Drop cloths, painter’s tape, and masking items to protect trim and floors
Safety gear:
NIOSH-approved respirator with P100 filters (lime dust can be an irritant)
Goggles or full-face protection
Chemical-resistant gloves (nitrile or neoprene)
Long sleeves and pants (lime is caustic in concentrated form)
Why safety matters: wet lime is alkaline and can irritate skin and eyes: dry powdered lime creates fine dust that can aggravate lungs. We always mix and apply in a well-ventilated area, and keep a spray bottle of water and eye wash nearby. If you’re unsure about working with lime, consult a professional or test a small wall area first.
Prep Work: How To Get Your Walls Ready For Limewash
Preparation determines the finish. We can’t overstate that a beautiful limewash look begins with proper substrate prep. Here’s how we prepare different wall conditions.
New lime or cement plaster: These are ideal. Make sure the plaster has cured for at least 28 days. The surface should be free of dust: we lightly mist and wipe before starting.
Bare masonry (brick, stone): Clean off efflorescence, grease, and loose mortar. A stiff brush and water usually suffice. For heavy soiling, use a mild detergent solution, rinse thoroughly, and allow to dry.
Previously painted walls: Remove loose paint and any glossy coatings. Full stripping to a porous base is ideal. If that’s impossible, use a bonding primer specifically rated for limewash adhesion, or consider a limewash product formulated for painted surfaces.
Drywall: Standard limewash does not bond well to finished drywall or joint compound. If we must work on drywall, we either apply a specialized lime primer/undercoat formulated for gypsum or create a thin lime or cement render skim coat to provide a mineral surface.
Repairing cracks and holes: Patch with compatible lime-based filler or a fine cementitious patch. Avoid using vinyl spackle: it won’t bond well with lime.
Masking and protection: Cover floors, furniture, and trim with drop cloths. Tape edges carefully. Limewash can be difficult to remove from fabric and porous trims.
Test patch: Always do a small 1–2 sq ft test patch using your chosen mix and application technique. Let it cure and live with it for a few days to see how color and texture develop under your room’s light.
A clean, appropriately porous surface helps limewash penetrate and carbonate properly, giving the layered, expensive look we’re after.
Application Techniques For A Luxe, Layered Look
Getting a luxe, layered limewash look is about building depth through multiple thin layers and varied application techniques. We’ll outline the core approach: start thin, work fast, and embrace irregularity.
General rules:
Thin coats: Limewash should usually be applied in several thin coats rather than one thick pass. Thin coats carbonate more evenly and allow underlying tones to show.
Work wet-on-wet or allow partial drying: Some techniques look better when layers are applied before full drying, which blends pigments: others rely on drying between coats for contrast.
Vary tools: Use brushes, rags, sponges, and trowels in sequence to create natural variations.
Keep edges soft: Hard, crisp lines read as artificial. We soften edges with a dry brush or rag while the lime is still damp.
Sequence example for a simple layered finish:
Base coat: Apply a diluted base limewash (lighter tone) with a masonry brush, working in sweeping, overlapping strokes. Let it set until slightly tacky.
Mid layer: While the base is tacky, apply a darker, more pigmented limewash in selective areas, using a rag or sea sponge to dab and blend.
Highlight glaze: Thin a small amount of pigment and brush lightly across high areas or around architectural features to create subtle highlights.
Burnish: After the final coat has set but not fully cured, lightly burnish with a soft brush or cloth to compress the surface and reveal sheen variations.
We’ll walk through specific brush and rag methods in the next subsections so you can replicate classic looks step by step.
Brushing, Layering, And Burnishing: Step‑By‑Step Method
This method delivers that effortless, polished patina often seen in boutique interiors.
Step 1, Mix your base: We mix hydrated lime with water to a creamy, milk-like consistency for the first coat. For the base tone choose a light color, off-white, warm taupe, or soft gray.
Step 2, Apply the base: Using a large masonry brush, apply the base in long, slightly arched strokes. Overlap each stroke by about 30–40% to avoid banding. Keep the coat thin and even: you should still see subtle texture from the substrate.
Step 3, Mid-tone layering: After the base becomes tacky (not bone-dry), we mix a mid-tone with a little more pigment and a slightly thicker body. With a smaller brush or rag, selectively apply this tone in vertical or horizontal passes, focusing on corners, around trim, and in areas where natural shadow would fall.
Step 4, Soft blending: Immediately after laying down the mid-tone, use a dry, soft-bristled brush or a clean rag to drag and soften edges. Work quickly, lime sets as it carbonates.
Step 5, Highlight and depth: For final depth, thin a stronger pigment with more water and splatter or stipple lightly with a sponge in small areas. This isn’t full coverage: it’s accentuation.
Step 6, Burnishing: Once the final coat is set enough to resist sticking, but not fully cured (usually within hours, depending on humidity), rub a tightly woven cotton cloth over sections to compress the surface and bring out subtle sheen in peaks. Burnishing refines the finish and creates that luxe, tactile quality.
Step 7, Curing: Allow the surface to carbonate slowly: avoid rapid drying by controlling air movement and humidity. A slow cure improves durability and color depth.
Ragging, Sponging, Distressing, And Creating Patina Effects
If we want a more weathered, patinated look, ragging, sponging, and controlled distressing are our go-to techniques. These mimic decades of wear and are especially effective in layered color schemes.
Ragging: We dip a loosely twisted cotton rag into a mid-toned limewash and blot excess. Press and lift in random, overlapping motions to build translucent patches of color. Ragging is forgiving: you can remove or soften areas immediately with a damp sponge.
Sponging: Using a natural sea sponge, we dab a diluted pigment onto the wall. The irregular cell structure of the sponge creates soft-edged spots that look organic. Vary pressure and pigment concentration to avoid repetitive marks.
Distressing: To create worn edges, we apply a slightly darker wash near corners and then, after partial drying, sand very lightly with fine-grit paper to reveal the base coat. Another method is to use a barely damp cloth to remove small amounts of wet limewash for a peeled, exposed effect.
Layered patina: For depth, alternate warm and cool undertones across three or four thin layers. For example, start with a warm beige base, rag on a cool gray mid-layer, then spatter a warm umber in select areas. The human eye reads these subtle temperature shifts as age and richness.
Tips for authenticity:
Work in small sections so blends look intentional.
Step back frequently under the room’s natural light to judge effect.
Less is more: subtlety sells the expensive look, if it reads too fussy, scale back.
These techniques let us sculpt visual history into a wall, an instant way to make a room look curated and costly without a high budget.
Color, Tone Blending, And Finishes To Match Your Style
Color selection and tone blending are where design intent meets material logic. We approach color with the goal of creating a backdrop that complements furnishings while providing subtle shifts that reward close inspection.
Choosing base tones:
Neutral, warm bases (soft beiges, warm whites) suit rustic, Scandinavian, and classic interiors. They pair beautifully with wood and leather.
Cool bases (muted grays, soft blues) work for modern, minimalist, or coastal looks and harmonize with metal and glass.
Earthy, saturated bases (terracotta, olive, deep umber) create dramatic, enveloping rooms that feel curated and intimate.
Blending strategies:
Two-tone approach: Start with a light base and add a single mid-tone for shadows and interest. This is safe and versatile.
Triadic layering: Use three related tones, base, mid, and accent, to create complex depth. We often use a neutral base, one warm mid, and a cool accent for visual tension.
Undertones: Be mindful of undertones (yellow, blue, red). Two neutrals can clash if their undertones differ. Test swatches next to furniture and fabrics.
Finish considerations:
Matte, low-sheen limewash reads most luxurious. It avoids glare and looks more tactile.
Slightly burnished areas can introduce localized satin-like reflections that add richness without gloss.
For high-traffic areas, consider a limewash with a mild acrylic modifier for extra durability, but keep the percentage low to preserve breathability and appearance.
Lighting: Observe how color reads at different times of day. Limewash can appear warmer in morning light and cooler under LED fixtures. We always test large swatches on multiple walls before committing.
Pairing with decor: Use limewash to set a tone, muted walls for bold furniture, or deep limewashed hues to make lighter art and moldings pop. The goal is a cohesive, intentional palette that reads like a thoughtfully styled interior.
Maintenance, Longevity, And When To Re‑Limewash
One advantage of limewash is its graceful aging. With the right care, a limewashed wall can last for years and actually improve in appearance as patina develops. Here’s how to look after it.
Cleaning: Avoid harsh cleaners. For routine cleaning, dust or vacuum with a soft brush. For spots, use a damp (not wet) sponge and mild soap: dab gently rather than scrub. Harsh abrasives will remove the lime binder and disturb the finish.
Durability: True limewash becomes mineralized and durable after full carbonation, which can take weeks. Surfaces with an acrylic modifier will be more forgiving in high-traffic zones. For kitchens and bathrooms, consider sealing the limewash with a breathable, water-repellent treatment if moisture is a concern, test first.
Touch-ups: Because limewash is layered and mineral in nature, touch-ups are usually invisible if we replicate the original mix and technique. Keep leftover mixed batches (stored tightly and refrigerated for short periods) and record pigment ratios. For larger repairs, feather new work into surrounding areas to avoid hard edges.
When to re-limewash: Over time, limewash can naturally thin or wear in high-contact areas. We typically reapply a fresh thin coat every 5–10 years depending on exposure and wear. In historic or exposed settings, more frequent maintenance may be necessary.
Environmental benefits: Limewash is low-VOC and breathable, which is kinder to indoor air quality compared with many modern paints. Its ability to regulate moisture in masonry also contributes to healthier wall systems in older homes.
In short, with gentle care and occasional refreshes, limewashed walls remain beautiful and functional for a long time.
Common Mistakes To Avoid And Troubleshooting Tips
We’ve learned from projects where things didn’t go to plan. Here are the common mistakes and how to fix or avoid them so your limewash project reads high-end, not amateur.
Mistake 1, Applying too thickly: Heavy coats crack and look patchy. Fix: scrape or sand off peaks and reapply thin, more diluted coats.
Mistake 2, Working on non-porous surfaces without a proper primer: Lime won’t bond to glossy paint or sealed drywall. Fix: remove the coating or scuff, and apply a mineral primer or a thin lime/render skim coat.
Mistake 3, Inconsistent mixing or unknown pigment ratios: Colors shift between batches. Fix: measure pigments by weight and record ratios. Mix enough for the wall or make test batches and compare.
Mistake 4, Rushing drying/cure time: Rapid drying causes powdery, weak surfaces. Fix: control ventilation and humidity, slower drying yields better carbonation. In a hurry, mist lightly and avoid direct fans.
Mistake 5, Overworking the surface: Excessive sanding, scrubbing, or aggressive wiping removes layers and creates shiny spots. Fix: be gentle: if the finish shows shine in places, lightly scuff and apply another thin coat to balance.
Mistake 6, Ignoring test patches: Skipping tests leads to surprises in color and texture. Fix: always test across different walls and lighting conditions: live with the sample for a few days.
Troubleshooting quick reference:
Powdery surface: Indicates incomplete carbonation or poor adhesion. Improve ventilation and consider a recoat after cleaning.
Flaking: Usually caused by moisture trapped under a non-breathable layer. Remove incompatible coatings and reapply to a breathable substrate.
Uneven sheen: Burnish selectively to even out, or add a thin matching wash to high or low spots.
If a problem persists, don’t be afraid to consult a lime plaster or conservation professional, especially on historic substrates. We’ve found that small, patient fixes outperform aggressive corrections every time.
Are you ready to give your living room a fresh new look with a touch of Korean charm? Korean aesthetics focus on minimalism, functionality, and natural beauty. Whether you are drawn to serene colors, unique furniture, or the simplicity of natural elements, these concepts will help you create a living room that is both stylish and tranquil. Let us dive in and discover how to transform your space into a haven of modern elegance.
The Foundation: Color and Light
Creating a calming atmosphere in your living room is key to achieving that Korean aesthetic, and it all starts with the foundational elements of color and light.
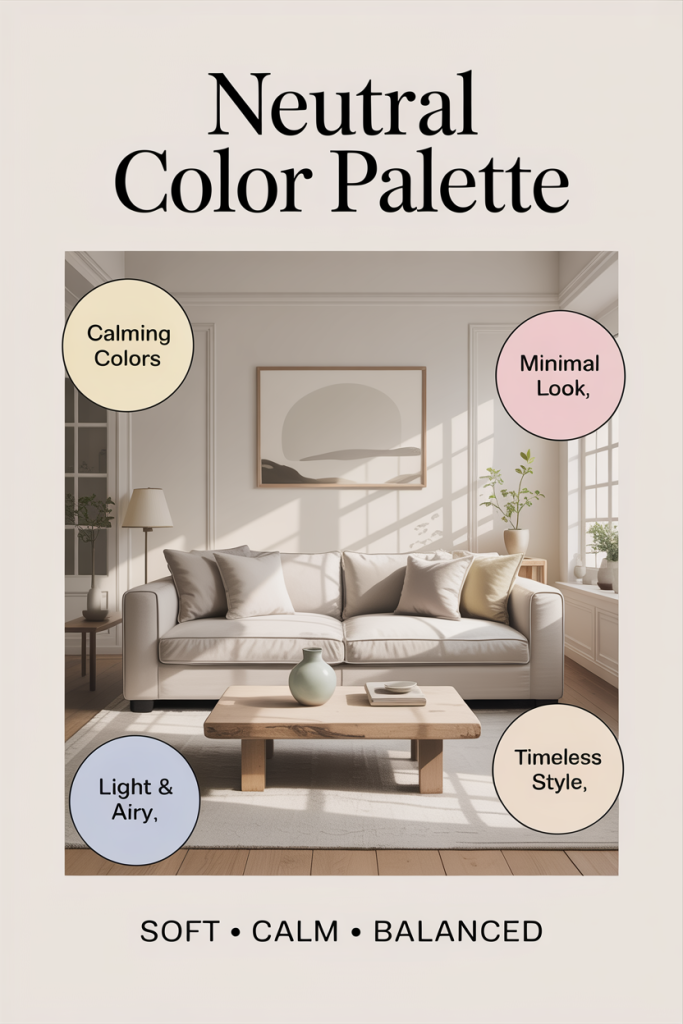
1. Neutral Color Palette
Think serene hues like white, beige, gray, and soft pastels. These colors soothe the senses and provide a neutral backdrop, allowing your furniture and décor pieces to shine. To add a touch of color, consider a beautiful vase in a soft pastel shade. It is the perfect way to add a subtle pop of color while maintaining that serene ambiance.
2. Earthy Tones
Complement your neutral color palette with earthy tones like brown, terracotta, and olive green. These colors create a sense of grounding and connection to nature, enhancing your living room’s calming and tranquil atmosphere. A set of ceramic planters in earthy tones is a perfect way to incorporate these colors.
3. Natural Light
Natural light is a gift; it must be maximized in Korean design. Keep your windows unobstructed, or use sheer curtains to allow as much natural light into your living room as possible.
This brightens the space and connects with the outdoors, bringing a sense of nature and tranquility indoors. Sheer linen curtains can provide soft, diffused light while maintaining your privacy.
4. Statement Lighting
Lighting plays a crucial role in setting the mood of any room. Choose unique pendant lights or floor lamps with exciting designs to create a focal point and add a touch of personality.
Soft, warm lighting further enhances the cozy and inviting atmosphere, making your living room a place to unwind and relax. A stunning paper lantern pendant light is a beautiful example of Korean-inspired lighting.
Embracing Nature and Texture
Bringing the outdoors in and incorporating tactile elements are big parts of Korean design.
5. Natural Materials
Incorporate natural materials like wood, bamboo, and stone into your décor to capture that authentic Korean feel. Think wooden furniture, bamboo blinds, or a stone accent wall.
These materials add warmth, texture, and a touch of the organic, creating a space that feels connected to nature. A stylish bamboo floor lamp can add a natural element and provide soft, ambient lighting.
6. Indoor Plants
Integrate indoor plants like bonsai, orchids, or snake plants to add life and freshness to your living room.
Not only do they purify the air, but they also contribute to the overall sense of tranquility and well-being. A beautiful bonsai tree can be a stunning focal point in your living room.
7. Soft Textures
To create a truly inviting and cozy atmosphere, incorporate soft textures into your living room décor. Think plush rugs, comfy throws, and comfortable cushions.
These elements add warmth, visual interest, and a tactile experience, inviting you to relax and unwind. A chunky knit throw blanket is perfect for snuggling up on the sofa.
Furniture and Layout
In Korean design, functionality is just as important as aesthetics. The layout should promote a sense of openness and connection.
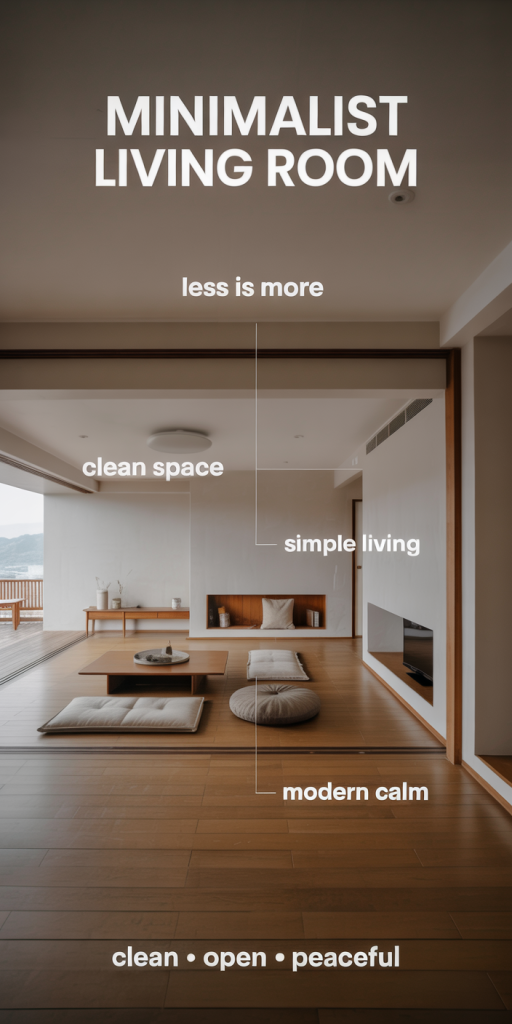
8. Minimalist Approach
One of the core principles of Korean aesthetics is minimalism. Embrace the “less is more” philosophy by keeping your décor minimal and clutter-free. This means carefully curating your furniture and accessories, choosing only pieces you truly love, and ensuring they serve a purpose. A minimalist approach creates a sense of openness.
9. Low-Level Seating
For a truly authentic Korean experience, consider incorporating low-level seating into your living room. This could include floor cushions, low tables, and platform sofas. This traditional seating arrangement encourages a relaxed and grounded ambiance, perfect for social gatherings or quiet contemplation. It also creates a sense of intimacy and connection.
10. Multi-functional Furniture
Opt for furniture pieces with multiple uses, such as a sofa bed or a coffee table with hidden storage. This maximizes space and functionality, especially in smaller living rooms. A convertible coffee table that can be used as a dining table or a workspace is a fantastic example.
11. Hidden Storage
Keeping your living room clutter-free is essential for achieving that clean, minimalist Korean aesthetic. To keep things organized and out of sight, utilize built-in shelves, drawers, or ottomans with storage. This enhances the visual appeal of your space and creates a sense of calm and order. A sleek TV stand with hidden storage is a great way to keep your entertainment area tidy.
Architectural and Decorative Details
These specific elements add cultural authenticity and visual interest to your space.
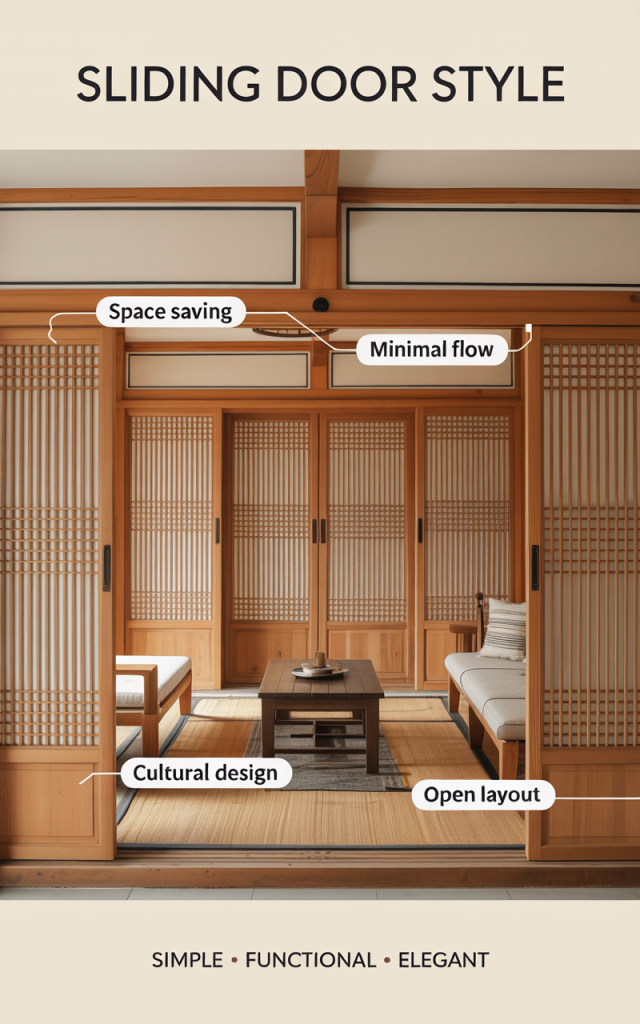
12. Sliding Doors
For an authentic Korean touch, replace traditional doors with sliding doors made from wood and paper (Hanji). These doors save space and enhance the minimalist aesthetic, creating a sense of flow and openness. If replacing your doors is not an option, consider adding a shoji-inspired room divider.
13. Decorative Screens
Decorative screens or room dividers are a fantastic way to add visual interest and create separate zones within your living room. They can be used for privacy, to define different areas, or simply as a decorative element. A beautiful folding screen with a cherry blossom design can add a touch of elegance.
14. Floor Heating (Ondol) If you want to add a truly authentic Korean touch to your living room, consider installing underfloor heating, known as Ondol in Korea. This traditional heating system provides comfortable warmth and adds a unique cultural element to your space. While installing Ondol might be a larger project, you can still achieve a similar cozy feeling with a thick, plush rug.
15. Geometric Patterns Introduce subtle geometric patterns into your living room décor through rugs, cushions, or artwork. These patterns add visual interest without overwhelming the minimalist design, creating a sense of balance and harmony. A geometric-patterned cushion cover is a great way to add a subtle touch of pattern.
16. Artful Displays Incorporate Korean art, calligraphy, or ceramics into your living room décor to showcase your personality and add cultural authenticity. Choose pieces that resonate with your style and complement the overall aesthetic. A hand-painted ceramic vase with a traditional Korean design is a beautiful way to add a touch of art and culture.
17. Personal Touches Finally, remember to add personal touches that reflect your interests and personality. These could include books, photographs, travel souvenirs, or anything else that makes you feel at home. These elements make the space feel uniquely yours and tell your story. A stylish bookshelf is a great way to display your favorite books and personal items.
Final Thoughts
By incorporating these 17 Korean living room décor ideas, you can create a serene and stylish space that reflects the beauty of Korean aesthetics. Embrace the minimalist philosophy, natural elements, and functional design to transform your living room into a haven of peace and modern elegance. Remember, it is all about truly creating a stylish and personal space to relax and unwind. So go ahead and experiment with these ideas, and have fun creating a living room that you absolutely love!
Spring is the season of renewal, making it the perfect time to give your patio a fresh start. After months of cooler weather, your outdoor space deserves attention so it can become a comfortable and stylish extension of your home. Whether you have a spacious backyard or a compact balcony, the right decor choices can transform your patio into a relaxing sanctuary.
The key to a beautiful spring patio isn’t about spending a lot—it’s about layering textures, adding greenery, and creating a space that feels both functional and inviting. From cozy seating arrangements to soft lighting and natural accents, these ideas will help you design an outdoor area you’ll love spending time in every day.
1. Create Zones with Layered Outdoor Rugs
Layering outdoor rugs is a simple yet impactful way to elevate your patio design. Start with a large neutral rug made from durable materials like jute or polypropylene, then layer a smaller patterned rug on top. This creates depth and visually separates different zones, such as a lounging area or dining space.
This technique not only enhances style but also improves comfort underfoot. It mimics indoor design, making your patio feel more like a true extension of your living space.
2. Add a Modern Outdoor Sofa
A modern outdoor sofa instantly transforms your patio into a comfortable living area. Look for designs with clean lines, neutral tones, and weather-resistant cushions. Sectional sofas are especially great for maximizing seating in larger spaces.
To make the space feel more inviting, layer in textured throw pillows and lightweight blankets. This creates a cozy environment that encourages long conversations and relaxing afternoons outdoors.
3. Style a Functional Outdoor Bar Cart
An outdoor bar cart adds both style and practicality to your patio. Use it to store beverages, glassware, and snacks, making entertaining effortless. Choose a design that complements your overall decor—wood for a natural look or metal for a modern vibe.
Decorate the cart with seasonal touches like fresh lemons, herbs, or colorful drinkware. It can also double as a serving station or plant display, making it a versatile addition to your outdoor setup.
4. Install Soft Patio String Lighting
Lighting plays a crucial role in setting the mood. String lights are an easy and affordable way to create a warm and welcoming ambiance. Hang them overhead, drape them along fences, or wrap them around pergolas.
The soft glow they provide makes your patio usable even after sunset, turning it into a cozy evening retreat perfect for gatherings or quiet nights.
5. Anchor the Space with an Outdoor Rug
A single large outdoor rug can tie your entire patio together. It helps anchor furniture and gives the space a cohesive look. Choose a pattern or color that complements your decor while being durable enough to withstand the elements.
In addition to aesthetics, rugs also provide comfort and protect your feet from hot or cold surfaces.
6. Add a Cozy Fire Pit Area
A fire pit creates a natural focal point and extends the usability of your patio into cooler evenings. Whether you choose a wood-burning or gas option, it adds warmth and charm to your space.
Arrange seating around the fire pit to encourage conversation and connection. It’s perfect for relaxing nights, storytelling, or even roasting marshmallows.
7. Incorporate a Vertical Garden Wall
For smaller patios, a vertical garden is a smart and stylish solution. Use wall-mounted planters, trellises, or hanging systems to grow herbs, flowers, or greenery.
Not only does it save space, but it also adds a lush, vibrant backdrop that enhances the overall aesthetic of your patio.
8. Decorate with Potted Spring Flowers
Nothing says spring like fresh flowers. Incorporate blooms such as tulips, daisies, or hyacinths to bring color and life to your patio.
Arrange them in clusters using pots of different sizes and materials for a layered look. This instantly brightens your space and creates a cheerful, welcoming atmosphere.
9. Hang Plants for Height and Interest
Hanging plants are perfect for adding dimension to your patio. They draw the eye upward and create a fuller, more dynamic look.
Use macrame hangers for a boho feel or sleek planters for a modern touch. Mixing heights and plant types adds visual interest and makes the space feel lush.
10. Upgrade Your Flooring with Deck Tiles
Interlocking deck tiles are an easy DIY upgrade that can completely change the look of your patio floor. Available in wood, composite, or stone finishes, they snap together without the need for professional installation.
They’re ideal for covering worn or outdated surfaces, giving your patio a clean and polished appearance.
11. Use Outdoor Curtains for a Resort Feel
Outdoor curtains add elegance and softness to your patio. They provide shade, privacy, and a gentle barrier against wind.
Choose light, airy fabrics for a breezy look, or thicker materials for more privacy. When tied back, they frame your space beautifully; when closed, they create a cozy outdoor room.
12. Add a Compact Bistro Set
A bistro set is perfect for small patios or balconies. It creates a charming and functional spot for enjoying coffee, meals, or quiet moments outdoors.
Choose foldable designs for flexibility or bold colors to add personality to your space.
13. Choose Boho-Inspired Patio Furniture
Bohemian-style furniture brings a relaxed and inviting vibe. Materials like rattan, wicker, and wood paired with soft cushions create a laid-back atmosphere.
Layer in patterned textiles, throws, and natural elements to complete the look and make your patio feel like a tropical escape.
14. Elevate Comfort with Throw Pillows
Throw pillows are one of the easiest ways to refresh your patio decor. Opt for weather-resistant fabrics in bright colors or seasonal patterns.
Mixing different textures and sizes adds depth and makes your seating area more comfortable and visually appealing.
15. Set Up a Dedicated Dining Area
Creating an outdoor dining space encourages you to enjoy meals outside. Choose a sturdy table and comfortable chairs that suit your space and style.
Add simple decor like a table runner, candles, or fresh flowers to make the area feel inviting and complete.
16. Use Solar Lanterns for Easy Lighting
Solar lanterns are a practical and eco-friendly lighting option. They charge during the day and automatically illuminate at night.
Place them on tables, hang them from hooks, or line pathways to create a soft, ambient glow without any wiring.
17. Add a Privacy Screen for Seclusion
A privacy screen helps define your patio and makes it feel more intimate. Use wooden panels, decorative metal screens, or tall plants to create separation from neighbors.
It adds both functionality and style while enhancing the sense of comfort in your outdoor space.
18. Choose a Timeless Wicker Patio Set
Wicker furniture is durable, stylish, and timeless. Modern versions are designed to withstand outdoor conditions while maintaining their look.
Pair wicker pieces with neutral cushions and add pops of color through accessories for a fresh spring update.
19. Install a Stylish Patio Umbrella
A patio umbrella provides essential shade and enhances comfort during sunny days. Choose from classic or cantilever styles depending on your layout.
Bright colors or patterns can also serve as a focal point in your patio design.
20. Build a Low-Maintenance Succulent Garden
Succulents are perfect for those who want greenery without the upkeep. Their unique shapes and colors add a modern touch to your patio.
Arrange them in decorative containers or group them together for a striking display.
21. Relax with a Hammock Chair
A hammock chair adds a cozy and playful element to your patio. It’s perfect for relaxing, reading, or simply enjoying the outdoors.
Its compact design makes it ideal even for smaller spaces while still offering maximum comfort.
22. Use Concrete Planters for a Modern Touch
Concrete planters bring a sleek, minimalist feel to your patio. Their neutral tones contrast beautifully with greenery and flowers.
Use different shapes and heights to create a structured and visually interesting arrangement.
23. Add Whimsy with Fairy Lights
Fairy lights add a magical and romantic touch to your outdoor space. Use them in jars, wrap them around railings, or drape them over plants.
Their soft glow creates a cozy and enchanting atmosphere, perfect for spring evenings.
24. Grow a Potted Lemon Tree
A lemon tree adds both beauty and functionality. Its fragrant blossoms and bright fruit bring a refreshing, Mediterranean vibe to your patio.
It also allows you to enjoy homegrown lemons, adding a practical benefit to your decor.
25. Include Modern Adirondack Chairs
Modern Adirondack chairs combine classic comfort with updated design. They are perfect for relaxing outdoors and can be placed around a fire pit or in a quiet corner.
Their durability and timeless appeal make them a smart and stylish addition to any patio.
Conclusion
Transforming your patio for spring is all about creating a space that feels welcoming, comfortable, and reflective of your personal style. By combining elements like cozy seating, vibrant greenery, and soft lighting, you can design an outdoor area that’s perfect for both relaxation and entertaining.
Start with a few key updates, then build on them over time. With thoughtful details and creative touches, your patio can become your favorite place to unwind and enjoy the beauty of the season.
Spring is the perfect time to refresh your space—but that doesn’t mean you need to buy anything new. With a bit of creativity, the items already in your home can be transformed into a light, layered, and beautifully styled mantel.
By mixing textures, playing with height, and incorporating natural elements, you can create a seasonal look that feels both effortless and intentional.
Here are 20 newly arranged ideas to inspire your spring mantel refresh.
1. Bring Nature Indoors With Branches and Blooms
Start with the simplest and most impactful element—nature. Clip branches, fresh flowers, or greenery from your yard and place them in vases or jars.
Vary the heights and shapes to create movement and a naturally styled look that instantly signals spring.
2. Combine Heights and Textures for a Balanced Look
A well-styled mantel relies on contrast. Mix tall and short objects, smooth and textured surfaces, and structured and organic elements.
This layered approach creates a natural flow that guides the eye across the entire display.
3. Stack Books Vertically for Instant Structure
Books can act as both decor and foundation pieces. Stack them vertically to add height and create platforms for smaller decorative items.
Stick to neutral or pastel tones to keep the palette light and cohesive.
4. Rotate Artwork From Other Rooms
Instead of buying new pieces, walk through your home and select artwork that fits a spring palette.
This simple swap refreshes your mantel while also giving other rooms a subtle update.
5. Layer Mirrors to Brighten the Space
Mirrors help reflect light and create depth. Place one or more behind your decor to make the entire arrangement feel larger and more open.
Leaning mirrors instead of hanging them adds a relaxed, casual touch.
6. Use Candlesticks for Visual Rhythm
Candlesticks in varying heights create a gentle flow across your mantel.
Mix finishes like brass, silver, or ceramic, and use soft-colored candles to enhance the seasonal feel.
7. Start With a Seasonal Photo Refresh
Swap out darker, wintery photos for lighter images filled with greenery, florals, or outdoor scenes.
Use light-colored frames to reflect more light and create an airy atmosphere.
8. Add a Fabric Layer for Softness
Lay a scarf, tea towel, or fabric piece across your mantel to introduce texture.
This acts as a subtle base layer that ties all your decor elements together.
9. Create a Mini Gallery With Small Frames
Group smaller frames together for a curated gallery look.
Mix sizes and finishes, and arrange them in odd-numbered groupings for a more natural composition.
10. Use Glass Jars for Simple Layered Decor
Fill glass jars with stones, moss, or greenery to create a clean, layered effect.
The transparency adds depth while keeping the look light and uncluttered.
11. Arrange Mirrors at Casual Angles
Instead of perfectly aligning mirrors, tilt them slightly or overlap them.
This relaxed arrangement feels more organic and less staged—perfect for spring styling.
12. Display Heirloom Dishes for Character
Bring out plates, teacups, or serving pieces from storage and use them as decor.
Layer them or lean them against the wall to create a charming, personal display.
13. Wrap Frames With Fabric for a Fresh Update
Transform old frames by wrapping them in patterned fabric like florals or soft stripes.
This simple trick adds color and personality without needing new decor.
14. Use Cutting Boards as Warm Backdrops
Lean wooden cutting boards behind your decor to add natural texture.
Their warm tones help ground lighter elements and create contrast.
15. Highlight Your Personal Collections
Showcase items you’ve collected over time—glassware, ceramics, or small decorative objects.
Group them thoughtfully and vary their heights to create a curated feel.
16. Reframe Existing Art With Vintage Frames
Switch out plain frames for more decorative or vintage ones you already own.
Keeping a consistent tone (like all gold or wood) helps tie everything together.
17. Drape Tea Towels as Decorative Accents
Use tea towels in unexpected ways—drape them over frames, tuck them behind decor, or layer them along the mantel.
They add softness, pattern, and movement.
18. Build Depth With Plate Layering
Use plate stands to layer different sizes and patterns.
Position them at slight angles to create dimension and keep the display dynamic.
19. Mix Metallic Finishes for Texture
Combine brass, silver, and copper accents throughout your mantel.
Distribute them evenly so light reflects across the display, adding subtle shine.
20. Frame Letters and Paper Keepsakes
Display handwritten notes, postcards, or vintage paper pieces in frames.
Pair them with pressed flowers for a soft, nostalgic, and meaningful finishing touch.
Conclusion
Refreshing your mantel for spring doesn’t require new purchases—it simply requires a fresh perspective.
By rearranging what you already own, layering textures, and bringing in natural elements, you can create a space that feels bright, intentional, and full of life.
Sometimes, the most beautiful transformations come from rediscovering what’s already yours.
Instead of separating toys by category (like cars, dolls, or puzzles), organize them by how your child uses them. For example, create a construction zone with blocks and magnetic tiles, an art corner with crayons and paper, and a pretend-play area with costumes and dolls.
This setup mirrors how kids naturally play, allowing them to stay engaged longer without constantly switching locations or making a mess searching for related items. It also makes cleanup easier since everything used in one activity belongs in one space.
2. Rotate Toys to Keep Things Fresh
Children don’t need access to every toy at once. In fact, having too many options can lead to overwhelm and shorter attention spans. By rotating toys every few weeks, you create a sense of novelty without buying anything new.
Store a portion of toys in labeled bins and bring them out on a schedule. When toys reappear, they feel exciting again—almost like new. This method also reduces visible clutter and encourages more focused, creative play.
3. Keep Everyday Favorites Within Easy Reach
Think about which toys your child uses daily—those should be the easiest to access. Place them on open shelves, low bins, or baskets without lids.
When children can grab and return items effortlessly, they’re more likely to play independently and clean up afterward. Complicated storage (like tight lids or high shelves) often leads to toys being left out instead of put away.
4. Use Clear Storage Bins for Visibility
Clear bins eliminate the frustration of digging through containers to find one specific toy. When everything is visible, children can quickly identify what they want and where it belongs.
This not only reduces mess but also builds independence. Kids learn to manage their own belongings without needing constant help, making your organization system more sustainable long-term.
5. Label Everything With Pictures and Words
Labels take organization to the next level. Adding both pictures and words ensures that children of all ages can understand where items belong.
For younger kids, images act as visual cues. For older children, words reinforce reading skills. Over time, this builds habits and makes cleanup feel straightforward rather than overwhelming.
6. Store Toys at Your Child’s Height
Accessibility plays a huge role in whether kids actually follow your system. If they can’t reach something, they won’t put it away.
Arrange shelves, bins, and hooks at your child’s level so they can independently take out and return toys. This simple adjustment encourages responsibility and reduces the need for constant reminders.
7. Use Vertical Space to Maximize Storage
When floor space is limited, walls become your best friend. Install floating shelves, pegboards, or hanging organizers to store toys without crowding the room.
Vertical storage keeps the area open for play while still offering plenty of room for organization. It also helps visually declutter the space, making the room feel bigger and more breathable.
8. Invest in Multi-Functional Furniture
Furniture that doubles as storage is a game-changer—especially in smaller homes. Ottomans with hidden compartments, beds with drawers, or benches with lift-up lids can store toys out of sight while still being functional.
This approach helps you maintain a clean look without sacrificing storage space, making it ideal for shared living areas like the living room.
9. Use Mesh Bags for Small Toy Pieces
Small toy pieces are often the biggest source of clutter. Mesh bags are a simple solution—they keep items contained while allowing you to see what’s inside.
They’re perfect for LEGO, puzzle pieces, or action figure accessories. You can hang them, stack them, or toss them into larger bins, keeping everything organized and easy to find.
10. Store Batteries, Manuals, and Accessories Separately
Few things are more frustrating than a toy that doesn’t work because you can’t find the batteries or instructions. Keep a dedicated container for these essentials.
Organizing them separately ensures that toys are always ready to use and saves you time when something needs fixing or replacing.
11. Limit Container Sizes to Prevent Clutter
Large bins may seem helpful, but they often lead to overstuffing. Smaller containers create natural limits, forcing you to be more selective about what stays.
This keeps your collection manageable and prevents clutter from building up again. It also makes cleanup quicker and less overwhelming for kids.
12. Implement the “One In, One Out” Rule
To maintain balance, adopt a simple rule: every time a new toy comes in, one goes out. This prevents accumulation and keeps your space under control.
Involve your child in choosing which toy to donate. This teaches them valuable lessons about sharing, gratitude, and mindful consumption.
13. Set Up a Donation Station
Instead of waiting for a big decluttering session, create an ongoing system. Keep a donation bin in your home where unused or outgrown toys can be placed anytime.
Once it’s full, donate everything at once. This keeps clutter from building up and makes letting go of items a normal habit.
14. Try a Toy Library System
A toy library system works similarly to rotation but with more structure. Keep only a portion of toys available and store the rest away.
Swap toys weekly or monthly to maintain interest while keeping your home organized. This approach also helps children focus better since they’re not overwhelmed by too many options.
15. Create a “Homeless Toy” Basket
Not every toy will have a designated place immediately—and that’s okay. Use a temporary basket for items that don’t yet belong anywhere.
Set a weekly time to sort through it and decide whether to assign a permanent spot or remove the item. This prevents random clutter from spreading throughout the house.
16. Establish a Nightly 10-Minute Cleanup Routine
Consistency is more important than perfection. A short daily cleanup routine can prevent mess from piling up.
Turn it into a fun activity—set a timer, play music, or make it a game. Over time, this becomes a habit that keeps your home organized with minimal effort.
17. Involve Your Kids in the Process
The best organization system is one your kids actually follow. Involve them in choosing storage solutions, labeling bins, and deciding where things go.
When children feel ownership over the system, they’re more likely to maintain it. Plus, they develop important life skills like responsibility and organization.
Conclusion
Toy organization doesn’t have to be overwhelming. By creating simple systems that match your child’s behavior and keeping routines consistent, you can maintain a space that feels calm, functional, and easy to manage. Start with just one or two ideas, build from there, and you’ll gradually create a home where both play and cleanup feel effortless.
This 21-day meal plan is designed to take the guesswork out of your nutrition. Every meal and snack listed below corresponds directly to the recipes provided in the comprehensive guide above. By following this plan, you will enjoy a diverse array of flavors while consistently meeting your high-protein and gluten-free dietary goals.
The plan is structured to provide three main meals and one substantial snack per day. Feel free to adjust portion sizes based on your individual caloric needs and activity levels.
Week 1: Establishing the Routine
The first week focuses on simple, satisfying meals that are easy to prepare, helping you build momentum and confidence in your new eating habits.
Day 1
Breakfast: Classic Spinach and Feta Omelet Start your week with a classic, protein-rich egg dish that provides essential vitamins from the spinach. Lunch: Mediterranean Chicken Quinoa Salad A refreshing and filling salad that can be prepped the night before. Dinner: Baked Lemon Herb Chicken Breasts A simple, elegant dinner paired with your favorite roasted vegetables. Snack: Classic Peanut Butter Protein Balls Keep these on hand for a quick, sweet energy boost in the afternoon.
Day 2
Breakfast: Make-Ahead Turkey Sausage Egg Muffins Grab a couple of these pre-made muffins for a fast, savory start to the day. Lunch: High-Protein Tuna and White Bean Salad A no-cook lunch that is incredibly fast to assemble and relies on pantry staples. Dinner: Ground Turkey Stuffed Zucchini Boats A low-carb, high-protein dinner that uses hollowed-out zucchini as a vessel. Snack: High-Protein Cottage Cheese Hummus Serve with gluten-free pita chips or fresh vegetable sticks.
Day 3
Breakfast: Classic Greek Yogurt and Berry Parfait A quick, no-cook breakfast that feels like a treat but is packed with nutrition. Lunch: Edamame and Shredded Chicken Crunch Salad A vibrant salad with a satisfying crunch and a massive dose of plant and animal protein. Dinner: Chicken and Broccoli Stir-Fry A classic takeout dish made healthier at home using gluten-free tamari. Snack: Hard-Boiled Eggs with Everything Bagel Seasoning The ultimate fast food, providing a complete protein source.
Day 4
Breakfast: Fluffy Gluten-Free Cottage Cheese Pancakes Enjoy a comforting, high-protein pancake breakfast that is completely free of gluten. Lunch: Steak and Arugula Salad with Balsamic Vinaigrette A fantastic way to repurpose leftover steak into a gourmet lunch. Dinner: Turkey Meatballs with Zucchini Noodles A lighter take on spaghetti and meatballs, packed with protein and hidden vegetables. Snack: Almond Joy Energy Bites A decadent but healthy snack inspired by the classic candy bar.
Day 5
Breakfast: Smoked Salmon and Avocado Egg Boats A creative and low-carb way to enjoy a high-protein breakfast. Lunch: Spicy Shrimp and Avocado Salad Shrimp cooks in minutes and is extremely high in protein and low in fat. Dinner: Sheet Pan Chicken Fajitas A virtually hands-off dinner that requires minimal cleanup and delivers massive flavor. Snack: Spicy Edamame Dip A vibrant green, plant-based dip that has a kick of heat from sriracha.
Day 6
Breakfast: High-Protein Cottage Cheese Scrambled Eggs Adding cottage cheese makes these eggs incredibly fluffy and boosts the protein content. Lunch: Ground Turkey Taco Bowl All the flavors of a taco without the shell, packed with lean protein and fiber. Dinner: Sheet Pan Salmon and Asparagus A classic, elegant dinner that cooks entirely on one pan in under 20 minutes. Snack: No-Bake Chocolate Peanut Butter Protein Bars Dense, chewy bars that taste incredibly similar to popular store-bought brands.
Day 7
Breakfast: Sweet Potato and Black Bean Breakfast Hash A hearty, savory breakfast skillet that provides complex carbohydrates and plant-based protein. Lunch: Salmon and Roasted Sweet Potato Bowl Rich in omega-3 fatty acids and high-quality protein, this bowl is both comforting and nutritious. Dinner: Spicy Shrimp Tacos with Cabbage Slaw Quick-cooking shrimp makes these tacos a perfect weekend dinner option. Snack: Greek Yogurt Tzatziki Sauce A classic Mediterranean sauce that doubles as a fantastic dip for vegetables.
Week 2: Exploring New Flavors
In the second week, we introduce more variety, incorporating plant-based proteins and different flavor profiles to keep your palate engaged.
Day 8
Breakfast: Savory Cottage Cheese Breakfast Bowl If you prefer savory over sweet in the morning, this high-protein bowl is perfect. Lunch: Vegan Tofu and Quinoa Buddha Bowl A completely plant-based bowl that doesn’t skimp on protein. Dinner: Baked Cod with Cherry Tomatoes and Olives A Mediterranean-inspired dish that is light, flavorful, and very high in protein. Snack: Lemon Coconut Protein Truffles A bright, refreshing, and zesty snack that provides a lighter alternative to heavy chocolate.
Day 9
Breakfast: Peanut Butter and Banana Protein Smoothie A classic flavor combination that provides a massive protein hit, perfect for post-morning workouts. Lunch: Chicken Fajita Prep Bowl A deconstructed fajita that is easy to make in large batches for the week. Dinner: Tuna and White Bean Stuffed Peppers A budget-friendly, high-protein dinner that requires minimal prep. Snack: Creamy White Bean and Roasted Garlic Dip Cannellini beans provide a smooth, buttery texture and a solid dose of protein and fiber.
Day 10
Breakfast: High-Protein Chia Seed Pudding Chia seeds are rich in fiber and healthy fats. Adding protein powder makes this a complete breakfast. Lunch: Lentil and Roasted Vegetable Power Bowl Lentils are an incredible source of both protein and dietary fiber, keeping you full for hours. Dinner: Garlic Butter Scallops with Zucchini Noodles Scallops feel luxurious but are incredibly fast to cook and pack a significant protein punch. Snack: Tahini Chocolate Chip Cookie Dough Bites Tahini provides a unique, slightly savory flavor profile and is an excellent source of plant-based protein.
Day 11
Breakfast: The Ultimate Tofu Scramble Tofu is a fantastic egg substitute that absorbs flavors beautifully and provides a substantial amount of protein. Lunch: Classic Chicken Salad Lettuce Wraps A low-carb, high-protein classic that swaps mayo for Greek yogurt to boost the protein content. Dinner: Gluten-Free Beef and Broccoli Stir-Fry A classic takeout favorite made healthier and completely gluten-free using tamari. Snack: Smoked Salmon and Dill Spread A luxurious, high-protein spread that feels fancy but takes only minutes to whip up.
Day 12
Breakfast: Quinoa Breakfast Porridge A warm, comforting alternative to oatmeal that provides a complete amino acid profile. Lunch: Turkey and Hummus Gluten-Free Wrap A quick and easy wrap that utilizes store-bought gluten-free tortillas and protein-rich hummus. Dinner: Classic Meatloaf (Gluten-Free) Using almond flour or gluten-free oats keeps this comforting classic high in protein and free of gluten. Snack: Matcha Green Tea Protein Balls Matcha provides a gentle caffeine boost and antioxidants, perfect for a mid-afternoon pick-me-up.
Day 13
Breakfast: High-Protein Vegan Smoothie Bowl A thick, spoonable smoothie that allows for endless topping variations. Lunch: Egg Salad Stuffed Bell Peppers Using bell peppers instead of bread adds crunch, vitamins, and keeps the meal entirely gluten-free. Dinner: Pork Tenderloin with Roasted Apples and Sweet Potatoes Pork tenderloin is as lean as chicken breast and pairs beautifully with sweet, roasted fruit. Snack: Chewy Almond and Seed Protein Bars Packed with nuts and seeds, these bars offer a fantastic crunch and a massive dose of healthy fats.
Day 14
Breakfast: Savory Chickpea Flour Pancakes (Socca) A traditional French flatbread that is naturally gluten-free and very high in protein. Lunch: Smoked Salmon and Cream Cheese Cucumber Subs A refreshing, no-cook lunch that feels elegant but takes only minutes to prepare. Dinner: Ground Beef and Cabbage Skillet A quick, budget-friendly, and incredibly filling one-pan meal that is naturally low in carbs. Snack: Roasted Spicy Chickpeas A crunchy, savory snack that satisfies the craving for chips or pretzels while providing plant-based protein.
Week 3: Mastering Meal Prep
The final week focuses on efficiency and comfort, utilizing recipes that are excellent for batch cooking and meal prepping.
Day 15
Breakfast: Edamame and Spinach Breakfast Salad A non-traditional breakfast that is incredibly refreshing and packed with plant-based protein. Lunch: Spicy Buffalo Chicken Collard Wraps Collard greens are sturdy and make excellent, nutrient-dense wraps for spicy, high-protein fillings. Dinner: Steak Fajita Bowls All the sizzling flavor of fajitas without the need for tortillas, served over a high-protein quinoa base. Snack: Vegan Cookie Dough Protein Bars Using chickpeas as a base blends into a perfect, high-protein cookie dough texture.
Day 16
Breakfast: Smoked Turkey Sausage and Sweet Potato Skillet A robust, savory breakfast that provides long-lasting energy from complex carbohydrates and lean protein. Lunch: High-Protein Lentil and Vegetable Soup A hearty, warming soup that provides a massive dose of plant-based protein and fiber. Dinner: High-Protein Lentil Shepherd’s Pie A comforting, meatless version of the classic dish, using protein-rich lentils and a creamy potato topping. Snack: Turkey and Cheese Roll-Ups A low-carb, high-protein snack that takes seconds to assemble.
Day 17
Breakfast: Chicken and Apple Sausage Patties Making your own sausage ensures there are no hidden gluten-containing fillers or excessive sodium. Lunch: Quick Chicken and White Bean Chili A faster, lighter take on traditional chili that uses white beans and shredded chicken for a protein boost. Dinner: Crispy Tofu and Vegetable Stir-Fry Extra-firm tofu provides a substantial amount of protein and absorbs the savory, gluten-free sauce perfectly. Snack: Crispy Rice and Peanut Butter Protein Squares A high-protein, grown-up version of the classic crispy rice treat, made without marshmallows.
Day 18
Breakfast: Steak and Egg Breakfast Bowl A fantastic way to use leftover steak from dinner, providing a massive protein hit to start the day. Lunch: Creamy Tomato and Red Lentil Soup Red lentils break down when cooked, naturally thickening the soup and adding hidden protein. Dinner: Black Bean and Quinoa Stuffed Peppers A colorful, nutrient-dense dinner that combines two excellent sources of plant-based protein. Snack: Cottage Cheese and Pineapple Bowls A classic combination that provides a massive hit of casein protein, which digests slowly.
Day 19
Breakfast: Turkey Bacon and Egg White Wrap A lighter, lower-fat option that still delivers a significant amount of protein. Lunch: Beef and Cabbage Detox Soup A low-carb, high-protein soup that is incredibly filling and packed with nutrient-dense cabbage. Dinner: Chickpea and Spinach Curry A fast, flavorful, and warming curry that uses pantry staples and delivers a high amount of protein and fiber. Snack: Baked Oatmeal Protein Bars These bars have a softer, cake-like texture, making them perfect for a mid-morning snack.
Day 20
Breakfast: Ground Beef and Spinach Scramble A very high-protein, low-carb breakfast that keeps you full for hours. Lunch: Turkey Sausage and Kale Soup Spicy turkey sausage provides robust flavor and high protein, while kale adds essential vitamins. Dinner: Edamame and Soba Noodle Salad Soba noodles made from 100% buckwheat are naturally gluten-free and higher in protein than traditional pasta. Snack: Edamame with Sea Salt Sometimes the simplest snacks are the best. Edamame is naturally gluten-free and packed with protein.
Day 21
Breakfast: High-Protein Peanut Butter Overnight Oats Oats are naturally gluten-free, but always ensure you buy certified gluten-free oats to avoid cross-contamination. Lunch: Tuna Salad Lettuce Wraps A classic, no-fuss lunch that is ready in minutes and requires zero cooking. Dinner: Turkey Sausage and Pepper Skillet A one-pan wonder that uses pre-cooked, gluten-free turkey sausage for a lightning-fast dinner. Snack: High-Protein Chocolate Chia Pudding A decadent-tasting snack that feels like dessert but is loaded with protein and fiber.
Starting the day with a high-protein, gluten-free breakfast is an excellent way to fuel your body, stabilize blood sugar levels, and maintain energy throughout the morning. Whether you have celiac disease, a gluten sensitivity, or simply prefer a gluten-free lifestyle, finding breakfasts that are both safe and satiating can sometimes be a challenge. Many traditional breakfast foods, such as cereals, pastries, and breads, are heavy in carbohydrates and gluten but lack the protein necessary to keep you full.
To help you start your mornings right, we have compiled a comprehensive list of over 25 gluten-free and high-protein breakfast recipes. These recipes utilize naturally gluten-free, protein-rich ingredients like eggs, Greek yogurt, cottage cheese, quinoa, tofu, and lean meats. Each recipe includes a full list of ingredients and step-by-step instructions to make your meal prep as seamless as possible.
Egg-Based Breakfasts
Eggs are a nutritional powerhouse, offering about 6 grams of high-quality protein per large egg [1]. They are naturally gluten-free and incredibly versatile.
1. Classic Spinach and Feta Omelet
A simple yet elegant breakfast that packs a protein punch from both the eggs and the cheese.
Ingredients:
3 large eggs
1 cup fresh spinach, chopped
2 tablespoons feta cheese, crumbled
1 teaspoon olive oil
Salt and black pepper to taste
Instructions:
In a small bowl, whisk the eggs until well combined. Season with a pinch of salt and pepper.
Heat the olive oil in a non-stick skillet over medium heat.
Add the chopped spinach to the skillet and sauté for about 1-2 minutes until wilted.
Pour the whisked eggs over the spinach, tilting the pan to ensure the eggs spread evenly.
Let the eggs cook undisturbed for about 2 minutes, or until the edges start to set.
Sprinkle the crumbled feta cheese over one half of the omelet.
Carefully fold the other half of the omelet over the cheese using a spatula.
Cook for another minute until the cheese is slightly melted and the eggs are fully cooked. Serve immediately.
2. Make-Ahead Turkey Sausage Egg Muffins
Perfect for meal prep, these egg muffins are easy to grab on busy mornings.
Ingredients:
8 large eggs
1/2 cup milk (dairy or unsweetened almond milk)
1/2 pound gluten-free turkey breakfast sausage, cooked and crumbled
1/2 cup bell peppers, diced
1/4 cup red onion, finely chopped
1/2 cup cheddar cheese, shredded
1/2 teaspoon garlic powder
Salt and pepper to taste
Instructions:
Preheat your oven to 350°F (175°C). Grease a 12-cup muffin tin generously with cooking spray or line with silicone baking cups.
In a large mixing bowl, whisk together the eggs, milk, garlic powder, salt, and pepper.
Stir in the cooked turkey sausage, diced bell peppers, red onion, and shredded cheddar cheese.
Divide the egg mixture evenly among the 12 muffin cups, filling each about 3/4 full.
Bake for 20-25 minutes, or until the centers are set and the tops are slightly golden.
Allow the muffins to cool in the tin for 5 minutes before removing. Store leftovers in an airtight container in the refrigerator for up to 4 days.
3. Smoked Salmon and Avocado Egg Boats
A creative and low-carb way to enjoy a high-protein breakfast using avocados as the vessel.
Ingredients:
2 ripe avocados, halved and pitted
4 small eggs
2 ounces smoked salmon, chopped
1 tablespoon fresh dill, chopped
Salt, pepper, and red pepper flakes to taste
Instructions:
Preheat your oven to 400°F (200°C).
Scoop out a small amount of flesh from the center of each avocado half to create a larger well for the egg.
Place the avocado halves in a baking dish so they sit flat and snug.
Carefully crack one small egg into the well of each avocado half.
Bake for 15-20 minutes, depending on how runny you like your yolks.
Remove from the oven and immediately top with chopped smoked salmon, fresh dill, salt, pepper, and a pinch of red pepper flakes.
4. High-Protein Cottage Cheese Scrambled Eggs
Adding cottage cheese to scrambled eggs makes them incredibly fluffy and significantly boosts the protein content.
Ingredients:
3 large eggs
1/3 cup full-fat or low-fat cottage cheese
1 teaspoon butter or ghee
Fresh chives, chopped (for garnish)
Salt and freshly ground black pepper
Instructions:
In a bowl, vigorously whisk the eggs and cottage cheese together until well blended.
Melt the butter in a skillet over medium-low heat.
Pour the egg and cottage cheese mixture into the skillet.
Let it sit for a few seconds until the bottom starts to set, then gently push the eggs around the pan with a silicone spatula.
Continue to cook slowly, stirring frequently, until the eggs are cooked to your desired consistency.
Remove from heat, season with salt and pepper, and garnish with fresh chives.
5. Sweet Potato and Black Bean Breakfast Hash
A hearty, savory breakfast skillet that provides complex carbohydrates and plant-based protein alongside eggs.
Ingredients:
1 medium sweet potato, peeled and diced into small cubes
1/2 cup canned black beans, rinsed and drained
1/4 cup red bell pepper, diced
2 large eggs
1 tablespoon olive oil
1/2 teaspoon smoked paprika
1/4 teaspoon cumin
Salt and pepper to taste
Fresh cilantro for garnish
Instructions:
Heat the olive oil in a cast-iron skillet over medium heat.
Add the diced sweet potatoes and cook for 8-10 minutes, stirring occasionally, until they are tender and slightly browned.
Stir in the diced red bell pepper, black beans, smoked paprika, cumin, salt, and pepper. Cook for another 3-4 minutes until the peppers are soft.
Use a spoon to create two small wells in the hash mixture.
Crack an egg into each well.
Cover the skillet with a lid and cook for 4-5 minutes, or until the egg whites are set but the yolks are still runny.
Garnish with fresh cilantro and serve hot.
Dairy-Powered Breakfasts
Dairy products like Greek yogurt and cottage cheese are phenomenal sources of protein. Greek yogurt can contain up to 20 grams of protein per cup [2].
6. Classic Greek Yogurt and Berry Parfait
A quick, no-cook breakfast that feels like a treat but is packed with nutrition.
Ingredients:
1 cup plain, unsweetened Greek yogurt
1/2 cup mixed berries (strawberries, blueberries, raspberries)
1/4 cup gluten-free high-protein granola
1 tablespoon chia seeds
1 teaspoon honey or pure maple syrup (optional)
Instructions:
In a glass or bowl, add half of the Greek yogurt as the base layer.
Top with half of the mixed berries and half of the chia seeds.
Add the remaining Greek yogurt, followed by the rest of the berries and chia seeds.
Sprinkle the gluten-free high-protein granola over the top for crunch.
Drizzle with honey or maple syrup if a touch of sweetness is desired. Serve immediately.
7. Fluffy Gluten-Free Cottage Cheese Pancakes
These pancakes are tender, high in protein, and completely free of gluten.
Ingredients:
1/2 cup cottage cheese
1/2 cup gluten-free rolled oats
2 large eggs
1/2 teaspoon vanilla extract
1/2 teaspoon baking powder
1/2 teaspoon cinnamon
Coconut oil or butter for cooking
Instructions:
Place the cottage cheese, gluten-free rolled oats, eggs, vanilla extract, baking powder, and cinnamon into a blender.
Blend on high until the batter is completely smooth and the oats are pulverized. Let the batter rest for 5 minutes to thicken.
Heat a skillet or griddle over medium heat and lightly coat with coconut oil or butter.
Pour about 1/4 cup of batter per pancake onto the skillet.
Cook for 2-3 minutes until bubbles form on the surface and the edges look set.
Flip carefully and cook for another 1-2 minutes until golden brown.
Serve warm with your favorite toppings, such as fresh fruit or a drizzle of maple syrup.
8. Savory Cottage Cheese Breakfast Bowl
If you prefer savory over sweet in the morning, this high-protein bowl is perfect.
Ingredients:
3/4 cup cottage cheese (4% milkfat recommended for flavor)
1/2 cup cherry tomatoes, halved
1/4 cup cucumber, diced
1 tablespoon pumpkin seeds (pepitas)
1 teaspoon everything bagel seasoning (ensure it is gluten-free)
A drizzle of high-quality olive oil
Instructions:
Spoon the cottage cheese into a serving bowl.
Arrange the halved cherry tomatoes and diced cucumber on top of the cottage cheese.
Sprinkle the pumpkin seeds evenly over the bowl.
Season generously with the everything bagel seasoning.
Finish with a light drizzle of olive oil and enjoy immediately.
9. Peanut Butter and Banana Protein Smoothie
A classic flavor combination that provides a massive protein hit, perfect for post-morning workouts.
Ingredients:
1 cup unsweetened almond milk (or milk of choice)
1 scoop gluten-free vanilla or chocolate protein powder
2 tablespoons natural peanut butter
1/2 frozen banana
1/4 cup plain Greek yogurt
1/2 cup ice cubes
Instructions:
Add the almond milk to the blender first to ensure smooth blending.
Add the protein powder, natural peanut butter, frozen banana, Greek yogurt, and ice cubes.
Blend on high speed for 45-60 seconds until the smoothie is creamy and completely smooth.
Pour into a tall glass and serve immediately.
10. High-Protein Chia Seed Pudding
Chia seeds are rich in fiber and healthy fats. Adding protein powder makes this a complete breakfast.
Ingredients:
3 tablespoons chia seeds
1 cup unsweetened almond milk
1 scoop gluten-free vanilla protein powder
1/2 teaspoon vanilla extract
1/4 cup fresh raspberries (for topping)
1 tablespoon sliced almonds (for topping)
Instructions:
In a mason jar or sealable container, whisk together the almond milk and vanilla protein powder until no lumps remain.
Stir in the chia seeds and vanilla extract.
Let the mixture sit for 5 minutes, then stir vigorously again to prevent the chia seeds from clumping at the bottom.
Cover the jar and refrigerate overnight, or for at least 2 hours until the mixture thickens into a pudding consistency.
Before eating, top with fresh raspberries and sliced almonds.
Plant-Based and Vegan High-Protein Breakfasts
For those who follow a vegan diet or simply want to incorporate more plant-based meals, tofu, quinoa, and legumes are excellent sources of gluten-free protein.
11. The Ultimate Tofu Scramble
Tofu is a fantastic egg substitute that absorbs flavors beautifully and provides a substantial amount of protein.
Ingredients:
1 block (14 oz) extra-firm tofu, drained and pressed
1 tablespoon olive oil
2 tablespoons nutritional yeast
1/2 teaspoon turmeric (for color)
1/2 teaspoon garlic powder
1/4 teaspoon black salt (Kala Namak) for an “eggy” flavor, or regular salt
1/4 cup unsweetened almond milk
1/2 cup cherry tomatoes, halved
1 cup fresh spinach
Instructions:
Crumble the pressed tofu into a bowl using your hands or a fork until it resembles scrambled eggs.
In a small bowl, whisk together the nutritional yeast, turmeric, garlic powder, black salt, and almond milk to create a sauce.
Heat the olive oil in a large skillet over medium heat.
Add the crumbled tofu to the skillet and cook for 3-4 minutes until slightly browned.
Pour the sauce over the tofu and stir well to coat evenly. Cook for another 2 minutes.
Stir in the cherry tomatoes and fresh spinach, cooking until the spinach is wilted. Serve hot.
12. Quinoa Breakfast Porridge
Quinoa is a complete protein, meaning it contains all nine essential amino acids, making it a perfect gluten-free breakfast base [3].
Ingredients:
1/2 cup uncooked quinoa, rinsed thoroughly
1 cup unsweetened almond milk or coconut milk
1/2 teaspoon cinnamon
1 tablespoon maple syrup
1/4 cup chopped walnuts or pecans
1/2 cup fresh blueberries
Instructions:
In a small saucepan, combine the rinsed quinoa, almond milk, and cinnamon.
Bring the mixture to a boil over medium-high heat.
Reduce the heat to low, cover, and simmer for 15 minutes, or until the liquid is absorbed and the quinoa is tender.
Remove from heat and let it sit covered for 5 minutes.
Fluff the quinoa with a fork and stir in the maple syrup.
Top with chopped nuts and fresh blueberries before serving.
13. High-Protein Vegan Smoothie Bowl
A thick, spoonable smoothie bowl packed with plant-based protein powder and nutrient-dense toppings.
Ingredients:
1 frozen banana
1/2 cup frozen mixed berries
1 scoop vegan vanilla or berry protein powder (ensure it is gluten-free)
1/4 cup unsweetened almond milk (add more if needed)
1 tablespoon hemp seeds
1 tablespoon pumpkin seeds
1/4 cup gluten-free granola
Instructions:
Add the frozen banana, mixed berries, vegan protein powder, and almond milk to a high-speed blender.
Blend on low speed, using a tamper to push the ingredients down, until the mixture is thick and smooth. You want it to be much thicker than a regular smoothie.
Scoop the thick smoothie into a bowl.
Arrange the hemp seeds, pumpkin seeds, and gluten-free granola in neat rows on top of the smoothie bowl.
Enjoy immediately with a spoon.
14. Savory Chickpea Flour Pancakes (Socca)
Chickpea flour is naturally gluten-free and high in protein, making it an excellent base for savory pancakes.
Ingredients:
1 cup chickpea flour (garbanzo bean flour)
1 cup water
1 tablespoon olive oil
1/2 teaspoon salt
1/4 teaspoon black pepper
1/4 cup fresh herbs (parsley, cilantro, or chives), chopped
Olive oil for cooking
Instructions:
In a medium bowl, whisk together the chickpea flour, water, olive oil, salt, and pepper until smooth.
Stir in the chopped fresh herbs. Let the batter rest for at least 15 minutes to allow the flour to hydrate.
Heat a non-stick skillet over medium-high heat and brush lightly with olive oil.
Pour about 1/4 cup of batter into the skillet, spreading it slightly to form a pancake.
Cook for 2-3 minutes until the edges look dry and bubbles form on the surface.
Flip and cook for another 1-2 minutes until golden brown. Serve warm with a side of avocado or salsa.
15. Edamame and Spinach Breakfast Salad
Who says you can’t have salad for breakfast? Edamame provides a massive boost of plant-based protein.
Ingredients:
2 cups fresh baby spinach
1/2 cup shelled edamame, steamed and cooled
1/4 cup cherry tomatoes, halved
1/4 avocado, sliced
1 tablespoon hemp hearts
1 tablespoon lemon juice
1 teaspoon olive oil
Salt and pepper to taste
Instructions:
In a large bowl, toss the baby spinach with the lemon juice, olive oil, salt, and pepper until lightly coated.
Top the dressed spinach with the steamed edamame, cherry tomatoes, and sliced avocado.
Sprinkle the hemp hearts over the salad for an extra crunch and protein boost.
Serve immediately for a refreshing, high-protein start to the day.
Meat and Poultry Breakfasts
Incorporating lean meats like turkey, chicken, or high-quality pork sausage can significantly increase the protein content of your morning meal.
16. Smoked Turkey Sausage and Sweet Potato Skillet
A hearty, one-pan meal that is perfect for weekend brunches or meal-prepped weekday breakfasts.
Ingredients:
1/2 pound gluten-free smoked turkey sausage, sliced into rounds
1 large sweet potato, peeled and diced
1/2 medium onion, chopped
1 bell pepper (any color), diced
1 tablespoon olive oil
1/2 teaspoon smoked paprika
4 large eggs
Salt and pepper to taste
Instructions:
Heat the olive oil in a large cast-iron skillet over medium heat.
Add the diced sweet potato and cook for 8-10 minutes, stirring occasionally, until tender.
Add the sliced turkey sausage, chopped onion, and diced bell pepper to the skillet. Season with smoked paprika, salt, and pepper.
Cook for another 5-7 minutes until the vegetables are soft and the sausage is browned.
Make four small wells in the mixture and crack an egg into each well.
Cover the skillet and cook for 4-5 minutes until the eggs are cooked to your liking. Serve hot.
17. Chicken and Apple Breakfast Sausage Patties
Making your own sausage patties ensures they are 100% gluten-free and free of unwanted fillers.
Ingredients:
1 pound ground chicken
1 small apple (like Gala or Fuji), peeled and finely grated
1/2 teaspoon dried sage
1/2 teaspoon dried thyme
1/2 teaspoon garlic powder
1/2 teaspoon salt
1/4 teaspoon black pepper
1 tablespoon olive oil or avocado oil for cooking
Instructions:
In a large mixing bowl, combine the ground chicken, grated apple, dried sage, dried thyme, garlic powder, salt, and black pepper. Mix gently until just combined; do not overmix.
Form the mixture into 6-8 small, flat patties.
Heat the olive oil in a large skillet over medium heat.
Add the patties to the skillet and cook for 4-5 minutes per side, or until they are browned and cooked through (internal temperature reaches 165°F).
Serve warm alongside eggs or a side salad.
18. Leftover Steak and Egg Breakfast Bowl
A fantastic way to use up leftover steak from dinner while packing in the protein.
Ingredients:
4 ounces leftover cooked steak, thinly sliced
2 large eggs
1/2 cup cooked quinoa (ensure it is gluten-free)
1/4 cup cherry tomatoes, halved
1/4 avocado, sliced
1 teaspoon butter or ghee
Salt and pepper to taste
Instructions:
Warm the leftover steak slices gently in a skillet over low heat or in the microwave.
In a separate skillet, melt the butter or ghee over medium heat.
Fry the eggs to your preferred doneness (sunny-side up or over-easy works best for this bowl). Season with salt and pepper.
Assemble the bowl by placing the cooked quinoa at the base.
Arrange the warmed steak slices, cherry tomatoes, and sliced avocado around the edges.
Top the bowl with the fried eggs and serve immediately.
19. Turkey Bacon and Egg White Wrap
Using a gluten-free wrap and egg whites keeps this breakfast low in fat but exceptionally high in protein.
Ingredients:
1 large gluten-free tortilla or wrap
3/4 cup liquid egg whites (or whites from 4 large eggs)
2 slices gluten-free turkey bacon, cooked and crumbled
1/4 cup fresh spinach
2 tablespoons salsa
1 teaspoon olive oil
Instructions:
Heat the olive oil in a non-stick skillet over medium heat.
Pour in the egg whites and scramble them until fully cooked and opaque.
Lay the gluten-free tortilla flat on a clean surface.
Spoon the scrambled egg whites onto the center of the tortilla.
Top with the crumbled turkey bacon, fresh spinach, and salsa.
Fold the sides of the tortilla inward, then roll it up tightly from the bottom to form a wrap.
Optional: Toast the wrap seam-side down in the skillet for 1-2 minutes until golden brown.
20. Ground Beef and Spinach Breakfast Scramble
A robust, savory scramble that provides a substantial amount of iron and protein.
Ingredients:
1/4 pound lean ground beef (90% lean or higher)
3 large eggs
1 cup fresh spinach, roughly chopped
1/4 cup onion, finely diced
1/2 teaspoon garlic powder
Salt and pepper to taste
1 teaspoon olive oil
Instructions:
Heat the olive oil in a skillet over medium-high heat.
Add the diced onion and cook for 2 minutes until translucent.
Add the lean ground beef to the skillet, breaking it apart with a spatula. Season with garlic powder, salt, and pepper. Cook until browned and cooked through.
Reduce the heat to medium-low and stir in the chopped spinach, cooking until wilted.
In a small bowl, whisk the eggs. Pour them over the beef and spinach mixture.
Scramble everything together until the eggs are fully cooked. Serve hot.
Quick and Easy On-the-Go Options
For those mornings when you have zero time to cook, these recipes can be prepped ahead or thrown together in minutes.
21. High-Protein Peanut Butter Overnight Oats
Oats are naturally gluten-free, but always ensure you buy certified gluten-free oats to avoid cross-contamination.
Ingredients:
1/2 cup certified gluten-free rolled oats
1/2 cup unsweetened almond milk
1 scoop vanilla or chocolate protein powder
1 tablespoon chia seeds
1 tablespoon natural peanut butter
1/2 teaspoon cinnamon
Instructions:
In a mason jar or sealable container, combine the gluten-free rolled oats, almond milk, protein powder, chia seeds, peanut butter, and cinnamon.
Stir vigorously until all ingredients are well mixed and the protein powder is fully dissolved.
Cover the jar securely and place it in the refrigerator overnight (or for at least 4 hours).
In the morning, give the oats a good stir. Add a splash of almond milk if the mixture is too thick.
Top with extra peanut butter or sliced bananas if desired, and enjoy cold.
22. Almond Flour and Protein Waffles
These waffles are crispy on the outside, fluffy on the inside, and packed with protein from almond flour and whey.
Ingredients:
1 cup blanched almond flour
1 scoop vanilla whey protein powder (or plant-based alternative)
2 large eggs
1/4 cup unsweetened almond milk
1 tablespoon melted coconut oil
1 teaspoon baking powder
1/2 teaspoon vanilla extract
Instructions:
Preheat your waffle iron according to the manufacturer’s instructions and lightly grease it with cooking spray.
In a medium bowl, whisk together the almond flour, protein powder, and baking powder.
In a separate small bowl, whisk the eggs, almond milk, melted coconut oil, and vanilla extract.
Pour the wet ingredients into the dry ingredients and stir until a smooth batter forms.
Pour the batter onto the preheated waffle iron (amount depends on the size of your iron).
Cook until the waffles are golden brown and crisp, usually 3-5 minutes.
Serve warm with fresh berries or a drizzle of pure maple syrup.
23. Protein-Packed Breakfast Cookies
Yes, you can have cookies for breakfast! These are dense, chewy, and full of complex carbs and protein.
Ingredients:
1 cup certified gluten-free rolled oats
1/2 cup almond butter or peanut butter
1/4 cup honey or maple syrup
1 scoop vanilla protein powder
1/4 cup pumpkin seeds
1/4 cup dried cranberries or raisins
1 teaspoon cinnamon
Instructions:
Preheat your oven to 350°F (175°C) and line a baking sheet with parchment paper.
In a large bowl, mix the almond butter and honey until smooth.
Stir in the gluten-free rolled oats, protein powder, pumpkin seeds, dried cranberries, and cinnamon until a thick dough forms.
Scoop out about 2 tablespoons of dough per cookie and roll into balls.
Place the balls on the prepared baking sheet and flatten them slightly with your hands or a fork.
Bake for 10-12 minutes until the edges are lightly golden.
Let the cookies cool completely on the baking sheet before storing them in an airtight container.
24. Smoked Salmon and Cream Cheese Cucumber Bites
A refreshing, low-carb, and high-protein breakfast that requires absolutely no cooking.
Ingredients:
1 large English cucumber, sliced into thick rounds
4 ounces smoked salmon, cut into small pieces
1/4 cup plain Greek yogurt or light cream cheese
1 tablespoon fresh dill, chopped
1 teaspoon lemon juice
Black pepper to taste
Instructions:
In a small bowl, mix the Greek yogurt (or cream cheese), fresh dill, lemon juice, and black pepper until smooth.
Lay the cucumber slices flat on a serving plate or meal prep container.
Spread a small dollop (about 1 teaspoon) of the yogurt mixture onto each cucumber slice.
Top each slice with a piece of smoked salmon.
Garnish with extra dill or a sprinkle of everything bagel seasoning if desired. Serve immediately or refrigerate for up to 2 days.
25. High-Protein Chocolate Chia Pudding
A decadent-tasting breakfast that feels like dessert but is loaded with protein and fiber.
Ingredients:
1/4 cup chia seeds
1 cup unsweetened almond milk
1 scoop chocolate protein powder
1 tablespoon unsweetened cocoa powder
1 teaspoon maple syrup (optional)
1/4 cup fresh strawberries, sliced (for topping)
Instructions:
In a jar or bowl, whisk together the almond milk, chocolate protein powder, cocoa powder, and maple syrup until smooth.
Stir in the chia seeds until evenly distributed.
Let the mixture sit for 5 minutes, then stir again to prevent clumping.
Cover and refrigerate overnight, or for at least 2 hours until thickened.
Top with fresh sliced strawberries before serving.
26. Savory Breakfast Meatballs
A unique and highly portable breakfast option that can be made in large batches and frozen.
Ingredients:
1 pound ground turkey or chicken
1/4 cup almond flour
1 large egg
1/2 cup finely grated zucchini (squeeze out excess moisture)
1 teaspoon garlic powder
1 teaspoon onion powder
1/2 teaspoon salt
1/4 teaspoon black pepper
Instructions:
Preheat your oven to 400°F (200°C) and line a baking sheet with parchment paper.
In a large bowl, combine the ground turkey, almond flour, egg, grated zucchini, garlic powder, onion powder, salt, and pepper. Mix gently until just combined.
Roll the mixture into 1-inch meatballs (you should get about 16-20 meatballs).
Place the meatballs on the prepared baking sheet, spacing them evenly.
Bake for 15-20 minutes, or until the meatballs are cooked through and lightly browned on the outside.
Serve warm, or let them cool and store in the refrigerator for quick breakfasts throughout the week.
Conclusion
Finding a breakfast that is both gluten-free and high in protein doesn’t have to be a daily struggle. By incorporating ingredients like eggs, Greek yogurt, cottage cheese, quinoa, and lean meats, you can create a wide variety of delicious and satisfying morning meals. Whether you prefer sweet or savory, hot or cold, sit-down or on-the-go, these 25+ recipes offer something for everyone. Meal prepping a few of these options on the weekend can ensure you always have a nutritious, protein-packed breakfast ready to fuel your day.
Finding a lunch that is both gluten-free and high in protein is essential for maintaining energy levels and focus throughout the afternoon. A well-balanced, protein-rich midday meal prevents the dreaded “afternoon slump” and keeps you satiated until dinner. Whether you are packing a lunch for the office, working from home, or prepping meals for the week, having a repertoire of reliable recipes is key.
This comprehensive guide features over 25 gluten-free and high-protein lunch recipes. From vibrant salads and hearty bowls to comforting soups and creative wraps, these meals utilize naturally gluten-free ingredients like quinoa, lentils, chicken, tuna, and legumes. Each recipe includes a full list of ingredients and step-by-step instructions to make your lunchtime both delicious and nutritious.
Vibrant Salads
Salads don’t have to be boring or leave you hungry an hour later. By incorporating substantial protein sources and healthy fats, these salads are complete meals.
1. Mediterranean Chicken Quinoa Salad
A refreshing and filling salad that combines lean chicken breast with protein-packed quinoa and fresh vegetables.
Ingredients:
1 cup cooked quinoa (ensure it is certified gluten-free)
6 oz grilled chicken breast, diced
1/2 cup cherry tomatoes, halved
1/2 cup cucumber, diced
1/4 cup red onion, finely chopped
1/4 cup Kalamata olives, pitted and halved
2 tablespoons feta cheese, crumbled
1 tablespoon extra-virgin olive oil
1 tablespoon fresh lemon juice
1/2 teaspoon dried oregano
Salt and black pepper to taste
Instructions:
In a large mixing bowl, combine the cooked quinoa, diced grilled chicken, cherry tomatoes, cucumber, red onion, and Kalamata olives.
In a small bowl, whisk together the olive oil, fresh lemon juice, dried oregano, salt, and black pepper to create the dressing.
Pour the dressing over the salad and toss well to ensure all ingredients are evenly coated.
Gently fold in the crumbled feta cheese.
Serve immediately or refrigerate in an airtight container for up to 3 days.
2. High-Protein Tuna and White Bean Salad
This no-cook salad is incredibly fast to assemble and relies on pantry staples, making it perfect for busy days.
Ingredients:
1 can (5 oz) solid white albacore tuna in water, drained and flaked
1/2 cup canned Cannellini beans (white beans), rinsed and drained
1/4 cup celery, finely diced
2 tablespoons red onion, finely minced
1 tablespoon fresh parsley, chopped
1 tablespoon olive oil
1 tablespoon red wine vinegar
1/2 teaspoon Dijon mustard
Salt and freshly ground black pepper
Instructions:
In a medium bowl, combine the flaked tuna, rinsed Cannellini beans, diced celery, red onion, and fresh parsley.
In a separate small bowl, whisk together the olive oil, red wine vinegar, Dijon mustard, salt, and pepper.
Pour the vinaigrette over the tuna and bean mixture.
Toss gently until everything is well combined.
Serve over a bed of mixed greens or enjoy it straight from the bowl.
3. Edamame and Shredded Chicken Crunch Salad
Edamame provides an excellent source of plant-based protein, complementing the shredded chicken perfectly.
Ingredients:
2 cups shredded cabbage (red or green)
1 cup cooked chicken breast, shredded
1/2 cup shelled edamame, steamed and cooled
1/4 cup carrots, julienned or grated
2 tablespoons sliced almonds
1 tablespoon gluten-free tamari or coconut aminos
1 tablespoon rice vinegar
1 teaspoon sesame oil
1/2 teaspoon grated fresh ginger
Instructions:
In a large salad bowl, toss together the shredded cabbage, shredded chicken, edamame, carrots, and sliced almonds.
In a small jar with a tight-fitting lid, combine the gluten-free tamari, rice vinegar, sesame oil, and grated ginger. Shake vigorously to emulsify the dressing.
Drizzle the dressing over the salad and toss thoroughly.
Let the salad sit for 5-10 minutes before eating to allow the cabbage to soften slightly and absorb the flavors.
4. Steak and Arugula Salad with Balsamic Vinaigrette
A fantastic way to repurpose leftover steak into a gourmet, high-protein lunch.
Ingredients:
3 cups fresh baby arugula
4 oz leftover cooked steak (flank or sirloin), thinly sliced
1/4 cup cherry tomatoes, halved
1/4 cup cucumber, sliced
1 tablespoon shaved Parmesan cheese
1 tablespoon balsamic vinegar
1 tablespoon extra-virgin olive oil
1/2 teaspoon Dijon mustard
Salt and pepper to taste
Instructions:
Place the fresh baby arugula in a large serving bowl.
Arrange the thinly sliced steak, cherry tomatoes, and cucumber slices on top of the arugula.
In a small bowl, whisk together the balsamic vinegar, olive oil, Dijon mustard, salt, and pepper.
Drizzle the vinaigrette evenly over the salad.
Top with shaved Parmesan cheese and serve immediately.
5. Spicy Shrimp and Avocado Salad
Shrimp cooks in minutes and is extremely high in protein and low in fat, making it an ideal lunch protein.
Ingredients:
6 oz raw shrimp, peeled and deveined
1/2 teaspoon chili powder
1/4 teaspoon garlic powder
1 teaspoon olive oil (for cooking)
2 cups mixed salad greens
1/2 avocado, diced
1/4 cup corn kernels (canned or thawed from frozen)
1 tablespoon lime juice
1 tablespoon fresh cilantro, chopped
Instructions:
Toss the raw shrimp with the chili powder and garlic powder until evenly coated.
Heat the olive oil in a skillet over medium-high heat. Add the shrimp and cook for 2-3 minutes per side until pink and opaque. Remove from heat and let cool slightly.
In a large bowl, combine the mixed salad greens, diced avocado, and corn kernels.
Add the cooked shrimp to the salad.
Drizzle with fresh lime juice and sprinkle with chopped cilantro. Toss gently and serve.
Hearty Bowls
Grain and protein bowls are excellent for meal prepping. They are highly customizable and easy to pack for work.
6. Ground Turkey Taco Bowl
All the flavors of a taco without the shell, packed with lean protein and fiber.
Ingredients:
1/2 lb lean ground turkey
1 tablespoon gluten-free taco seasoning
1/2 cup cooked brown rice or cauliflower rice
1/4 cup black beans, rinsed and drained
1/4 cup corn kernels
2 tablespoons salsa
1 tablespoon plain Greek yogurt (as a sour cream substitute)
Fresh cilantro for garnish
Instructions:
Heat a non-stick skillet over medium heat. Add the ground turkey and cook until browned, breaking it apart with a spatula.
Stir in the gluten-free taco seasoning and a splash of water. Simmer for 2 minutes until the turkey is fully coated and the liquid has absorbed.
In a serving bowl, lay down a base of cooked brown rice or cauliflower rice.
Top the rice with the seasoned ground turkey, black beans, and corn.
Add a dollop of salsa and plain Greek yogurt in the center.
Garnish with fresh cilantro and serve warm.
7. Salmon and Roasted Sweet Potato Bowl
Rich in omega-3 fatty acids and high-quality protein, this bowl is both comforting and nutritious.
Ingredients:
1 salmon fillet (about 5 oz)
1 cup sweet potato, peeled and cubed
1 cup broccoli florets
1 tablespoon olive oil
1/2 teaspoon smoked paprika
Salt and pepper to taste
1 tablespoon lemon juice
Instructions:
Preheat your oven to 400°F (200°C). Line a baking sheet with parchment paper.
Toss the cubed sweet potato and broccoli florets with the olive oil, smoked paprika, salt, and pepper. Spread them out on one side of the baking sheet.
Place the salmon fillet on the other side of the baking sheet. Season the salmon with salt, pepper, and a squeeze of lemon juice.
Roast in the oven for 15-20 minutes, or until the sweet potatoes are tender and the salmon flakes easily with a fork.
Transfer the roasted vegetables and salmon to a bowl and enjoy.
8. Vegan Tofu and Quinoa Buddha Bowl
A completely plant-based bowl that doesn’t skimp on protein, utilizing extra-firm tofu and quinoa.
Ingredients:
1/2 block (7 oz) extra-firm tofu, pressed and cubed
1 tablespoon gluten-free tamari
1 teaspoon sesame oil
1/2 cup cooked quinoa
1/2 cup steamed spinach or kale
1/4 cup shredded carrots
1 tablespoon tahini
1 teaspoon lemon juice
1 teaspoon warm water (to thin the dressing)
Instructions:
Preheat your oven to 400°F (200°C). Toss the cubed tofu with the gluten-free tamari and sesame oil.
Spread the tofu on a baking sheet and bake for 20-25 minutes until golden and crispy, flipping halfway through.
In a small bowl, whisk together the tahini, lemon juice, and warm water until a smooth dressing forms.
Assemble the bowl by placing the cooked quinoa at the base.
Arrange the baked tofu, steamed spinach, and shredded carrots over the quinoa.
Drizzle the tahini dressing over the top before serving.
9. Chicken Fajita Prep Bowl
A deconstructed fajita that is easy to make in large batches for the week.
Ingredients:
6 oz chicken breast, sliced into strips
1/2 bell pepper (any color), sliced
1/4 red onion, sliced
1 tablespoon olive oil
1 teaspoon chili powder
1/2 teaspoon cumin
1/2 cup cooked quinoa or rice
1/4 avocado, sliced
Instructions:
In a bowl, toss the chicken strips, sliced bell pepper, and red onion with the olive oil, chili powder, and cumin until well coated.
Heat a large skillet over medium-high heat. Add the chicken and vegetable mixture.
Sauté for 7-10 minutes, stirring frequently, until the chicken is cooked through and the vegetables are tender-crisp.
Place the cooked quinoa or rice in a serving bowl.
Top with the chicken fajita mixture and sliced avocado. Serve warm.
10. Lentil and Roasted Vegetable Power Bowl
Lentils are an incredible source of both protein and dietary fiber, keeping you full for hours.
Ingredients:
1/2 cup cooked green or brown lentils
1/2 cup Brussels sprouts
1/2 cup butternut squash, cubed
1 tablespoon olive oil
1/2 teaspoon garlic powder
Salt and pepper to taste
1 tablespoon balsamic glaze
Instructions:
Preheat your oven to 400°F (200°C).
Toss the Brussels sprouts and cubed butternut squash with the olive oil, garlic powder, salt, and pepper.
Spread the vegetables on a baking sheet and roast for 20-25 minutes until tender and caramelized.
In a bowl, combine the cooked lentils with the roasted vegetables.
Drizzle the balsamic glaze over the top and toss gently. Serve warm or at room temperature.
Wraps and Handheld Lunches
Using gluten-free wraps, lettuce cups, or high-protein bread alternatives makes these lunches portable and satisfying.
11. Classic Chicken Salad Lettuce Wraps
A low-carb, high-protein classic that swaps mayo for Greek yogurt to boost the protein content even further.
Ingredients:
1 cup cooked chicken breast, shredded or finely diced
1/4 cup plain Greek yogurt
1 tablespoon Dijon mustard
1/4 cup celery, finely diced
1 tablespoon fresh dill, chopped
Salt and black pepper to taste
4 large butter lettuce or romaine leaves
Instructions:
In a medium bowl, combine the shredded chicken, plain Greek yogurt, Dijon mustard, diced celery, and fresh dill.
Mix thoroughly until the chicken is evenly coated. Season with salt and black pepper to taste.
Wash and dry the lettuce leaves carefully to avoid tearing them.
Spoon the chicken salad mixture evenly into the center of each lettuce leaf.
Serve immediately or pack the chicken salad separately from the lettuce leaves if taking it to go.
12. Turkey and Hummus Gluten-Free Wrap
A quick and easy wrap that utilizes store-bought gluten-free tortillas and protein-rich hummus.
Ingredients:
1 large gluten-free tortilla or wrap
2 tablespoons high-protein hummus
4 slices deli turkey breast (ensure it is gluten-free)
1/4 cup fresh spinach or mixed greens
2 slices tomato
1 slice provolone or Swiss cheese (optional)
Instructions:
Lay the gluten-free tortilla flat on a clean surface.
Spread the hummus evenly over the center of the tortilla, leaving a small border around the edges.
Layer the deli turkey slices, fresh spinach, tomato slices, and cheese over the hummus.
Fold the sides of the tortilla inward, then roll it up tightly from the bottom to form a wrap.
Slice in half diagonally and serve.
13. Egg Salad Stuffed Bell Peppers
Using bell peppers instead of bread adds crunch, vitamins, and keeps the meal entirely gluten-free.
Ingredients:
4 hard-boiled eggs, peeled and chopped
2 tablespoons plain Greek yogurt or avocado oil mayonnaise
1 teaspoon yellow mustard
1 tablespoon fresh chives, chopped
Salt, pepper, and paprika to taste
2 medium bell peppers (any color), halved and seeded
Instructions:
In a bowl, mash the chopped hard-boiled eggs with a fork.
Stir in the Greek yogurt, yellow mustard, fresh chives, salt, pepper, and paprika until well combined.
Spoon the egg salad mixture generously into the hollowed-out bell pepper halves.
Garnish with an extra sprinkle of paprika or fresh chives.
Serve chilled.
14. Smoked Salmon and Cream Cheese Cucumber Subs
A refreshing, no-cook lunch that feels elegant but takes only minutes to prepare.
Ingredients:
1 large English cucumber
4 oz smoked salmon, thinly sliced
2 tablespoons whipped cream cheese or dairy-free alternative
1 tablespoon fresh dill, chopped
1 teaspoon lemon juice
Everything bagel seasoning (ensure it is gluten-free)
Instructions:
Cut the English cucumber in half crosswise, then slice each half lengthwise to create four “sub” buns.
Use a spoon to carefully scoop out the seeds from the center of each cucumber piece, creating a hollow channel.
In a small bowl, mix the cream cheese, fresh dill, and lemon juice until smooth.
Spread the cream cheese mixture into the hollowed channels of the cucumber slices.
Layer the smoked salmon over the cream cheese.
Sprinkle generously with everything bagel seasoning and serve immediately.
15. Spicy Buffalo Chicken Collard Wraps
Collard greens are sturdy and make excellent, nutrient-dense wraps for spicy, high-protein fillings.
Ingredients:
1 cup cooked chicken breast, shredded
2 tablespoons buffalo sauce (check label for gluten-free)
1 tablespoon plain Greek yogurt or ranch dressing
1/4 cup shredded carrots
1/4 cup celery, thinly sliced
2 large collard green leaves, stems trimmed and blanched
Instructions:
In a bowl, toss the shredded chicken with the buffalo sauce and Greek yogurt until fully coated.
Lay the blanched collard green leaves flat on a cutting board.
Place half of the buffalo chicken mixture in the center of each leaf.
Top with the shredded carrots and sliced celery.
Fold the sides of the collard leaf inward and roll tightly, similar to a burrito.
Slice in half and serve.
Comforting Soups and Stews
Soups are fantastic for meal prep. They freeze well and can be packed with protein-rich legumes and meats.
16. High-Protein Lentil and Vegetable Soup
A hearty, warming soup that provides a massive dose of plant-based protein and fiber.
Ingredients:
1 cup dry green or brown lentils, rinsed
4 cups low-sodium vegetable or chicken broth
1 cup diced carrots
1 cup diced celery
1/2 cup diced onion
2 cloves garlic, minced
1 can (14.5 oz) diced tomatoes, undrained
1 teaspoon dried thyme
1 teaspoon dried oregano
1 tablespoon olive oil
Salt and pepper to taste
Instructions:
Heat the olive oil in a large pot or Dutch oven over medium heat.
Add the diced carrots, celery, and onion. Sauté for 5-7 minutes until the vegetables are softened.
Stir in the minced garlic, dried thyme, and dried oregano, cooking for 1 more minute until fragrant.
Add the rinsed lentils, diced tomatoes (with their juices), and broth to the pot.
Bring the soup to a boil, then reduce the heat to low, cover, and simmer for 25-30 minutes, or until the lentils are tender.
Season with salt and pepper to taste before serving hot.
17. Quick Chicken and White Bean Chili
A faster, lighter take on traditional chili that uses white beans and shredded chicken for a protein boost.
Ingredients:
1 cup cooked chicken breast, shredded
1 can (15 oz) Cannellini or Great Northern beans, rinsed and drained
1 cup low-sodium chicken broth
1/2 cup salsa verde (green salsa)
1/2 teaspoon ground cumin
1/2 teaspoon chili powder
1 tablespoon olive oil
Fresh cilantro and lime wedges for garnish
Instructions:
Heat the olive oil in a medium saucepan over medium heat.
Add the shredded chicken, rinsed white beans, chicken broth, salsa verde, cumin, and chili powder.
Stir well to combine and bring the mixture to a gentle simmer.
Let the chili simmer uncovered for 10-15 minutes to allow the flavors to meld and the liquid to reduce slightly.
Ladle into bowls and garnish with fresh cilantro and a squeeze of lime juice.
18. Creamy Tomato and Red Lentil Soup
Red lentils break down when cooked, naturally thickening the soup and adding hidden protein.
Ingredients:
1/2 cup dry red lentils, rinsed
1 can (28 oz) crushed tomatoes
2 cups vegetable broth
1/2 cup coconut milk (canned, full-fat)
1/2 cup chopped onion
2 cloves garlic, minced
1 tablespoon olive oil
1 teaspoon smoked paprika
Salt and pepper to taste
Instructions:
Heat the olive oil in a large pot over medium heat. Add the chopped onion and sauté until translucent, about 5 minutes.
Add the minced garlic and smoked paprika, cooking for 1 minute.
Pour in the crushed tomatoes, vegetable broth, and rinsed red lentils.
Bring to a boil, then reduce heat, cover, and simmer for 20 minutes until the lentils are very soft.
Use an immersion blender to puree the soup until smooth and creamy.
Stir in the coconut milk and season with salt and pepper. Serve warm.
19. Beef and Cabbage Detox Soup
A low-carb, high-protein soup that is incredibly filling and packed with nutrient-dense cabbage.
Ingredients:
1/2 lb lean ground beef
4 cups beef broth
2 cups shredded green cabbage
1 can (14.5 oz) diced tomatoes
1/2 cup diced onion
1 teaspoon garlic powder
1 teaspoon Italian seasoning
Salt and pepper to taste
Instructions:
In a large pot, brown the lean ground beef over medium-high heat, breaking it apart as it cooks. Drain any excess fat.
Add the diced onion, garlic powder, and Italian seasoning to the beef. Cook for 3 minutes.
Stir in the shredded cabbage, diced tomatoes, and beef broth.
Bring the soup to a boil, then reduce the heat to low and simmer for 15-20 minutes until the cabbage is tender.
Season with salt and pepper to taste. Serve hot.
20. Turkey Sausage and Kale Soup
Spicy turkey sausage provides robust flavor and high protein, while kale adds essential vitamins.
Heat the olive oil in a large pot over medium heat. Add the turkey sausage and diced onion.
Cook until the sausage is browned and crumbled, and the onions are soft.
Pour in the chicken broth and rinsed white beans. Bring to a simmer.
Stir in the chopped kale and red pepper flakes.
Simmer for 10 minutes until the kale is wilted and tender. Serve hot.
More Quick Lunch Ideas
21. Tuna Salad Lettuce Wraps
A classic, no-fuss lunch that is ready in minutes and requires zero cooking.
Ingredients:
2 cans (5 oz each) white albacore tuna in water, drained
2 tablespoons plain Greek yogurt or avocado oil mayonnaise
1 teaspoon Dijon mustard
1/4 cup celery, finely diced
1 tablespoon fresh lemon juice
Salt and pepper to taste
4 large romaine or butter lettuce leaves
Instructions:
In a medium bowl, flake the drained tuna with a fork.
Add the Greek yogurt, Dijon mustard, diced celery, and lemon juice. Mix well.
Season with salt and pepper to taste.
Spoon the tuna salad into the center of each lettuce leaf.
Fold the sides of the lettuce inward and eat like a taco. Serve immediately.
22. Quinoa and Black Bean Burrito Bowl
A fully plant-based, high-protein bowl that is both filling and deeply flavorful.
Ingredients:
1 cup cooked quinoa
1/2 cup black beans, rinsed and drained
1/4 cup corn kernels
1/4 cup diced red onion
1/4 cup diced tomato
1/4 avocado, sliced
1 tablespoon fresh lime juice
1 tablespoon fresh cilantro
1/2 teaspoon cumin
Instructions:
In a serving bowl, place the cooked quinoa as the base.
Top with the rinsed black beans, corn, diced red onion, and diced tomato.
Arrange the sliced avocado on top.
Drizzle with fresh lime juice and sprinkle with cumin and fresh cilantro.
Toss gently before eating.
23. Shrimp Fried Cauliflower Rice
A low-carb, high-protein twist on classic fried rice using cauliflower rice.
Ingredients:
1/2 lb raw shrimp, peeled and deveined
2 cups cauliflower rice (fresh or frozen)
1/4 cup frozen peas and carrots
2 large eggs, beaten
2 tablespoons gluten-free tamari
1 teaspoon sesame oil
1 tablespoon olive oil
2 cloves garlic, minced
Instructions:
Heat the olive oil in a large skillet or wok over medium-high heat. Add the shrimp and cook for 2 minutes per side until pink. Remove and set aside.
In the same skillet, add the minced garlic and cook for 30 seconds. Add the cauliflower rice and frozen peas and carrots.
Stir-fry for 3-4 minutes until the cauliflower rice is tender.
Push the cauliflower rice to the sides of the pan. Pour the beaten eggs into the center and scramble them until cooked through.
Mix the scrambled eggs into the cauliflower rice. Add the cooked shrimp back to the pan.
Drizzle the tamari and sesame oil over the top. Toss everything together and serve hot.
24. Chicken and Avocado Salad
A creamy, satisfying salad that uses mashed avocado instead of mayonnaise for a healthier fat profile.
Ingredients:
1 cup cooked chicken breast, shredded
1 ripe avocado, mashed
1 tablespoon fresh lime juice
1/4 cup cherry tomatoes, halved
2 tablespoons red onion, finely diced
1 tablespoon fresh cilantro, chopped
Salt and pepper to taste
Instructions:
In a medium bowl, mash the ripe avocado with the fresh lime juice until smooth.
Add the shredded chicken, cherry tomatoes, red onion, and fresh cilantro.
Stir gently until everything is combined. Season with salt and pepper.
Serve over mixed greens, in lettuce cups, or with gluten-free crackers.
25. Egg Drop Soup
A simple, comforting, and surprisingly high-protein soup that comes together in under 10 minutes.
Ingredients:
4 cups low-sodium chicken broth
3 large eggs, beaten
2 tablespoons gluten-free tamari
1 teaspoon sesame oil
1/2 teaspoon ground ginger
2 green onions, thinly sliced
Instructions:
In a medium saucepan, bring the chicken broth, tamari, sesame oil, and ground ginger to a gentle boil over medium heat.
Slowly pour the beaten eggs into the boiling broth in a thin, steady stream while stirring the broth in a circular motion with a fork. This creates the characteristic egg ribbons.
Remove the soup from the heat immediately after adding the eggs.
Ladle into bowls and garnish with sliced green onions.
26. Smoked Salmon and Quinoa Power Bowl
A nutrient-dense bowl that combines the omega-3 richness of smoked salmon with the complete protein of quinoa.
Ingredients:
1 cup cooked quinoa
3 oz smoked salmon, flaked
1/4 cup cucumber, diced
1/4 cup cherry tomatoes, halved
1 tablespoon capers
1 tablespoon fresh dill, chopped
1 tablespoon lemon juice
1 teaspoon olive oil
Instructions:
Place the cooked quinoa in a serving bowl.
Arrange the flaked smoked salmon, diced cucumber, and cherry tomatoes over the quinoa.
Scatter the capers and fresh dill over the top.
Drizzle with fresh lemon juice and olive oil.
Toss gently and serve immediately or refrigerate until ready to eat.
Conclusion
Finding a lunch that is both gluten-free and high in protein doesn’t have to be a daily struggle. By incorporating ingredients like chicken, tuna, lentils, quinoa, and lean meats, you can create a wide variety of delicious and satisfying midday meals. Whether you prefer vibrant salads, hearty bowls, comforting soups, or quick wraps, these 25+ recipes offer something for everyone. Meal prepping a few of these options on the weekend can ensure you always have a nutritious, protein-packed lunch ready to fuel your afternoon.
After a long day, sitting down to a dinner that is both satisfying and aligned with your nutritional goals is incredibly rewarding. For those following a gluten-free lifestyle, ensuring that your evening meal is also high in protein is crucial for muscle recovery, satiety, and overall health. A high-protein dinner helps stabilize blood sugar overnight and prevents late-night snacking.
This guide provides over 25 gluten-free and high-protein dinner recipes. From quick sheet pan meals and comforting casseroles to elegant seafood dishes and hearty beef stir-fries, these recipes are designed to be flavorful, easy to prepare, and completely free of gluten. Each recipe includes a full list of ingredients and step-by-step instructions.
Poultry Dinners
Chicken and turkey are incredibly versatile, lean sources of protein that form the base of many quick and healthy dinners.
1. Baked Lemon Herb Chicken Breasts
A simple, elegant, and incredibly juicy chicken recipe that pairs perfectly with roasted vegetables or a side salad.
Ingredients:
4 boneless, skinless chicken breasts (about 6 oz each)
2 tablespoons olive oil
2 tablespoons fresh lemon juice
1 teaspoon lemon zest
2 cloves garlic, minced
1 teaspoon dried oregano
1 teaspoon dried thyme
1/2 teaspoon salt
1/4 teaspoon black pepper
Instructions:
Preheat your oven to 400°F (200°C). Lightly grease a baking dish.
In a small bowl, whisk together the olive oil, lemon juice, lemon zest, minced garlic, oregano, thyme, salt, and pepper.
Place the chicken breasts in the prepared baking dish.
Pour the lemon herb marinade over the chicken, turning the breasts to ensure they are evenly coated.
Bake for 20-25 minutes, or until the internal temperature of the chicken reaches 165°F (74°C).
Let the chicken rest for 5 minutes before slicing and serving.
2. Ground Turkey Stuffed Zucchini Boats
A low-carb, high-protein dinner that uses hollowed-out zucchini as a vessel for savory, seasoned ground turkey.
Ingredients:
4 medium zucchinis, halved lengthwise
1 lb lean ground turkey
1/2 cup diced onion
1 can (14.5 oz) diced tomatoes, drained
1 teaspoon Italian seasoning
1/2 teaspoon garlic powder
1/2 cup shredded mozzarella cheese (ensure it is gluten-free)
1 tablespoon olive oil
Salt and pepper to taste
Instructions:
Preheat your oven to 375°F (190°C).
Use a spoon to scoop out the center of each zucchini half, leaving a 1/4-inch thick shell. Place the zucchini boats in a baking dish.
Heat the olive oil in a large skillet over medium heat. Add the diced onion and cook until soft.
Add the ground turkey to the skillet, breaking it apart and cooking until browned. Drain any excess fat.
Stir in the diced tomatoes, Italian seasoning, garlic powder, salt, and pepper. Simmer for 5 minutes.
Spoon the turkey mixture evenly into the zucchini boats.
Top each boat with shredded mozzarella cheese.
Bake for 20-25 minutes until the zucchini is tender and the cheese is melted and bubbly.
3. Chicken and Broccoli Stir-Fry
A classic takeout dish made healthier at home, using gluten-free tamari instead of traditional soy sauce.
1 teaspoon arrowroot powder (or cornstarch) mixed with 1 tablespoon water
Instructions:
In a small bowl, whisk together the tamari, honey, rice vinegar, sesame oil, garlic, and ginger to make the sauce.
Heat the olive oil in a large wok or skillet over medium-high heat.
Add the sliced chicken and cook for 5-7 minutes until browned and cooked through. Remove the chicken from the pan and set aside.
Add the broccoli florets to the pan with a splash of water. Cover and steam for 3-4 minutes until tender-crisp.
Return the chicken to the pan. Pour the sauce over the chicken and broccoli.
Stir in the arrowroot slurry and cook for 1-2 minutes until the sauce thickens and coats the ingredients. Serve hot.
4. Turkey Meatballs with Zucchini Noodles
A lighter take on spaghetti and meatballs, packed with protein and hidden vegetables.
Ingredients:
1 lb ground turkey
1/4 cup almond flour
1 large egg
1/4 cup grated Parmesan cheese
1 teaspoon garlic powder
1 teaspoon dried basil
1/2 teaspoon salt
2 cups gluten-free marinara sauce
4 medium zucchinis, spiralized into noodles (zoodles)
Instructions:
Preheat your oven to 400°F (200°C). Line a baking sheet with parchment paper.
In a large bowl, combine the ground turkey, almond flour, egg, Parmesan cheese, garlic powder, basil, and salt. Mix gently.
Form the mixture into 1.5-inch meatballs and place them on the baking sheet.
Bake for 15-20 minutes until cooked through and lightly browned.
While the meatballs bake, heat the marinara sauce in a large skillet over medium heat.
Add the baked meatballs to the sauce and simmer for 5 minutes.
In a separate skillet, quickly sauté the zucchini noodles for 2-3 minutes until just warmed through (do not overcook).
Serve the meatballs and sauce over the warm zucchini noodles.
5. Sheet Pan Chicken Fajitas
A virtually hands-off dinner that requires minimal cleanup and delivers massive flavor.
Ingredients:
1 lb chicken breast, sliced into strips
1 red bell pepper, sliced
1 green bell pepper, sliced
1 large onion, sliced
2 tablespoons olive oil
1 tablespoon chili powder
1 teaspoon cumin
1/2 teaspoon smoked paprika
1/2 teaspoon garlic powder
Salt and pepper to taste
Gluten-free tortillas or lettuce cups for serving
Instructions:
Preheat your oven to 400°F (200°C).
Place the sliced chicken, bell peppers, and onion on a large sheet pan.
Drizzle with olive oil and sprinkle the chili powder, cumin, smoked paprika, garlic powder, salt, and pepper evenly over the top.
Toss everything together directly on the pan until well coated, then spread into a single layer.
Roast for 20-25 minutes, tossing halfway through, until the chicken is cooked and the vegetables are tender and slightly charred.
Serve immediately with gluten-free tortillas or lettuce cups.
Seafood Dinners
Fish and shellfish are excellent sources of lean protein and heart-healthy omega-3 fatty acids.
6. Sheet Pan Salmon and Asparagus
A classic, elegant dinner that cooks entirely on one pan in under 20 minutes.
Ingredients:
4 salmon fillets (about 5 oz each)
1 bunch asparagus, tough ends trimmed
2 tablespoons olive oil
2 cloves garlic, minced
1 lemon, sliced into rounds
Salt and freshly ground black pepper
Fresh dill for garnish
Instructions:
Preheat your oven to 400°F (200°C). Line a baking sheet with parchment paper.
Place the salmon fillets in the center of the baking sheet and arrange the trimmed asparagus around them.
Drizzle the olive oil evenly over the salmon and asparagus.
Sprinkle the minced garlic, salt, and pepper over everything.
Place 1-2 lemon slices on top of each salmon fillet.
Roast for 12-15 minutes, or until the salmon flakes easily with a fork and the asparagus is tender.
Garnish with fresh dill and serve.
7. Spicy Shrimp Tacos with Cabbage Slaw
Quick-cooking shrimp makes these tacos a perfect weeknight dinner option.
Ingredients:
1 lb raw shrimp, peeled and deveined
1 tablespoon olive oil
1 teaspoon chili powder
1/2 teaspoon cumin
1/4 teaspoon cayenne pepper (optional)
2 cups shredded red cabbage
2 tablespoons lime juice
1 tablespoon plain Greek yogurt
Salt to taste
8 small gluten-free corn tortillas
Instructions:
In a medium bowl, toss the shrimp with the chili powder, cumin, and cayenne pepper.
In a separate bowl, mix the shredded red cabbage with the lime juice, Greek yogurt, and a pinch of salt to create the slaw. Set aside.
Heat the olive oil in a large skillet over medium-high heat.
Add the seasoned shrimp and cook for 2-3 minutes per side until pink and opaque.
Warm the gluten-free corn tortillas in a dry skillet or microwave.
Assemble the tacos by placing a spoonful of cabbage slaw on each tortilla, followed by the cooked shrimp.
8. Baked Cod with Cherry Tomatoes and Olives
A Mediterranean-inspired dish that is light, flavorful, and very high in protein.
Ingredients:
4 cod fillets (about 6 oz each)
1 pint cherry tomatoes, halved
1/2 cup Kalamata olives, pitted and halved
2 tablespoons olive oil
1 tablespoon balsamic vinegar
2 cloves garlic, minced
1 teaspoon dried oregano
Salt and pepper to taste
Instructions:
Preheat your oven to 400°F (200°C). Lightly grease a baking dish.
Place the cod fillets in the baking dish and season with salt and pepper.
In a bowl, toss the halved cherry tomatoes, Kalamata olives, olive oil, balsamic vinegar, minced garlic, and dried oregano.
Pour the tomato and olive mixture over and around the cod fillets.
Bake for 15-18 minutes, or until the fish is opaque and flakes easily.
Serve hot, spooning the roasted tomatoes and juices over the fish.
9. Tuna and White Bean Stuffed Peppers
Using canned tuna makes this a budget-friendly, high-protein dinner that requires minimal prep.
Ingredients:
4 large bell peppers (any color), tops cut off and seeded
2 cans (5 oz each) solid white tuna in water, drained
1 can (15 oz) Cannellini beans, rinsed and drained
1/2 cup diced red onion
1/4 cup fresh parsley, chopped
2 tablespoons olive oil
1 tablespoon lemon juice
1/2 cup shredded mozzarella cheese
Salt and pepper to taste
Instructions:
Preheat your oven to 375°F (190°C).
Bring a large pot of water to a boil. Blanch the hollowed-out bell peppers for 3-4 minutes to soften them slightly. Drain and stand them upright in a baking dish.
In a large bowl, mix the drained tuna, Cannellini beans, red onion, parsley, olive oil, lemon juice, salt, and pepper.
Stuff the tuna and bean mixture evenly into the bell peppers.
Top each pepper with shredded mozzarella cheese.
Bake for 20 minutes until the peppers are tender and the cheese is melted and golden.
10. Garlic Butter Scallops with Zucchini Noodles
Scallops feel luxurious but are incredibly fast to cook and pack a significant protein punch.
Ingredients:
1 lb large sea scallops, tough side muscle removed
2 tablespoons butter or ghee
3 cloves garlic, minced
1 tablespoon fresh lemon juice
1/4 cup fresh parsley, chopped
Salt and black pepper to taste
4 medium zucchinis, spiralized into noodles
Instructions:
Pat the scallops completely dry with paper towels and season with salt and pepper.
Heat 1 tablespoon of butter in a large skillet over medium-high heat until hot.
Add the scallops in a single layer. Sear for 2 minutes per side until a golden crust forms. Remove the scallops from the pan and set aside.
In the same skillet, melt the remaining 1 tablespoon of butter. Add the minced garlic and cook for 30 seconds until fragrant.
Stir in the lemon juice and chopped parsley.
Add the zucchini noodles to the skillet and toss for 1-2 minutes until just warmed through.
Return the scallops to the pan, toss gently with the zoodles and garlic butter sauce, and serve immediately.
Beef and Pork Dinners
Lean cuts of beef and pork are excellent sources of high-quality protein, iron, and B vitamins.
11. Gluten-Free Beef and Broccoli Stir-Fry
A classic takeout favorite made healthier and completely gluten-free using tamari.
Ingredients:
1 lb flank steak, thinly sliced against the grain
3 cups broccoli florets
2 tablespoons olive oil or avocado oil
1/4 cup gluten-free tamari (or coconut aminos)
2 tablespoons beef broth
1 tablespoon honey or maple syrup
2 cloves garlic, minced
1 teaspoon fresh ginger, grated
1 tablespoon arrowroot powder (or cornstarch) mixed with 1 tablespoon water
Instructions:
In a small bowl, whisk together the tamari, beef broth, honey, minced garlic, and grated ginger to create the sauce.
Heat 1 tablespoon of oil in a large wok or skillet over medium-high heat.
Add the sliced steak in a single layer and sear for 2-3 minutes per side until browned. Remove the steak and set aside.
Add the remaining 1 tablespoon of oil to the skillet, followed by the broccoli florets. Sauté for 3-4 minutes until tender-crisp.
Return the steak to the skillet and pour the sauce over the top.
Stir in the arrowroot slurry and cook for 1-2 minutes until the sauce thickens and coats the beef and broccoli. Serve hot.
12. Classic Meatloaf (Gluten-Free)
Using almond flour or gluten-free oats instead of breadcrumbs keeps this comforting classic high in protein and free of gluten.
Ingredients:
1.5 lbs lean ground beef (90% lean or higher)
1/2 cup almond flour or certified gluten-free quick oats
1 large egg
1/2 cup onion, finely diced
1/4 cup fresh parsley, chopped
1 teaspoon garlic powder
1 teaspoon Italian seasoning
1/2 teaspoon salt
1/4 teaspoon black pepper
1/2 cup gluten-free ketchup or tomato sauce (divided)
Instructions:
Preheat your oven to 375°F (190°C). Lightly grease a loaf pan or line a baking sheet with parchment paper.
In a large bowl, combine the ground beef, almond flour, egg, diced onion, parsley, garlic powder, Italian seasoning, salt, pepper, and 1/4 cup of the ketchup.
Mix gently with your hands until just combined; do not overmix.
Form the mixture into a loaf shape and place it in the prepared pan or on the baking sheet.
Spread the remaining 1/4 cup of ketchup evenly over the top of the meatloaf.
Bake for 45-55 minutes, or until the internal temperature reaches 160°F (71°C). Let it rest for 10 minutes before slicing.
13. Pork Tenderloin with Roasted Apples and Sweet Potatoes
Pork tenderloin is as lean as chicken breast and pairs beautifully with sweet, roasted fruit and root vegetables.
Ingredients:
1 pork tenderloin (about 1.5 lbs)
2 medium sweet potatoes, peeled and cubed
2 apples (like Gala or Honeycrisp), cored and cubed
2 tablespoons olive oil
1 tablespoon fresh rosemary, chopped
1 teaspoon garlic powder
1/2 teaspoon cinnamon
Salt and pepper to taste
Instructions:
Preheat your oven to 400°F (200°C). Line a large baking sheet with parchment paper.
Rub the pork tenderloin with 1 tablespoon of olive oil, garlic powder, chopped rosemary, salt, and pepper. Place it in the center of the baking sheet.
In a bowl, toss the cubed sweet potatoes and apples with the remaining 1 tablespoon of olive oil, cinnamon, salt, and pepper.
Arrange the sweet potatoes and apples around the pork tenderloin on the baking sheet.
Roast for 25-30 minutes, or until the pork reaches an internal temperature of 145°F (63°C) and the vegetables are tender.
Let the pork rest for 5 minutes before slicing. Serve with the roasted apples and sweet potatoes.
14. Ground Beef and Cabbage Skillet
A quick, budget-friendly, and incredibly filling one-pan meal that is naturally low in carbs and high in protein.
Ingredients:
1 lb lean ground beef
1 small head of green cabbage, cored and shredded
1/2 cup onion, chopped
2 cloves garlic, minced
1 can (14.5 oz) diced tomatoes, undrained
1 tablespoon olive oil
1 teaspoon smoked paprika
1/2 teaspoon salt
1/4 teaspoon black pepper
Instructions:
Heat the olive oil in a large skillet or Dutch oven over medium-high heat.
Add the chopped onion and minced garlic, sautéing for 2-3 minutes until fragrant.
Add the ground beef, breaking it apart with a spatula, and cook until browned. Drain any excess fat.
Stir in the shredded cabbage, diced tomatoes (with juices), smoked paprika, salt, and pepper.
Reduce the heat to medium-low, cover, and simmer for 15-20 minutes, stirring occasionally, until the cabbage is very tender.
Taste and adjust seasoning if necessary before serving.
15. Steak Fajita Bowls
All the sizzling flavor of fajitas without the need for tortillas, served over a high-protein quinoa base.
Ingredients:
1 lb flank or skirt steak, sliced into thin strips
1 red bell pepper, sliced
1 green bell pepper, sliced
1 large onion, sliced
2 tablespoons olive oil
1 tablespoon chili powder
1 teaspoon cumin
1/2 teaspoon garlic powder
2 cups cooked quinoa (ensure it is gluten-free)
Salsa and avocado for topping
Instructions:
In a bowl, toss the steak strips with 1 tablespoon of olive oil, chili powder, cumin, and garlic powder.
Heat the remaining 1 tablespoon of olive oil in a large skillet over medium-high heat.
Add the sliced bell peppers and onion, sautéing for 5-7 minutes until softened and slightly charred. Remove from the skillet and set aside.
In the same skillet, add the seasoned steak strips in a single layer. Sear for 2-3 minutes per side until browned and cooked to your liking.
Return the vegetables to the skillet and toss with the steak for 1 minute to combine flavors.
Divide the cooked quinoa among serving bowls and top with the steak fajita mixture. Garnish with salsa and sliced avocado.
Plant-Based and Vegetarian Dinners
You don’t need meat to have a high-protein dinner. Tofu, lentils, beans, and quinoa are excellent gluten-free, plant-based protein sources.
16. High-Protein Lentil Shepherd’s Pie
A comforting, meatless version of the classic dish, using protein-rich lentils and a creamy potato topping.
Ingredients:
1 cup dry brown or green lentils, rinsed
3 cups vegetable broth
1 cup carrots, diced
1 cup frozen peas
1/2 cup onion, chopped
2 tablespoons tomato paste
1 teaspoon dried thyme
4 large potatoes, peeled and cubed
1/4 cup unsweetened almond milk or regular milk
2 tablespoons butter or vegan butter
Salt and pepper to taste
Instructions:
In a medium saucepan, bring the lentils and vegetable broth to a boil. Reduce heat, cover, and simmer for 25-30 minutes until the lentils are tender and the liquid is absorbed.
While the lentils cook, boil the cubed potatoes in a separate pot of salted water until fork-tender (about 15 minutes). Drain and mash with the milk, butter, salt, and pepper until smooth.
Preheat your oven to 400°F (200°C).
In a large oven-safe skillet, sauté the diced carrots and onion until soft. Stir in the frozen peas, tomato paste, dried thyme, and cooked lentils. Cook for 2-3 minutes.
Spread the mashed potatoes evenly over the lentil mixture in the skillet.
Bake for 15-20 minutes until the potato topping is lightly golden and the filling is bubbly.
17. Crispy Tofu and Vegetable Stir-Fry
Extra-firm tofu provides a substantial amount of protein and absorbs the savory, gluten-free sauce perfectly.
Ingredients:
1 block (14 oz) extra-firm tofu, pressed and cubed
Toss the pressed and cubed tofu in the cornstarch until evenly coated.
Heat 1 tablespoon of oil in a large skillet over medium-high heat. Add the tofu and pan-fry for 5-7 minutes, turning occasionally, until crispy and golden on all sides. Remove and set aside.
In a small bowl, whisk together the tamari, maple syrup, rice vinegar, sesame oil, and minced garlic.
Add the remaining 1 tablespoon of oil to the skillet, followed by the mixed vegetables. Sauté for 4-5 minutes until tender-crisp.
Return the crispy tofu to the skillet and pour the sauce over everything.
Toss well and cook for 1-2 minutes until the sauce thickens and coats the tofu and vegetables. Serve hot.
18. Black Bean and Quinoa Stuffed Peppers
A colorful, nutrient-dense dinner that combines two excellent sources of plant-based protein.
Ingredients:
4 large bell peppers (any color), tops cut off and seeded
1 cup cooked quinoa
1 can (15 oz) black beans, rinsed and drained
1 cup corn kernels (canned or frozen)
1/2 cup salsa
1 teaspoon cumin
1 teaspoon chili powder
1/2 cup shredded cheddar or vegan cheese
Fresh cilantro for garnish
Instructions:
Preheat your oven to 375°F (190°C).
Bring a large pot of water to a boil. Blanch the hollowed-out bell peppers for 3-4 minutes to soften them slightly. Drain and stand them upright in a baking dish.
In a large bowl, mix the cooked quinoa, rinsed black beans, corn, salsa, cumin, and chili powder.
Stuff the quinoa and bean mixture evenly into the bell peppers.
Top each pepper with shredded cheese.
Bake for 20-25 minutes until the peppers are tender and the cheese is melted. Garnish with fresh cilantro before serving.
19. Chickpea and Spinach Curry
A fast, flavorful, and warming curry that uses pantry staples and delivers a high amount of protein and fiber.
Ingredients:
2 cans (15 oz each) chickpeas, rinsed and drained
1 can (14.5 oz) diced tomatoes, undrained
1 can (13.5 oz) full-fat coconut milk
4 cups fresh baby spinach
1/2 cup onion, chopped
2 tablespoons curry powder
1 teaspoon turmeric
1 tablespoon olive oil
Salt to taste
Instructions:
Heat the olive oil in a large pot or Dutch oven over medium heat. Add the chopped onion and sauté until soft, about 5 minutes.
Stir in the curry powder and turmeric, cooking for 1 minute until fragrant.
Add the rinsed chickpeas, diced tomatoes (with juices), and coconut milk. Stir well to combine.
Bring the curry to a simmer, reduce the heat to low, and let it cook for 15 minutes to allow the flavors to meld.
Stir in the fresh baby spinach and cook for 2-3 minutes until wilted.
Season with salt to taste and serve hot, optionally over gluten-free grains like quinoa or brown rice.
20. Edamame and Soba Noodle Salad
Soba noodles made from 100% buckwheat are naturally gluten-free and higher in protein than traditional pasta.
Ingredients:
8 oz 100% buckwheat soba noodles (check label to ensure no wheat is added)
1 cup shelled edamame, steamed
1 cup red cabbage, shredded
1/2 cup carrots, julienned
3 tablespoons gluten-free tamari
2 tablespoons peanut butter or almond butter
1 tablespoon rice vinegar
1 teaspoon sesame oil
1 teaspoon sriracha (optional)
1 tablespoon sesame seeds
Instructions:
Cook the buckwheat soba noodles according to the package instructions. Drain and rinse thoroughly under cold water to stop the cooking process and remove excess starch.
In a large bowl, combine the cooked noodles, steamed edamame, shredded red cabbage, and julienned carrots.
In a small bowl, whisk together the tamari, peanut butter, rice vinegar, sesame oil, and sriracha until smooth.
Pour the peanut dressing over the noodle salad and toss until everything is evenly coated.
Sprinkle with sesame seeds and serve chilled or at room temperature.
Quick and Easy Weeknight Dinners
When time is short, these high-protein, gluten-free meals can be on the table in 30 minutes or less.
21. Turkey Sausage and Pepper Skillet
A one-pan wonder that uses pre-cooked, gluten-free turkey sausage for a lightning-fast dinner.
Ingredients:
1 lb fully cooked gluten-free turkey sausage, sliced into rounds
2 bell peppers (any color), sliced
1 large onion, sliced
1 tablespoon olive oil
1 teaspoon Italian seasoning
1/2 teaspoon garlic powder
Salt and pepper to taste
Instructions:
Heat the olive oil in a large skillet over medium-high heat.
Add the sliced bell peppers and onion, sautéing for 5-7 minutes until softened and slightly charred.
Add the sliced turkey sausage to the skillet.
Sprinkle the Italian seasoning, garlic powder, salt, and pepper over the mixture.
Cook for another 5 minutes, stirring frequently, until the sausage is heated through and browned on the edges.
Serve hot, either on its own or over gluten-free pasta or rice.
22. High-Protein Quinoa Mac and Cheese
A healthier, gluten-free twist on a childhood favorite, using quinoa instead of pasta and adding hidden protein.
Ingredients:
1 cup uncooked quinoa, rinsed
2 cups chicken or vegetable broth
1 cup shredded sharp cheddar cheese
1/2 cup plain Greek yogurt
1/4 cup milk (dairy or unsweetened almond)
1/2 teaspoon garlic powder
1/2 teaspoon dry mustard
Salt and pepper to taste
Instructions:
In a medium saucepan, bring the rinsed quinoa and broth to a boil. Reduce heat, cover, and simmer for 15 minutes until the liquid is absorbed.
Remove the saucepan from the heat and leave it covered for 5 minutes to let the quinoa fluff up.
Stir in the shredded cheddar cheese, plain Greek yogurt, milk, garlic powder, dry mustard, salt, and pepper.
Mix vigorously until the cheese is completely melted and the quinoa is coated in a creamy sauce.
Serve immediately while hot and gooey.
23. Lemon Garlic Butter Shrimp with Zucchini Noodles
Shrimp cooks in mere minutes, making this elegant, high-protein dish perfect for busy weeknights.
Ingredients:
1 lb raw shrimp, peeled and deveined
2 tablespoons butter or ghee
3 cloves garlic, minced
1 tablespoon fresh lemon juice
1/4 cup fresh parsley, chopped
4 medium zucchinis, spiralized into noodles
Salt and red pepper flakes to taste
Instructions:
Pat the shrimp dry with paper towels and season with salt and red pepper flakes.
Melt 1 tablespoon of butter in a large skillet over medium-high heat. Add the shrimp in a single layer and cook for 1-2 minutes per side until pink. Remove and set aside.
In the same skillet, melt the remaining 1 tablespoon of butter. Add the minced garlic and cook for 30 seconds until fragrant.
Stir in the lemon juice and chopped parsley.
Add the zucchini noodles to the skillet and toss for 1-2 minutes until just warmed through (do not overcook, or they will become mushy).
Return the shrimp to the pan, toss gently with the zoodles and garlic butter sauce, and serve immediately.
24. Ground Beef Taco Salad Bowls
A customizable, family-friendly dinner that is naturally gluten-free and packed with protein and fresh vegetables.
Ingredients:
1 lb lean ground beef
1 tablespoon gluten-free taco seasoning
4 cups chopped romaine lettuce
1 cup cherry tomatoes, halved
1/2 cup black beans, rinsed and drained
1/2 cup shredded cheddar cheese
1/4 cup black olives, sliced
Salsa and plain Greek yogurt for topping
Instructions:
Heat a large skillet over medium-high heat. Add the ground beef and cook until browned, breaking it apart with a spatula. Drain any excess fat.
Stir in the gluten-free taco seasoning and a splash of water. Simmer for 2-3 minutes until the beef is fully coated and the liquid has absorbed.
Divide the chopped romaine lettuce among serving bowls.
Top the lettuce with the seasoned ground beef, cherry tomatoes, black beans, shredded cheese, and black olives.
Garnish with a dollop of salsa and plain Greek yogurt (as a high-protein sour cream substitute). Serve immediately.
25. Baked Chicken Parmesan (Gluten-Free)
Using almond flour and Parmesan cheese for the breading keeps this Italian classic low-carb, gluten-free, and high in protein.
Ingredients:
4 boneless, skinless chicken breasts, pounded to an even thickness
1/2 cup almond flour
1/2 cup grated Parmesan cheese
1 teaspoon Italian seasoning
1 large egg, beaten
1 cup gluten-free marinara sauce
1 cup shredded mozzarella cheese
1 tablespoon olive oil
Instructions:
Preheat your oven to 400°F (200°C). Lightly grease a baking dish with olive oil.
In a shallow dish, mix the almond flour, grated Parmesan cheese, and Italian seasoning.
Dip each chicken breast into the beaten egg, then coat thoroughly in the almond flour mixture.
Place the breaded chicken breasts in the prepared baking dish.
Bake for 20 minutes, or until the chicken is cooked through and the coating is lightly golden.
Remove from the oven and spoon marinara sauce over each chicken breast. Top with shredded mozzarella cheese.
Return to the oven and bake for another 5-7 minutes until the cheese is melted and bubbly. Serve hot.
26. Quick Chicken and Vegetable Curry
A fast, flavorful, and warming curry that uses pantry staples and delivers a high amount of protein.
Ingredients:
1 lb chicken breast, cut into bite-sized pieces
1 can (13.5 oz) full-fat coconut milk
2 cups mixed vegetables (broccoli, bell peppers, carrots)
2 tablespoons red curry paste (ensure it is gluten-free)
1 tablespoon olive oil
1 tablespoon fish sauce (or gluten-free tamari)
1 teaspoon brown sugar or coconut sugar
Fresh basil or cilantro for garnish
Instructions:
Heat the olive oil in a large skillet or wok over medium-high heat. Add the chicken pieces and cook until browned on all sides.
Stir in the red curry paste and cook for 1 minute until fragrant.
Pour in the coconut milk, fish sauce, and brown sugar. Bring the mixture to a simmer.
Add the mixed vegetables to the skillet. Reduce the heat to medium-low, cover, and simmer for 10-15 minutes until the chicken is cooked through and the vegetables are tender.
Garnish with fresh basil or cilantro and serve hot, optionally over gluten-free grains like quinoa or rice.
Conclusion
Enjoying a high-protein, gluten-free dinner is entirely achievable with a little planning and the right ingredients. By focusing on lean meats, seafood, and plant-based proteins like tofu and lentils, you can create meals that are both deeply satisfying and nutritionally balanced. Whether you need a quick 20-minute weeknight meal or a comforting casserole for the weekend, these 25+ recipes provide a diverse array of options to keep your dinners exciting, healthy, and completely free of gluten.
Snacking is often where healthy eating plans fall apart. Many convenient, pre-packaged snacks are loaded with refined carbohydrates, sugar, and gluten, leaving you hungry again within an hour. A truly satisfying snack needs to be high in protein to stabilize blood sugar, keep you full between meals, and support muscle recovery.
For those following a gluten-free diet, finding high-protein snacks that are both safe and delicious can require a bit of creativity. This comprehensive guide provides over 25 gluten-free and high-protein snack recipes. From no-bake energy bites and homemade protein bars to savory dips and roasted nuts, these recipes are easy to prepare, highly portable, and packed with nutrition. Each recipe includes a full list of ingredients and step-by-step instructions.
No-Bake Energy Bites and Balls
Energy bites are the ultimate meal-prep snack. They require no cooking, store beautifully in the fridge or freezer, and can be customized with your favorite protein powders and nut butters.
1. Classic Peanut Butter Protein Balls
A simple, 5-ingredient recipe that tastes like a peanut butter cup but is packed with protein and fiber.
Ingredients:
1 cup certified gluten-free rolled oats
1/2 cup natural peanut butter (creamy or crunchy)
1/3 cup honey or pure maple syrup
1/4 cup vanilla or chocolate protein powder (ensure it is gluten-free)
1/4 cup mini chocolate chips (dairy-free if desired)
Instructions:
In a large mixing bowl, combine the gluten-free rolled oats, natural peanut butter, honey, and protein powder.
Stir vigorously until the mixture forms a thick, sticky dough. If the dough is too dry, add a teaspoon of water or extra honey.
Gently fold in the mini chocolate chips.
Chill the dough in the refrigerator for 15-20 minutes to make it easier to handle.
Roll the dough into 1-inch balls (you should get about 12-14 balls).
Store in an airtight container in the refrigerator for up to 2 weeks, or freeze for longer storage.
2. Almond Joy Energy Bites
Inspired by the classic candy bar, these bites use almond butter, coconut, and chocolate for a decadent but healthy snack.
Ingredients:
1 cup certified gluten-free rolled oats
1/2 cup almond butter
1/3 cup honey
1/4 cup unsweetened shredded coconut
1/4 cup chocolate protein powder
2 tablespoons sliced almonds, chopped
1 tablespoon cocoa powder
Instructions:
In a large bowl, mix the almond butter and honey until smooth.
Add the gluten-free rolled oats, shredded coconut, chocolate protein powder, chopped almonds, and cocoa powder.
Stir until all ingredients are thoroughly combined into a thick dough.
Place the bowl in the refrigerator for 15 minutes to firm up.
Scoop out tablespoon-sized portions and roll them into balls.
Roll the finished balls in extra shredded coconut if desired. Store in the fridge.
3. Lemon Coconut Protein Truffles
A bright, refreshing, and zesty snack that provides a lighter alternative to heavy chocolate or peanut butter flavors.
Ingredients:
1 cup almond flour
1/2 cup vanilla protein powder
1/4 cup unsweetened shredded coconut
1/4 cup cashew butter or macadamia nut butter
3 tablespoons honey or agave nectar
2 tablespoons fresh lemon juice
1 tablespoon lemon zest
Instructions:
In a medium bowl, whisk together the almond flour, vanilla protein powder, and shredded coconut.
In a separate small bowl, mix the cashew butter, honey, fresh lemon juice, and lemon zest until smooth.
Pour the wet ingredients into the dry ingredients and stir until a cohesive dough forms.
Roll the dough into bite-sized truffles.
Optional: Roll the truffles in extra lemon zest or shredded coconut for a beautiful finish.
Refrigerate for at least 30 minutes before eating to allow the flavors to meld.
4. Tahini Chocolate Chip Cookie Dough Bites
Tahini (sesame seed paste) provides a unique, slightly savory flavor profile and is an excellent source of plant-based protein and healthy fats.
Ingredients:
1 cup almond flour
1/2 cup tahini (well-stirred)
1/4 cup maple syrup
1/4 cup vanilla protein powder
1/4 cup dark chocolate chips
1 teaspoon vanilla extract
1/4 teaspoon sea salt
Instructions:
In a large mixing bowl, combine the tahini, maple syrup, and vanilla extract until smooth.
Add the almond flour, vanilla protein powder, and sea salt. Stir until a thick cookie dough consistency is reached.
Fold in the dark chocolate chips.
Chill the dough in the refrigerator for 10-15 minutes.
Roll into 1-inch balls and place them on a parchment-lined plate.
Store in the refrigerator or freezer.
5. Matcha Green Tea Protein Balls
Matcha provides a gentle caffeine boost and antioxidants, making these balls perfect for a mid-afternoon pick-me-up.
Ingredients:
1 cup cashew butter
1/2 cup coconut flour
1/4 cup vanilla protein powder
1/4 cup honey or maple syrup
1 tablespoon culinary-grade matcha powder
1 teaspoon vanilla extract
Instructions:
In a mixing bowl, blend the cashew butter, honey, and vanilla extract until completely smooth.
Sift in the coconut flour, vanilla protein powder, and matcha powder to prevent any lumps.
Stir the mixture until it forms a vibrant green, pliable dough.
Roll the dough into small, bite-sized balls.
Store in an airtight container in the refrigerator for up to a week.
Homemade Protein Bars
Store-bought protein bars are often expensive and filled with artificial sweeteners and sugar alcohols. Making your own ensures they are 100% gluten-free and tailored to your taste.
6. No-Bake Chocolate Peanut Butter Protein Bars
These bars are dense, chewy, and taste incredibly similar to popular store-bought brands, but with much cleaner ingredients.
Ingredients:
1 cup natural peanut butter
1/2 cup honey or brown rice syrup
1 cup chocolate or vanilla protein powder
1 cup certified gluten-free quick oats
1/4 cup unsweetened almond milk (add more if needed)
1/4 cup dark chocolate chips (for melting)
1 teaspoon coconut oil
Instructions:
Line an 8×8-inch baking pan with parchment paper, leaving an overhang for easy removal.
In a large microwave-safe bowl, gently warm the peanut butter and honey for 20-30 seconds until they are easy to stir together.
Add the protein powder and gluten-free quick oats to the bowl. Stir well. The mixture will be very dry and crumbly.
Gradually add the almond milk, 1 tablespoon at a time, using your hands to knead the dough until it holds together when squeezed.
Press the dough firmly and evenly into the prepared baking pan.
In a small bowl, melt the dark chocolate chips and coconut oil in the microwave in 15-second increments until smooth.
Drizzle or spread the melted chocolate over the top of the bars.
Refrigerate for at least 2 hours before lifting the parchment paper out of the pan and slicing into 10-12 bars.
7. Chewy Almond and Seed Protein Bars
Packed with nuts and seeds, these bars offer a fantastic crunch and a massive dose of healthy fats and protein.
Ingredients:
1 cup raw almonds, roughly chopped
1/2 cup pumpkin seeds (pepitas)
1/2 cup sunflower seeds
1/4 cup chia seeds
1/4 cup hemp hearts
1/2 cup almond butter
1/3 cup honey or maple syrup
1/4 cup unflavored or vanilla protein powder
1/2 teaspoon sea salt
Instructions:
Preheat your oven to 325°F (160°C). Line an 8×8-inch baking pan with parchment paper.
In a large bowl, combine the chopped almonds, pumpkin seeds, sunflower seeds, chia seeds, hemp hearts, and protein powder.
In a small saucepan over low heat, gently warm the almond butter, honey, and sea salt until smooth and liquid.
Pour the warm almond butter mixture over the dry ingredients and stir until everything is thoroughly coated and sticky.
Transfer the mixture to the prepared baking pan. Use a piece of parchment paper to press the mixture down very firmly and evenly.
Bake for 15-18 minutes until the edges are lightly golden.
Allow the bars to cool completely in the pan (at least 2 hours) before slicing, otherwise they will crumble.
8. Vegan Cookie Dough Protein Bars
Using chickpeas as a base might sound strange, but they blend into a perfect, high-protein cookie dough texture.
Ingredients:
1 can (15 oz) chickpeas (garbanzo beans), rinsed, drained, and patted dry
1/2 cup peanut butter or cashew butter
1/3 cup maple syrup
1/4 cup vanilla plant-based protein powder
1 teaspoon vanilla extract
1/4 teaspoon salt
1/3 cup mini chocolate chips
Instructions:
Line a loaf pan (9×5-inch) with parchment paper.
Place the rinsed and dried chickpeas, peanut butter, maple syrup, vanilla extract, and salt into a food processor.
Process until the mixture is completely smooth and creamy, scraping down the sides as needed.
Add the vanilla protein powder and pulse until just combined into a thick dough.
Remove the blade from the food processor and gently fold in the mini chocolate chips with a spatula.
Press the dough evenly into the prepared loaf pan.
Freeze for 1-2 hours until firm, then slice into bars. Keep stored in the freezer or refrigerator.
9. Crispy Rice and Peanut Butter Protein Squares
A high-protein, grown-up version of the classic crispy rice treat, made without marshmallows.
Ingredients:
3 cups gluten-free crisp brown rice cereal
1 cup natural peanut butter
1/2 cup honey or brown rice syrup
1/2 cup vanilla protein powder
1 teaspoon vanilla extract
Instructions:
Line an 8×8-inch baking pan with parchment paper.
Place the gluten-free crisp brown rice cereal in a large mixing bowl.
In a medium saucepan over low heat, gently warm the peanut butter and honey, stirring constantly until smooth and combined. Remove from heat.
Whisk the vanilla extract and vanilla protein powder into the warm peanut butter mixture until no lumps remain.
Immediately pour the peanut butter mixture over the crisp rice cereal. Use a spatula to fold gently until all the cereal is coated.
Transfer the mixture to the prepared baking pan and press down firmly.
Refrigerate for at least 1 hour before slicing into squares.
10. Baked Oatmeal Protein Bars
These bars have a softer, cake-like texture, making them perfect for a mid-morning snack with coffee or tea.
Ingredients:
2 cups certified gluten-free rolled oats
1 cup unsweetened applesauce
1/2 cup vanilla or cinnamon protein powder
1/2 cup almond milk
1/4 cup almond butter
2 large eggs
1 teaspoon cinnamon
1 teaspoon baking powder
1/2 cup raisins or dried cranberries
Instructions:
Preheat your oven to 350°F (175°C). Grease an 8×8-inch baking pan or line it with parchment paper.
In a large bowl, whisk together the applesauce, almond milk, almond butter, and eggs until smooth.
Stir in the gluten-free rolled oats, protein powder, cinnamon, and baking powder until well combined.
Fold in the raisins or dried cranberries.
Pour the batter into the prepared baking pan and smooth the top with a spatula.
Bake for 20-25 minutes, or until the center is set and the edges are lightly browned.
Let cool completely before slicing into bars. Store in an airtight container in the refrigerator.
Savory Dips and Spreads
If you prefer savory over sweet, these high-protein dips are perfect for pairing with gluten-free crackers, cucumber slices, or celery sticks.
11. High-Protein Cottage Cheese Hummus
Blending cottage cheese into traditional hummus makes it incredibly creamy and doubles the protein content.
Ingredients:
1 can (15 oz) chickpeas, rinsed and drained
1 cup full-fat or low-fat cottage cheese
1/4 cup tahini
2 tablespoons fresh lemon juice
1 clove garlic, minced
1/2 teaspoon ground cumin
1/4 teaspoon salt
1 tablespoon olive oil (for drizzling)
Paprika for garnish
Instructions:
In a food processor or high-speed blender, combine the rinsed chickpeas, cottage cheese, tahini, lemon juice, minced garlic, cumin, and salt.
Process on high for 2-3 minutes, scraping down the sides as needed, until the hummus is completely smooth and fluffy.
Taste and adjust seasoning, adding more lemon juice or salt if desired.
Transfer to a serving bowl, drizzle with olive oil, and sprinkle with paprika.
Serve with gluten-free pita chips or fresh vegetable sticks.
12. Spicy Edamame Dip
A vibrant green, plant-based dip that is packed with protein and has a kick of heat from sriracha.
Ingredients:
2 cups shelled edamame, steamed and cooled
1/4 cup fresh cilantro, packed
2 tablespoons tahini or almond butter
2 tablespoons lime juice
1 tablespoon gluten-free tamari
1 teaspoon sriracha (or to taste)
1 clove garlic
2-3 tablespoons water (to thin)
Instructions:
Place the steamed edamame, fresh cilantro, tahini, lime juice, tamari, sriracha, and garlic into a food processor.
Pulse several times to break down the edamame.
With the processor running, slowly drizzle in the water until the dip reaches your desired consistency (it will be slightly chunkier than traditional hummus).
Transfer to a bowl and serve chilled with rice crackers or snap peas.
13. Greek Yogurt Tzatziki Sauce
A classic Mediterranean sauce that doubles as a fantastic, high-protein dip for vegetables or gluten-free falafel.
Ingredients:
1 cup plain, unsweetened Greek yogurt
1/2 cup English cucumber, finely grated and squeezed dry
1 tablespoon fresh dill, finely chopped
1 tablespoon fresh lemon juice
1 clove garlic, minced
1 tablespoon extra-virgin olive oil
Salt and black pepper to taste
Instructions:
Grate the cucumber and place it in a clean kitchen towel or paper towel. Squeeze out as much liquid as possible to prevent the dip from becoming watery.
In a medium bowl, combine the plain Greek yogurt, squeezed cucumber, fresh dill, lemon juice, minced garlic, and olive oil.
Stir well to combine. Season with salt and black pepper to taste.
Cover and refrigerate for at least 30 minutes before serving to allow the flavors to meld.
14. Creamy White Bean and Roasted Garlic Dip
Cannellini beans provide a smooth, buttery texture and a solid dose of protein and fiber.
Ingredients:
1 can (15 oz) Cannellini beans, rinsed and drained
1 whole head of garlic, roasted
2 tablespoons olive oil
1 tablespoon fresh rosemary, chopped
1 tablespoon lemon juice
1/2 teaspoon salt
1/4 teaspoon black pepper
Instructions:
To roast the garlic: Cut the top off the head of garlic, drizzle with olive oil, wrap in foil, and bake at 400°F (200°C) for 40 minutes until soft and caramelized. Let cool.
Squeeze the roasted garlic cloves out of their skins into a food processor.
Add the rinsed Cannellini beans, olive oil, fresh rosemary, lemon juice, salt, and pepper.
Process until completely smooth and creamy.
Serve warm or at room temperature with gluten-free crostini or bell pepper strips.
15. Smoked Salmon and Dill Spread
A luxurious, high-protein spread that feels fancy but takes only minutes to whip up.
Ingredients:
8 oz whipped cream cheese or plain Greek yogurt
4 oz smoked salmon, finely chopped
1 tablespoon fresh dill, chopped
1 tablespoon capers, drained and roughly chopped
1 teaspoon lemon juice
1/4 teaspoon black pepper
Instructions:
In a medium bowl, mix the whipped cream cheese (or Greek yogurt) until smooth and spreadable.
Fold in the finely chopped smoked salmon, fresh dill, capers, lemon juice, and black pepper.
Stir gently until all ingredients are evenly distributed.
Serve immediately or refrigerate for up to 3 days. Enjoy on gluten-free bagels, cucumber slices, or celery boats.
Quick and Portable Snacks
When you need a snack on the go, these options require minimal prep and are easy to pack in a bag or lunchbox.
16. Hard-Boiled Eggs with Everything Bagel Seasoning
The ultimate fast food. Eggs are a complete protein, and a sprinkle of seasoning elevates them instantly.
Ingredients:
2 large eggs
1 teaspoon everything bagel seasoning (ensure it is gluten-free)
1/2 teaspoon hot sauce (optional)
Instructions:
Place the eggs in a saucepan and cover them with cold water by 1 inch.
Bring the water to a rolling boil over high heat.
Once boiling, remove the pan from the heat, cover, and let sit for 10-12 minutes.
Transfer the eggs to an ice water bath for 5 minutes to cool and make peeling easier.
Peel the eggs, slice them in half, and sprinkle generously with everything bagel seasoning and a dash of hot sauce if desired.
17. Roasted Spicy Chickpeas
A crunchy, savory snack that satisfies the craving for chips or pretzels while providing plant-based protein.
Ingredients:
1 can (15 oz) chickpeas, rinsed, drained, and patted completely dry
1 tablespoon olive oil
1 teaspoon smoked paprika
1/2 teaspoon garlic powder
1/2 teaspoon cumin
1/4 teaspoon cayenne pepper (optional)
1/2 teaspoon salt
Instructions:
Preheat your oven to 400°F (200°C). Line a baking sheet with parchment paper.
Ensure the chickpeas are as dry as possible (this is crucial for crunchiness). Remove any loose skins.
In a bowl, toss the dry chickpeas with the olive oil, smoked paprika, garlic powder, cumin, cayenne pepper, and salt until evenly coated.
Spread the chickpeas in a single layer on the prepared baking sheet.
Roast for 25-30 minutes, shaking the pan halfway through, until the chickpeas are crispy and golden brown.
Let them cool completely on the baking sheet before storing in an airtight container at room temperature.
18. Turkey and Cheese Roll-Ups
A low-carb, high-protein snack that takes seconds to assemble and is perfect for kids and adults alike.
Ingredients:
4 slices deli turkey breast (ensure it is gluten-free)
4 slices provolone, Swiss, or cheddar cheese
1 tablespoon Dijon mustard or hummus
4 small pickle spears or cucumber sticks
Instructions:
Lay the slices of deli turkey flat on a clean surface or cutting board.
Place a slice of cheese on top of each piece of turkey.
Spread a thin layer of Dijon mustard or hummus over the cheese.
Place a pickle spear or cucumber stick at one end of the turkey and cheese stack.
Roll the turkey and cheese tightly around the pickle or cucumber.
Secure with a toothpick if necessary and serve immediately, or pack in a lunchbox.
19. Cottage Cheese and Pineapple Bowls
A classic combination that provides a massive hit of casein protein, which digests slowly and keeps you full longer.
Ingredients:
1/2 cup full-fat or low-fat cottage cheese
1/2 cup fresh pineapple chunks
1 tablespoon shredded coconut (unsweetened)
1 tablespoon macadamia nuts or almonds, chopped
Instructions:
Spoon the cottage cheese into a small serving bowl or portable container.
Top the cottage cheese with the fresh pineapple chunks.
Sprinkle the shredded coconut and chopped nuts over the top for added texture and healthy fats.
Enjoy immediately or keep refrigerated until ready to eat.
20. Edamame with Sea Salt
Sometimes the simplest snacks are the best. Edamame is naturally gluten-free and packed with protein.
Ingredients:
1 cup frozen edamame in the pod
1/2 teaspoon coarse sea salt or flaky salt
1/2 teaspoon sesame oil (optional)
Instructions:
Bring a small pot of water to a boil, or place the frozen edamame in a microwave-safe bowl with a splash of water.
Boil for 3-5 minutes, or microwave on high for 2-3 minutes, until the edamame pods are bright green and tender.
Drain the edamame well.
Toss the warm pods with the coarse sea salt and a drizzle of sesame oil if desired.
To eat, squeeze the pods to pop the beans directly into your mouth (discard the pods).
Sweet and Satisfying Treats
When you need something sweet but don’t want to derail your nutrition, these high-protein snacks hit the spot.
21. Greek Yogurt and Berry Parfait
A quick, no-cook snack that feels like a dessert but is packed with protein and antioxidants.
Ingredients:
1 cup plain, unsweetened Greek yogurt
1/2 cup mixed berries (strawberries, blueberries, raspberries)
1/4 cup gluten-free high-protein granola
1 tablespoon chia seeds
1 teaspoon honey or pure maple syrup (optional)
Instructions:
In a glass or bowl, add half of the Greek yogurt as the base layer.
Top with half of the mixed berries and half of the chia seeds.
Add the remaining Greek yogurt, followed by the rest of the berries and chia seeds.
Sprinkle the gluten-free high-protein granola over the top for crunch.
Drizzle with honey or maple syrup if a touch of sweetness is desired. Serve immediately.
22. High-Protein Chocolate Chia Pudding
A decadent-tasting snack that feels like dessert but is loaded with protein and fiber.
Ingredients:
1/4 cup chia seeds
1 cup unsweetened almond milk
1 scoop chocolate protein powder
1 tablespoon unsweetened cocoa powder
1 teaspoon maple syrup (optional)
1/4 cup fresh strawberries, sliced (for topping)
Instructions:
In a jar or bowl, whisk together the almond milk, chocolate protein powder, cocoa powder, and maple syrup until smooth.
Stir in the chia seeds until evenly distributed.
Let the mixture sit for 5 minutes, then stir again to prevent clumping.
Cover and refrigerate overnight, or for at least 2 hours until thickened.
Top with fresh sliced strawberries before serving.
23. Peanut Butter Apple Slices
A classic after-school snack that is equally satisfying for adults, providing a great balance of carbs, fat, and protein.
Ingredients:
1 large apple (like Honeycrisp or Granny Smith), cored and sliced
2 tablespoons natural peanut butter or almond butter
1 tablespoon hemp hearts or chia seeds
1/2 teaspoon cinnamon
Instructions:
Arrange the apple slices on a plate.
Spread a thin layer of natural peanut butter or almond butter onto each apple slice.
Sprinkle the hemp hearts or chia seeds evenly over the nut butter.
Dust lightly with cinnamon and enjoy immediately.
24. Protein-Packed Breakfast Cookies
Yes, you can have cookies for a snack! These are dense, chewy, and full of complex carbs and protein.
Ingredients:
1 cup certified gluten-free rolled oats
1/2 cup almond butter or peanut butter
1/4 cup honey or maple syrup
1 scoop vanilla protein powder
1/4 cup pumpkin seeds
1/4 cup dried cranberries or raisins
1 teaspoon cinnamon
Instructions:
Preheat your oven to 350°F (175°C) and line a baking sheet with parchment paper.
In a large bowl, mix the almond butter and honey until smooth.
Stir in the gluten-free rolled oats, protein powder, pumpkin seeds, dried cranberries, and cinnamon until a thick dough forms.
Scoop out about 2 tablespoons of dough per cookie and roll into balls.
Place the balls on the prepared baking sheet and flatten them slightly with your hands or a fork.
Bake for 10-12 minutes until the edges are lightly golden.
Let the cookies cool completely on the baking sheet before storing them in an airtight container.
25. Cottage Cheese Pancakes (Mini Snack Size)
These mini pancakes are tender, high in protein, and completely free of gluten, perfect for a mid-day snack.
Ingredients:
1/2 cup cottage cheese
1/2 cup gluten-free rolled oats
2 large eggs
1/2 teaspoon vanilla extract
1/2 teaspoon baking powder
1/2 teaspoon cinnamon
Coconut oil or butter for cooking
Instructions:
Place the cottage cheese, gluten-free rolled oats, eggs, vanilla extract, baking powder, and cinnamon into a blender.
Blend on high until the batter is completely smooth and the oats are pulverized. Let the batter rest for 5 minutes to thicken.
Heat a skillet or griddle over medium heat and lightly coat with coconut oil or butter.
Pour about 2 tablespoons of batter per mini pancake onto the skillet.
Cook for 2-3 minutes until bubbles form on the surface and the edges look set.
Flip carefully and cook for another 1-2 minutes until golden brown.
A smaller portion of overnight oats makes a fantastic, filling snack that is ready whenever you are.
Ingredients:
1/4 cup certified gluten-free rolled oats
1/4 cup unsweetened almond milk
1/2 scoop vanilla or chocolate protein powder
1/2 tablespoon chia seeds
1/2 tablespoon natural peanut butter
1/4 teaspoon cinnamon
Instructions:
In a small mason jar or sealable container, combine the gluten-free rolled oats, almond milk, protein powder, chia seeds, peanut butter, and cinnamon.
Stir vigorously until all ingredients are well mixed and the protein powder is fully dissolved.
Cover the jar securely and place it in the refrigerator overnight (or for at least 4 hours).
In the morning, give the oats a good stir. Add a splash of almond milk if the mixture is too thick.
Enjoy cold straight from the jar.
Conclusion
Snacking on a gluten-free diet doesn’t mean you have to settle for low-protein, unsatisfying options. By incorporating ingredients like nuts, seeds, Greek yogurt, cottage cheese, and high-quality protein powders, you can create a wide variety of delicious and satiating snacks. Whether you prefer sweet energy bites, savory dips, or quick on-the-go options, these 25+ recipes offer something for every craving. Prepping a few of these snacks ahead of time ensures you always have a nutritious, protein-packed option ready when hunger strikes.