Creating a home office that truly reflects your personality can transform the way you work and feel throughout the day. Instead of settling for a plain, uninspiring setup, infusing your space with elements that resonate with you can make a significant difference. Whether you prefer vibrant hues, soft fabrics, or cherished mementos, tailoring your environment to your tastes helps foster both comfort and creativity.
By thoughtfully incorporating these personal touches, you can design a workspace that is not only practical but also inviting. These subtle adjustments encourage productivity while showcasing your unique style, making your home office a destination you look forward to entering each day. With a few intentional choices, balancing efficiency and individuality becomes a seamless process.
1. Chic Desk Details That Speak Your Style
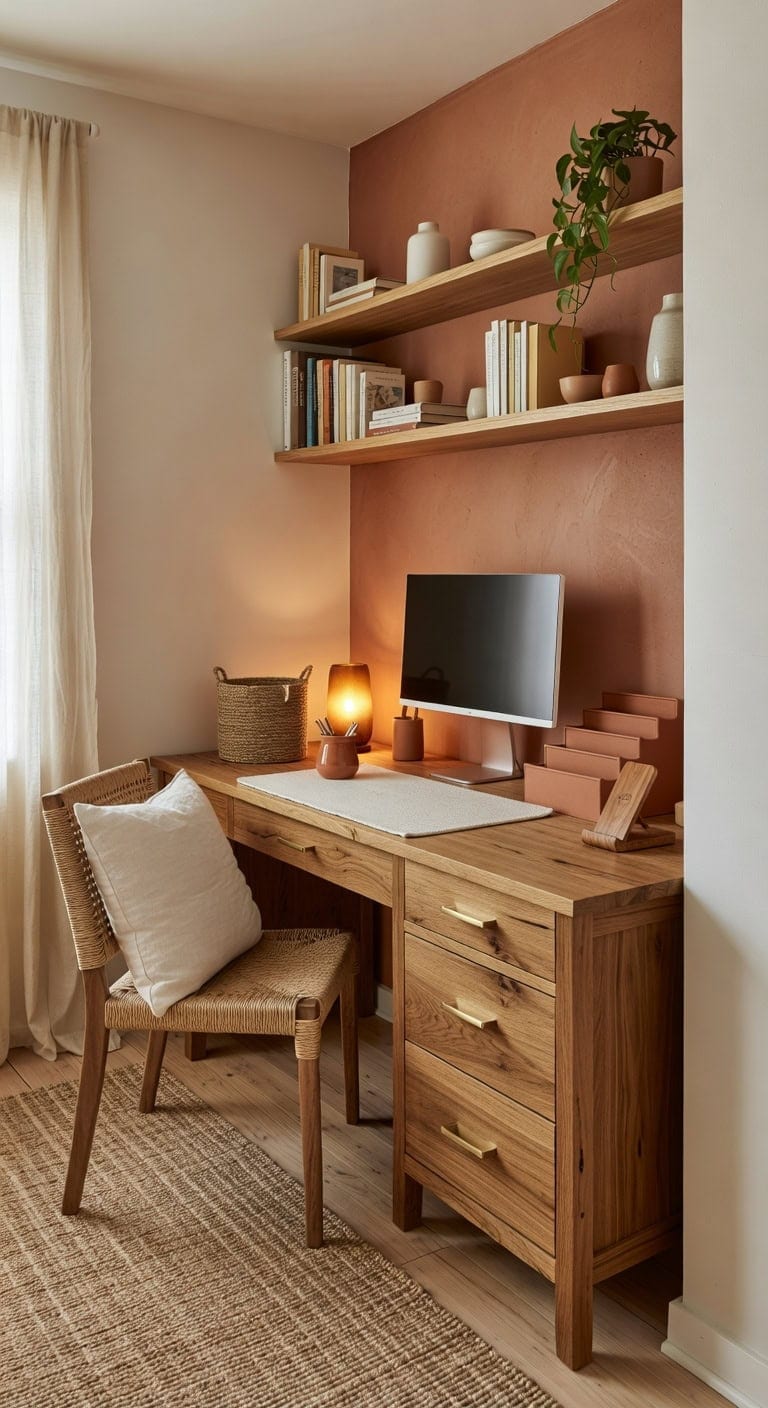
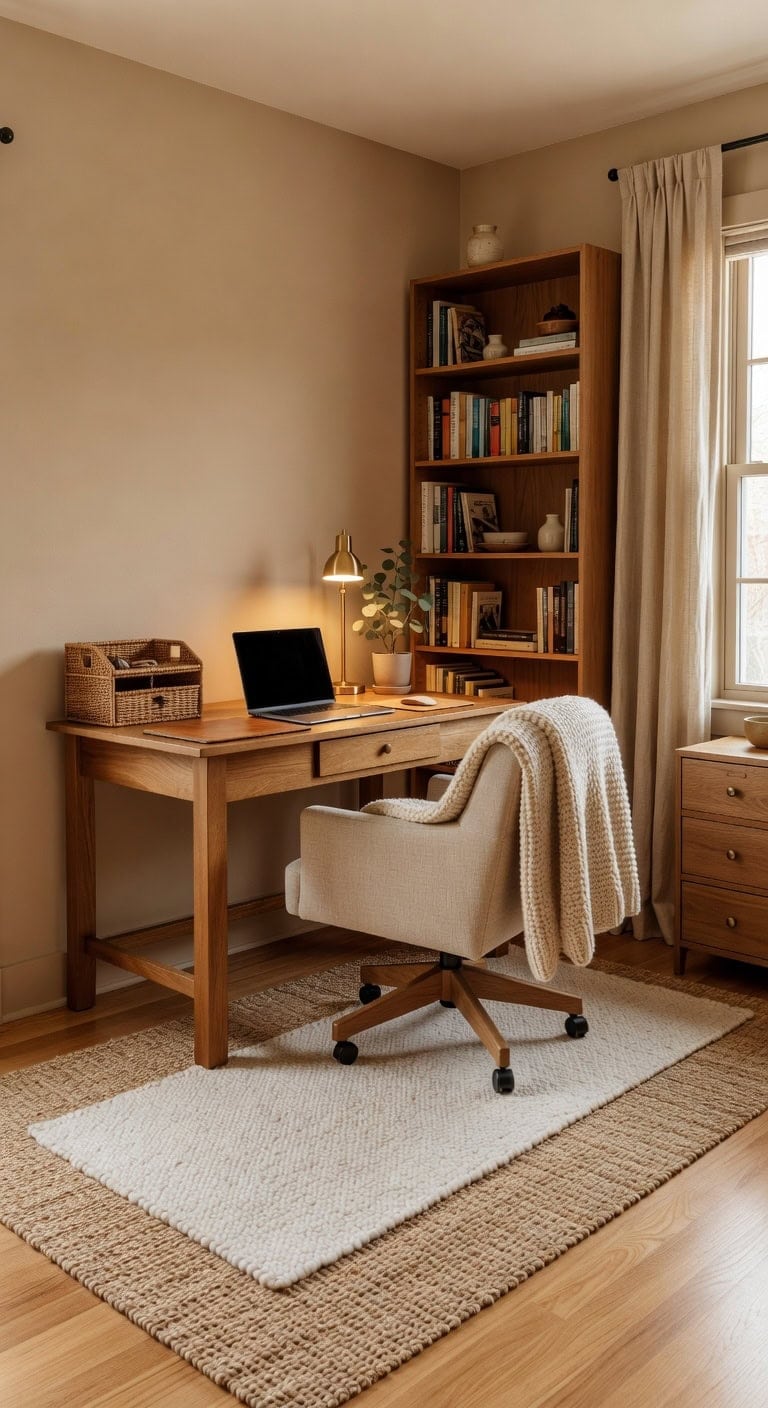
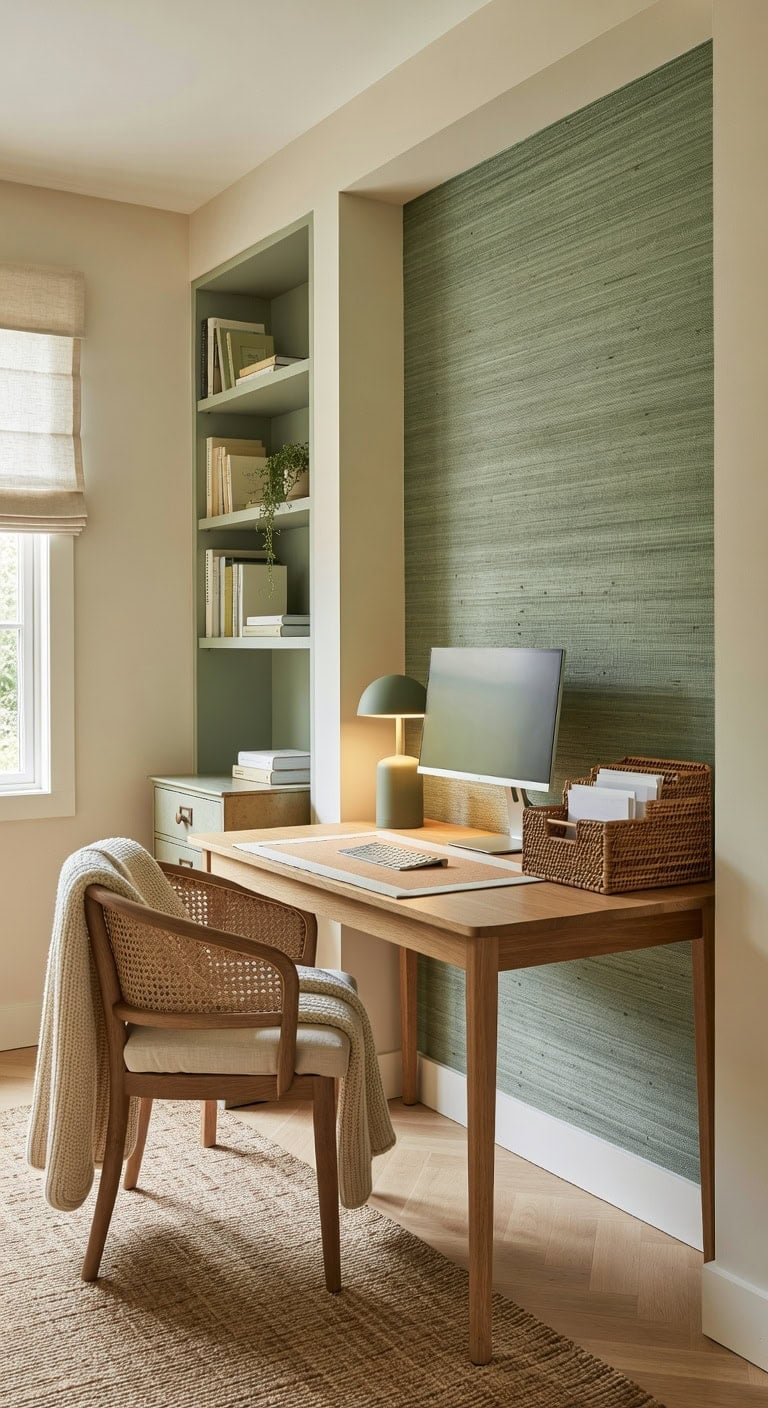
Ditch the dull and embrace desk decor that reflects your unique taste. Imagine soft sandstone organizers beside sleek marble trays, where natural fibers blend seamlessly with polished glass and matte gold touches. These thoughtful elements elevate your work area from ordinary to a curated haven that’s both stylish and inviting.
Key Design Elements
Feature Wall: Choose a deep, earthy ‘Spiced Pumpkin’ (Benjamin Moore 2171-30) to infuse your space with cozy, grounded energy.
Neutral Backdrop: Opt for ‘Swiss Coffee’ (Benjamin Moore OC-45) on surrounding walls to maintain a fresh, airy atmosphere that balances the bold accent.
Pro Tip: Best For: Compact workstations or cozy corners where intentional design details create an inspiring, boutique-like environment.
2. Design a Personalized Art Display That Inspires
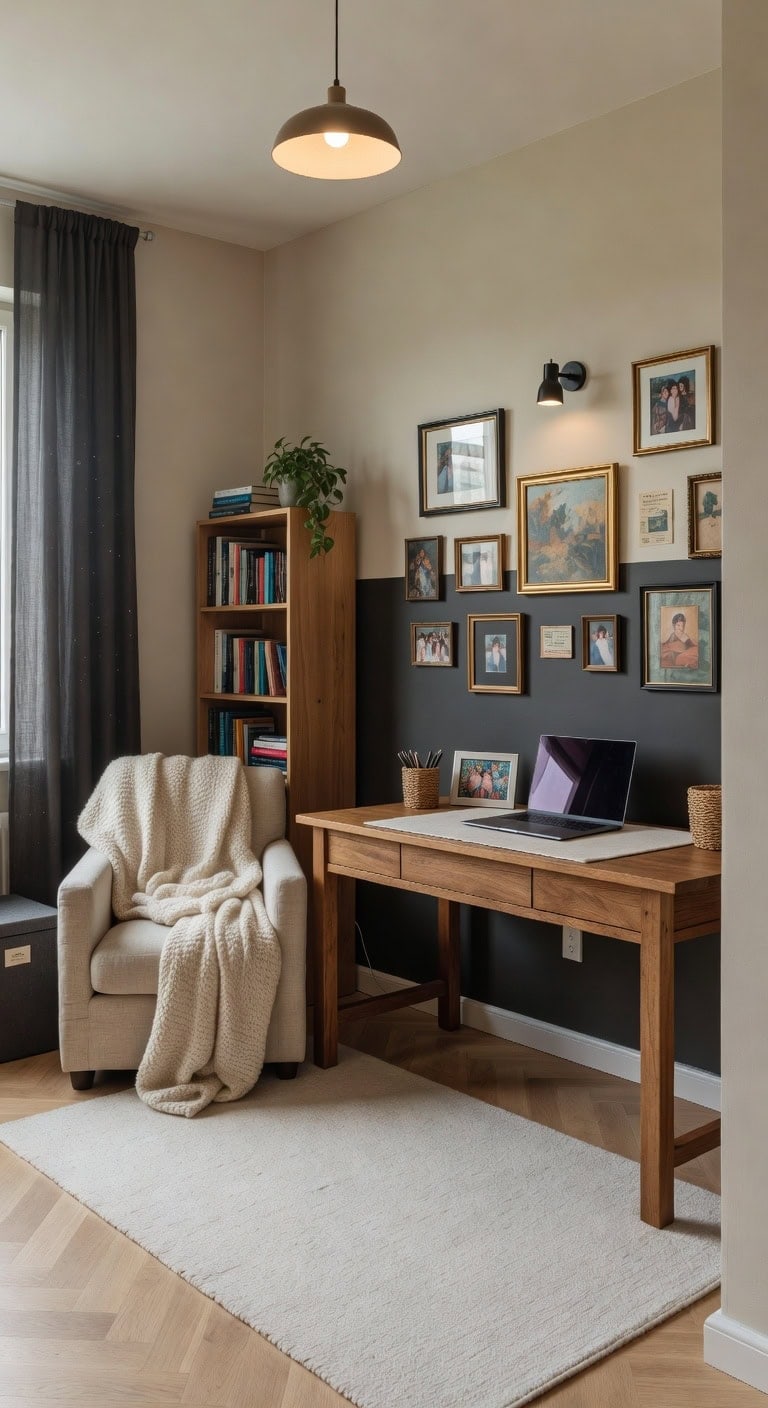
Transform your home office with a curated selection of artwork and photos that reflect your unique journey. Sleek matte black frames combined with neutral-toned mats create a cohesive look that’s both sophisticated and inviting. Adding a textured wallpaper backdrop introduces depth, while clear glass coverings ensure your pieces remain crisp and protected.
Key Design Elements
Feature Wall: Choose ‘Iron Ore’ (Sherwin-Williams SW 7069) — a rich charcoal hue that grounds your art collection beautifully.
Complementary Walls: Opt for ‘Alabaster’ (Sherwin-Williams SW 7008) — a soft, warm white that illuminates the space without overpowering it.
Pro Tip: Best For: Individuals who want their workspace to double as a gallery of inspiration, blending personal stories with creative motivation throughout their day.
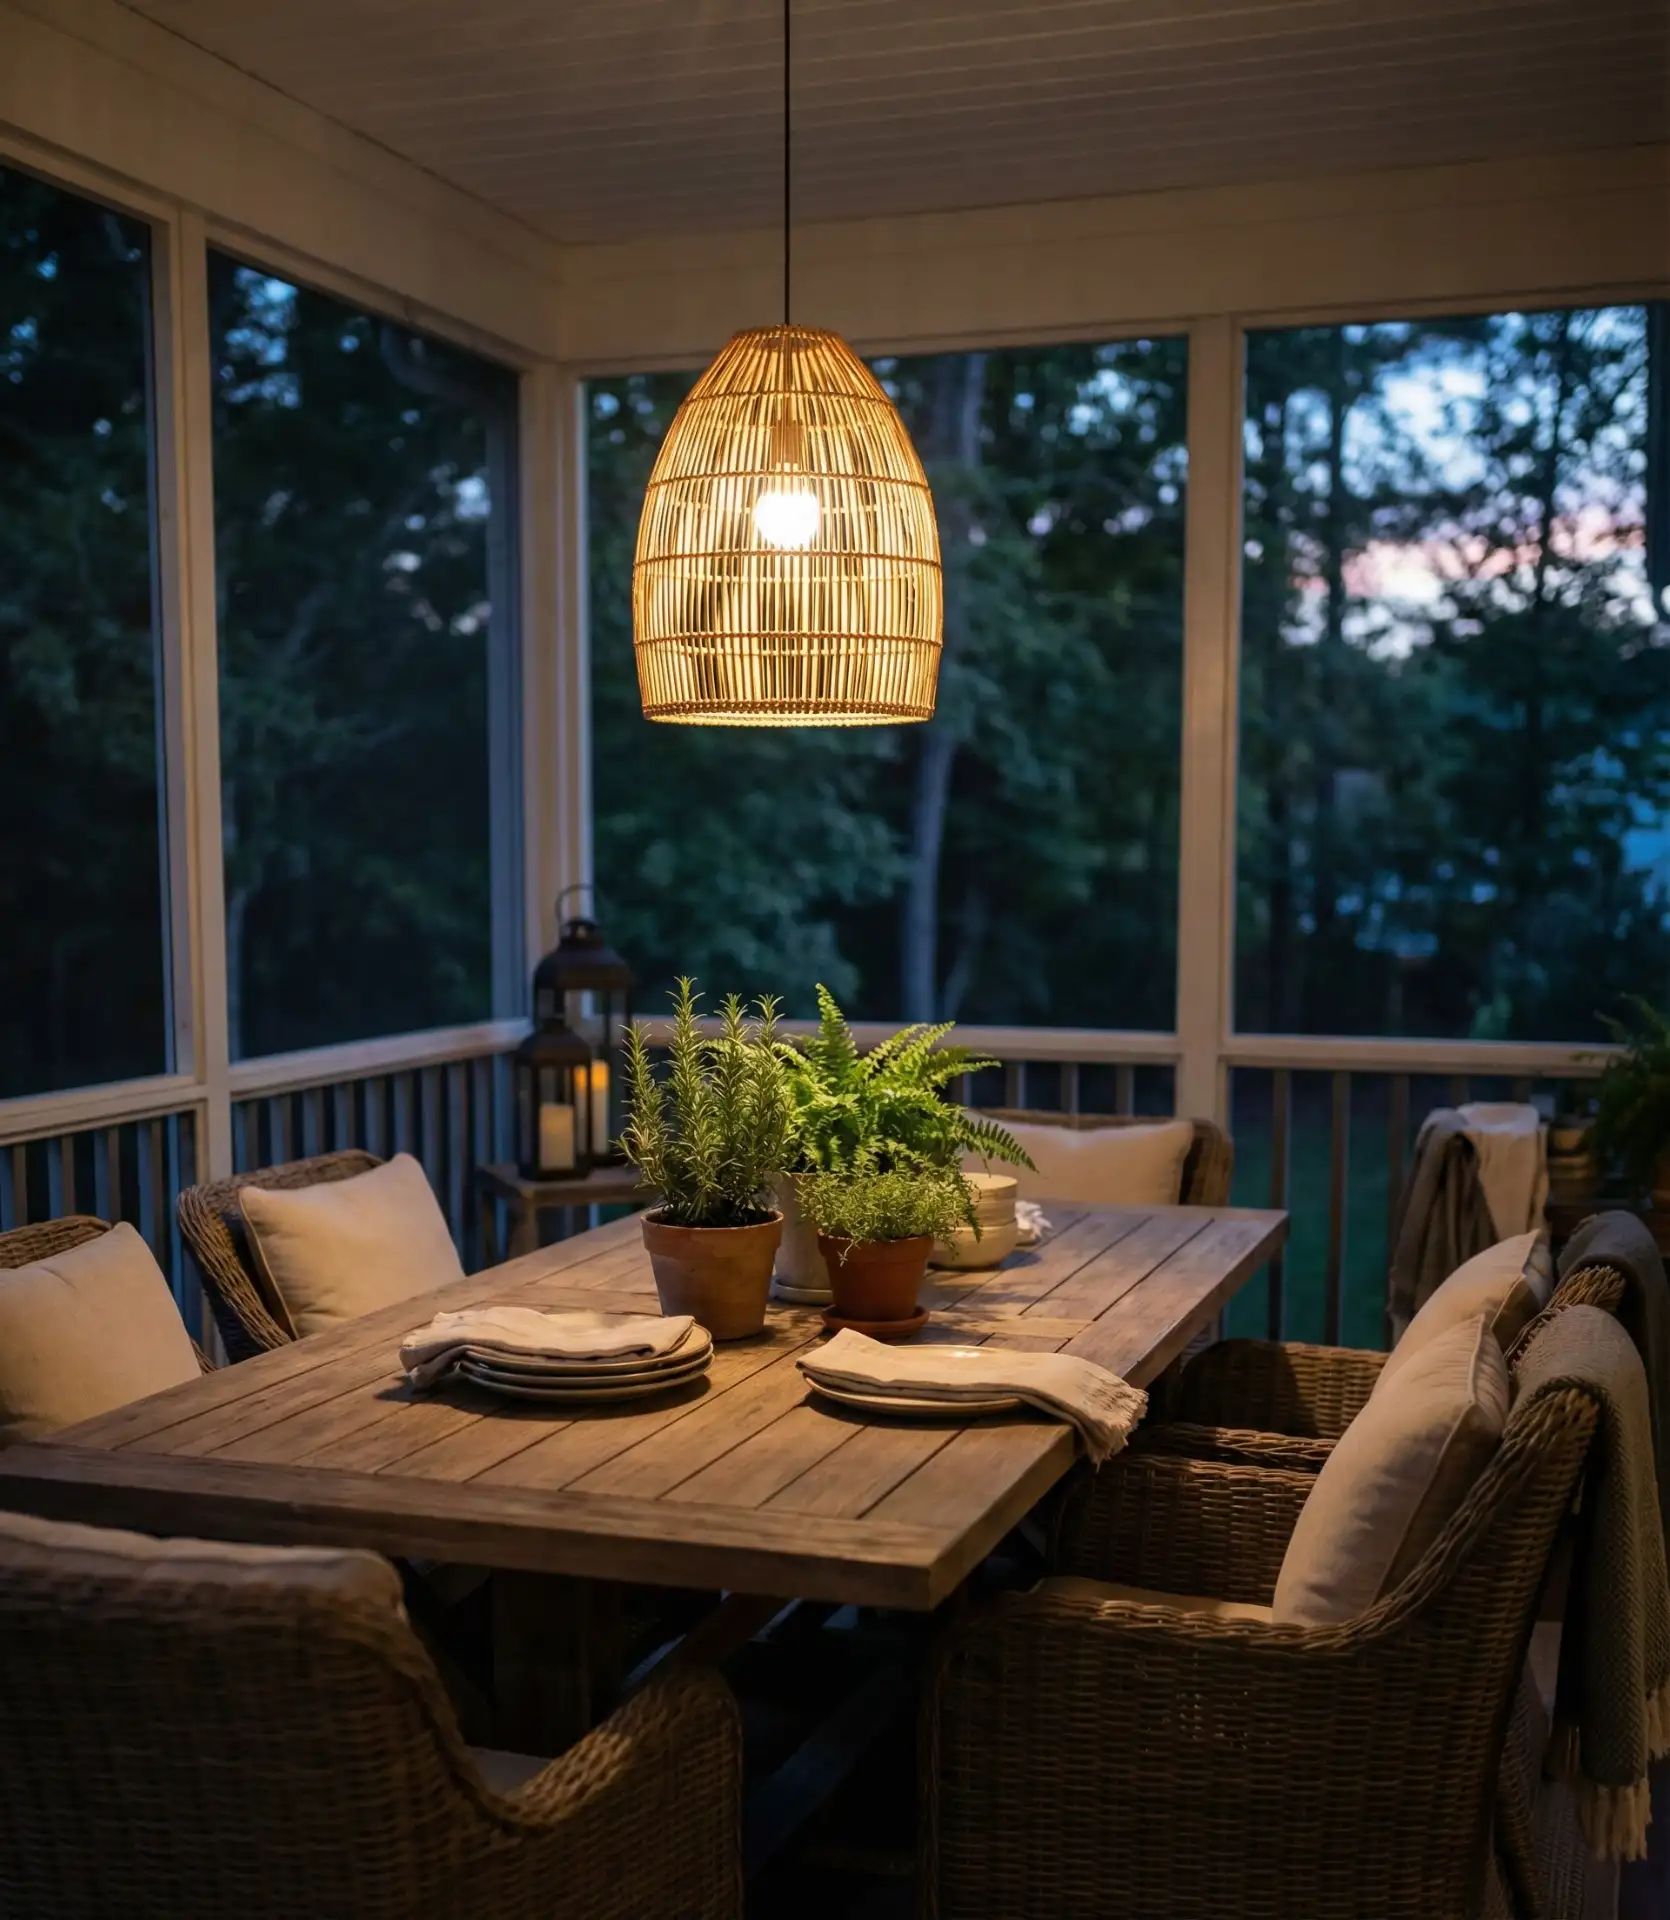
3. Create Multi-Layered Lighting to Enhance Productivity and Ambiance
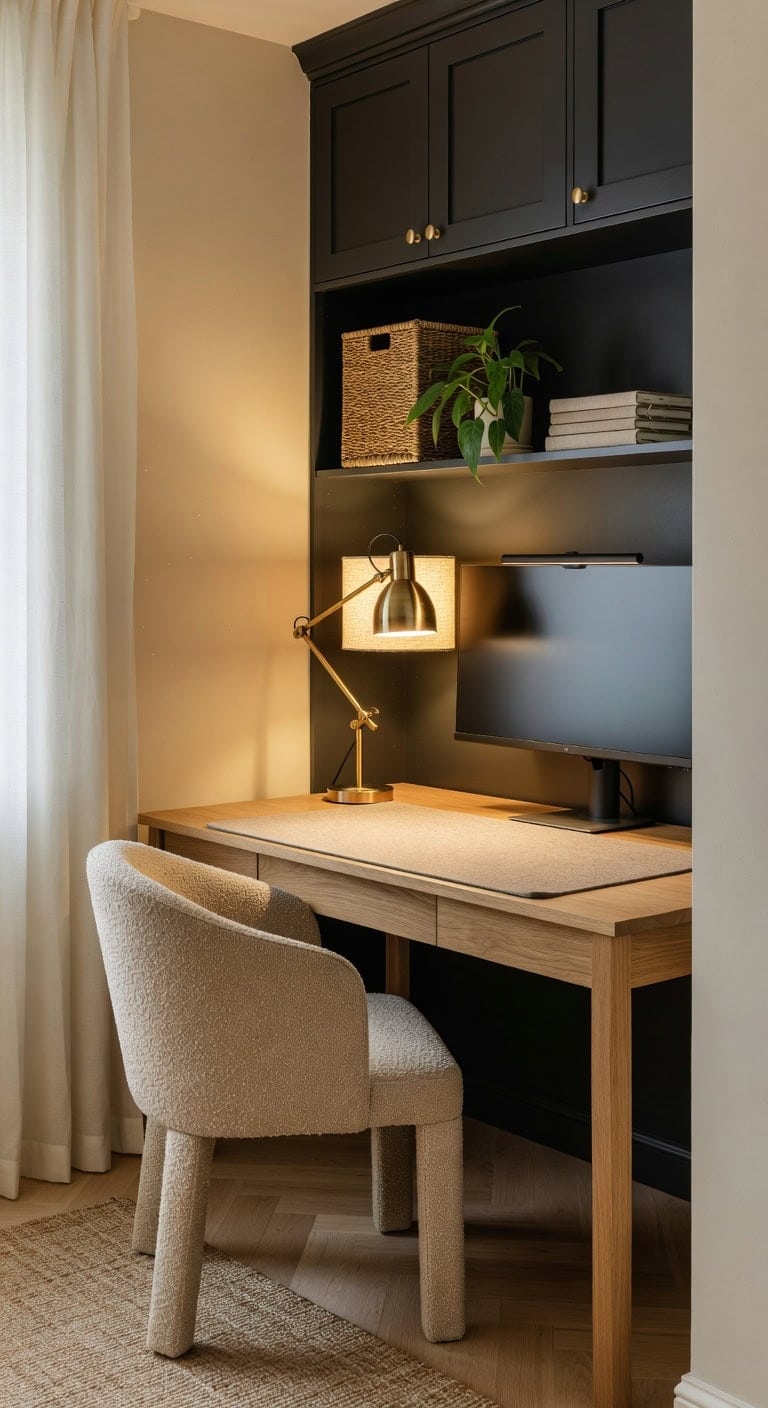
A home office lighting setup should adapt to both your peak productivity hours and moments of calm reflection. Combining sleek matte black sconces with soft fabric shades and a textured jute desk pad adds depth and warmth without feeling sterile. Blending ambient, focused, and decorative lighting elements customizes your workspace to support your energy and comfort throughout the day.
Key Design Elements
Walls: Use ‘Ivory Lace’ (Sherwin-Williams SW 6126) — a cozy, light beige that amplifies both sunlight and lamp glow for a welcoming environment.
Trim and Shelving: Choose ‘Iron Ore’ (Sherwin-Williams SW 7069) — a rich, smoky charcoal that grounds the room and highlights architectural details.
Pro Tip: Best For: Versatile home offices that transition smoothly from high-intensity work to relaxed brainstorming sessions, particularly ideal in spaces with minimal window exposure.
4. Seasonal Style Swaps for Your Home Workspace
Refreshing your home office with subtle seasonal touches keeps your environment vibrant and motivating. Imagine swapping out cushions, desk organizers, or wall art to reflect cozy autumn tones or breezy spring hues, creating an ever-evolving space without the need for a full makeover.
Key Design Elements
Incorporate a soft terracotta shade on an accent wall to bring warmth and a grounding feel during fall and winter months.
Use deep teal on window frames or shelving units to introduce a cool, calming vibe perfect for spring and summer productivity.
Pro Tip: Best For: Those who enjoy effortlessly updating their workspace ambiance through small, meaningful decor changes that align with the season’s mood.
5. Combine Layered Rugs for a Cozy Home Workspace
Bare floors and minimal décor can make your home office feel stark and uninspiring. Placing a textured sisal rug under a plush, patterned carpet creates a multidimensional surface that invites comfort and creativity. This blend of rustic and soft materials transforms your work area into a warm, welcoming retreat that encourages productivity.
Key Design Elements
Walls: Choose ‘Soft Taupe’ (Behr 720C-3) — a gentle hue that complements natural fiber tones and enhances a calm atmosphere.
Trim and Baseboards: Use ‘Almond White’ (Farrow & Ball No. 228) — a smooth, warm white that subtly unifies your space and highlights layered textures.
Pro Tip: Best For: Those wanting to enrich chilly home offices with inviting textures through simple rug layering, avoiding major floor upgrades.
6. Showcase Your Treasured Finds with Open Shelves
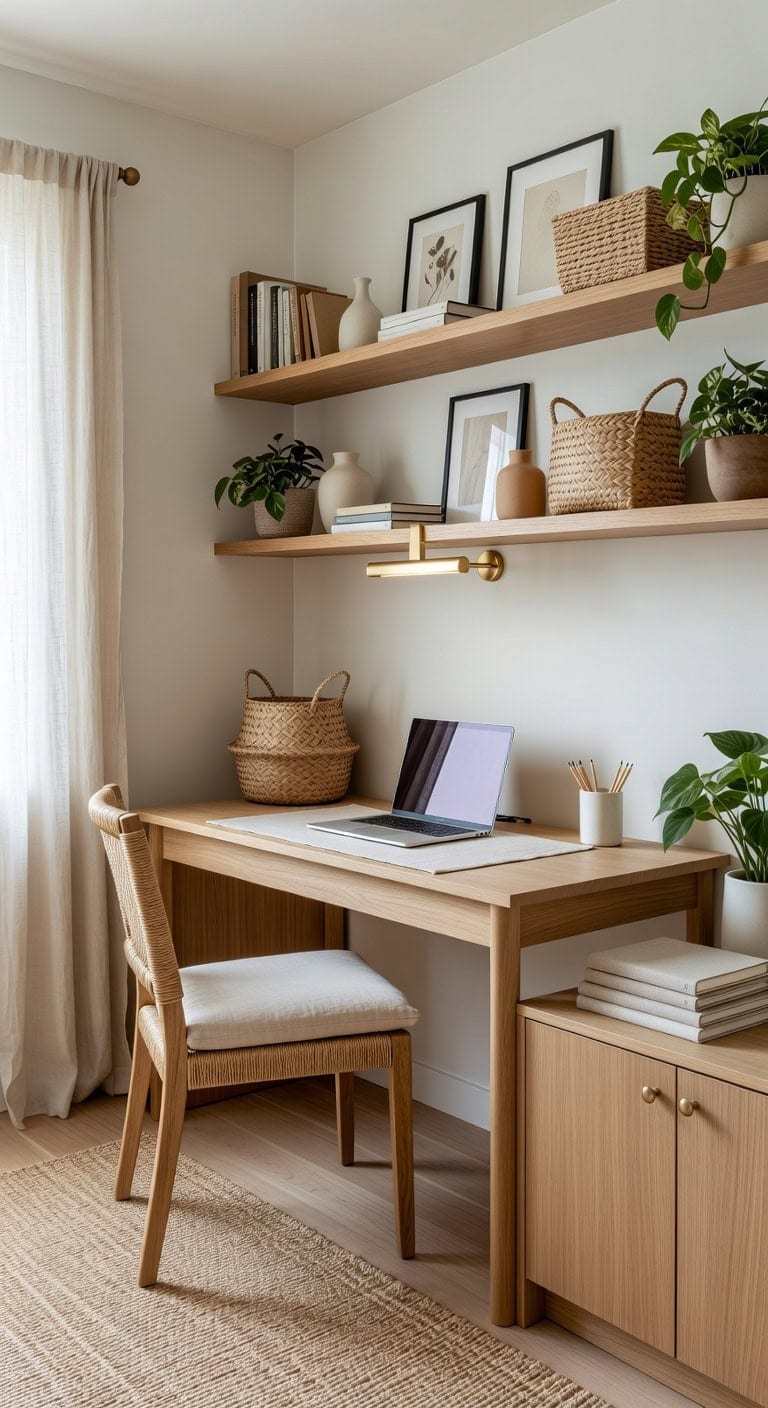
Incorporating open shelves into your home workspace brings a personalized touch that inspires productivity. The inviting contrast of natural wood shelves against a soft, pale backdrop creates visual interest, while textured baskets and artisanal journals add cozy, tactile elements alongside your favorite books and art pieces. This arrangement highlights your unique style without overwhelming your desktop.
Key Design Elements
Background wall color: Opt for ‘Snowfall White’ (Sherwin-Williams SW 7004) — a gentle, neutral white that brightens the room and gives each item its moment to shine.
Hardware and trim finish: Choose ‘Weathered Oak’ (Farrow & Ball No. 239) — a muted, earthy tone that complements wooden shelving and brings warmth to the space.
Pro Tip: Best For: Artistic workrooms, intimate reading corners, or versatile rooms where personal expression meets everyday practicality on the same wall.
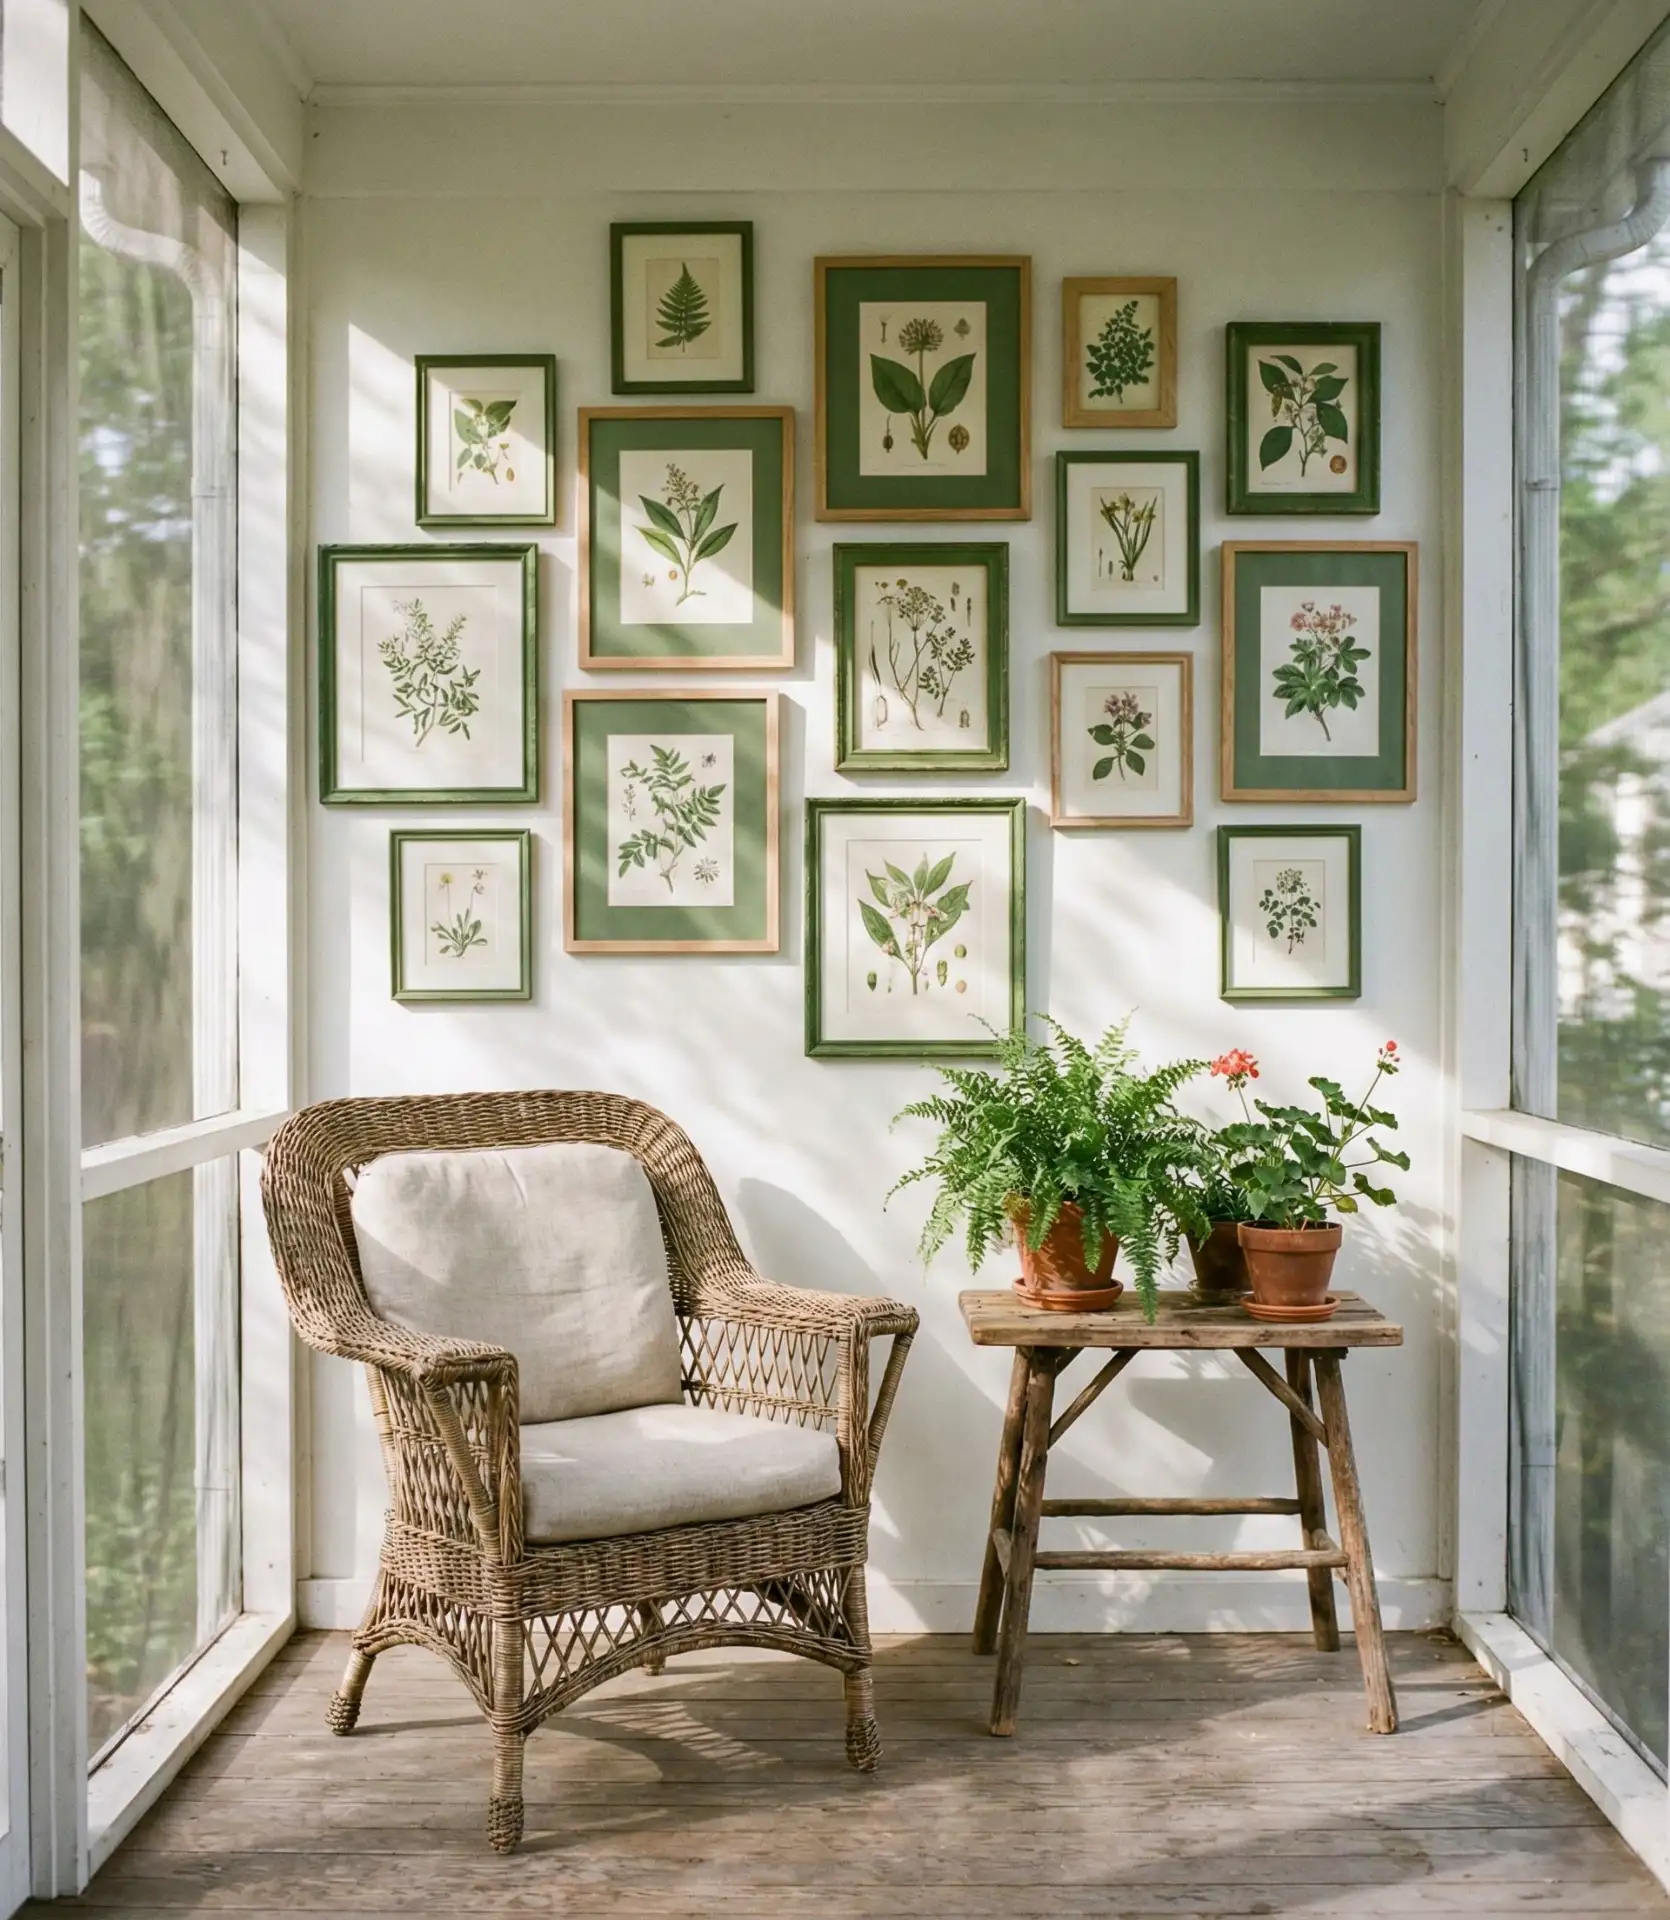
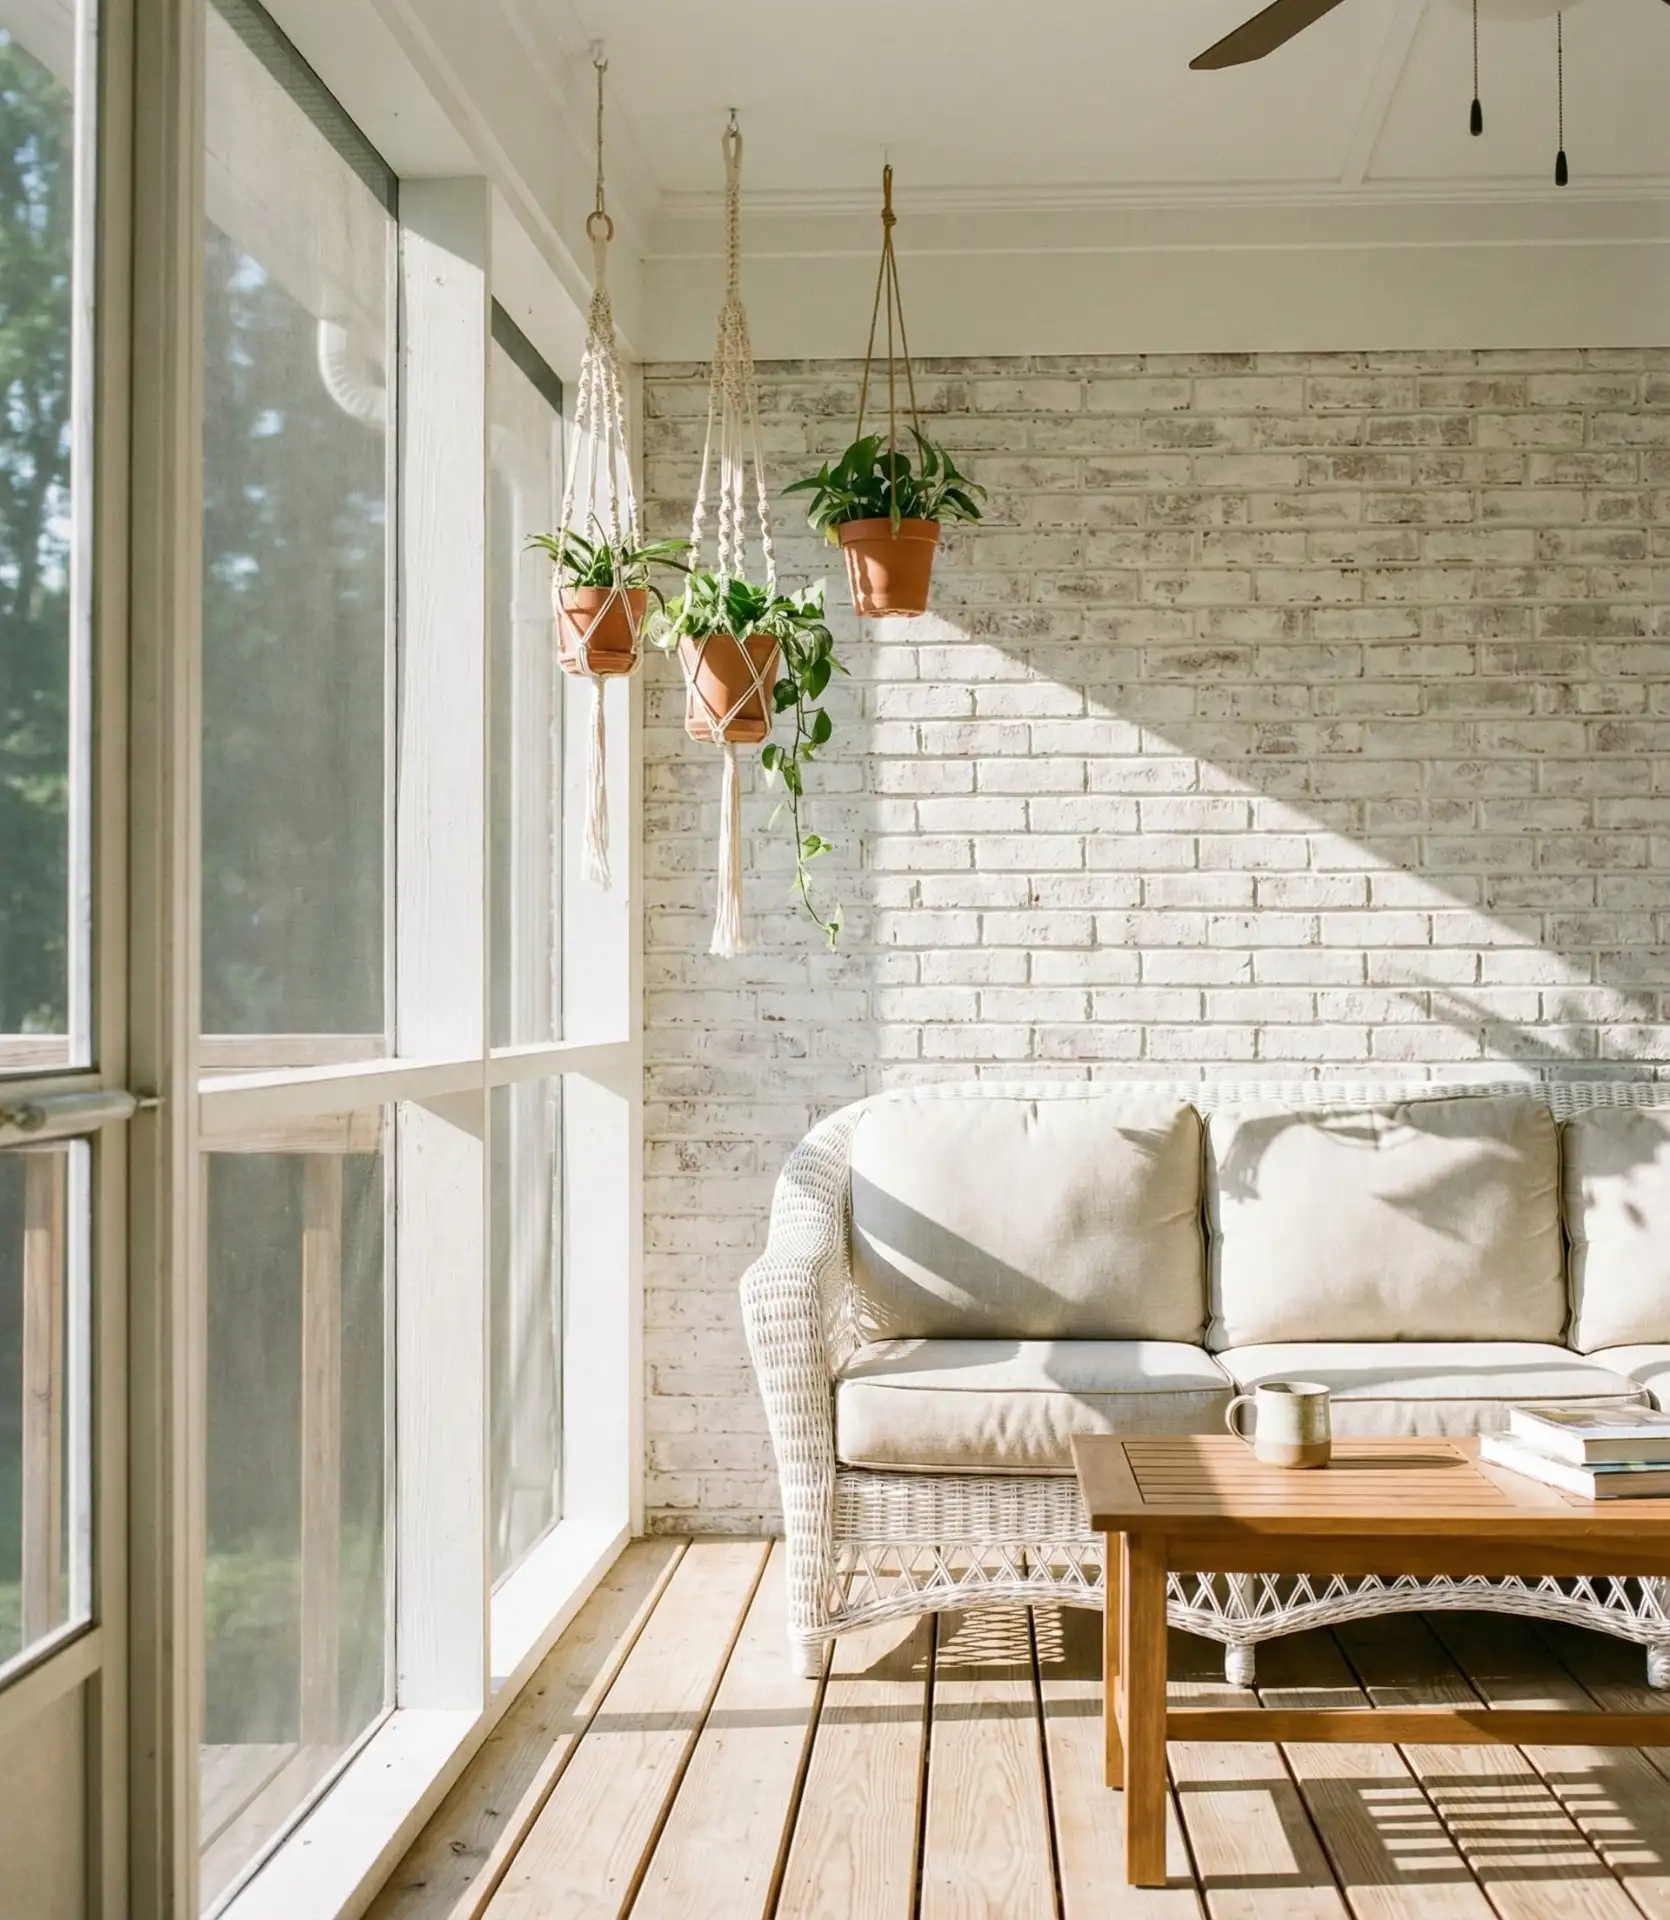
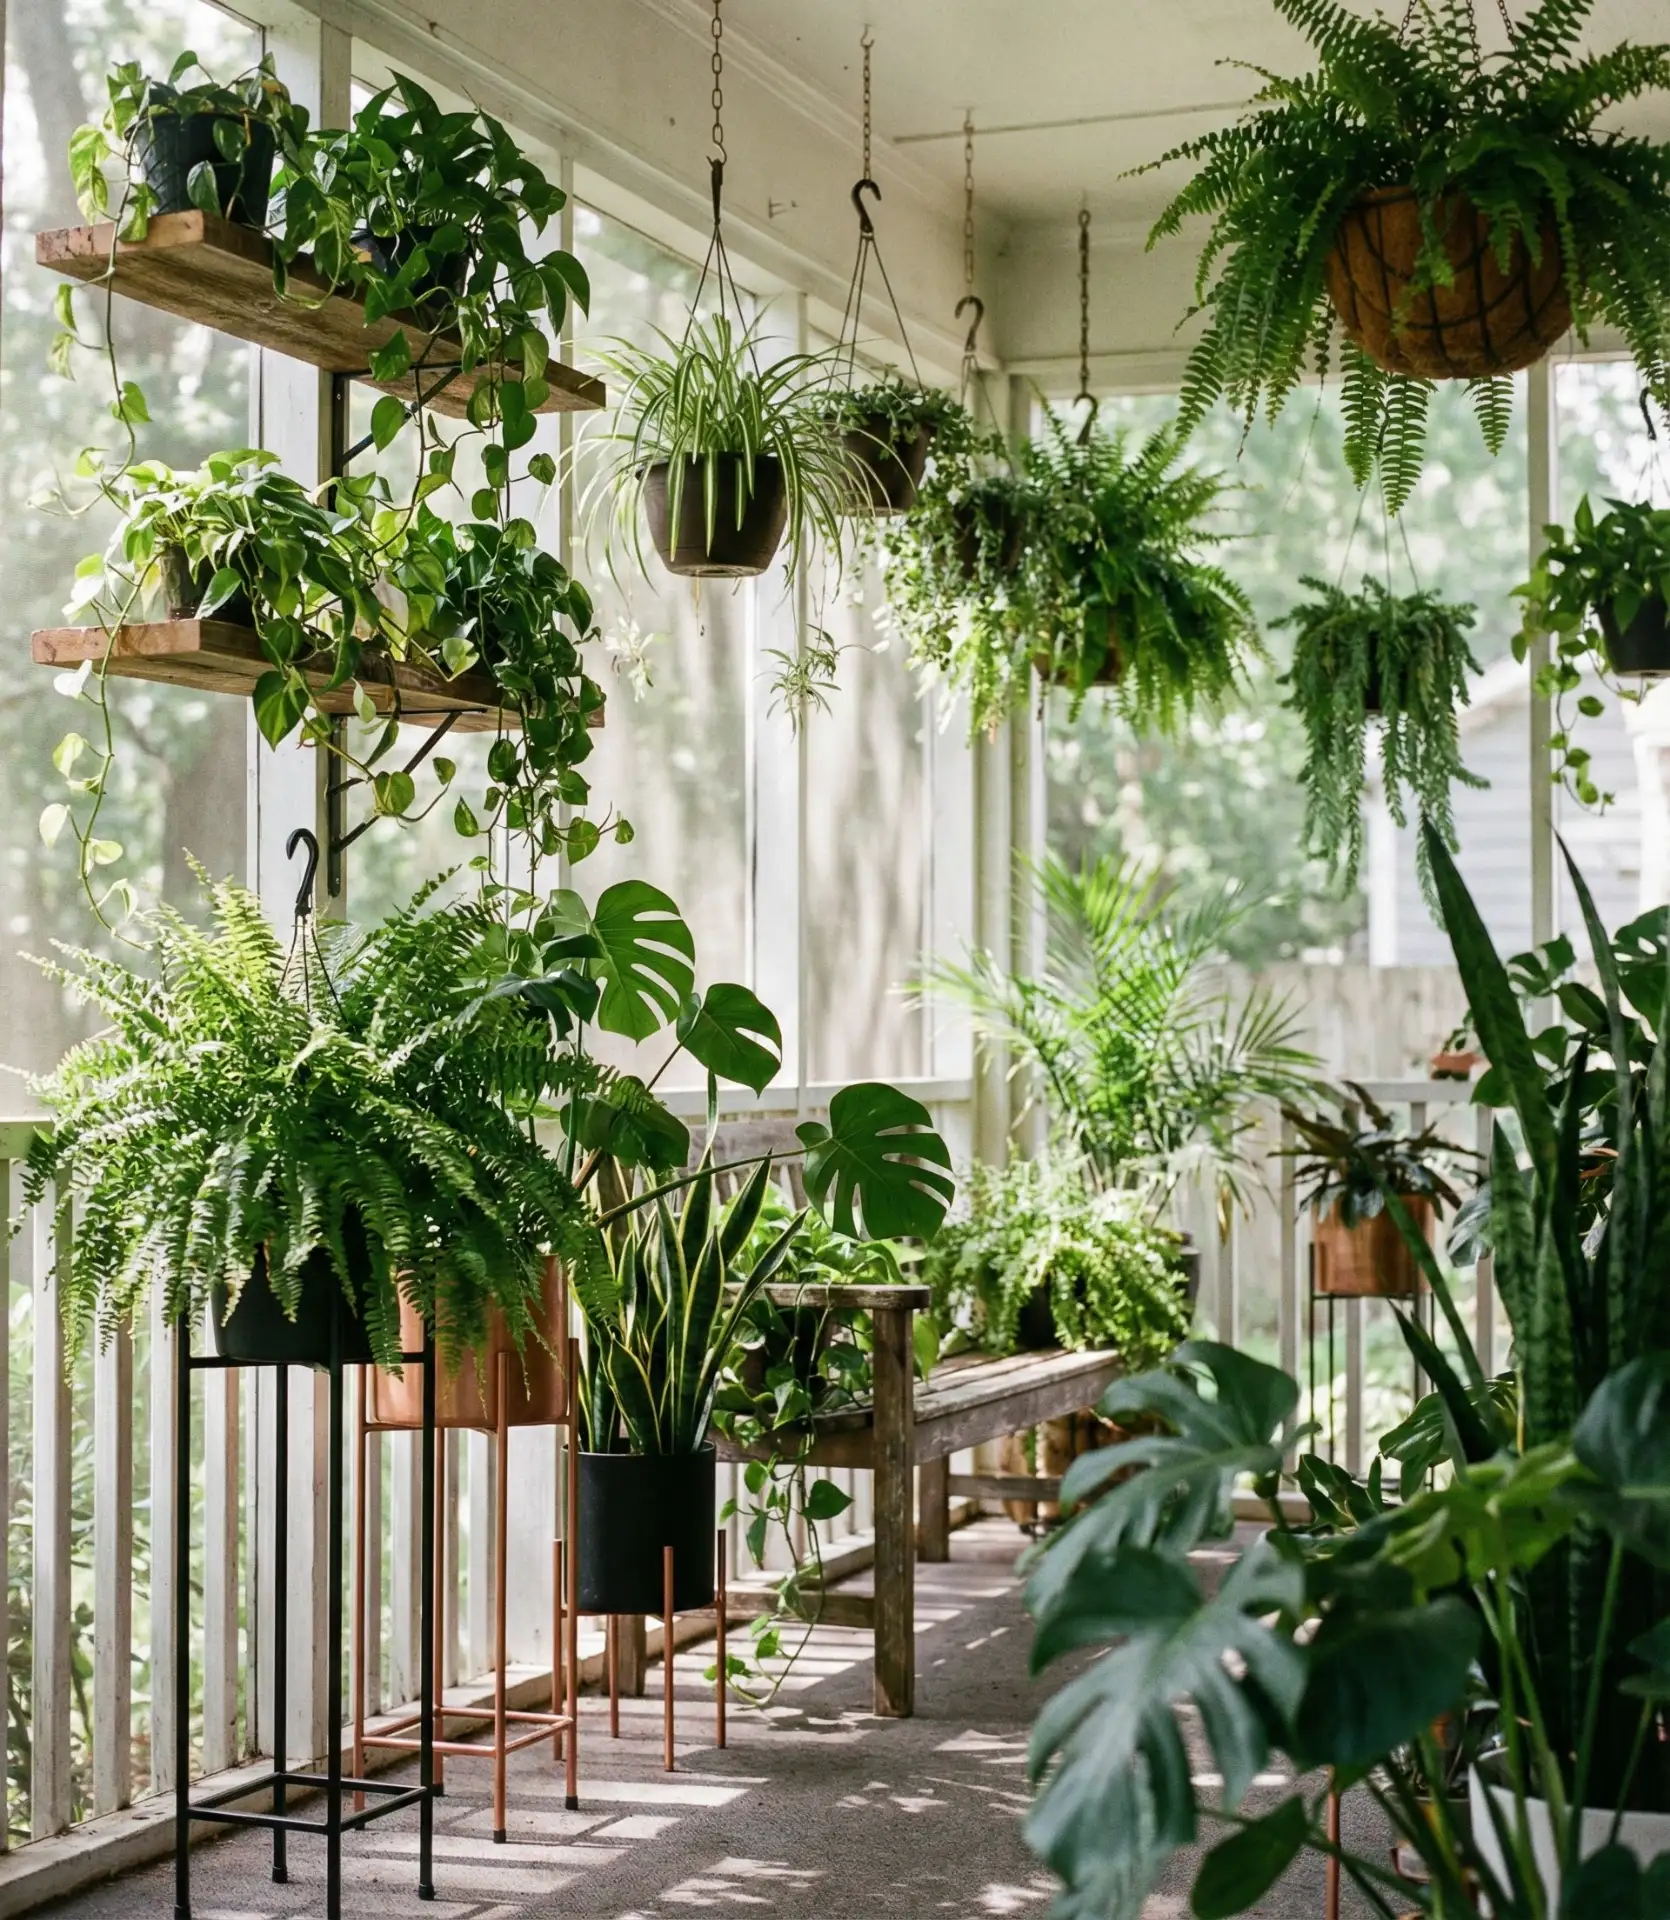
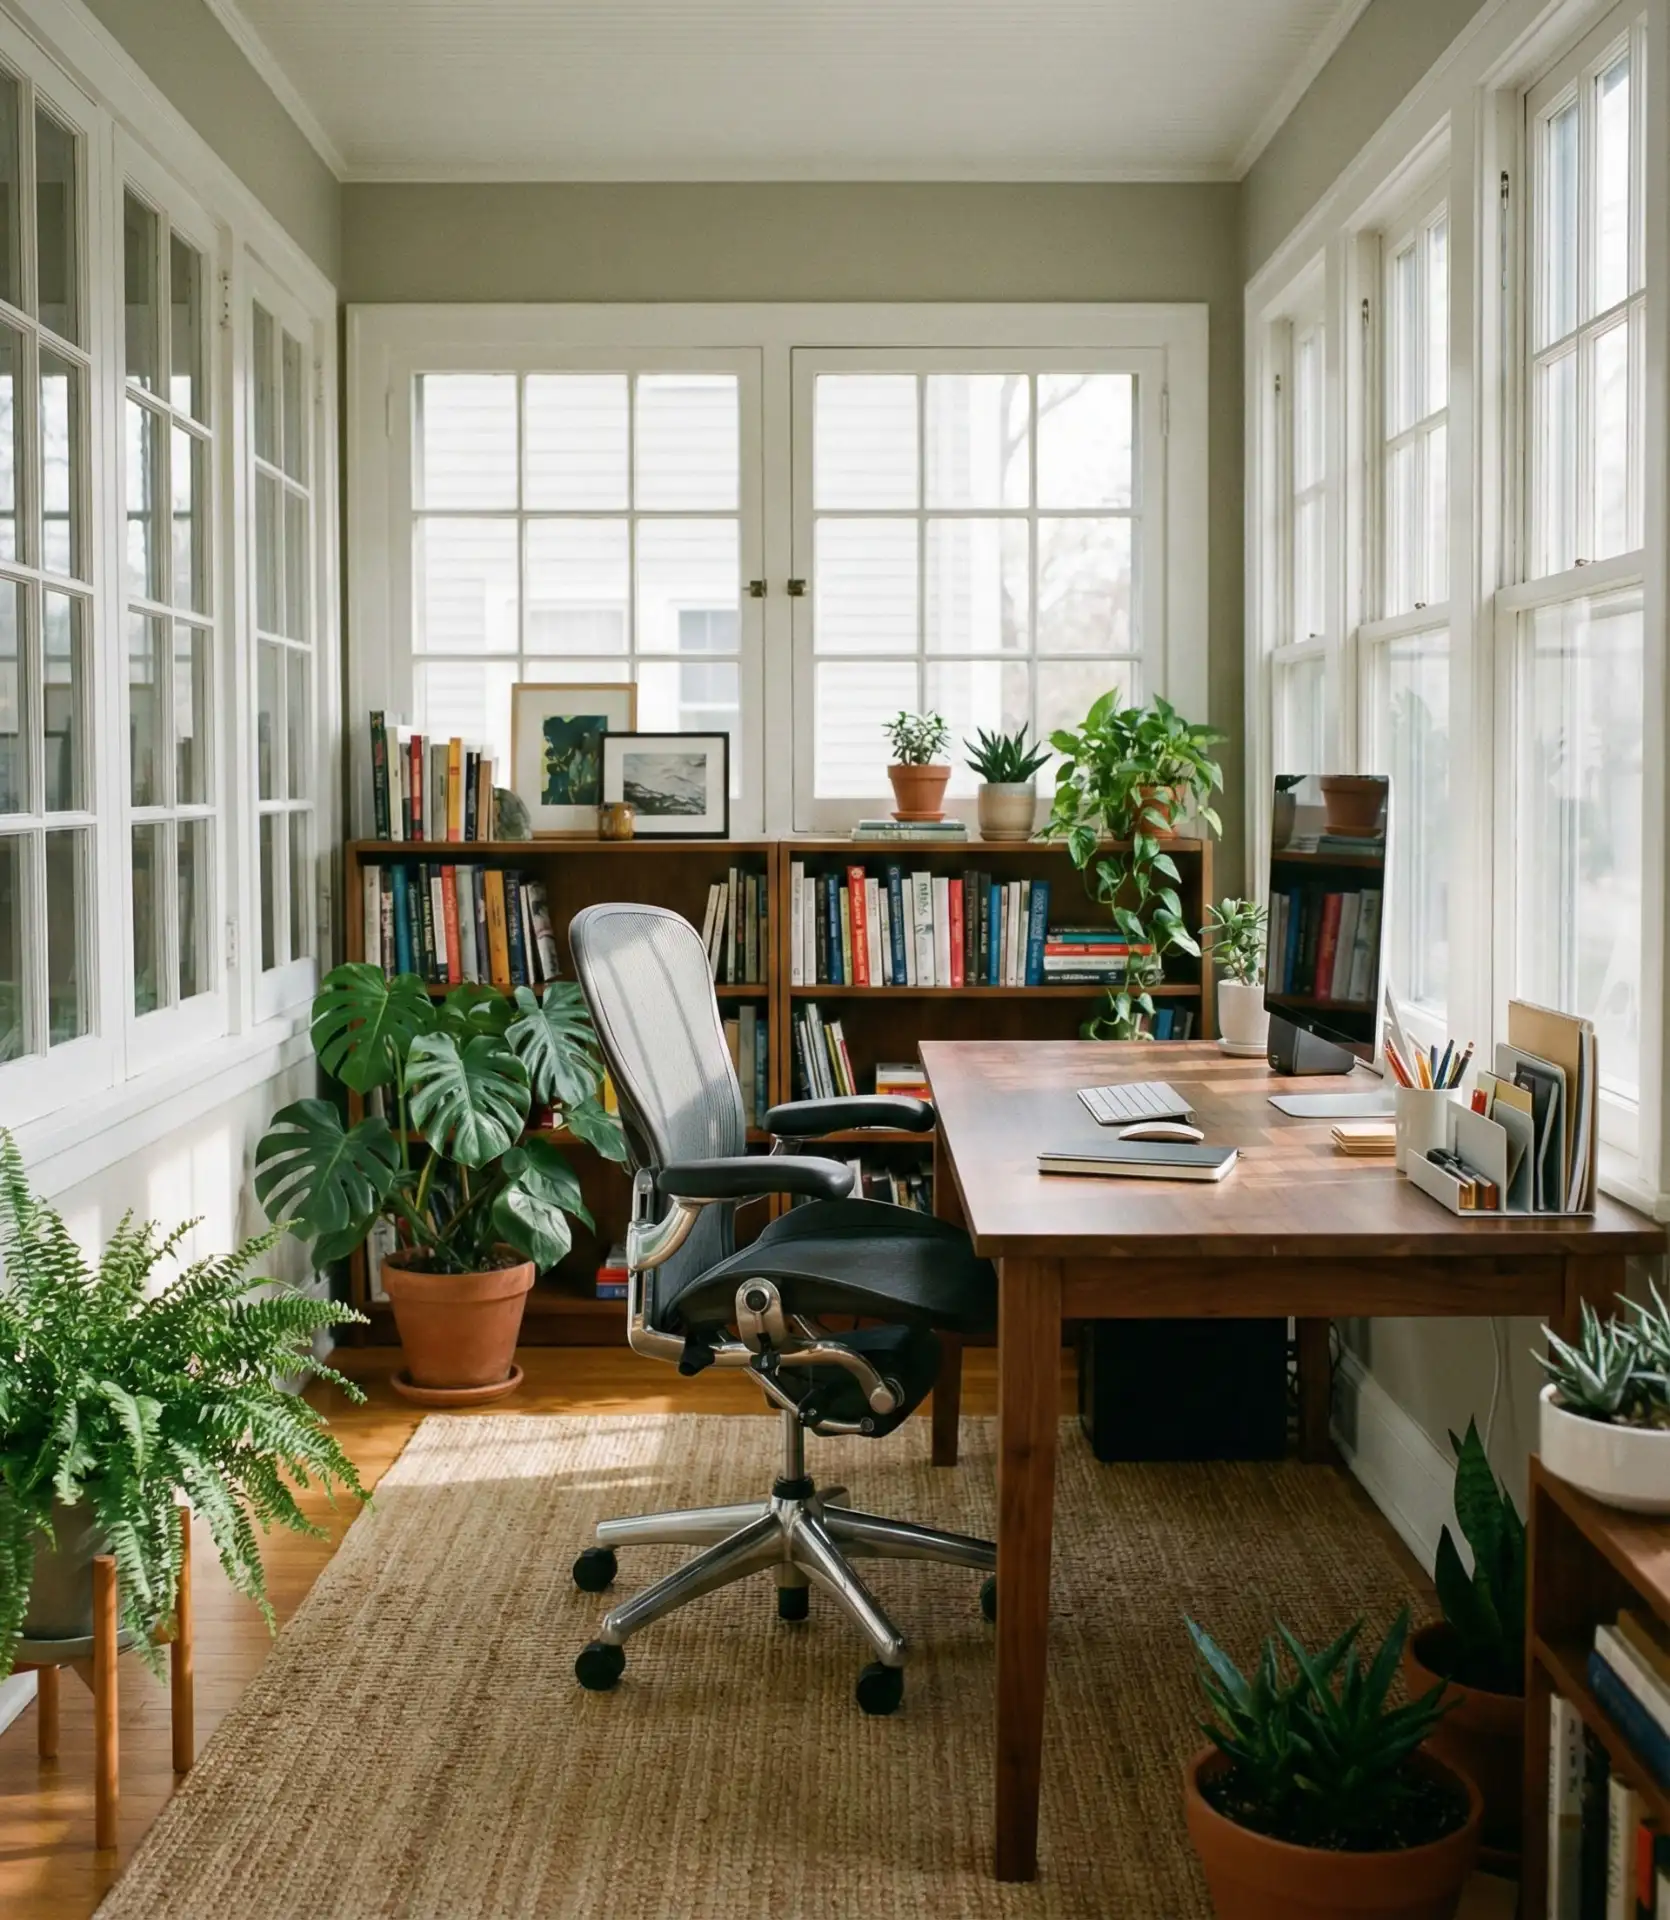
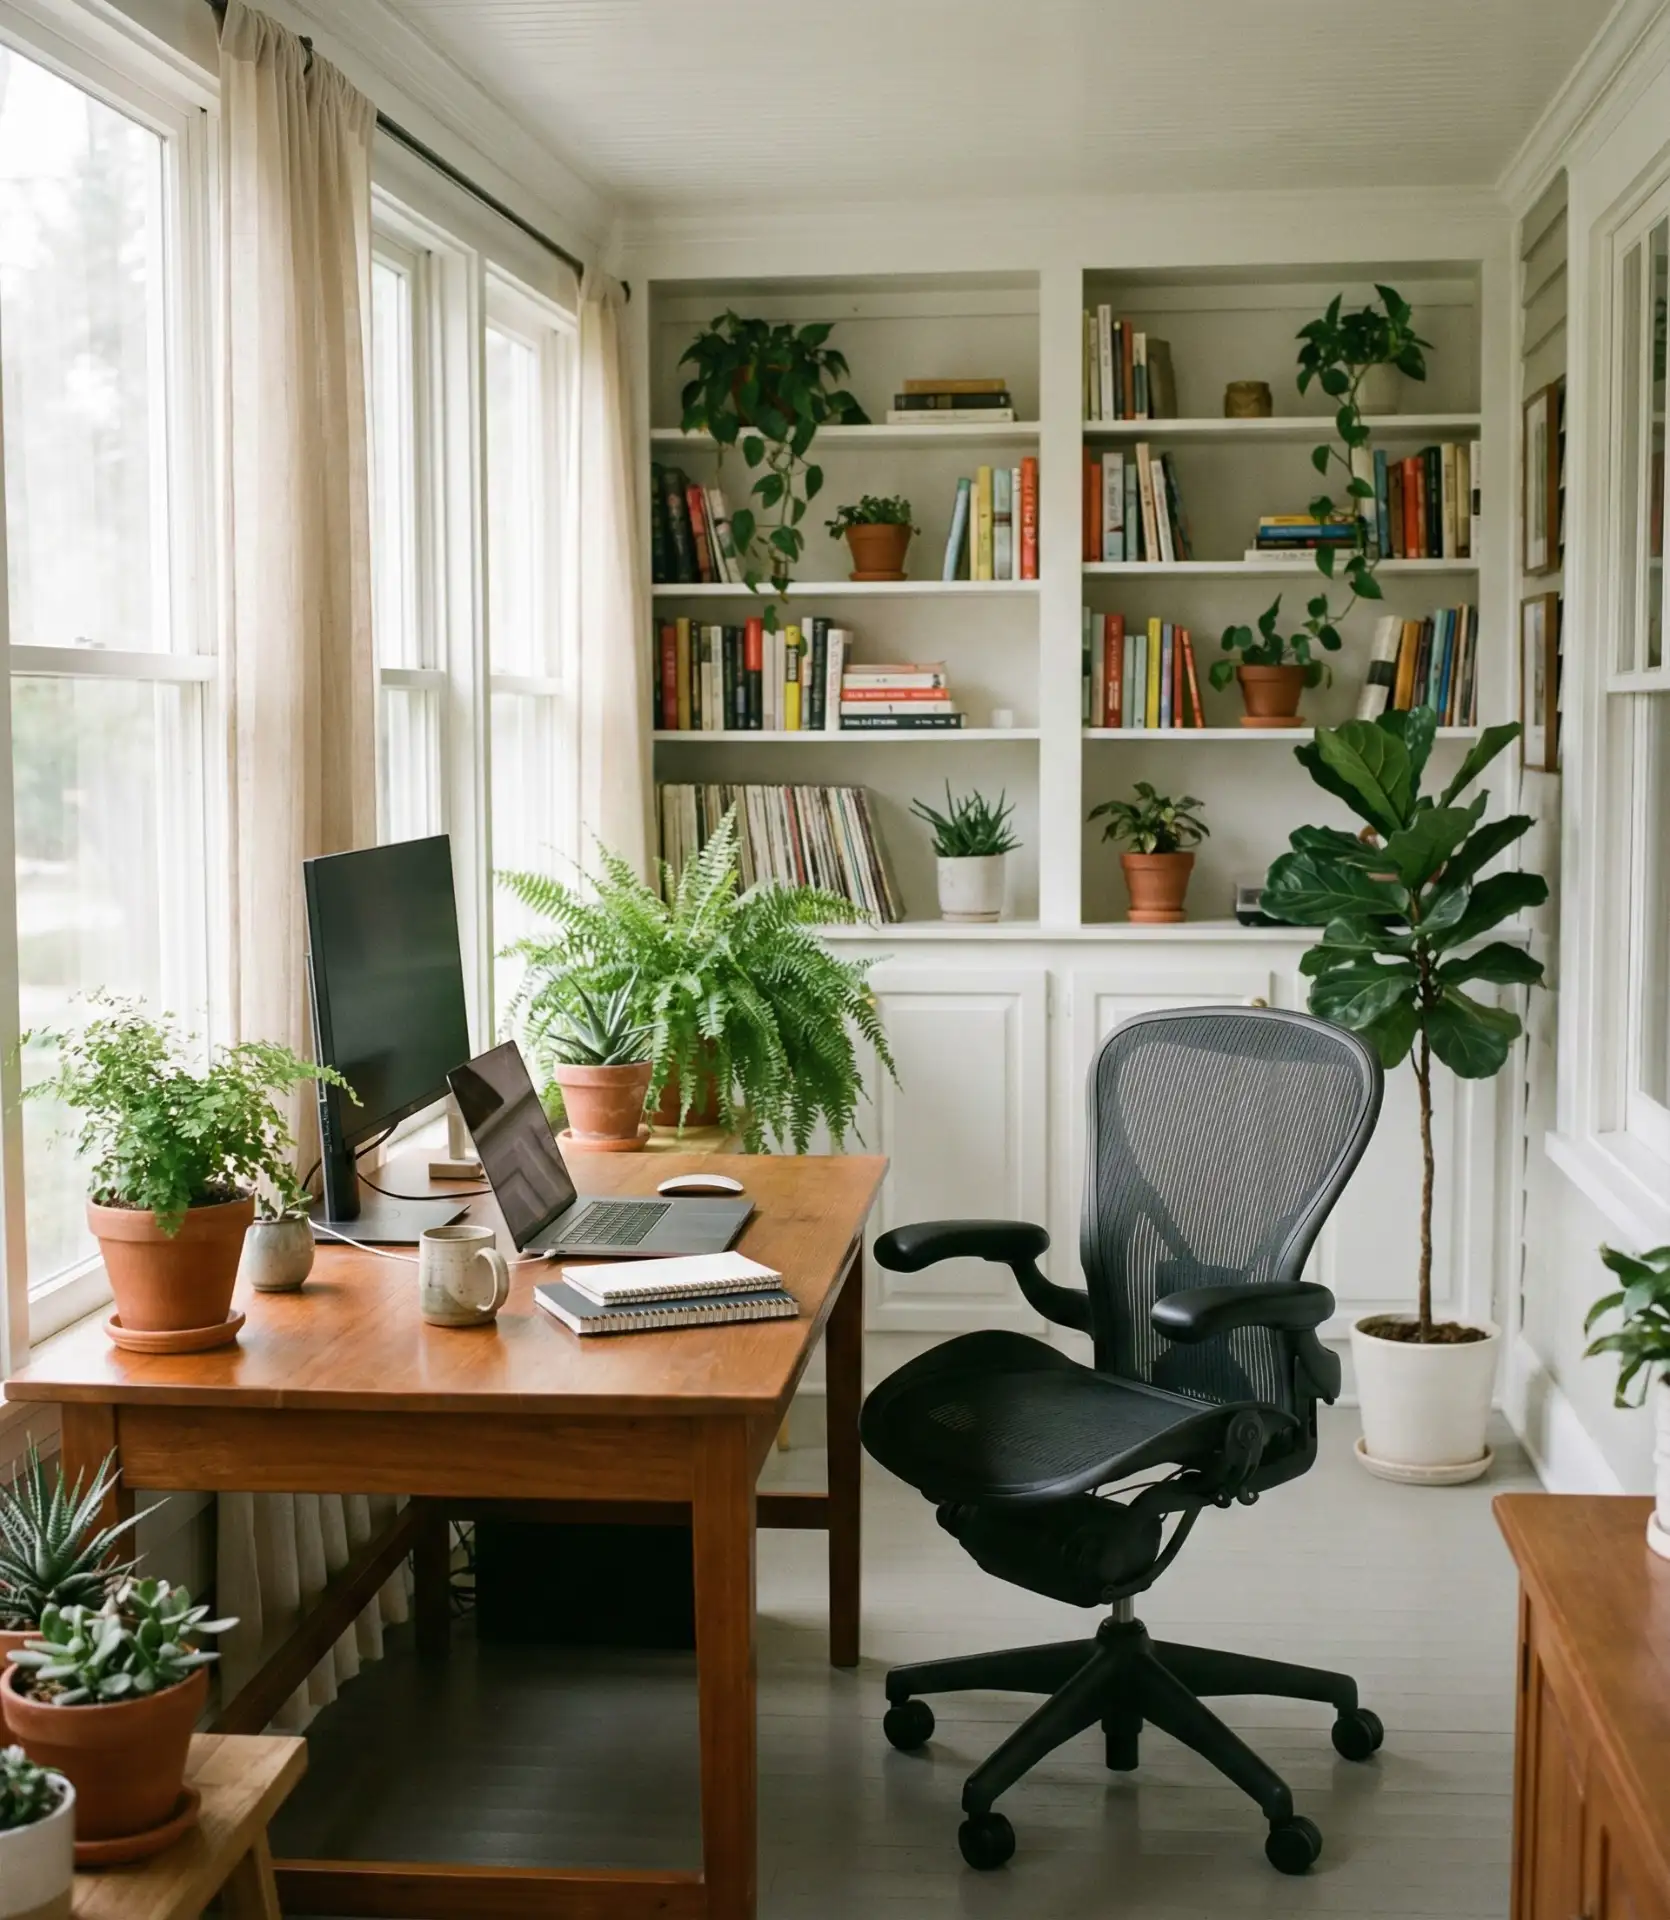
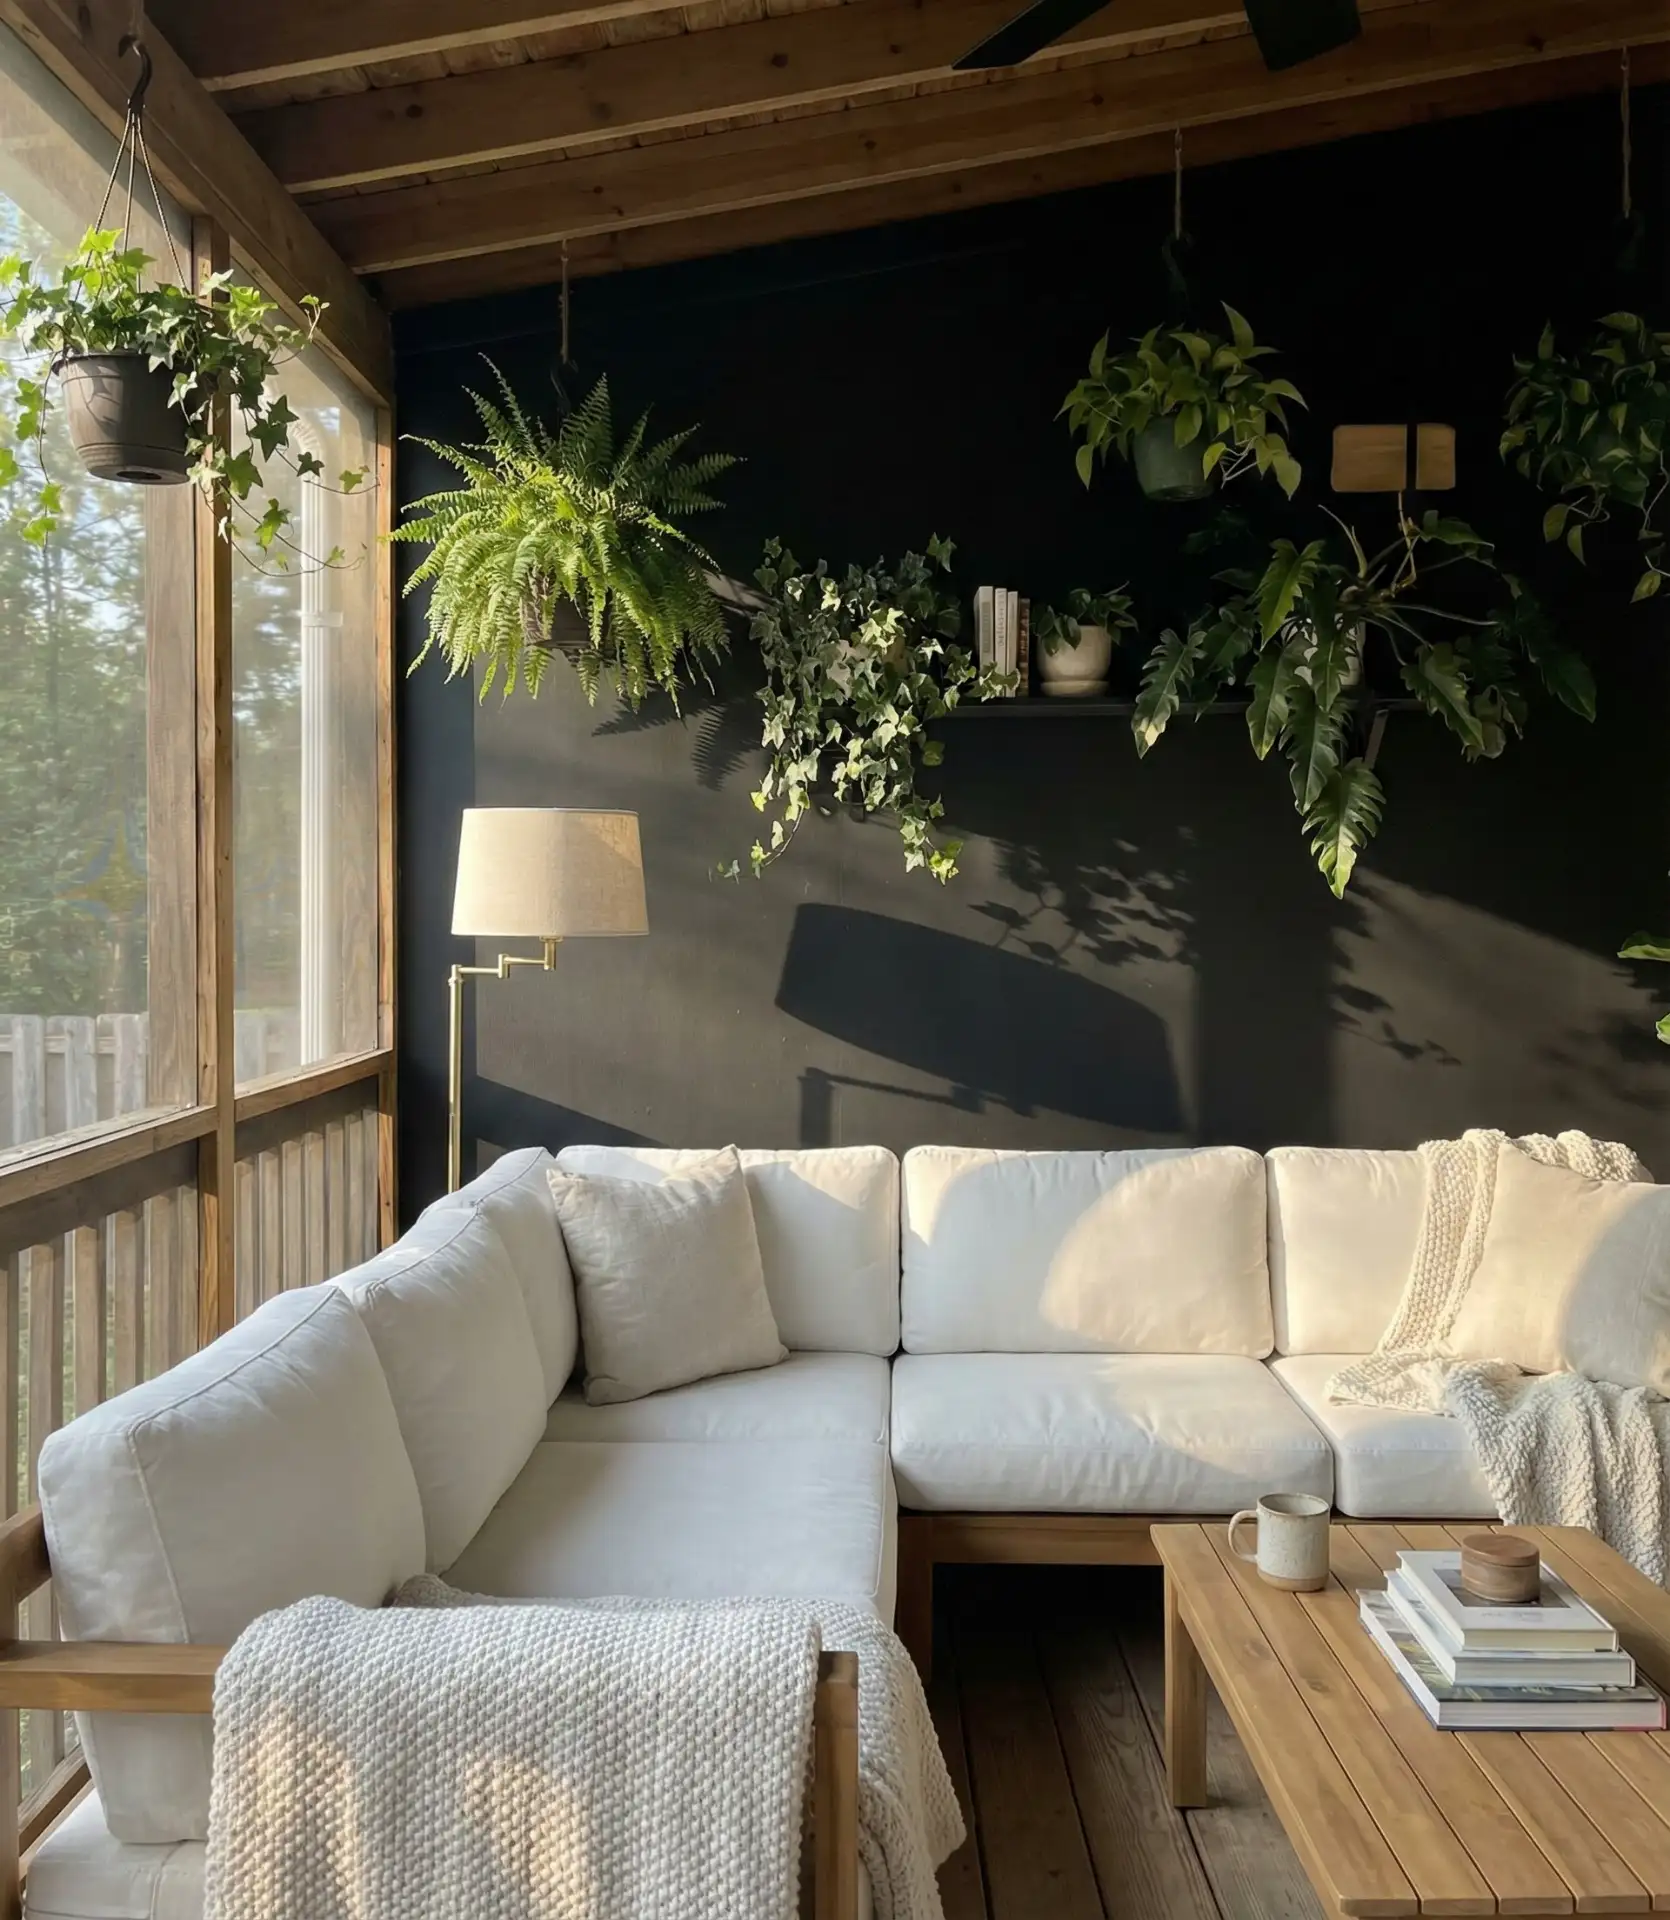
7. Incorporate Lush Greenery into Your Workspace
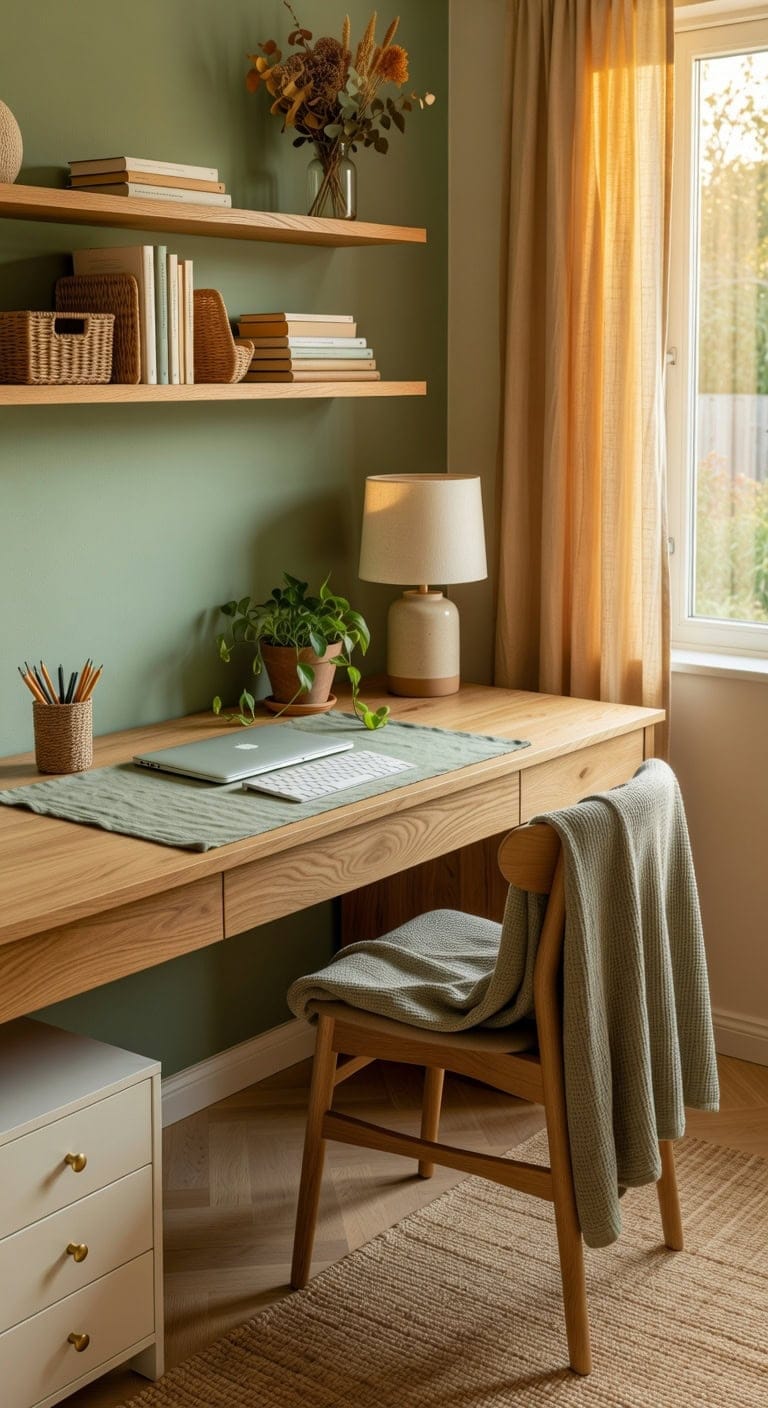
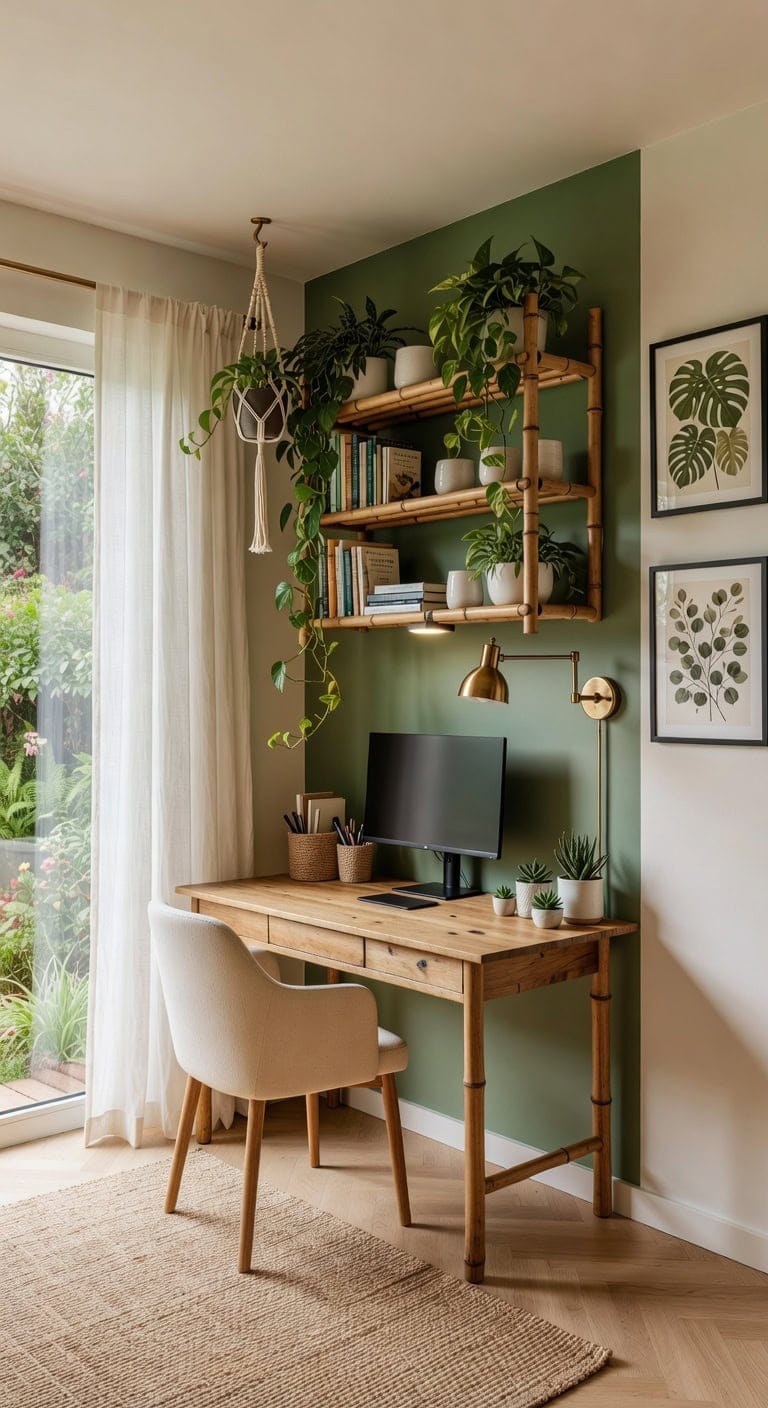
Placing a vibrant fern near your keyboard or arranging a collection of air plants in glass terrariums breathes life into your work area. Combining natural textures like stone pots and woven baskets adds depth and a refreshing vibe that keeps you motivated throughout the day. Soft greens paired with neutral tones effortlessly brighten any desk corner without requiring a total makeover.
Key Design Elements
Feature Wall: Use ‘Sagebrush’ (Behr M440-3) — a soothing muted green that evokes the tranquility of nature.
Neutral Walls & Trim: Opt for ‘Snowfall White’ (Sherwin-Williams SW 7004) — a bright, airy white that enhances light and space.
Pro Tip: Best For: Compact or medium-sized workspaces seeking a calm and invigorating atmosphere without overpowering the room with vivid colors.
8. Install Floating Shelves to Elevate Your Workspace
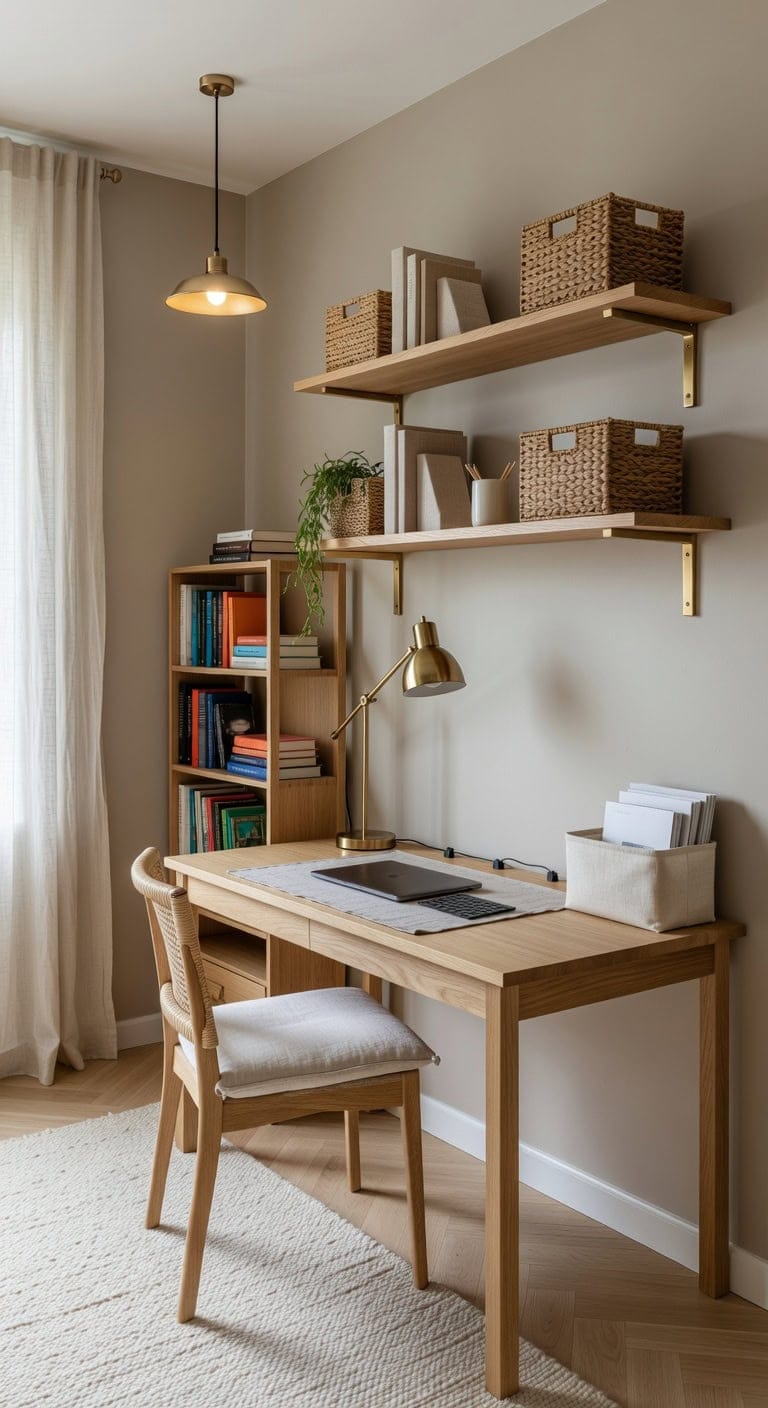
Transform the empty space above your desk into a stylish storage solution by adding floating shelves. Choose shelves in a soft cream tone against a muted taupe wall to create depth, then accessorize with terracotta pots, ceramic sculptures, and leather-bound books for a balanced, inviting look. This simple tweak instantly personalizes your office without overwhelming the room.
Key Design Elements
Desk backdrop: Use ‘Accessible Beige’ (Benjamin Moore 508) — a warm, neutral shade that provides a cozy foundation for your shelving decor.
Shelving and trim: Opt for ‘Whisper White’ (Sherwin-Williams SW 7002) — a gentle, clean white that brings lightness and subtle contrast to the shelves.
Pro Tip: Best For: Compact or medium-sized workspaces that benefit from added storage and aesthetic charm without taking up precious floor area.
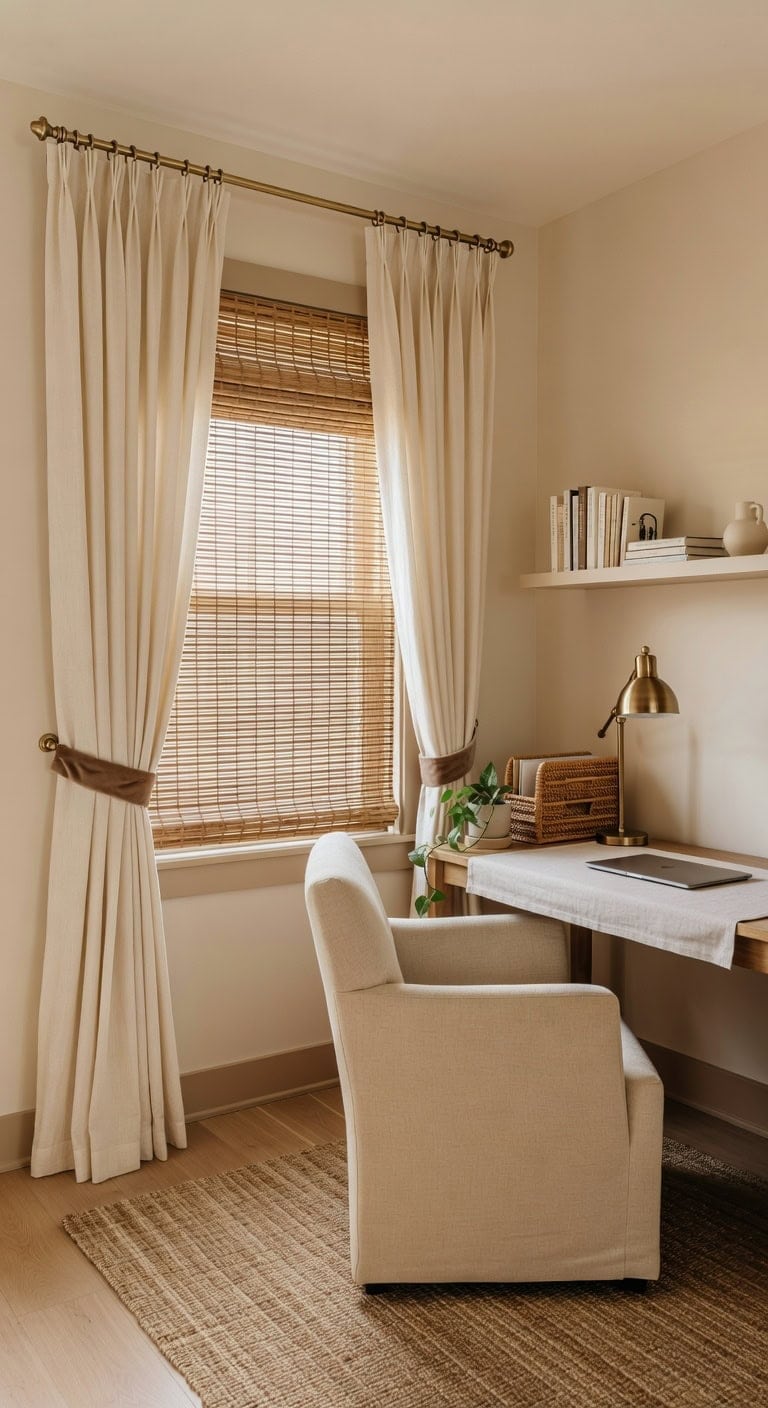
9. Stylish Window Treatments to Elevate Your Workspace
Choosing the perfect window coverings can transform your home office, making the window a captivating focal point. Imagine airy cotton curtains in soft dove gray combined with a sleek bamboo blind beneath for a cozy, textured vibe. Incorporate leather strap tiebacks to introduce an element of sophistication, giving your office a curated and welcoming atmosphere.
Key Design Elements
Accent Wall Color: Opt for ‘Classic Gray’ (Benjamin Moore 1548) to harmonize with the muted tones of the curtains while adding subtle depth to the space.
Trim and Molding: Use ‘Balanced Beige’ (Benjamin Moore 1089) for window frames to complement the natural hues of the bamboo blinds and maintain a cohesive palette.
Pro Tip: Best For: Home offices facing east or west, where layered window layers and warm neutrals help soften harsh sunlight while preserving a serene and inviting environment.
10. Showcase Cherished Memories
Infusing your workspace with images of loved ones and meaningful moments instantly adds a touch of warmth and inspiration. Whether through a sleek digital slideshow or an artfully arranged collection of printed snapshots, your desk transforms into a personal sanctuary that keeps motivation close at hand.
Key Design Elements
Display a rotating slideshow on a smart digital frame to effortlessly cycle through your favorite snapshots.
Arrange printed photos of different sizes on a floating shelf for a stylish, gallery-like presentation.
Pro Tip: Best For: Anyone looking to personalize their office without permanent decor changes, keeping treasured memories front and center to boost daily productivity.
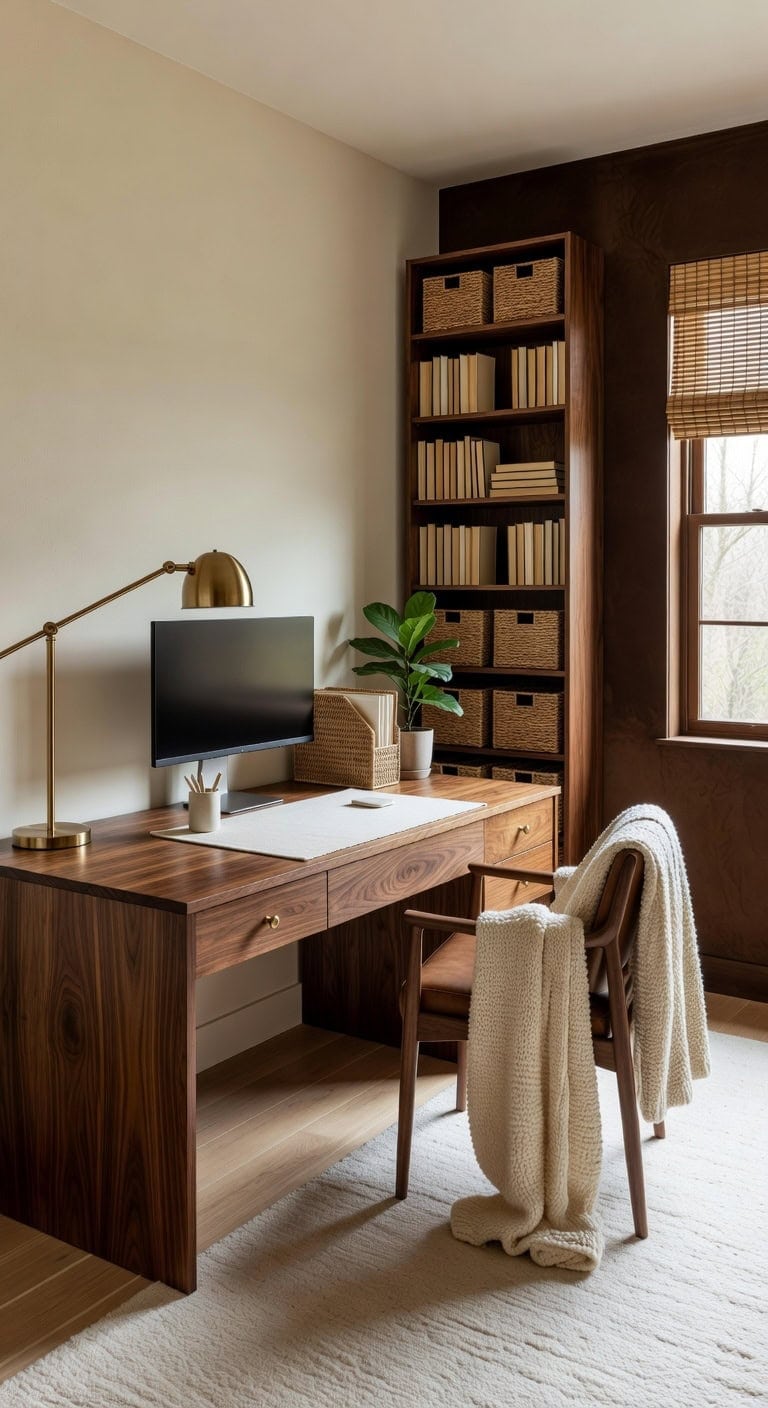
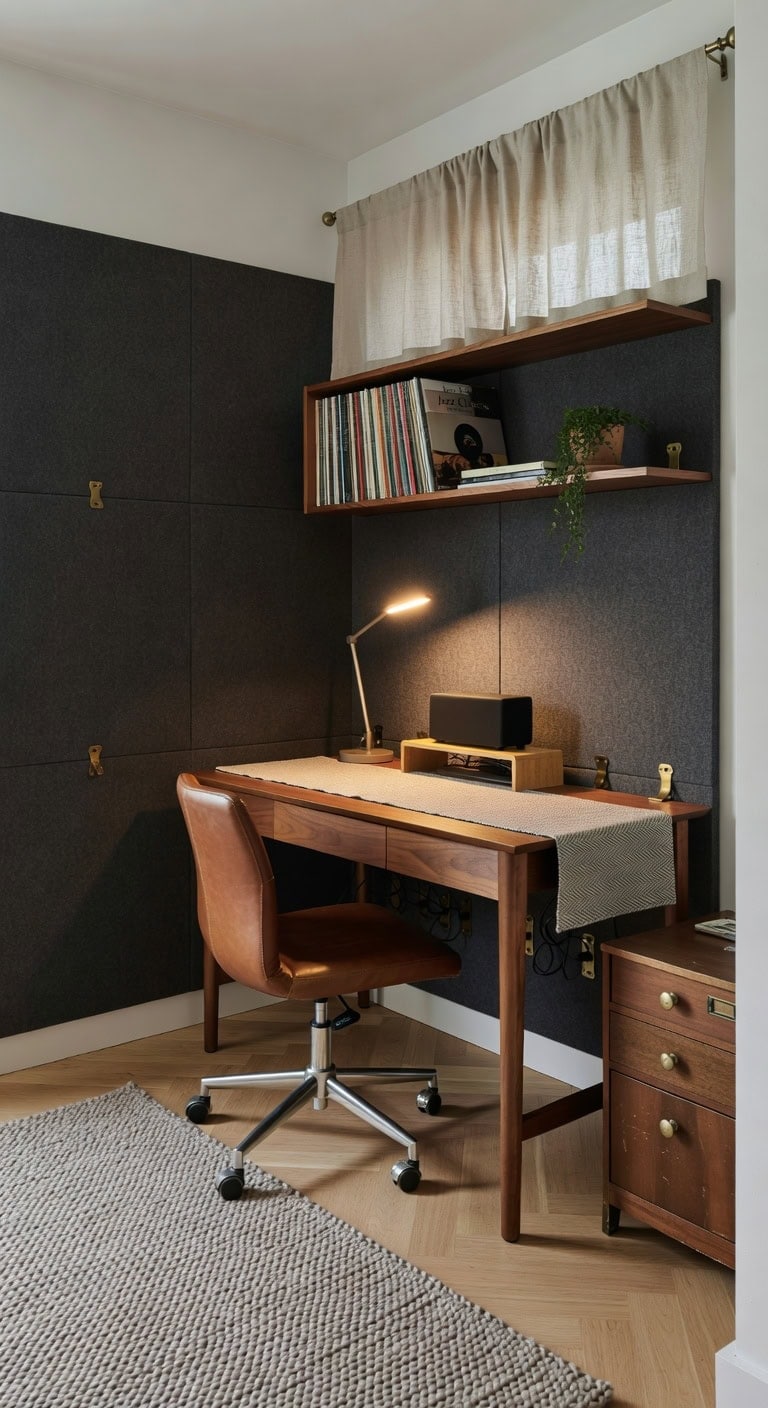
11. Select a Striking Desk to Define Your Workspace
Choosing a distinctive desk instantly shapes the vibe of your home office, blending natural wood hues with soft, neutral shades for a balanced and inviting environment. Picture the tactile allure of walnut grain paired with smooth, pale surfaces and sleek metal accents — a dynamic mix that breathes character into any spot, whether it’s a full room or a cozy corner setup.
Key Design Elements
Walls: Opt for ‘Alabaster Glow’ (Farrow & Ball 2004) — a subtle, warm white that enhances light and space.
Feature Wall or Desk Alcove: Use ‘Espresso Brown’ (Benjamin Moore 1613) — a rich, dark brown that anchors your workspace.
Pro Tip: Best For: Compact home offices or multifunctional areas where a standout desk and complementary hues create a polished, cohesive look without overwhelming the space.
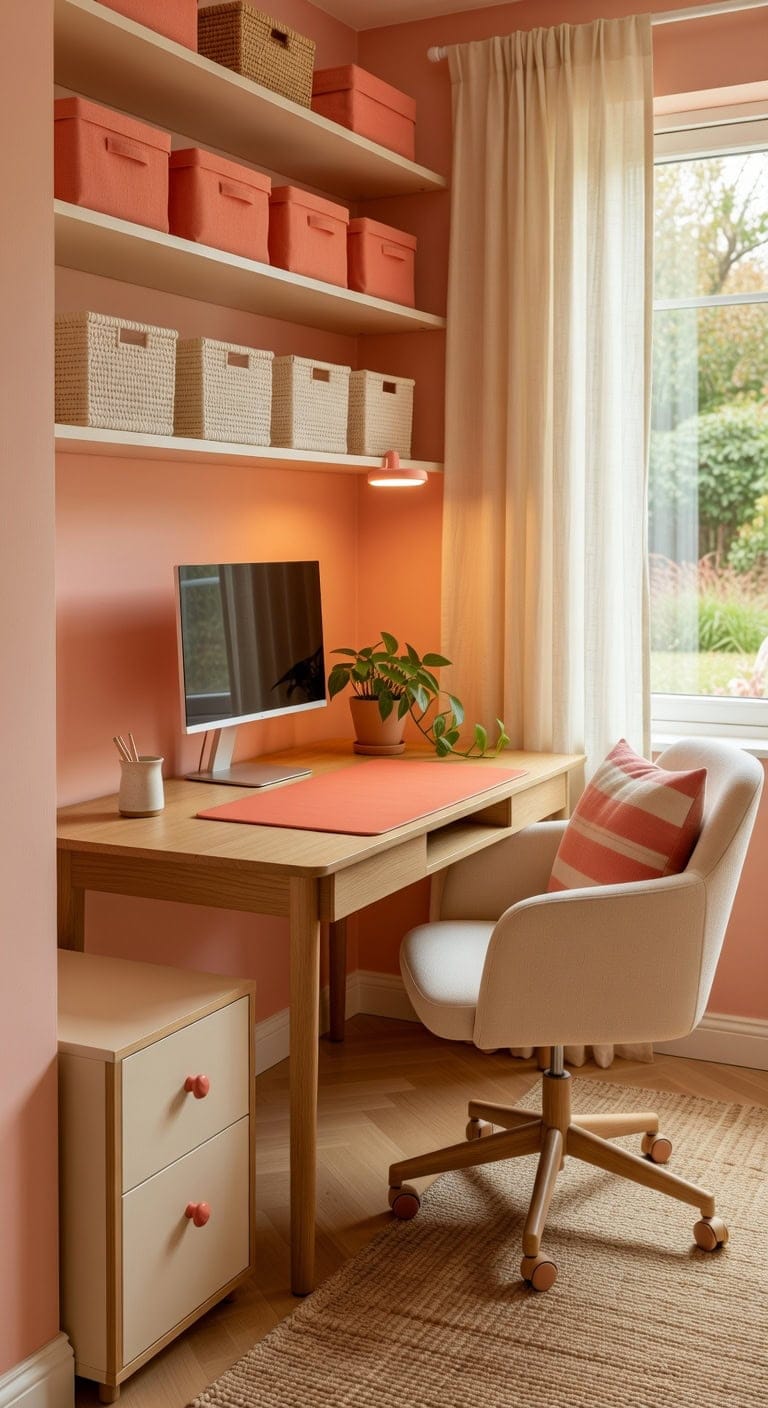
12. Coordinate Your Storage Hues with Your Space
Choosing storage containers and organizers that echo your room’s color story elevates a chaotic workspace into a harmonious retreat. Imagine pastel teal boxes aligned neatly on dark walnut shelves, complemented by soft beige drawer liners and textured rattan baskets that add subtle layers of interest throughout the room.
Key Design Elements
Feature Wall and Storage Units: Use ‘Teal Tide’ (Sherwin-Williams SW 6760) to create a calm, invigorating foundation that highlights cream and natural fiber accents.
Other Walls and Trim: Opt for ‘Almond Milk’ (Sherwin-Williams SW 6107), a warm off-white shade that balances bold colors and enhances warmth.
Pro Tip: Best For: Home offices with open displays where organized storage doubles as stylish decor, perfect for rooms that serve multiple purposes, like a guest area or family nook.
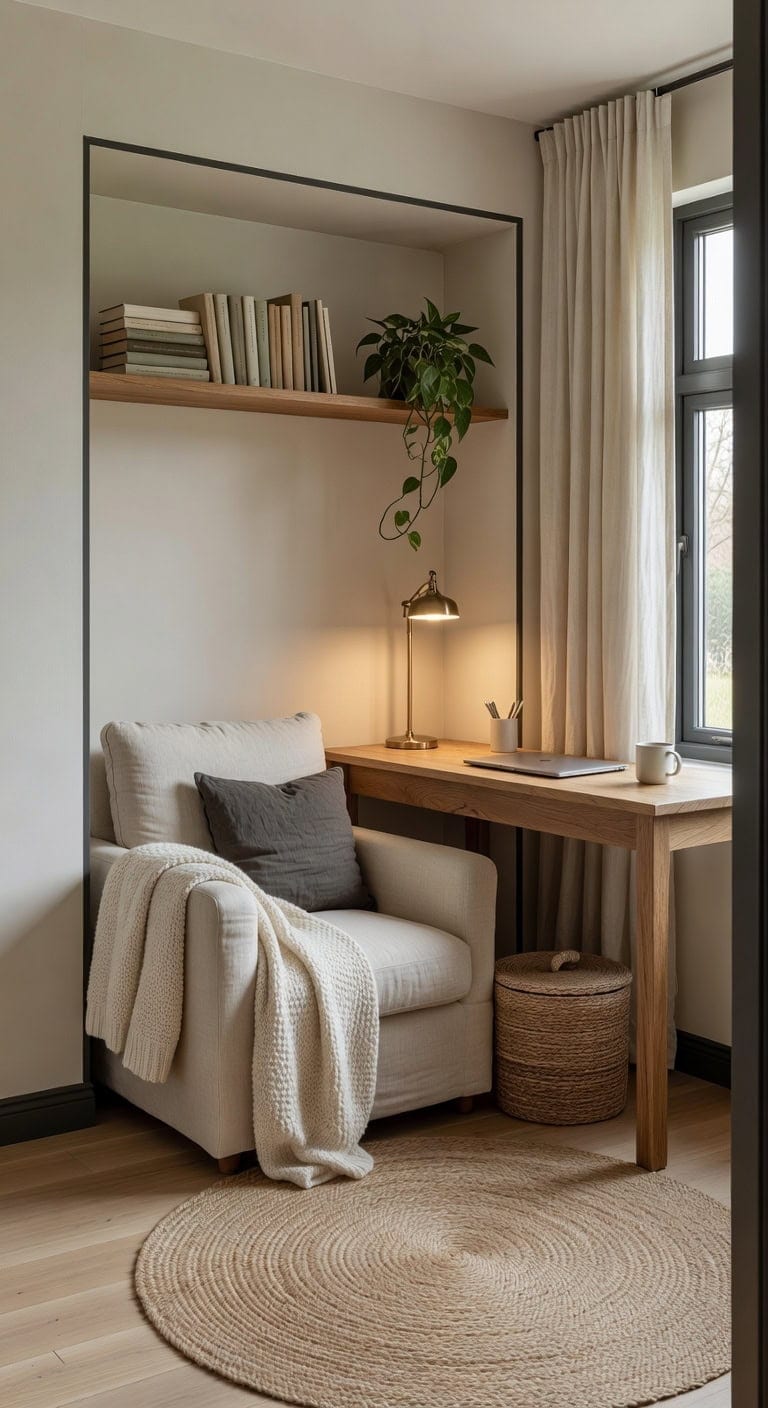
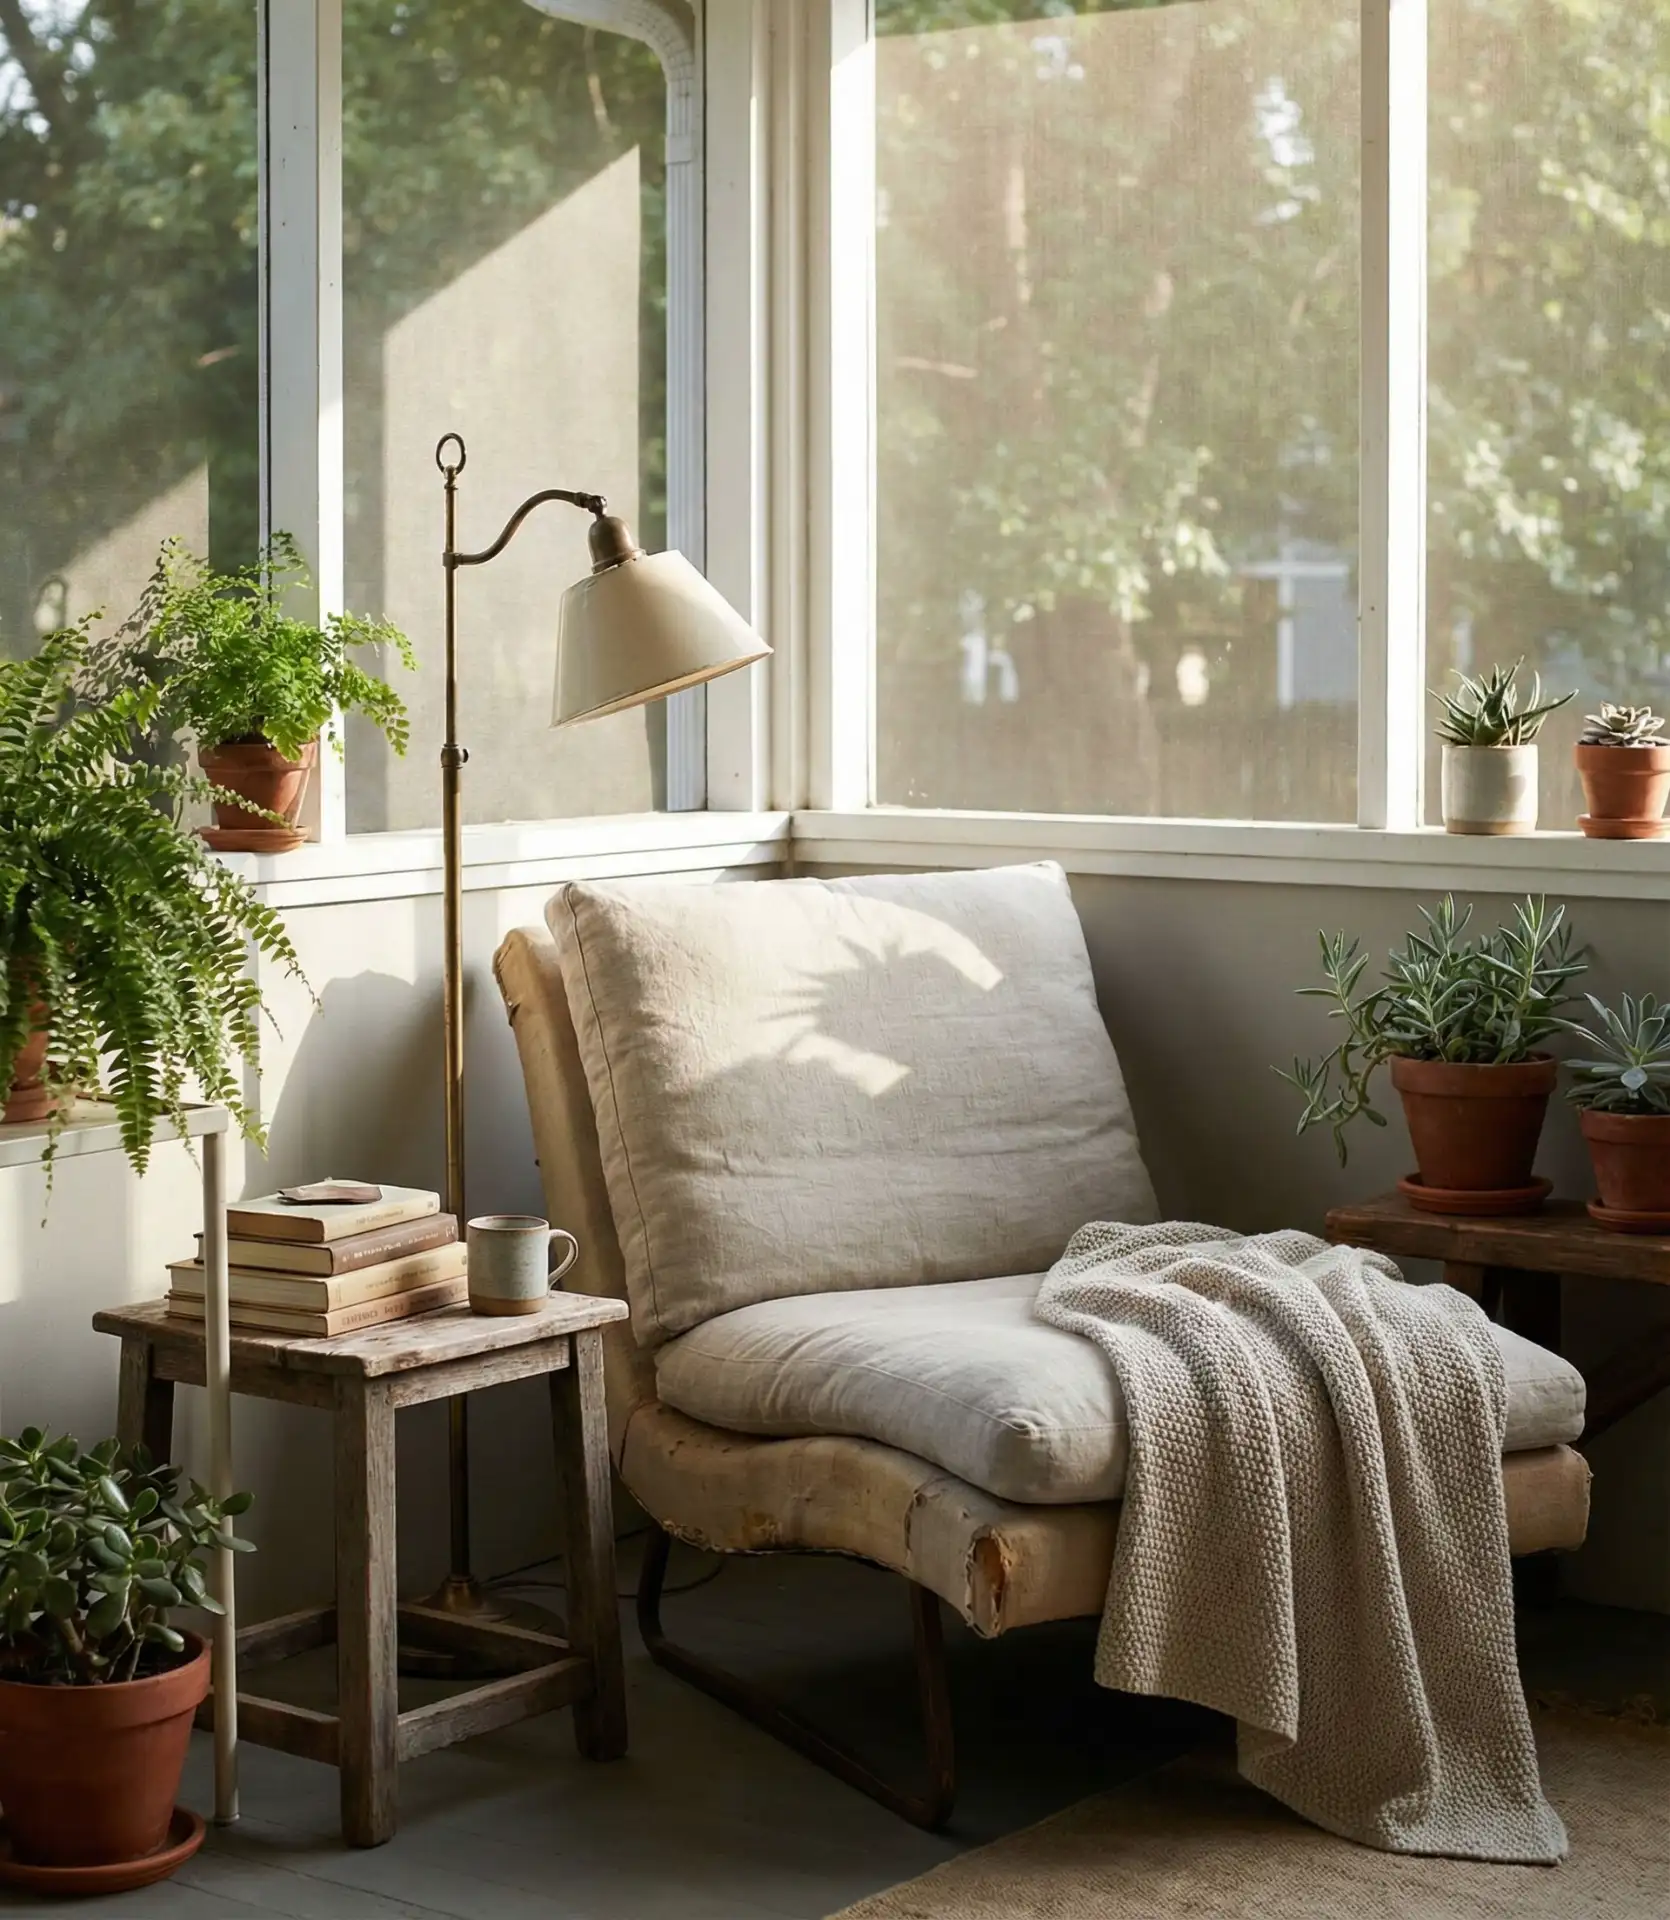
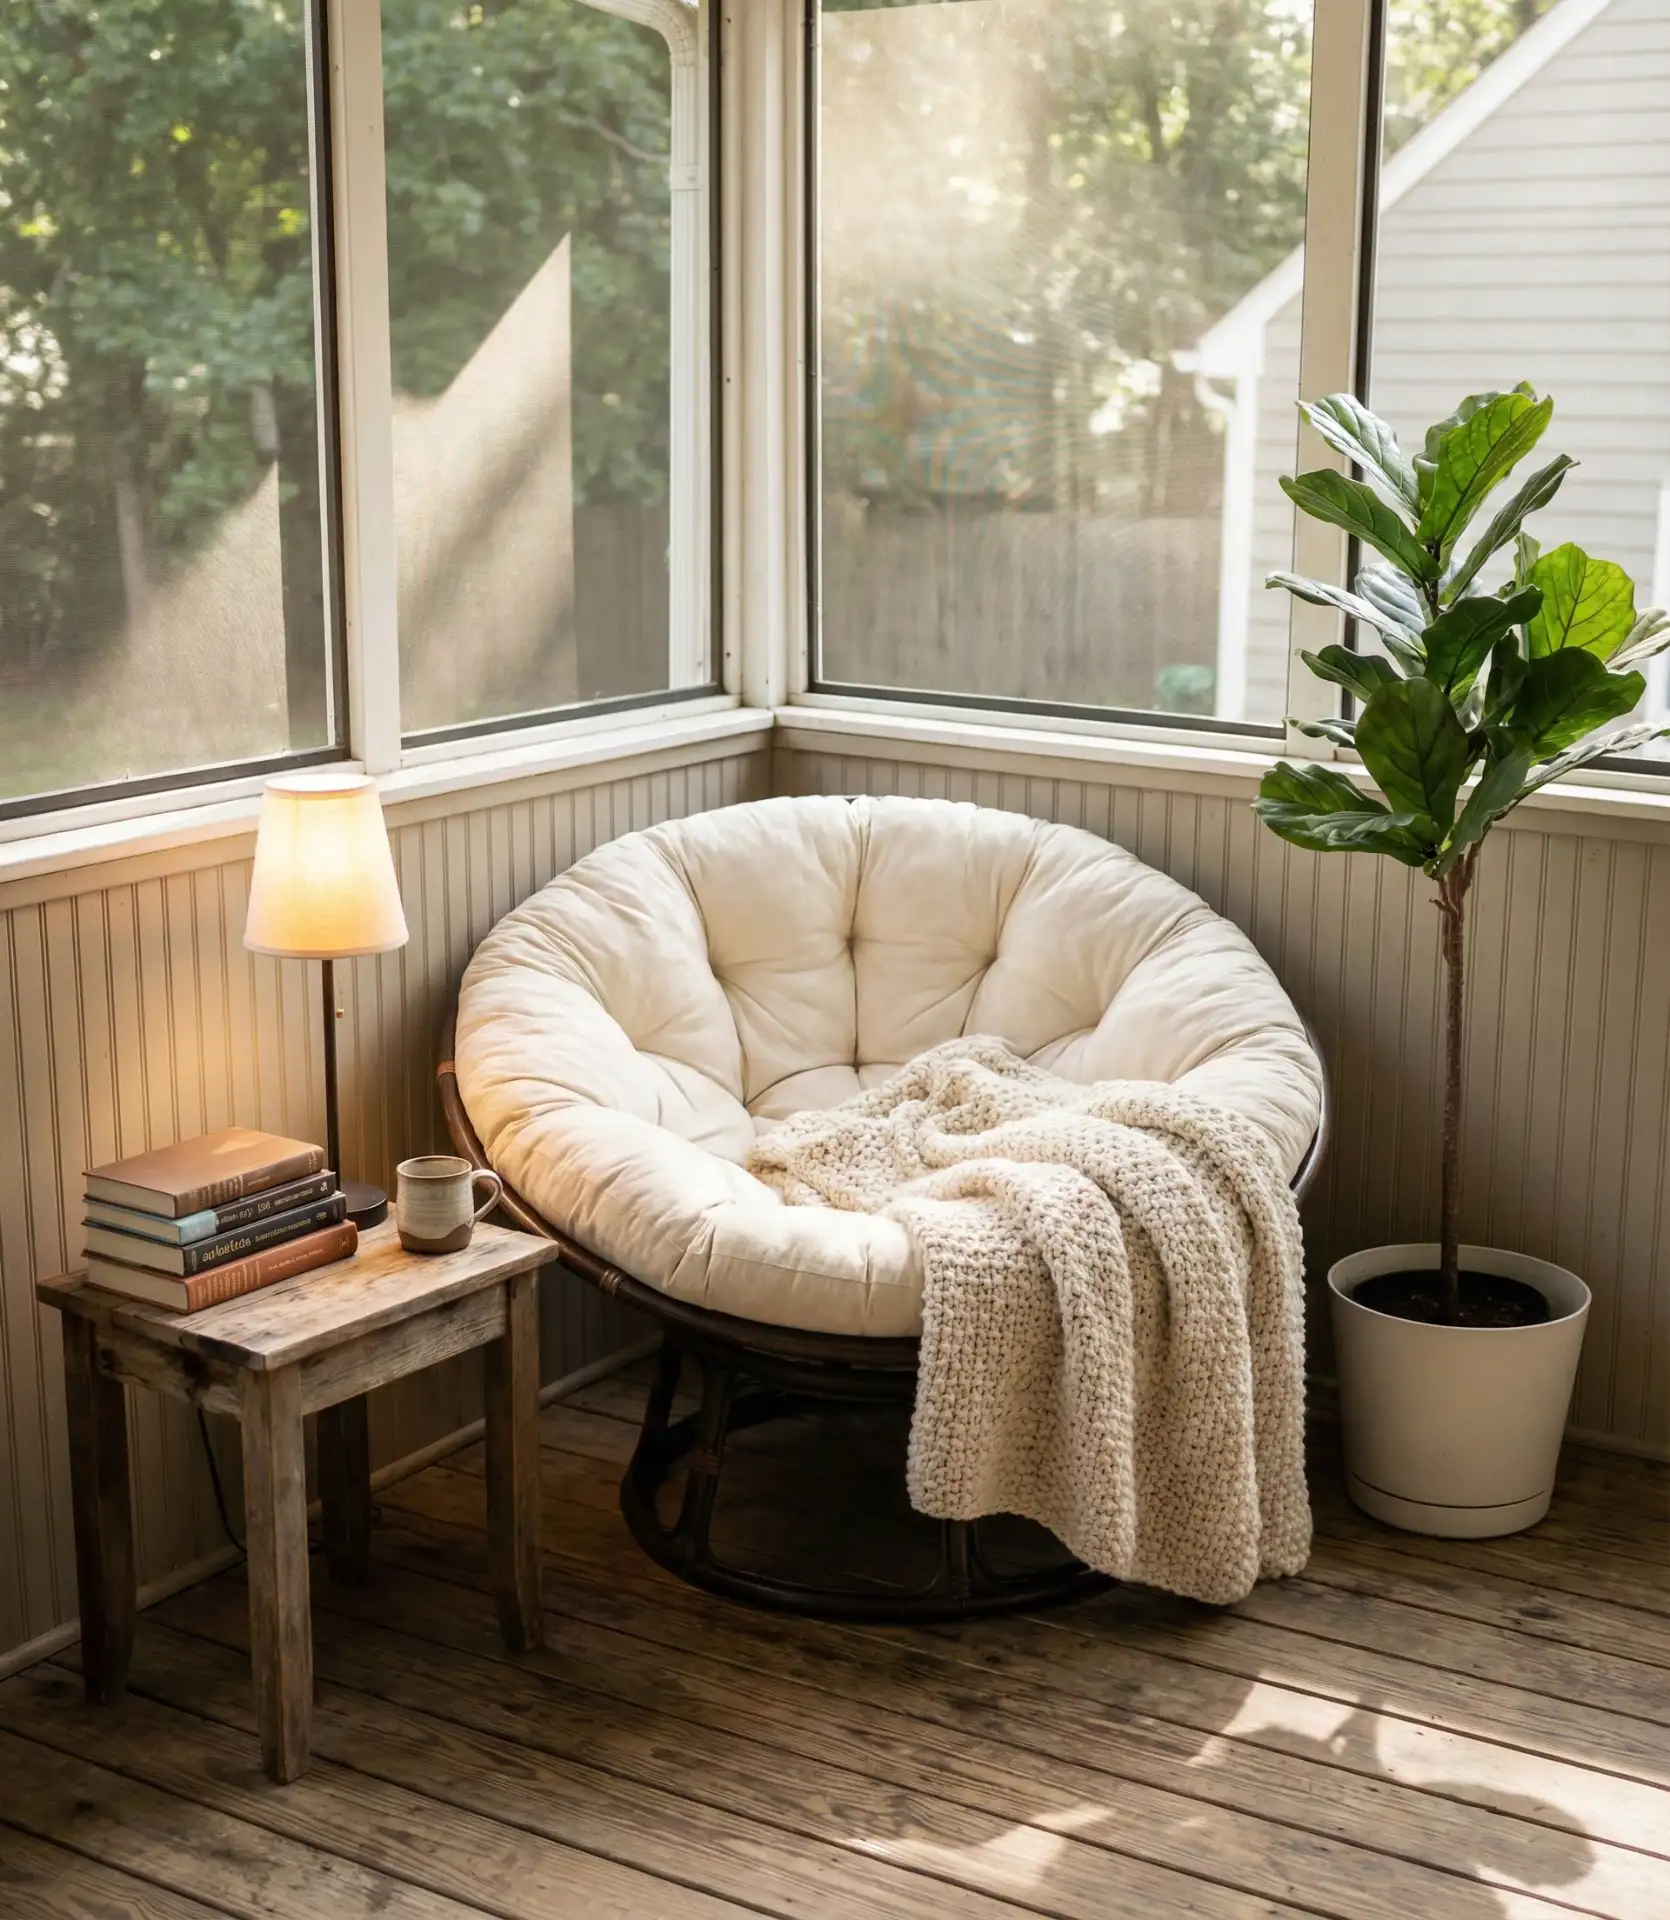
13. Create a Serene Reading Retreat
Transform that overlooked spot next to your workspace into a tranquil haven where you can unwind. Imagine plush cushions layered with a cozy throw, set against soothing cream walls paired with sleek graphite highlights, all anchored by a natural sisal rug. This peaceful enclave makes remote work feel like a mini getaway.
Key Design Elements
Wall Hue: Choose ‘Alabaster’ (Sherwin-Williams SW 7008) — a creamy, soft white that bathes the nook in gentle, calming light.
Feature Accent: Use ‘Iron Ore’ (Sherwin-Williams SW 7069) for trim or a statement wall — a bold, matte charcoal that adds depth and modern edge.
Pro Tip: Best For: Small, neglected spaces like a corner near your desk, a cozy bay window, or a narrow hallway that could benefit from a thoughtful, inviting makeover.
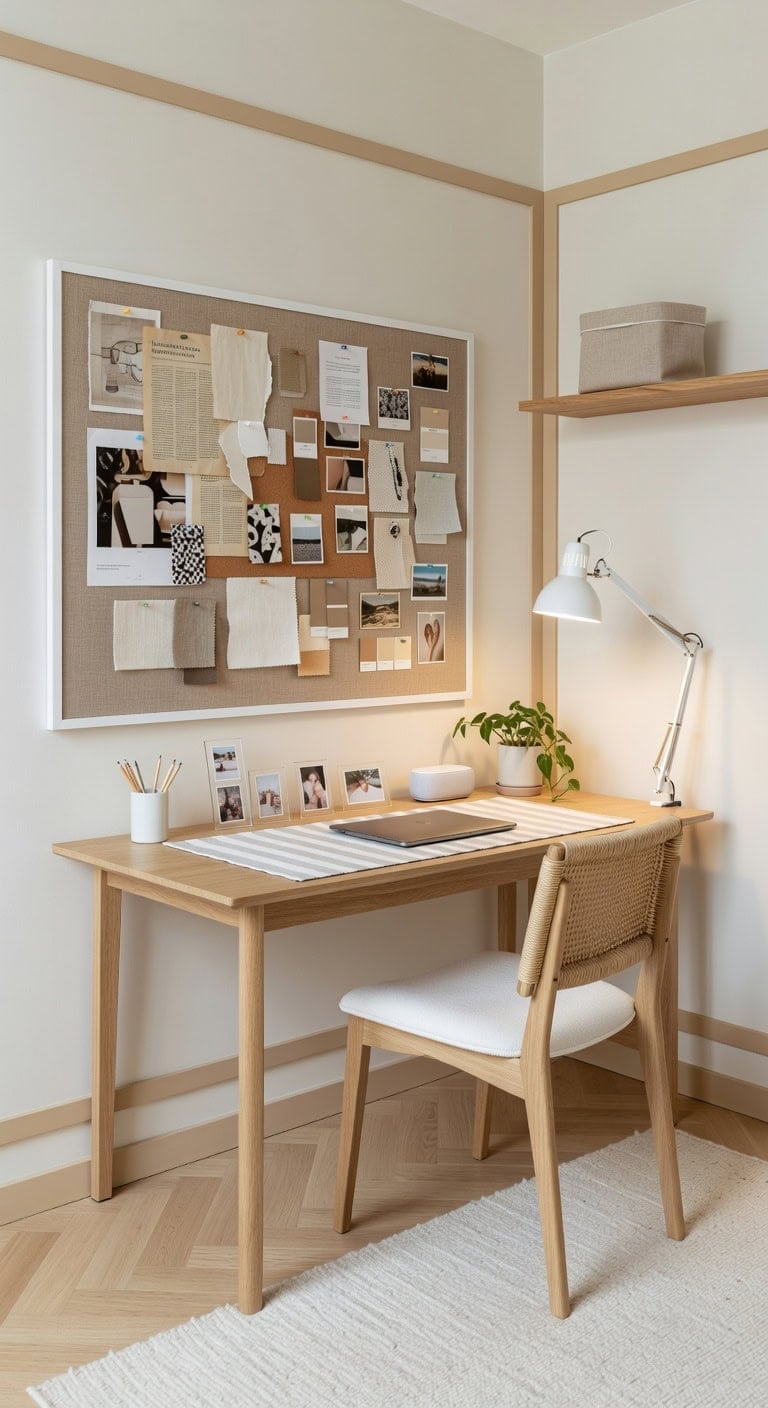
14. Create an Inspiration Hub with a Dynamic Idea Wall
Turn an empty wall into a vibrant hub of creativity by combining different textures like cork panels, fabric pinboards, and sleek magnetic strips. This layered approach not only organizes your thoughts but also keeps fresh ideas visible and easy to rearrange. Neutral shades such as soft beige and ivory provide a calm backdrop that energizes without distraction.
Key Design Elements
Main Wall Color: Choose ‘Alabaster’ (Sherwin-Williams SW 7008) — a gentle, creamy white that highlights your pinned notes and images beautifully.
Trim or Accent Area: Use ‘Desert Taupe’ (Behr PPU5-10) — a warm, earthy tone that complements natural materials like cork and fabric.
Pro Tip: Best For: Home studios, creative nooks, and any workspace where keeping evolving ideas front and center sparks productivity and inventive thinking.
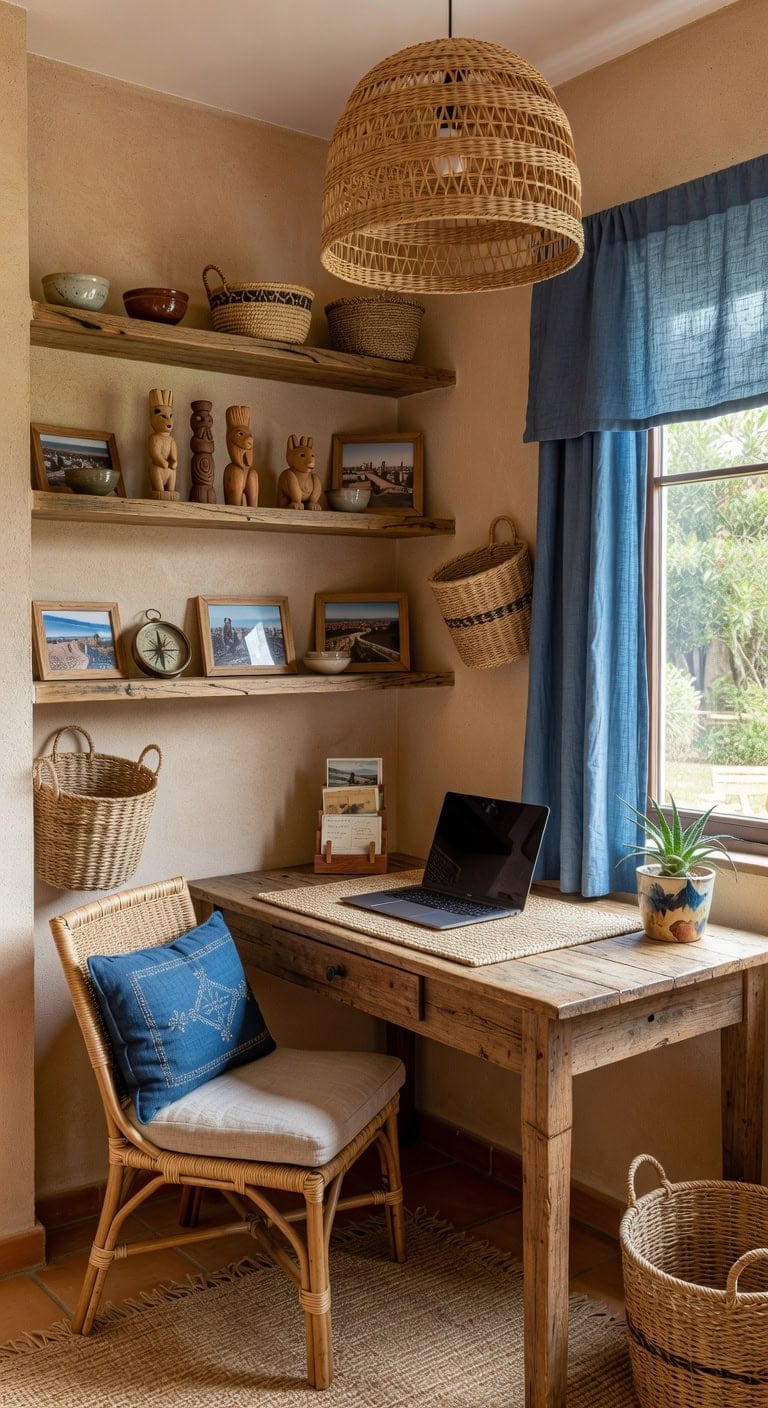
15. Showcase Your Travel Treasures in Your Workspace
Integrate your cherished travel mementos into your home office to create a personalized environment that reflects your adventures. Combining earthy clay shades with serene sea greens alongside natural rattan accents and soft cotton textiles evokes a curated, worldly vibe. This method turns scattered keepsakes into a cohesive display that fuels inspiration throughout your workday.
Key Design Elements
Feature Wall Behind Display: Use ‘Tuscan Clay’ (Sherwin-Williams SW 7701) — a warm, earthy tone that grounds and highlights your collection beautifully.
Shelving Nooks or Cabinets: Paint in ‘Coastal Fern’ (Sherwin-Williams SW 6433) — a calming green-blue shade that adds depth and enhances your souvenirs’ colors.
Pro Tip: Best For: Artistic workspaces where infusing personality and global flair takes priority over purely streamlined design.
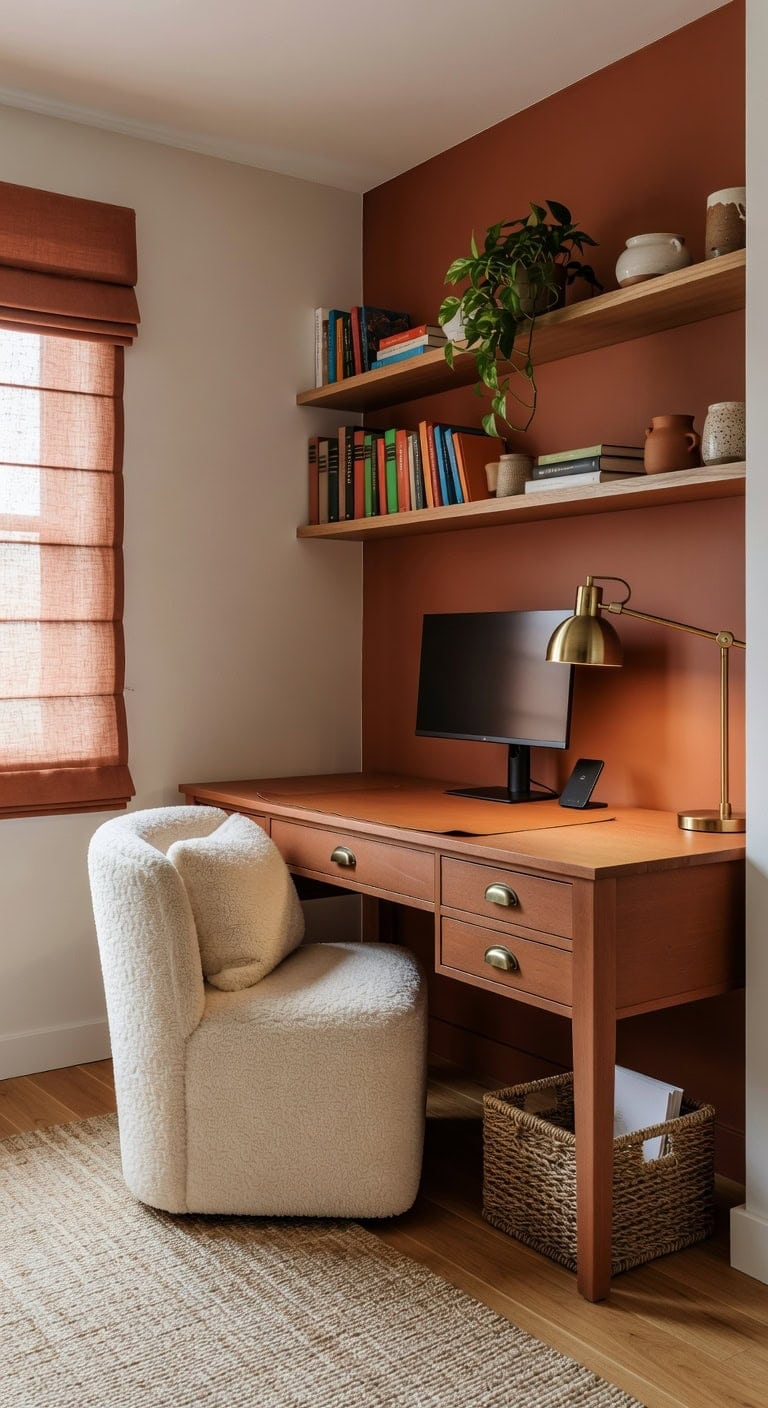
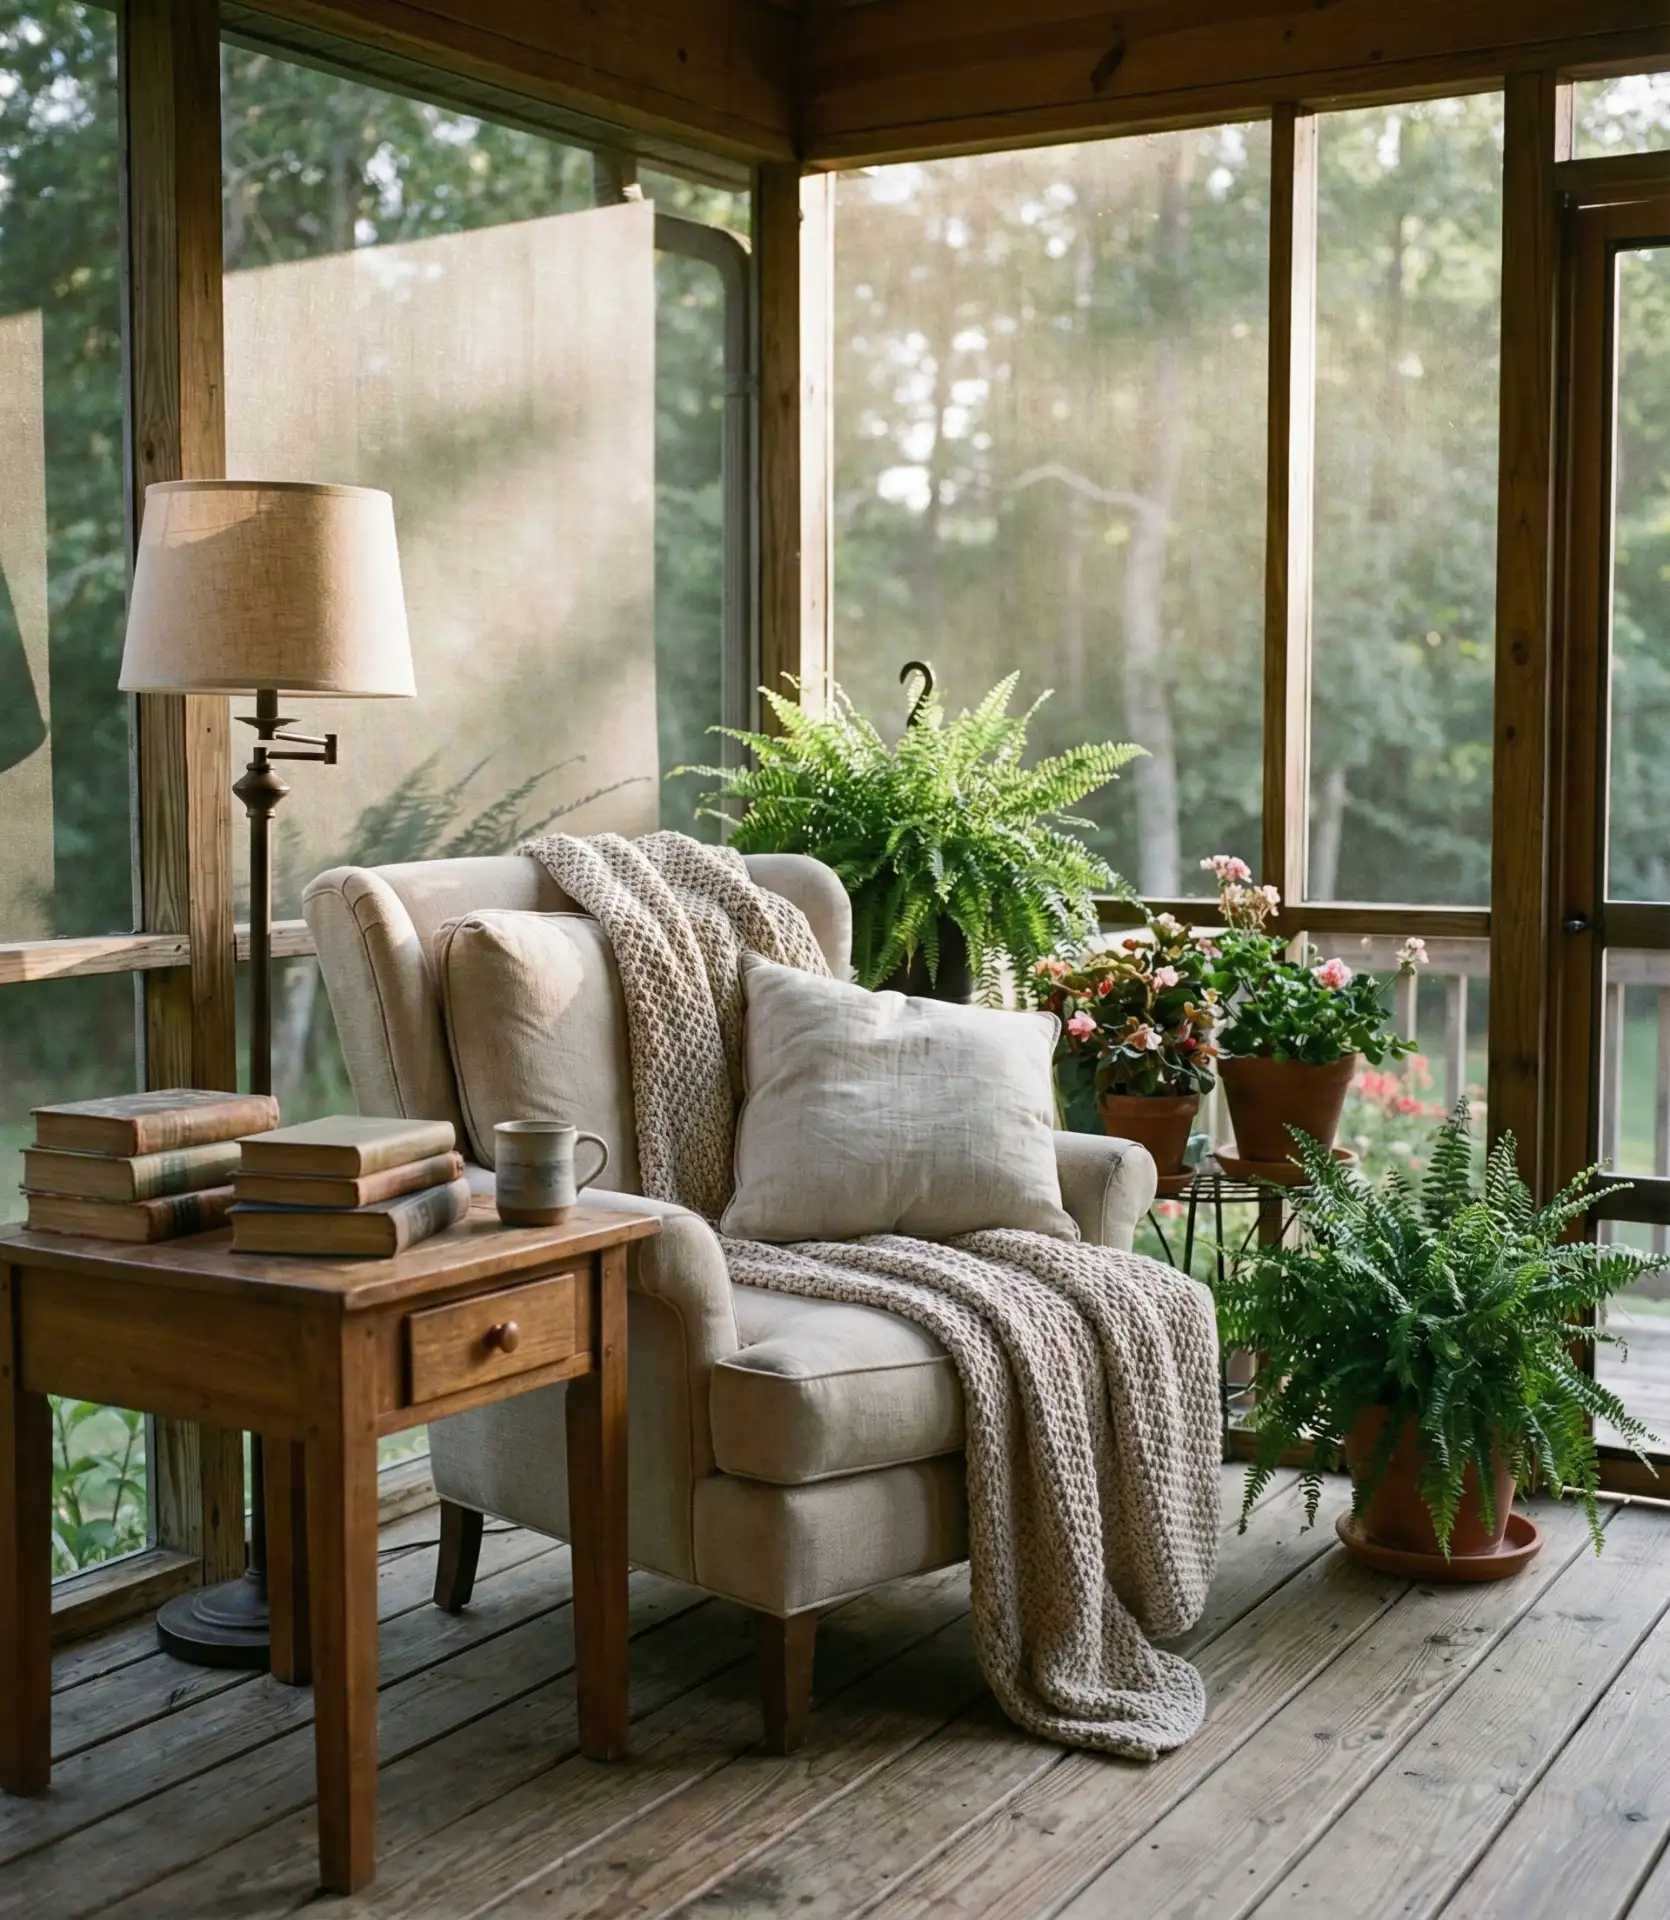
16. Trade Your Office Chair for a Statement Seat
Replacing your typical desk chair with a unique seating option transforms your home workspace instantly. Imagine a plush velvet armchair in deep emerald nestled next to a walnut desk, complemented by a patterned sisal rug beneath. This combination offers both style and comfort, elevating your work environment.
Key Design Elements
Feature Wall Behind Desk: Choose a rich forest green shade like ‘Hunter Green’ (Benjamin Moore 2041-10) to bring depth and energy to your workspace.
Complementary Walls + Trim: Opt for a crisp, clean white such as ‘Chantilly Lace’ (Benjamin Moore OC-65) to maintain brightness and balance the bold accent.
Pro Tip: Best For: Compact or medium-sized home offices where replacing a traditional swivel chair with a chic, lounge-inspired seat enhances both the look and feel of the space.
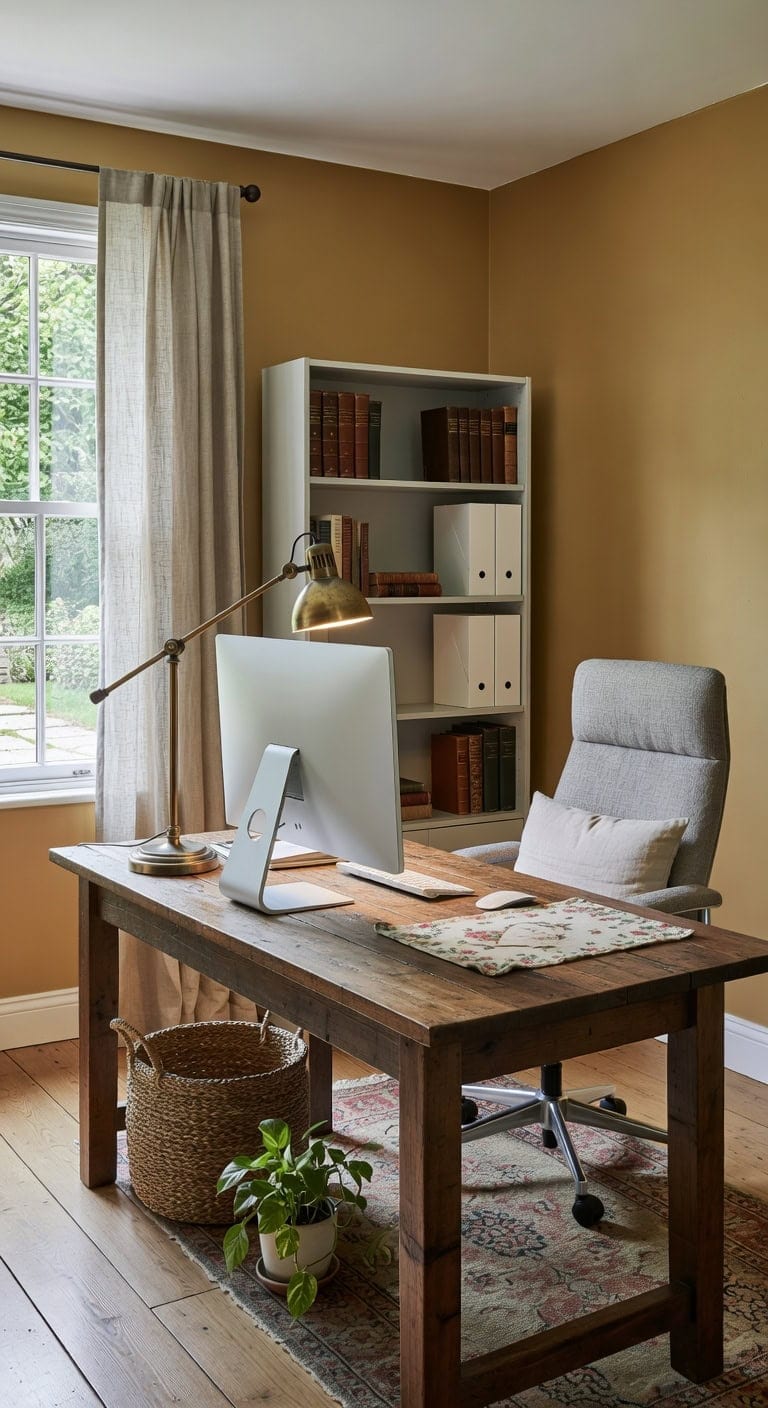
17. Blend Timeless Treasures With Contemporary Workspace Must-Haves
Combine the charm of an antique wooden writing desk with a minimalist metal task chair to craft a home office that feels both inviting and efficient. Imagine rich textures like a woven jute rug beneath sleek glass accessories, creating a balanced mix of nostalgia and modernity that energizes your workflow.
Key Design Elements
Walls: Choose ‘Antique Gold’ (Benjamin Moore 2168-30) — a soft, muted hue that complements vintage accents without overpowering the room.
Trim and Shelving: Opt for ‘Chantilly Lace’ (Benjamin Moore OC-65) — a bright, fresh white that frames contemporary office tools beautifully.
Pro Tip: Best For: Compact work areas or cozy corners where a harmonious blend of heritage and current style fuels creativity without cluttering the space.
18. Create Depth with a Statement Wall
That empty space behind your desk doesn’t have to stay dull and uninspiring. Introducing a tactile wallpaper in soft taupe and muted olive can instantly add warmth and intrigue. Pair it with natural elements like a linen desk chair and a handwoven wicker basket to bring an inviting, layered feel to your workspace.
Key Design Elements
Main Walls: Use ‘Almond Glow’ (Behr 720C-3) — a creamy neutral that provides a subtle backdrop, allowing the statement wall to shine.
Trim and Shelves: Opt for ‘Olive Branch’ (Farrow & Ball No. 264) — a gentle green shade that complements the wallpaper’s tones and enhances natural accents.
Pro Tip: Best For: A medium-sized office with one prominent wall perfect for a bold wallpaper feature that adds character without crowding the space.
19. Create a Fragrance Corner in Your Workspace
Designating a cozy spot on your desk for calming aromas can dramatically enhance your work environment. Combine earthy terracotta diffusers with a minimalist slate tray, and watch your office transform into a thoughtfully curated sanctuary. The gentle shimmer of clay-toned vessels against muted taupe walls fosters tranquility without overwhelming your area.
Key Design Elements
Feature Wall: Use ‘Rustic Clay’ (Farrow & Ball No. 289) — a deep, inviting terracotta shade behind your fragrance display.
Complementary Walls: Choose ‘Soft Dove’ (Benjamin Moore OC-17) — a gentle, neutral hue that keeps the space bright and serene.
Pro Tip: Best For: Compact workstations or dedicated corners where you want to infuse calm scents as a quick mental refresh without overhauling the entire space.
20. Showcase Your Credentials with Sleek Gallery Frames
Celebrate your academic achievements by turning your diplomas into a striking wall display. Choose slim, matte black frames paired with clean white mats to achieve a refined gallery look that feels thoughtfully arranged rather than overcrowded. Adding a subtle textured wallpaper behind the display brings depth and coziness, while clear glass keeps each certificate crisp and easy to read.
Key Design Elements
Background Wall: Opt for a soft, warm white like ‘Snowfall White’ (Sherwin-Williams SW 7004) to provide a gentle, inviting canvas that enhances your framed diplomas.
Trim and Molding: Go with a deep charcoal gray such as ‘Iron Ore’ (Sherwin-Williams SW 7069) on narrow trim to complement the frames and add a modern edge.
Pro Tip: Best For: An inspiring focal point in a home workspace, reading corner, or entryway where your educational milestones can be proudly displayed and admired.
21. Add Modular Peg Rails for Adaptable Wall Organization
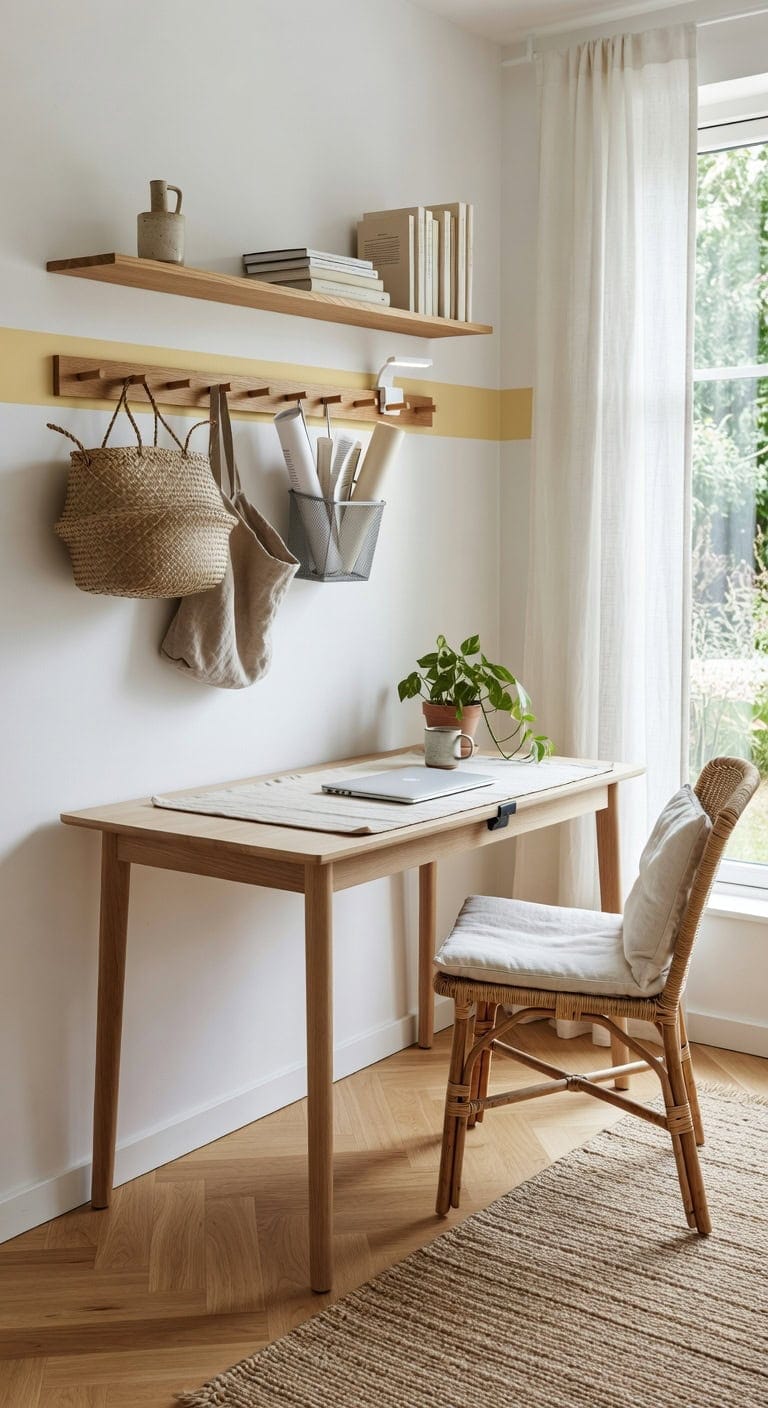
Installing a sleek peg rail just above your workspace provides versatile storage that evolves alongside your projects. Imagine smooth birch hooks against a muted cream backdrop, supporting canvas pouches and metal baskets stocked with notebooks and supplies. This arrangement keeps your essentials within reach while preserving a tidy, open desktop.
Key Design Elements
Wall Color: Choose a soft ‘Almond Light’ (Sherwin-Williams SW 7027) to create a gentle contrast that highlights natural wood accessories and fabric containers.
Accent Detail: Apply a horizontal band in ‘Honey Maple’ (Farrow & Ball No. 234) behind the peg rail to add warmth and subtly frame your storage area.
Pro Tip: Best For: Small workspaces or rental apartments where maximizing vertical storage without permanent alterations is key, making it easy to customize and reconfigure your setup as your needs change.
22. Define Your Home Office Style and Stick With It
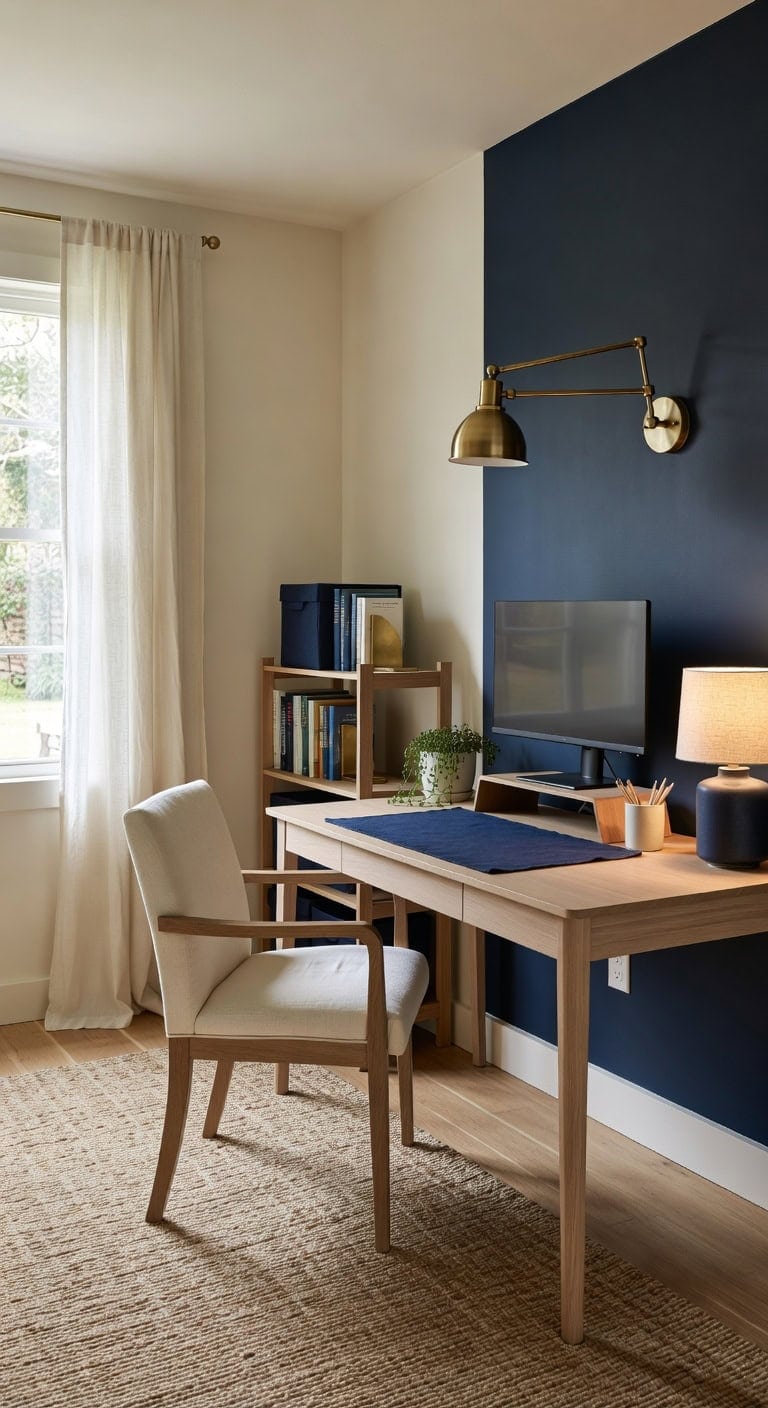
Establishing a style for your workspace is simpler than it sounds—just select a pair of complementary colors and an overall mood that resonates with you. Picture soft cream walls enhanced by rich teal accents, where sheer cotton drapes softly frame the windows and natural wood desk elements bring everything into harmony. This deliberate coordination transforms your home office into a polished, inspiring environment rather than a random assortment of items.
Key Design Elements
Feature Wall Behind Desk: Use ‘Deep Teal’ (Benjamin Moore 2049-20) to create a striking backdrop that grounds your space and highlights your work zone.
Other Walls: Choose ‘Soft Cream’ (Benjamin Moore OC-17) for the remaining walls to maintain a light, airy atmosphere that encourages focus.
Pro Tip: Best For: Those designing a dedicated workspace or revamping a guest room into a productive area, seeking a unified design that enhances concentration and boosts motivation throughout the day.
23. Create a Striking Feature Wall in Your Workspace
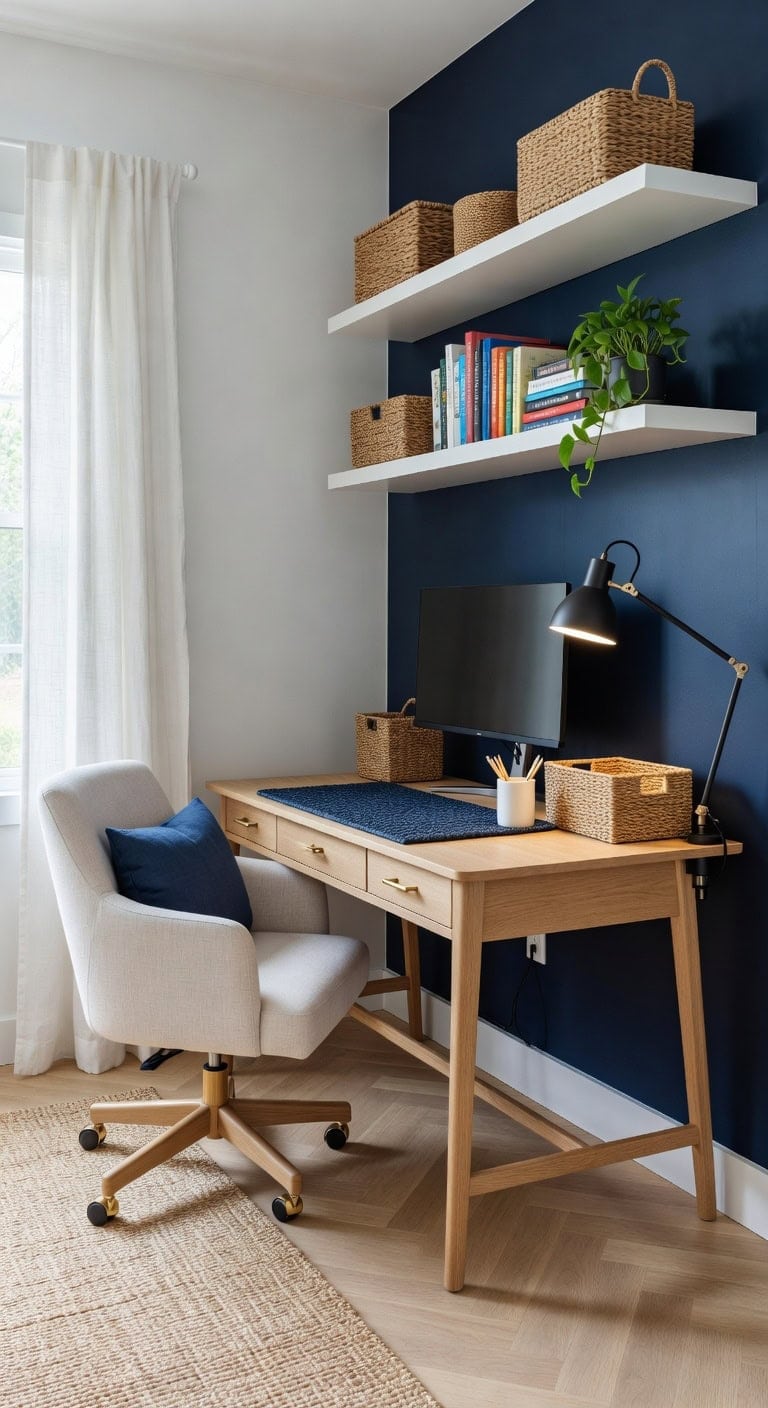
Introducing a vibrant feature wall can redefine your home office’s ambiance without crowding the room. Imagine a rich, jewel-toned backdrop behind your desk paired with sleek white molding to highlight the space — natural fiber baskets on minimalist shelves bring texture, while sheer curtains gently diffuse sunlight for a cozy glow.
Key Design Elements
Feature Wall Color: Use ‘Emerald Isle’ (Farrow & Ball 248) — a lush, captivating green that adds sophistication and focus to your work area.
Neutral Walls & Trim: Opt for ‘Snowbound’ (Sherwin-Williams SW 7004) — a soft, warm white that balances the bold wall and keeps the room feeling airy.
Pro Tip: Best For: Compact or moderately sized home offices seeking a chic centerpiece that enhances productivity and style without overwhelming the entire space.
24. Design a Sound Nook with a Compact Speaker Setup
Carving out a tiny sound nook with a sleek speaker gives your workspace a curated vibe while conserving precious desk real estate. Soft, textured wall panels in deep slate mute unwanted reverberations, and a natural fiber placemat cushions your device. Light-filtering linen drapes complete the scene, crafting a warm and inviting atmosphere that feels thoughtfully designed rather than overcrowded.
Key Design Elements
Feature Wall: Use ‘Slate Gray’ (Sherwin-Williams SW 2819) for a rich, moody backdrop that highlights your audio corner.
Adjacent Walls: Choose ‘Alabaster’ (Sherwin-Williams SW 7008) for a bright, creamy contrast that keeps the room feeling airy and spacious.
Pro Tip: Best For: Compact work areas or flexible living spaces where you want a stylish audio zone that blends seamlessly without overwhelming your setup.
Conclusion
Creating a home office that truly inspires productivity and comfort doesn’t have to happen overnight. Start small by incorporating simple touches that resonate with your personal style—whether it’s a favorite plant, artwork, or a cozy chair. Trust your instincts as you curate your space; after all, your workspace should reflect not only your professional needs but also what makes you feel motivated and at ease.
Remember, the most effective home office is one that feels uniquely yours. Embrace the process of making adjustments over time, knowing that each change brings you closer to an environment that supports your best work. With thoughtful choices and a bit of creativity, you can transform any corner into a space that energizes and empowers you every day.
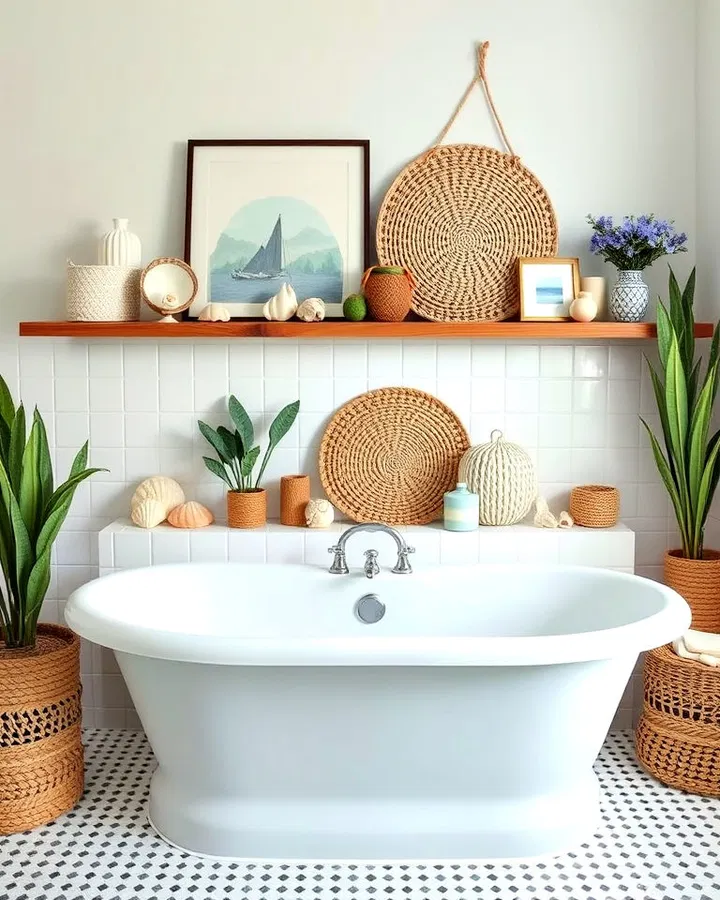
A bathtub is more than just a functional fixture—it can become the centerpiece of a relaxing spa-inspired sanctuary right in your home. With the right decorative touches, your bathroom can feel elegant, inviting, and personalized while still remaining practical for everyday use. Whether you prefer modern minimalism, cozy farmhouse charm, or luxury hotel-inspired aesthetics, thoughtful bathtub decor can completely transform the atmosphere of your space.
From stylish storage solutions to statement lighting and decorative accents, these bathtub decor ideas will help you create a bathroom that feels both beautiful and functional.
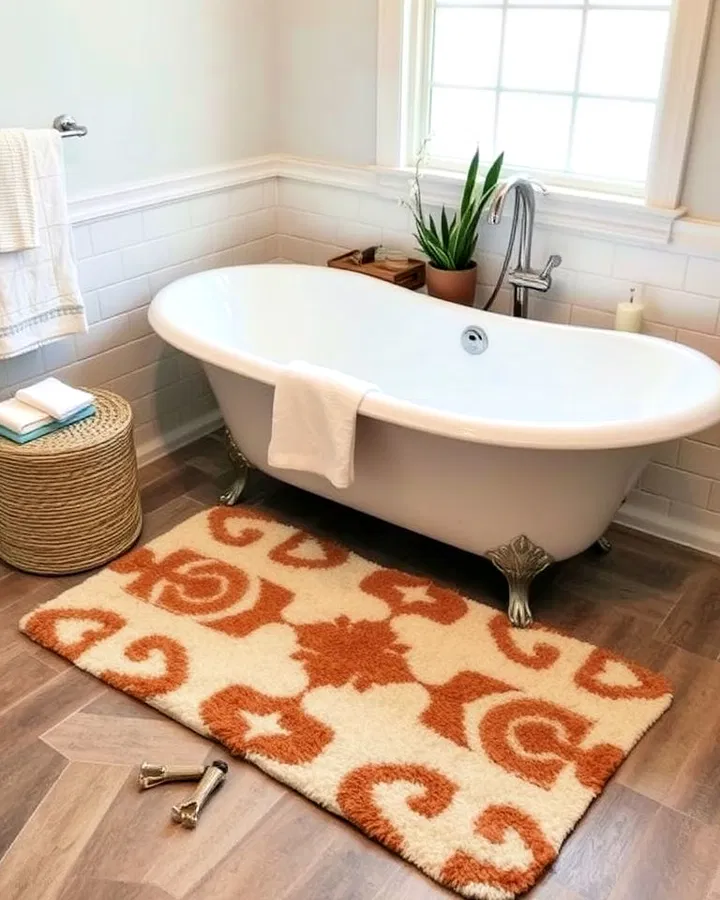
1. Define the Space with a Plush Area Rug
A carefully chosen rug can instantly make your bathtub area feel warmer and more inviting. Place a soft, moisture-resistant rug beside the tub to create a cozy landing spot after a bath. Neutral rugs help maintain a spa-like atmosphere, while bold patterns can introduce personality and visual interest. Beyond comfort, a rug helps anchor the space and make the bathtub feel like a dedicated relaxation zone.
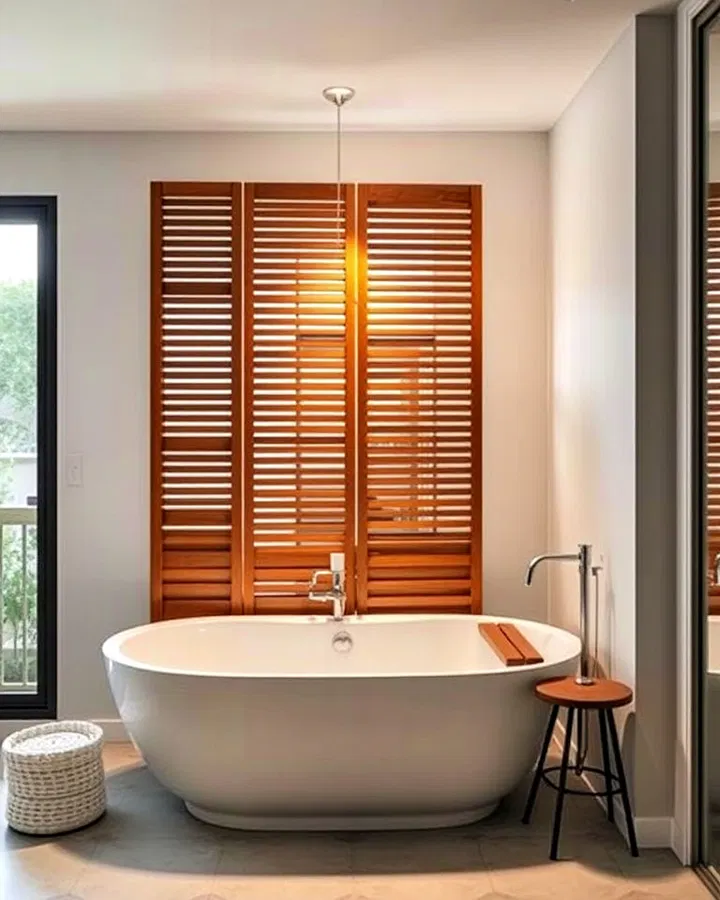
2. Install a Decorative Privacy Screen
Privacy screens are both practical and stylish, especially in larger bathrooms or open-concept spaces. A bamboo, wood, or frosted-glass screen can subtly separate the bathtub area while adding texture and architectural interest. This simple addition creates a more intimate environment and helps your bathroom feel like a luxurious retreat.
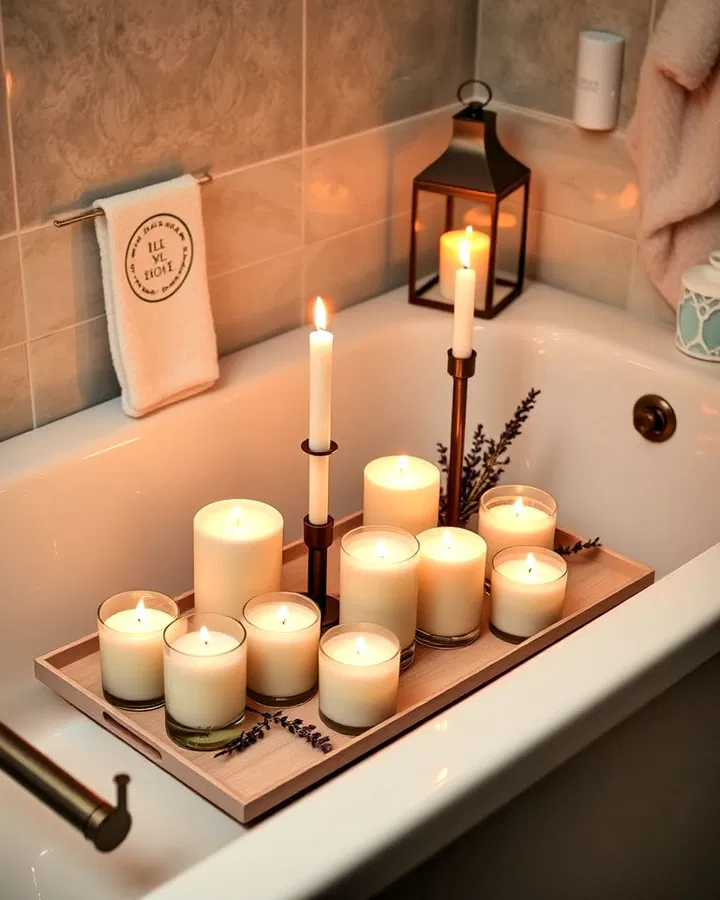
3. Create a Relaxing Candle Display
Nothing elevates bath time quite like candlelight. Arrange candles of varying heights around the bathtub on trays, shelves, or decorative stands. Fragrances such as lavender, eucalyptus, and vanilla help promote relaxation while adding warmth and ambiance. Decorative candle holders can also serve as beautiful design accents when the candles aren’t in use.
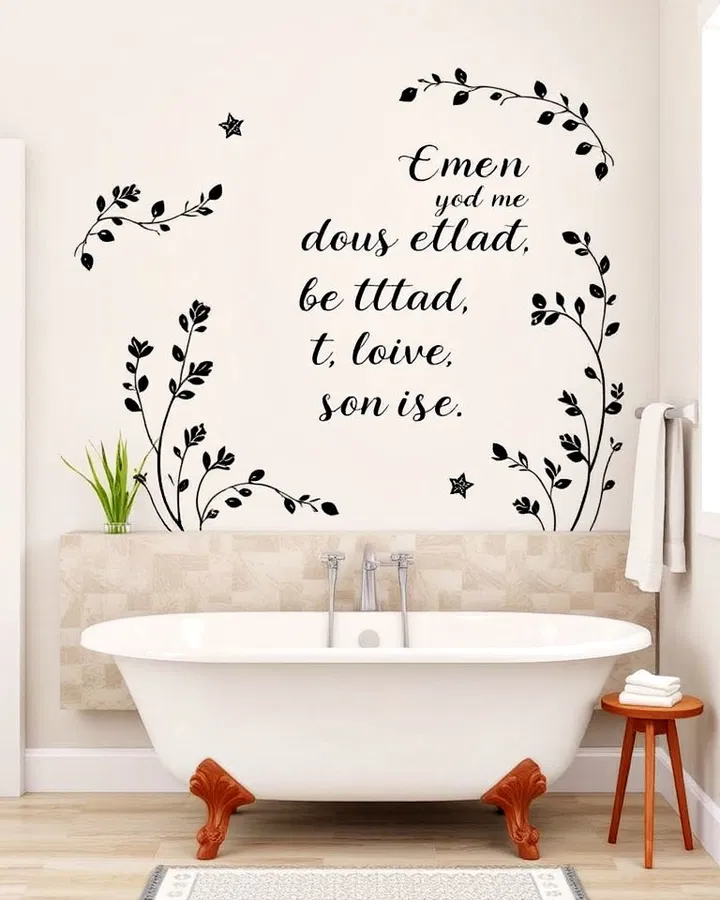
4. Decorate with Waterproof Wall Art
The wall around your bathtub presents an excellent opportunity to showcase your personal style. Choose moisture-resistant artwork featuring calming landscapes, abstract designs, botanical prints, or inspirational quotes. Wall decals are another flexible option that allows you to update your bathroom decor without making permanent changes.
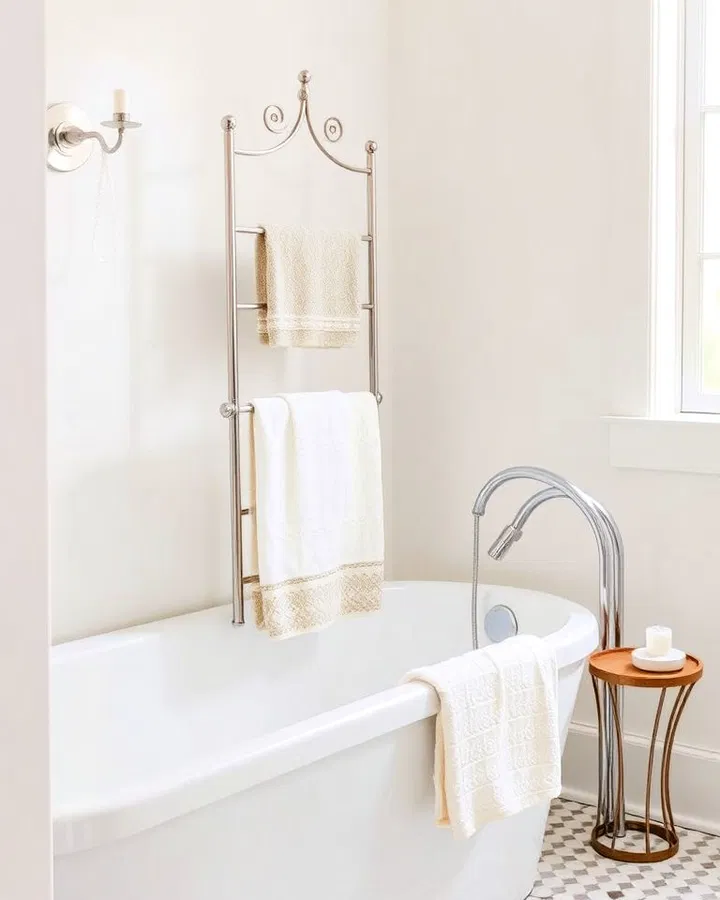
5. Add a Freestanding Towel Rack
A freestanding towel rack combines convenience with style. Position it beside the tub so fresh towels are always within reach. Modern chrome finishes create a sleek contemporary look, while wrought iron or wood options add warmth and character. It’s a simple way to improve functionality while enhancing your bathroom decor.
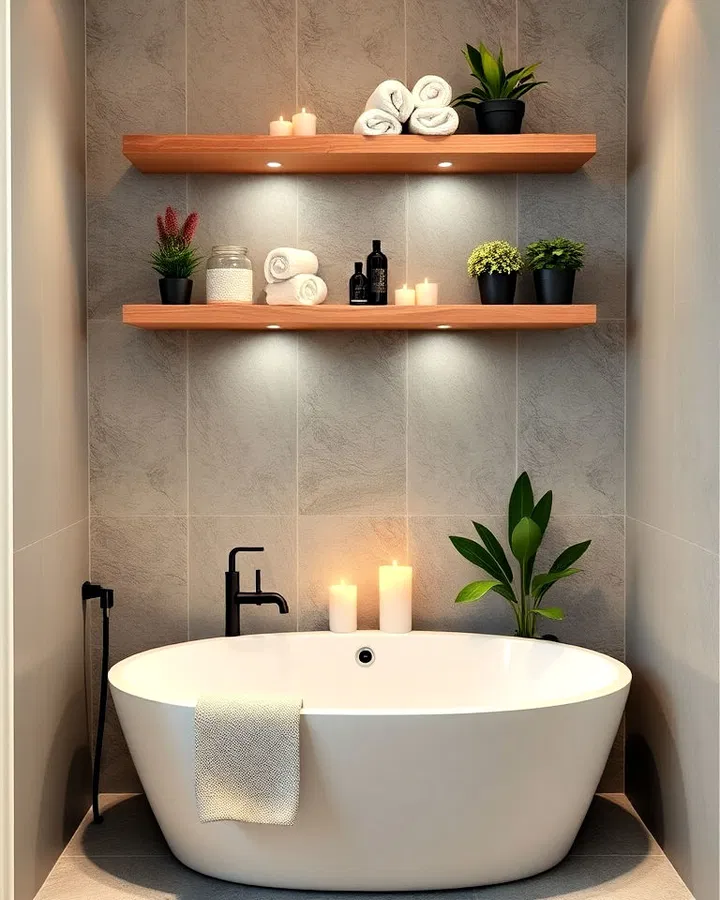
6. Add Floating Shelves for Stylish Storage
Floating shelves offer the perfect balance of beauty and practicality. Install them above or beside your bathtub to display neatly folded towels, candles, small plants, or decorative jars. Wood shelves create a natural spa-inspired feel, while painted shelves can blend seamlessly into modern interiors. They maximize vertical space while keeping essentials close at hand.
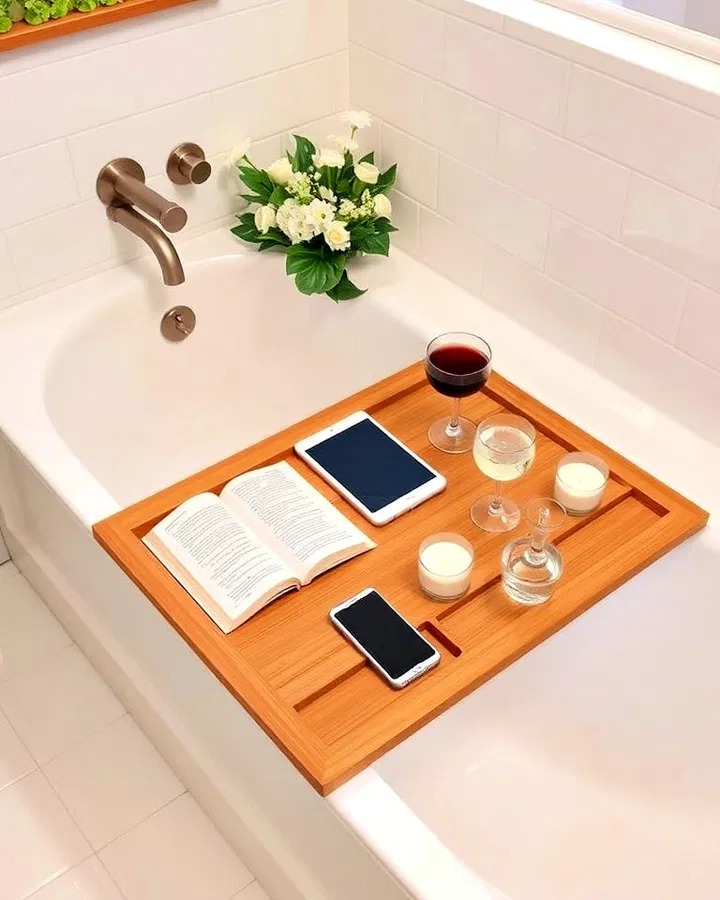
7. Upgrade Bath Time with a Bathtub Tray
A bathtub tray instantly transforms an ordinary soak into a luxurious experience. Use it to hold a book, tablet, candle, beverage, or bath products while you relax. Bamboo trays add warmth and natural charm, while acrylic versions complement modern bathrooms. Adjustable trays offer extra flexibility for different bathtub sizes.
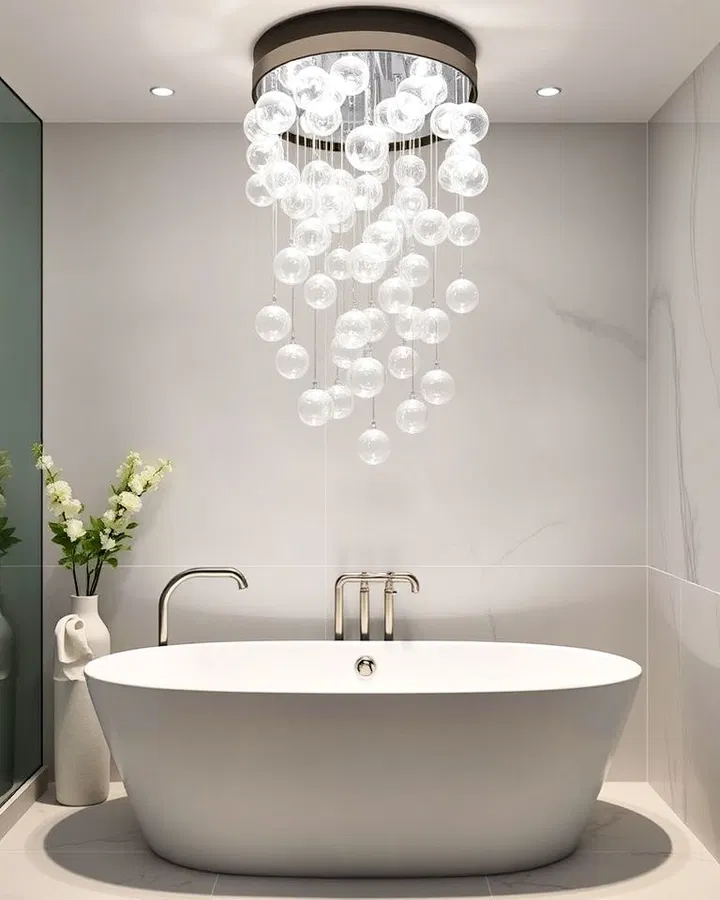
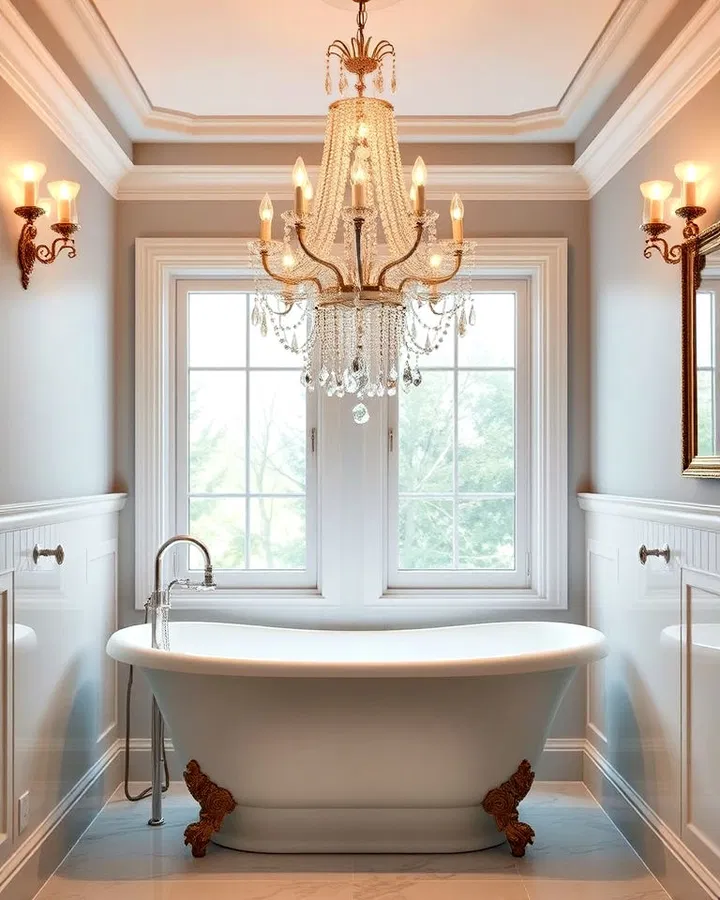
8. Make a Statement with a Chandelier
Few bathroom upgrades feel as luxurious as a chandelier above the tub. Whether you choose sparkling crystal, contemporary metal, or woven rattan, statement lighting immediately elevates the room. A chandelier creates a focal point that draws attention to the bathtub while enhancing the overall ambiance.
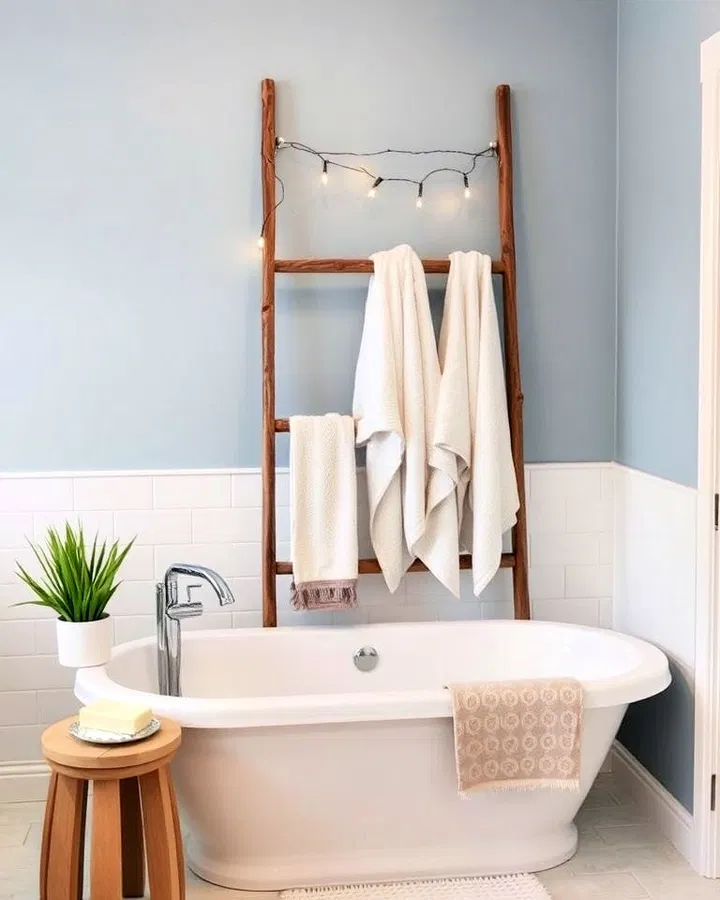
9. Use a Ladder Rack for Decorative Storage
A ladder rack is a stylish alternative to traditional towel storage. Lean one against the wall and drape towels, robes, or decorative blankets across the rungs. The vertical design saves floor space while adding visual interest. Wooden ladder racks work beautifully in farmhouse and spa-inspired bathrooms.
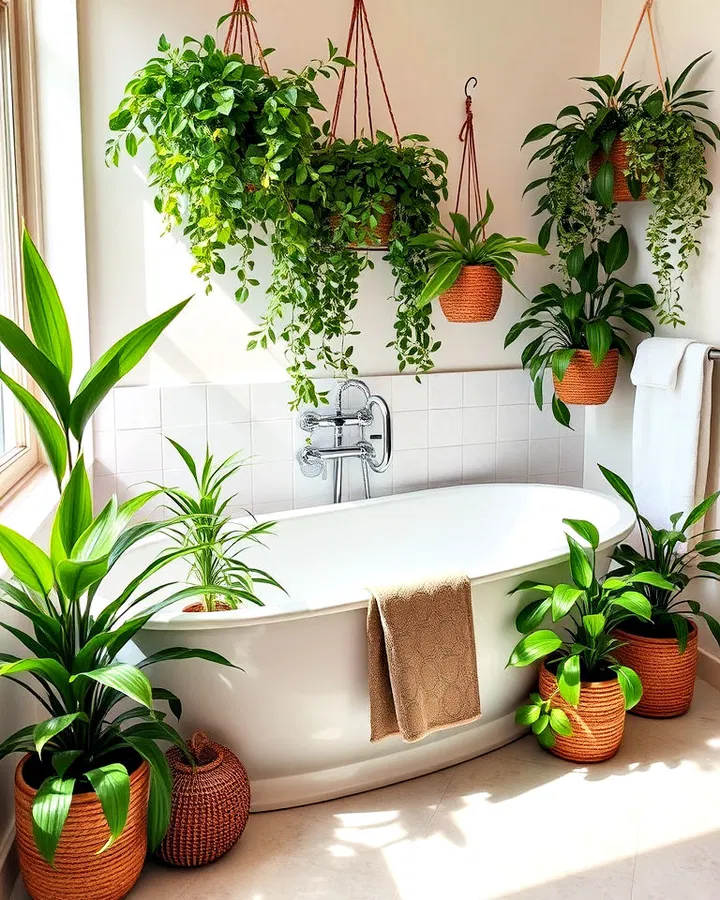
10. Bring Nature Indoors with Plants
Indoor plants instantly make a bathroom feel fresher and more serene. Humidity-loving varieties such as ferns, peace lilies, pothos, and bamboo thrive in bathroom conditions. Arrange plants around the bathtub to create a calming, nature-inspired oasis that promotes relaxation and improves the overall atmosphere.
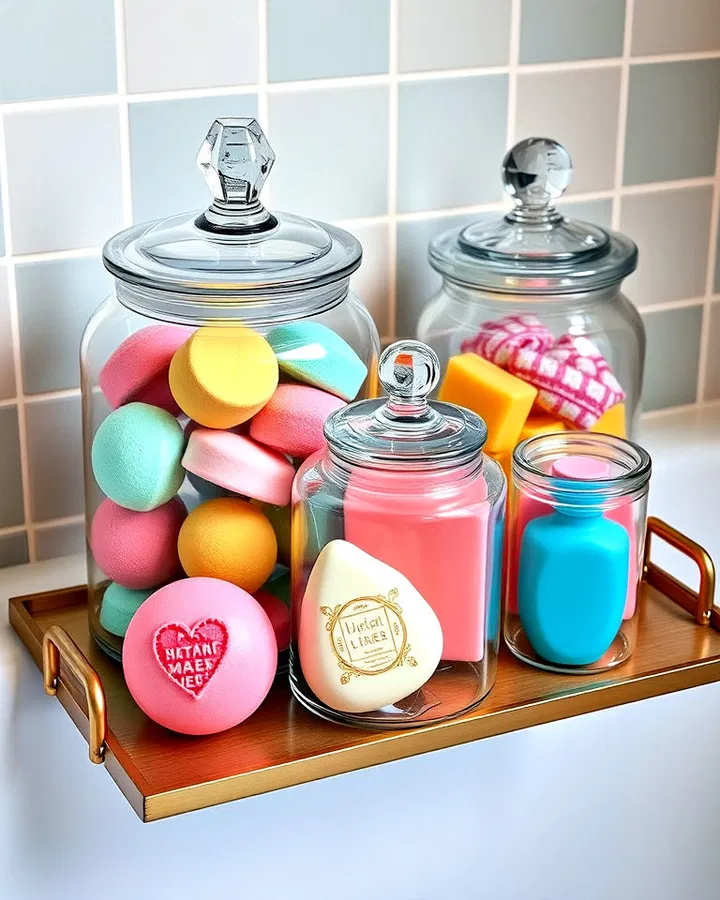
11. Display Bath Bombs and Soaps in Decorative Jars
Transform everyday bath essentials into decor by storing them in elegant glass jars. Colorful bath bombs, artisanal soaps, and bath salts add texture and visual appeal while remaining easily accessible. Choose decorative containers that complement your bathroom style for a polished and organized look.
12. Install Ambient Backlighting
LED backlighting can dramatically enhance your bathtub area. Soft illumination beneath the tub or behind surrounding walls creates a soothing glow that feels luxurious and modern. Warm white lighting is especially effective for creating a spa-like atmosphere during evening baths.
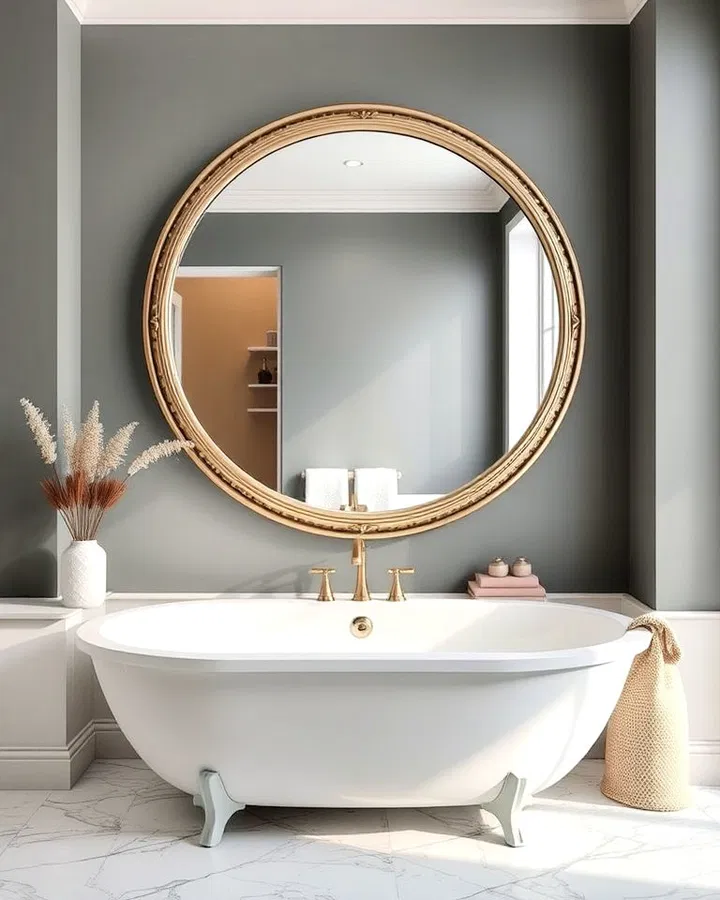
13. Add a Large Decorative Mirror
A large mirror reflects light and helps your bathroom feel more spacious. Decorative frames can introduce elegance, while frameless designs maintain a sleek contemporary look. Positioning a mirror near the bathtub can also amplify natural light and make the space feel brighter and more open.
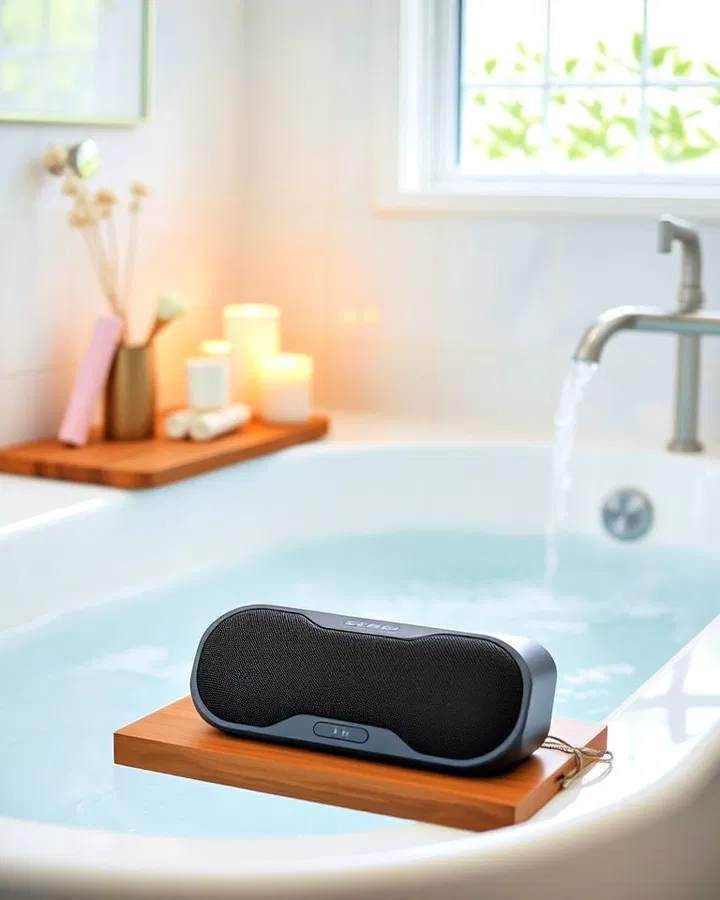
14. Enjoy Music with a Waterproof Speaker
Bring entertainment and relaxation together by adding a waterproof Bluetooth speaker near your bathtub. Listen to calming playlists, podcasts, audiobooks, or nature sounds while you soak. Modern designs blend seamlessly into bathroom decor while providing excellent sound quality.
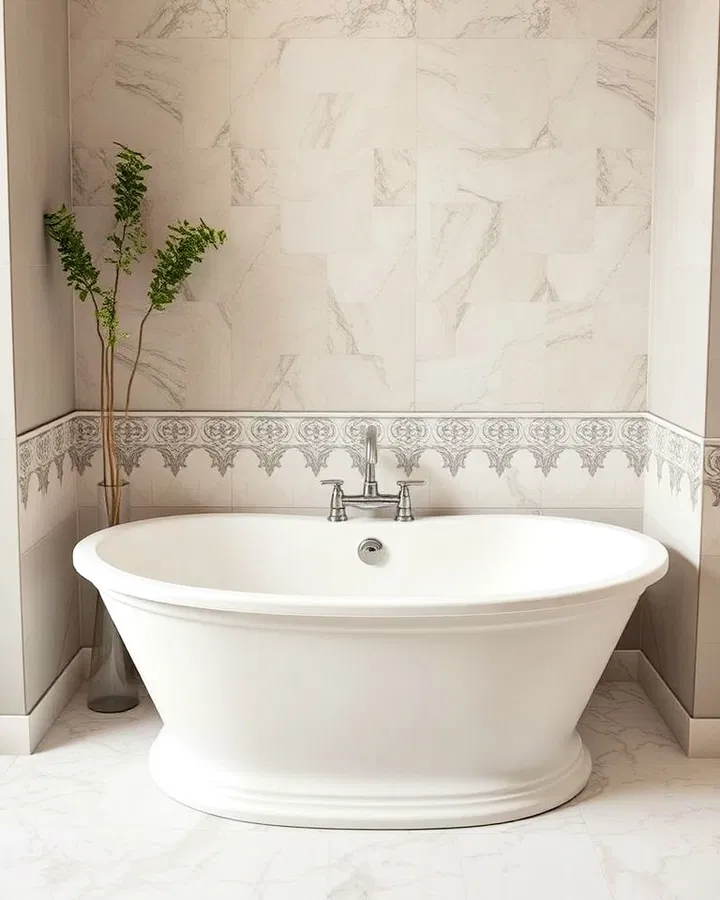
15. Enhance the Tub Area with Decorative Tiles
Decorative tiles can turn your bathtub wall into a stunning feature. Consider mosaic patterns, geometric designs, or textured finishes that add depth and personality. Beyond aesthetics, tiles provide a durable and moisture-resistant surface that stands up beautifully in wet environments.
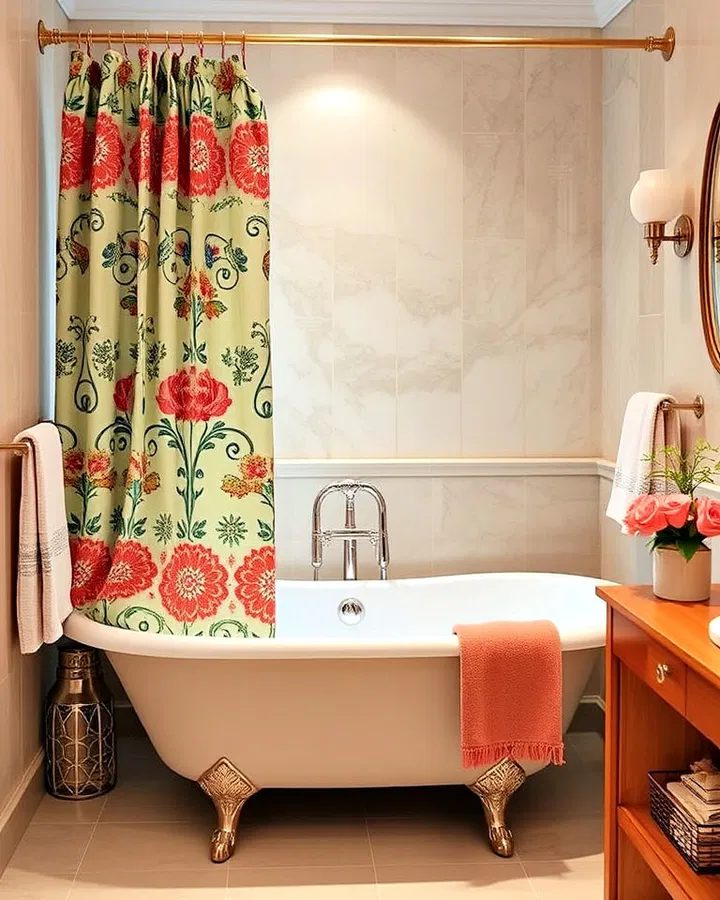
16. Install a Decorative Curtain
A beautiful bathtub curtain can instantly refresh your bathroom. Choose fabrics, colors, and patterns that complement your overall design theme. Decorative curtains add softness, visual interest, and privacy while making the space feel more finished and intentional.
17. Display a Sculptural Accent Piece
Artistic sculptures and decorative objects can bring sophistication to your bathtub area. Place a carefully selected piece on a nearby shelf, pedestal, or side table to create a curated designer look. Choose styles that align with your bathroom’s overall aesthetic.
18. Add a Stylish Bench or Stool
A bench or stool serves both decorative and functional purposes. Use it to hold towels, candles, bath products, or a small plant. Wooden stools add natural warmth, while upholstered benches introduce a luxurious touch that makes the bathroom feel more like a high-end spa.
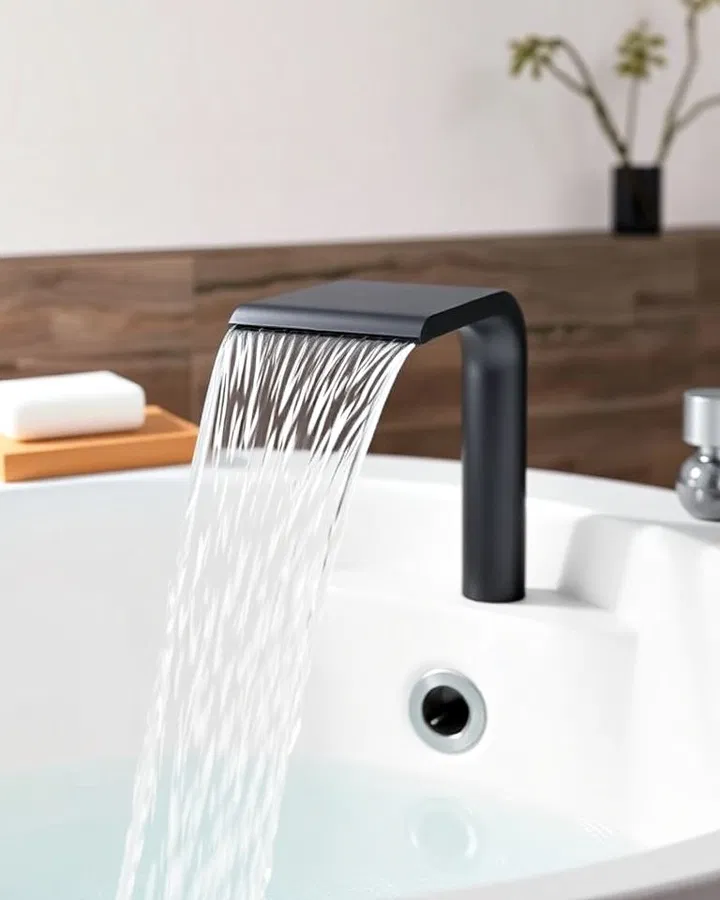
19. Upgrade to a Waterfall Faucet
A waterfall faucet creates a soothing visual and auditory experience. The gentle flow mimics natural streams, adding a spa-inspired element to your bathroom. Available in a variety of finishes, this simple upgrade can significantly elevate the look and feel of your bathtub area.
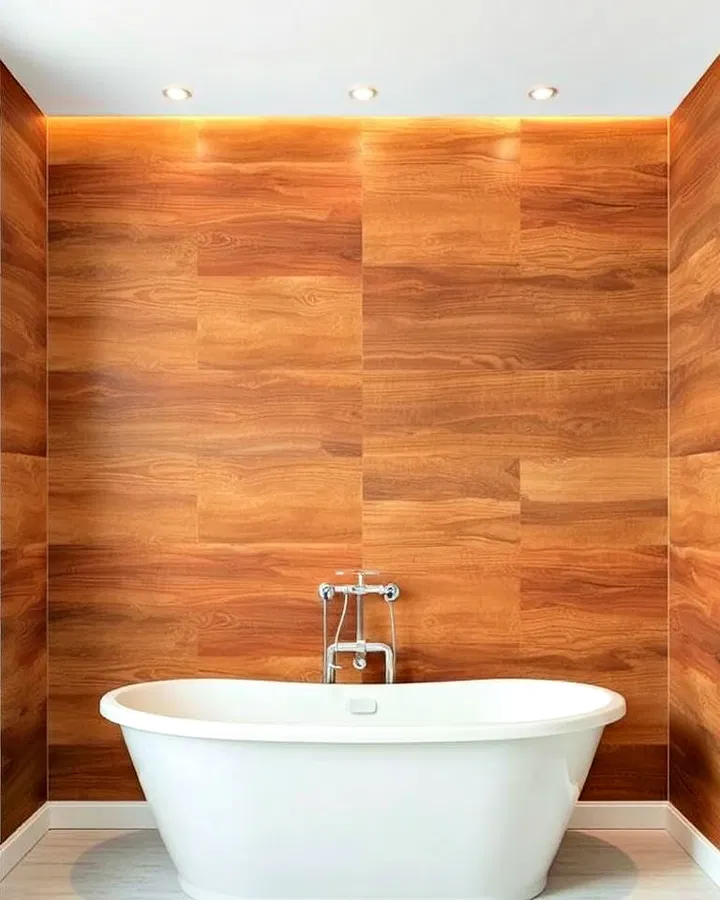
20. Use Textured Wallpaper for Added Depth
Water-resistant textured wallpaper offers a simple way to make a dramatic impact. Designs inspired by marble, wood, linen, or geometric patterns create visual depth and interest. It’s an easy solution for creating a stylish accent wall behind your bathtub.
21. Install a Small Bookshelf
For avid readers, a small bookshelf near the bathtub adds both charm and convenience. Store favorite books, magazines, decorative baskets, and spa essentials within easy reach. A compact shelf helps personalize the space while improving organization.
22. Add a Bubble Chandelier
A bubble chandelier combines elegance with a playful touch. Clusters of glass spheres resemble floating bubbles and create a striking focal point above the tub. Dimmable versions allow you to adjust the mood and create a tranquil environment for relaxing baths.
23. Personalize the Space with Framed Photos
Framed photos and artwork help make your bathroom feel more personal and welcoming. Choose calming imagery such as landscapes, botanical prints, or meaningful family photos. Moisture-resistant frames ensure your display remains beautiful despite bathroom humidity.
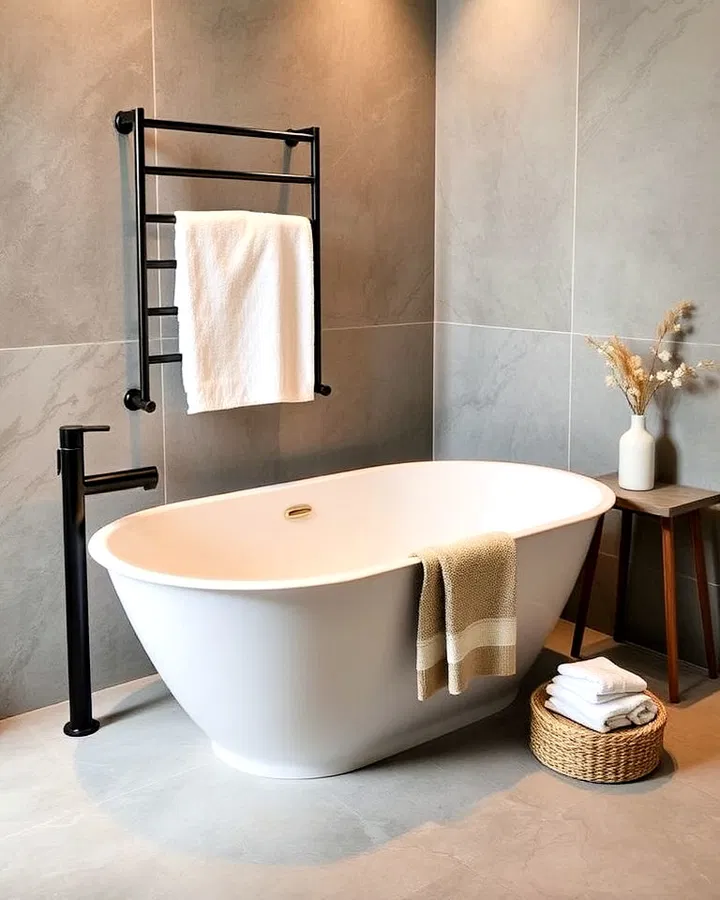
24. Install a Heated Towel Rack
A heated towel rack delivers everyday luxury. Fresh, warm towels after a bath make the experience feel indulgent and comfortable. Modern heated racks are available in sleek finishes that enhance both the appearance and functionality of the bathroom.
25. Create a Themed Decorative Display
A themed display can tie your bathtub decor together beautifully. Coastal-inspired accessories, boho accents, spa-themed decor, or minimalist arrangements help create a cohesive look. Display your chosen elements on trays, shelves, or side tables for maximum visual impact.
Conclusion
Transforming your bathtub area doesn’t require a complete renovation. Thoughtful additions like elegant lighting, stylish storage, lush greenery, and carefully chosen accessories can dramatically enhance both the beauty and functionality of your bathroom. Whether you prefer understated sophistication or luxurious statement pieces, these bathtub decor ideas offer endless inspiration for creating a space that feels relaxing, personalized, and inviting. With a few strategic upgrades, your bathtub can become the ultimate destination for comfort and self-care.
Mudroom lockers are the unsung heroes of home organization, perfectly blending practicality with style. Whether you’re corralling coats, shoes, backpacks, or sports gear, these versatile storage solutions keep your entryway clutter-free and welcoming. From rustic farmhouse charm to sleek modern designs, there’s a mudroom locker style to fit every home’s personality and lifestyle.
Imagine walking into a mudroom where everything has its place—each family member’s belongings neatly stored in lockers that not only organize but also elevate your home’s decor. In this post, we’re diving into 23 inspiring types of mudroom lockers that make tidying up feel like a breeze and design look effortlessly put together. Get ready to discover options that will transform your entryway from chaos to calm with loads of character and smart functionality!
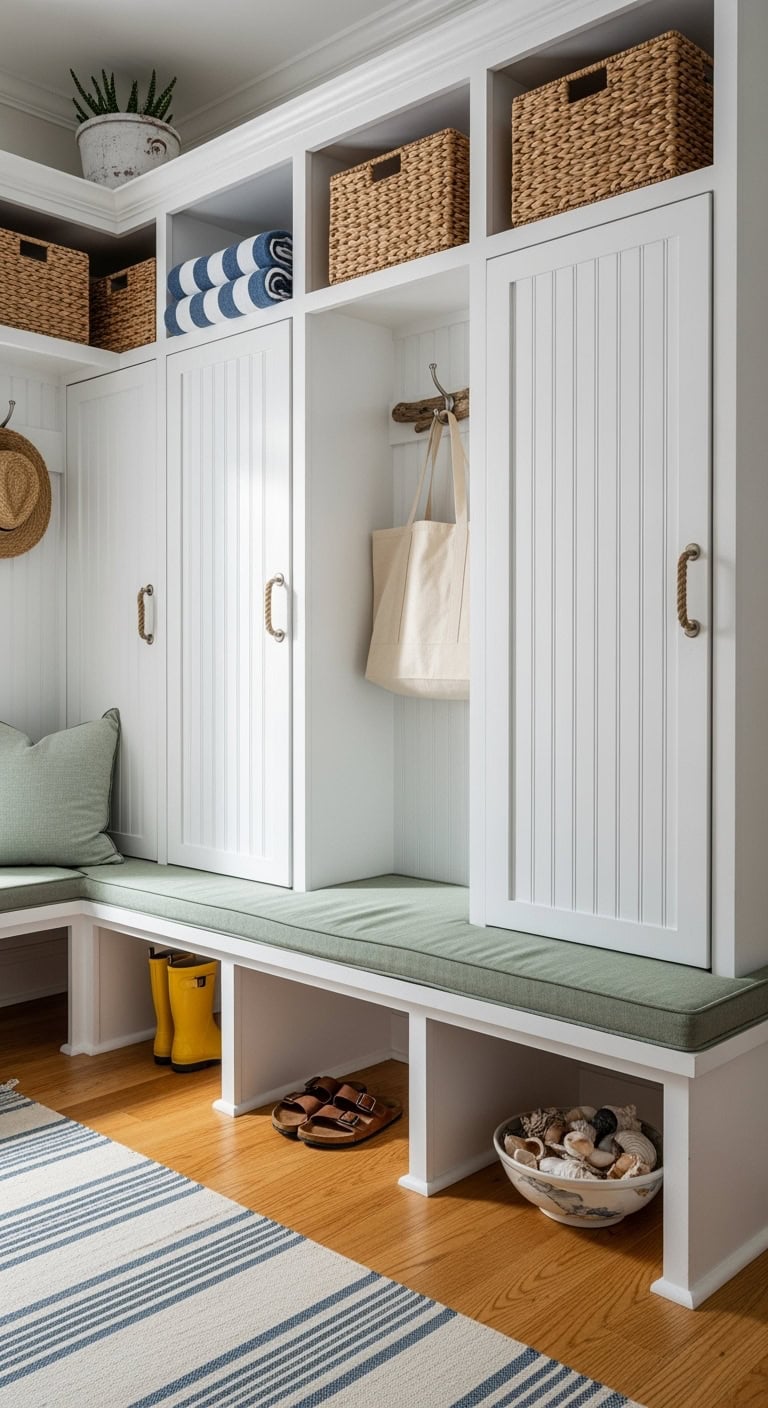
1. Seaside Beadboard Lockers
Step into a mudroom that feels like your favorite beach retreat! Crisp white beadboard panels create a welcoming coastal backdrop, their subtle grooves casting playful shadows as the light shifts. Each locker features charming rope handles that invite you to slip on your sandals and head outdoors. A plush bench cushion in soft sage green completes the look, perfectly blending ocean-inspired colors with casual comfort.
Key Design Elements
Use bright white or gentle seafoam paint on beadboard for that true coastal feel
Incorporate brushed nickel or rope-wrapped pulls to enhance the nautical theme
Add open shelves above lockers for easy storage of baskets and beach essentials
Opt for durable cushions in classic coastal stripes or solid ocean blues
Decorate with vintage oars or driftwood hooks mounted between compartments
Pro Tip: Limit your beadboard panel height to 48 inches—going higher can make the space feel more like a cramped boat cabin rather than an airy seaside entryway.
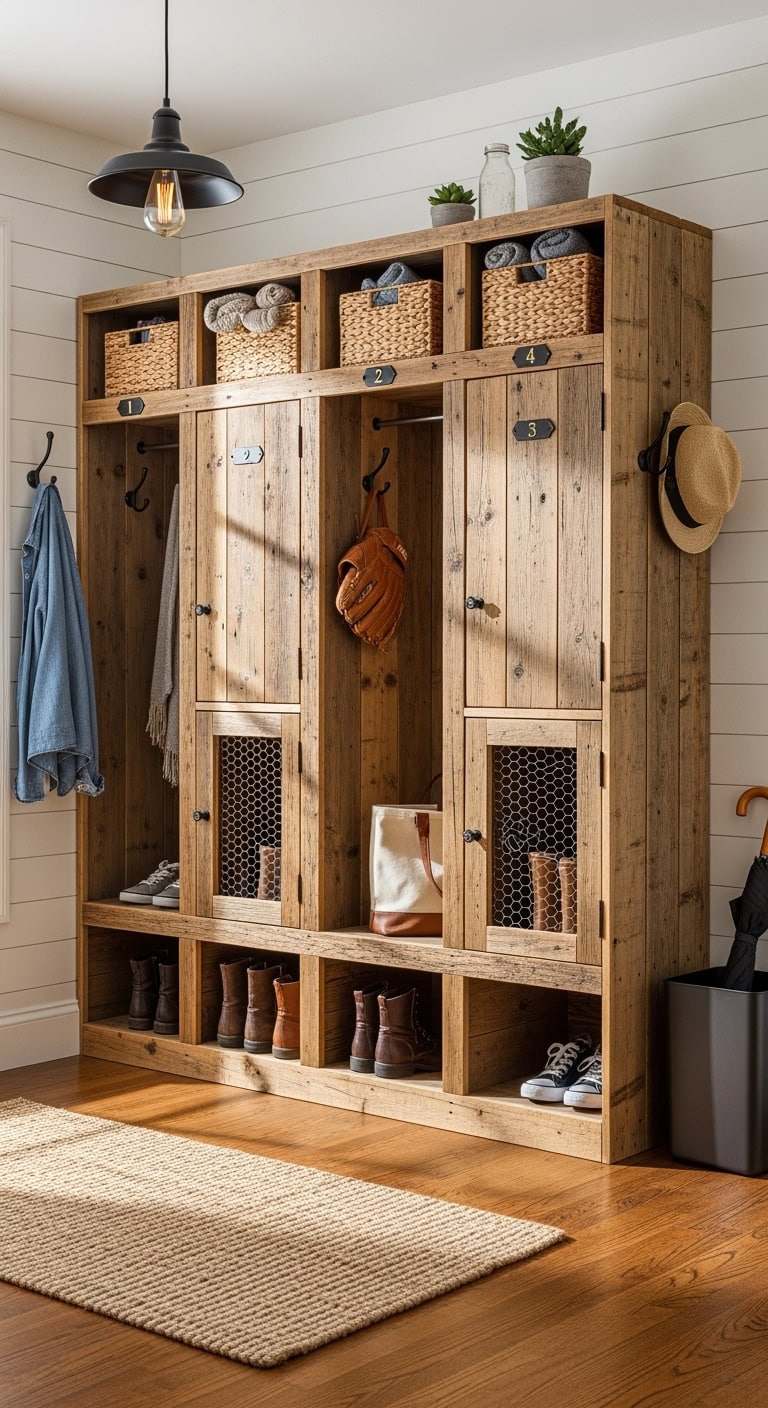
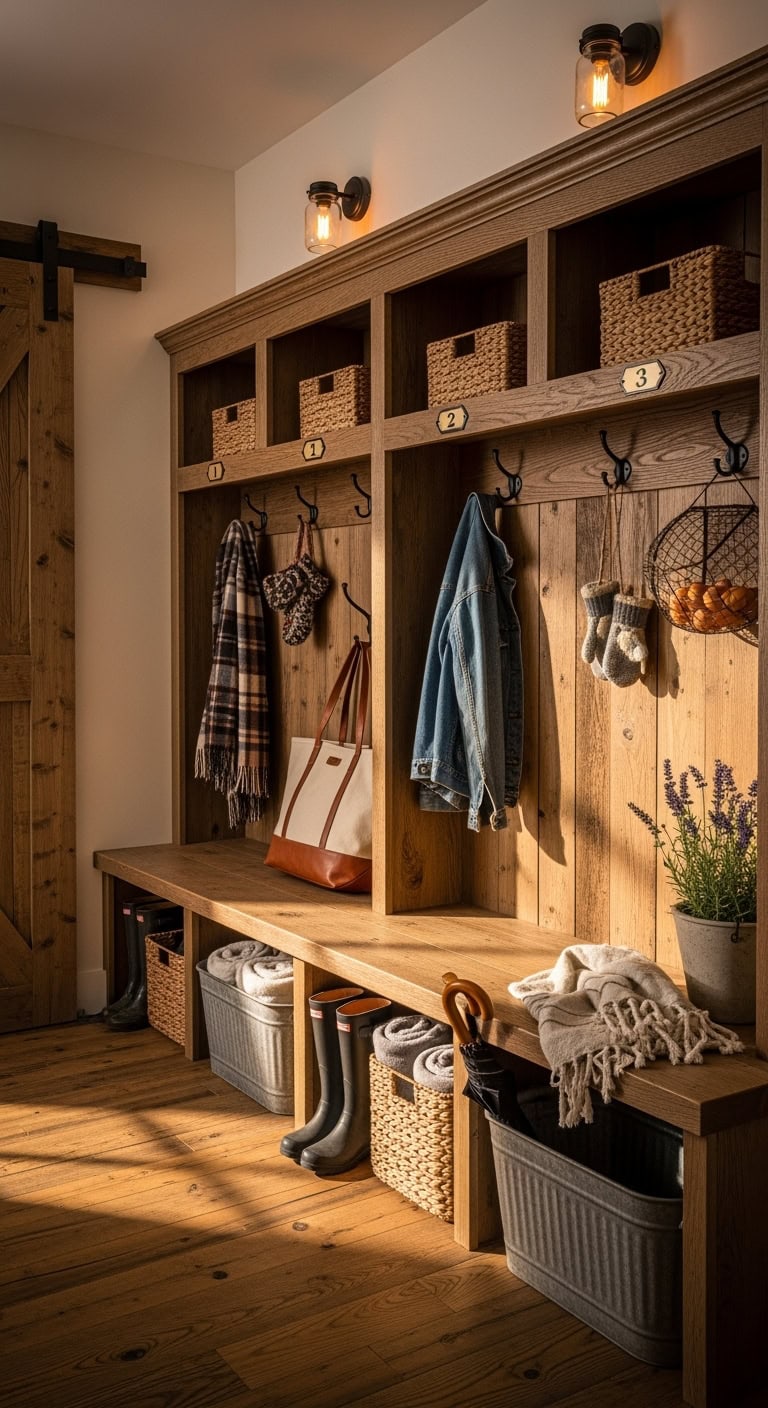
2. Rustic Charm with Reclaimed Pallet Lockers
Nothing beats the cozy farmhouse feel that reclaimed pallet wood brings to your mudroom. The natural textures, complete with knots and weathered details, add a unique character to each locker. Paired with sturdy iron hooks and vintage-inspired number plaques, these lockers blend rustic charm with a touch of industrial edge. Plus, woven baskets fit perfectly inside, keeping your scarves and gloves neat yet easy to grab.
Key Design Elements
Gently sand pallets to keep their rustic look while avoiding rough spots
Combine various wood shades to create a rich, layered appearance
Incorporate mesh or chicken wire accents for airflow and visual interest
Use adjustable shelving to fit boots, bags, and other gear comfortably
Add Edison-style bulbs for a cozy, inviting glow
Pro Tip: To prevent the space from feeling too heavy, brighten up the walls and introduce a modern touch like sleek metal bins or minimalist artwork nearby.
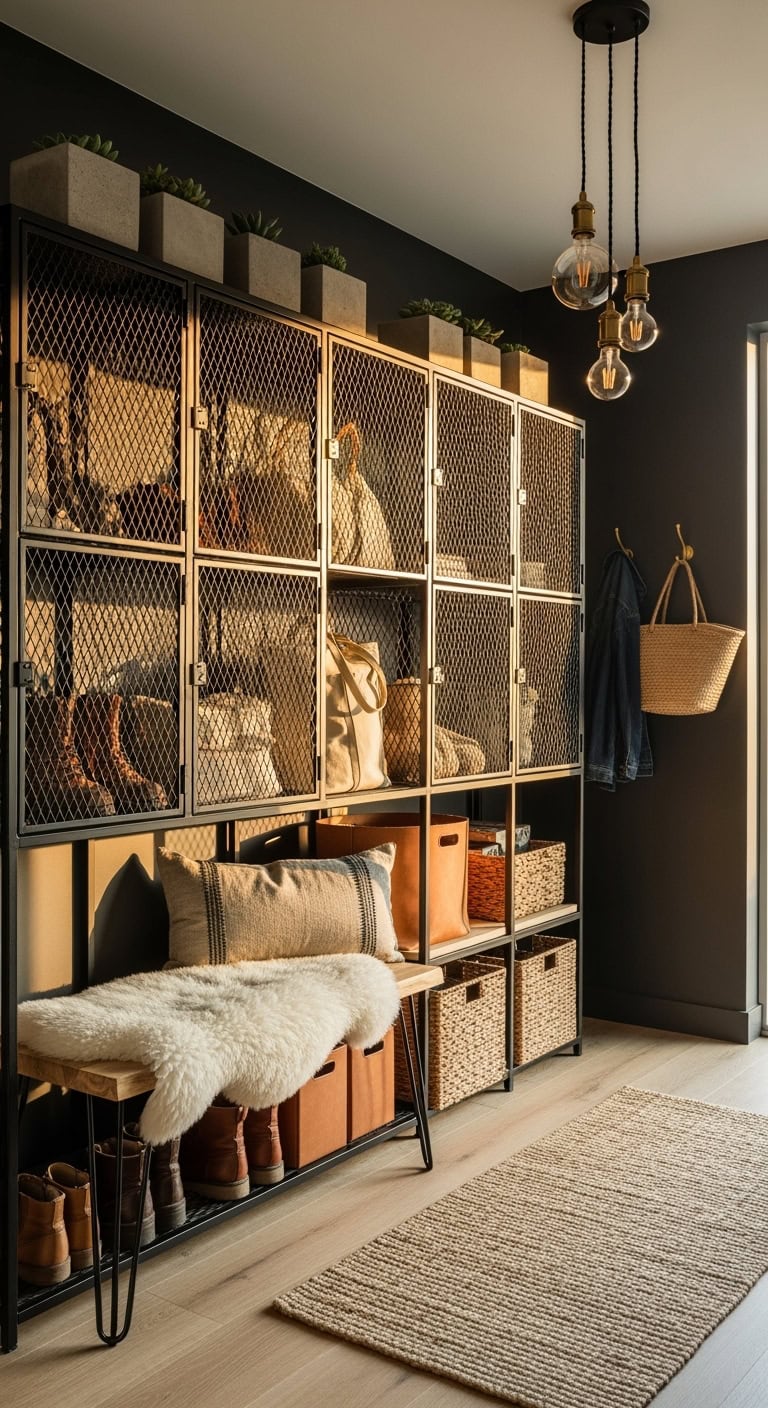
3. Chic Industrial Wire Lockers
Featuring bold black wire frames, these lockers bring a fresh industrial flair that’s both stylish and incredibly functional. They transform your mudroom into a space reminiscent of trendy loft apartments, where open storage proudly displays your favorite shoes and accessories. The airy mesh design not only keeps everything in plain sight but also lets light pass through, eliminating dark, stuffy corners.
Key Design Elements
Pair wire lockers with wooden seating to introduce warmth and balance the industrial look
Slip woven baskets inside compartments to keep clutter neatly hidden
Hang Edison bulb fixtures overhead to infuse a cozy vintage-meets-modern ambiance
Incorporate leather or canvas containers on the lower racks for added texture and interest
Create drama by painting a single accent wall in a rich charcoal shade to highlight the metal elements
Pro Tip: Soften the starkness of metal lockers by introducing natural materials like jute rugs, wooden hooks, or plush sheepskin throws for a welcoming, layered mudroom feel.
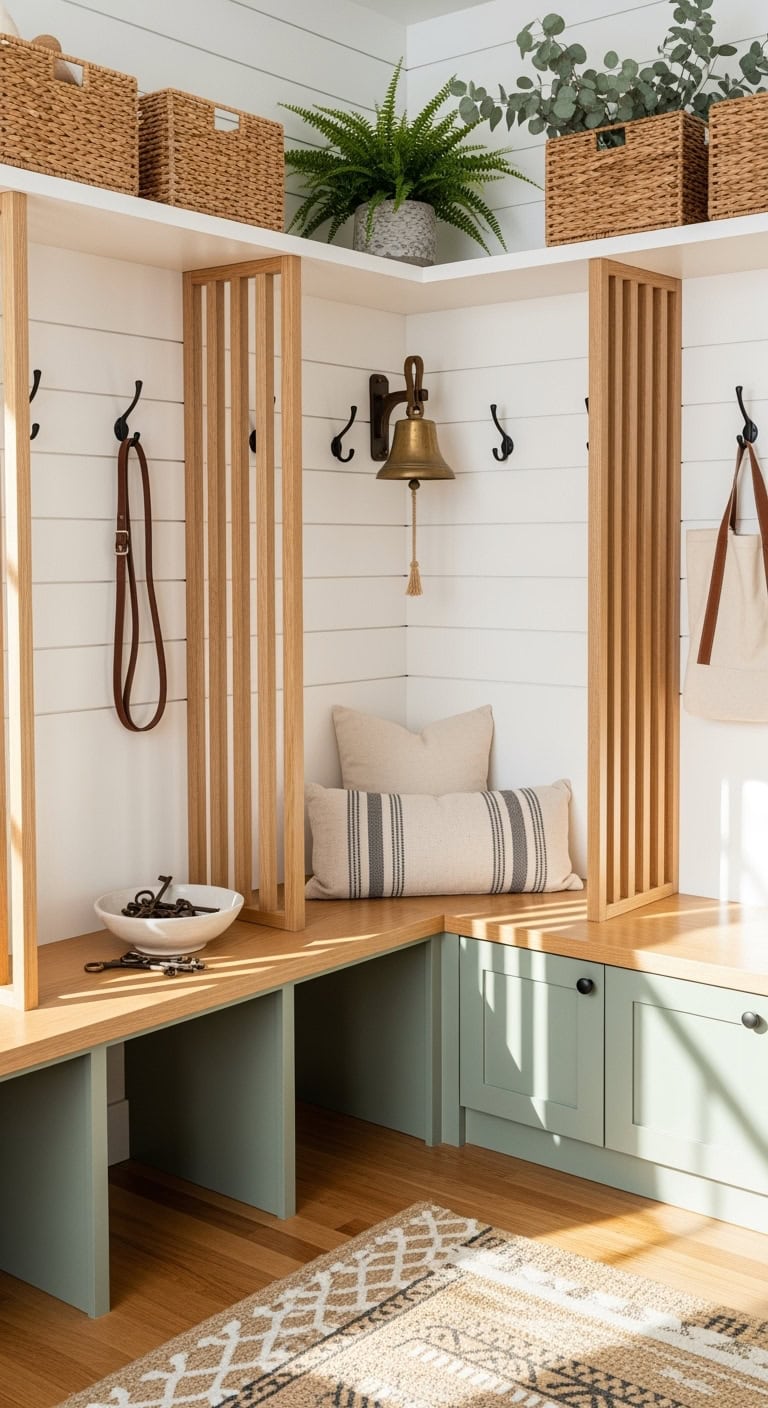
4. Charming Dutch Door Lockers
Step into a mudroom that instantly transports you to a cozy farmhouse dream! These Dutch door lockers are the centerpiece, featuring a clever split-door design where the top opens wide to showcase quaint vintage wire baskets, while the bottom conceals clutter out of sight. A soft sage shiplap backdrop beautifully complements brass hooks that display everything from canvas bags to denim jackets with effortless style.
Key Design Elements
Paint the upper doors bright white to add a fresh pop of contrast
Incorporate cane webbing panels for a touch of texture and ventilation
Equip upper sections with adjustable shelves for flexible storage
Choose antique-inspired latches to enhance the rustic charm
Combine open cubbies and closed compartments for practical appeal
Pro Tip: To keep your Dutch door lockers looking clean and inviting, pick either decorative hardware or textured door inserts—but not both. This approach preserves that light, farmhouse feel without making the space feel cluttered.
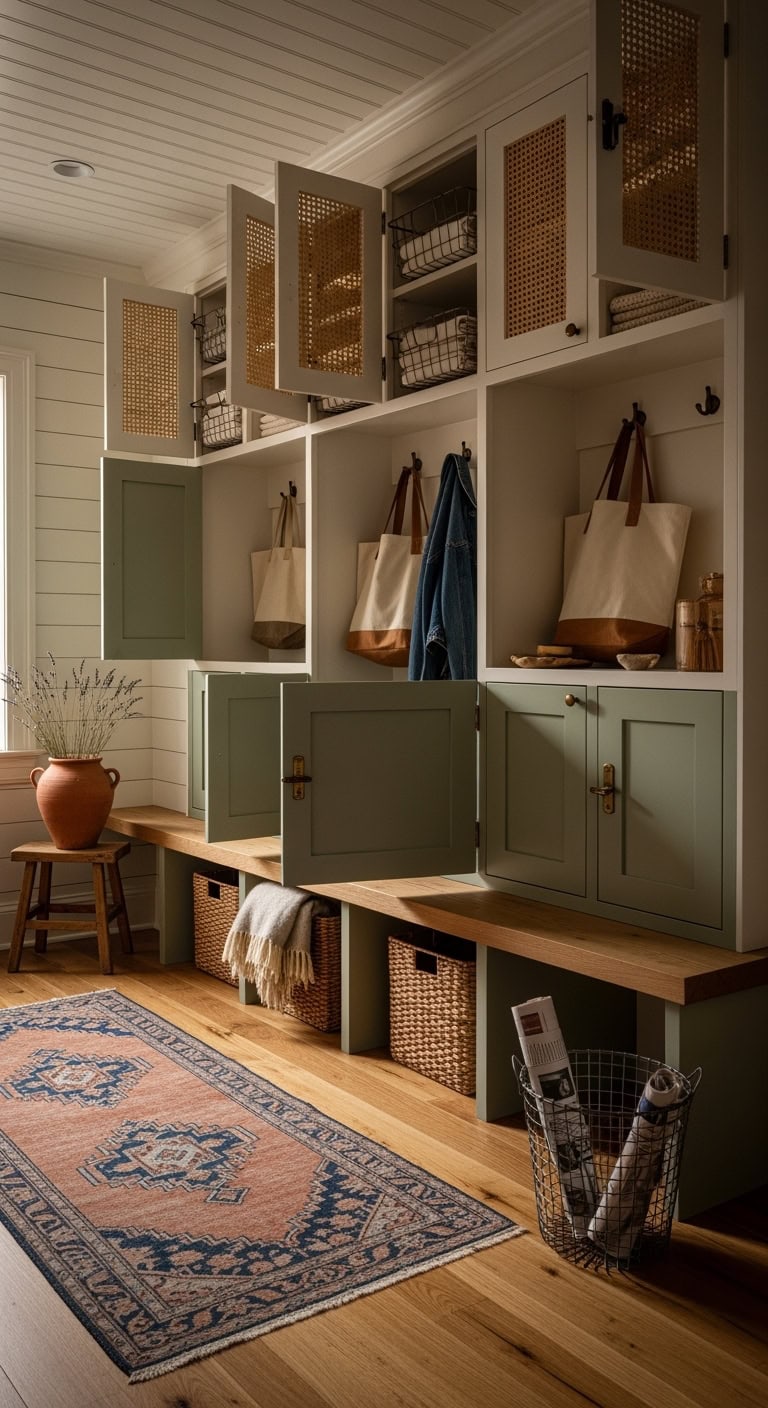
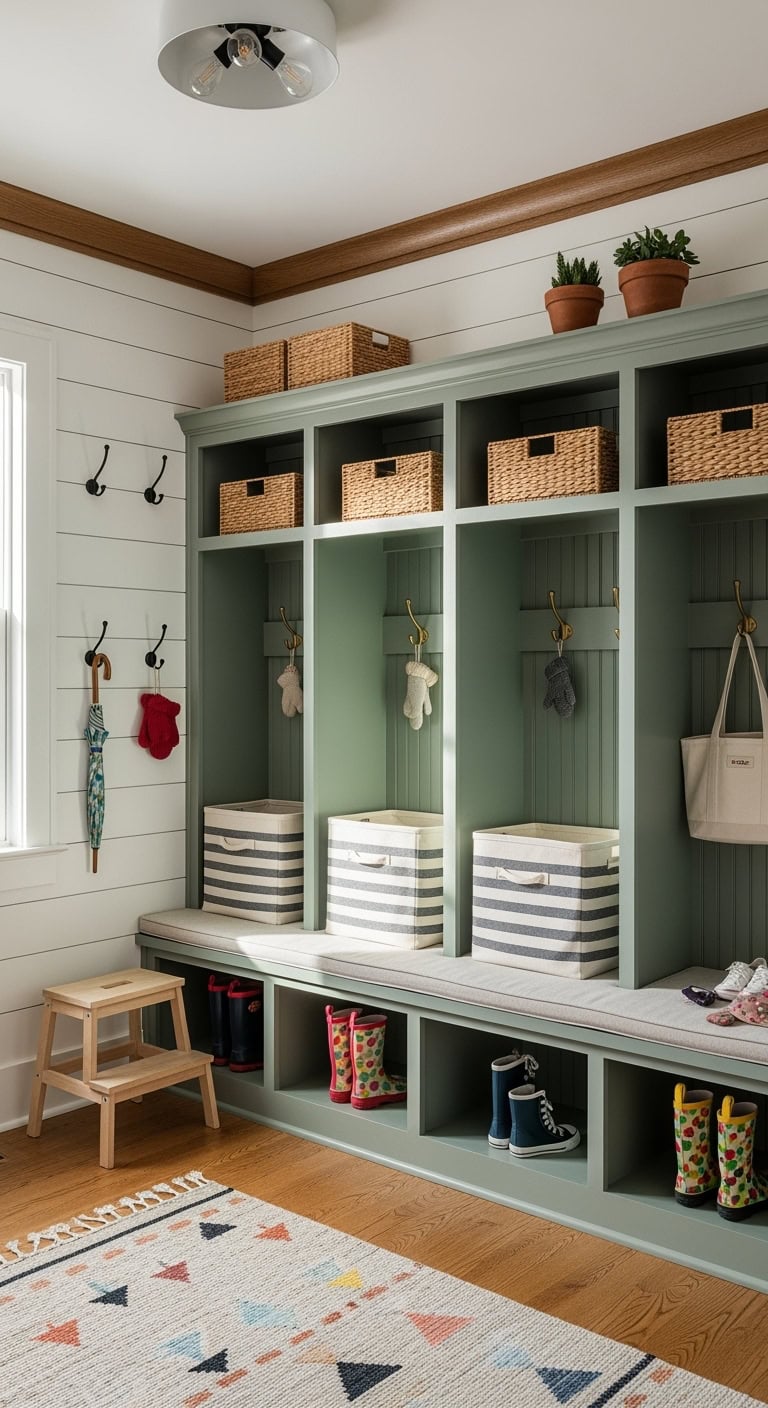
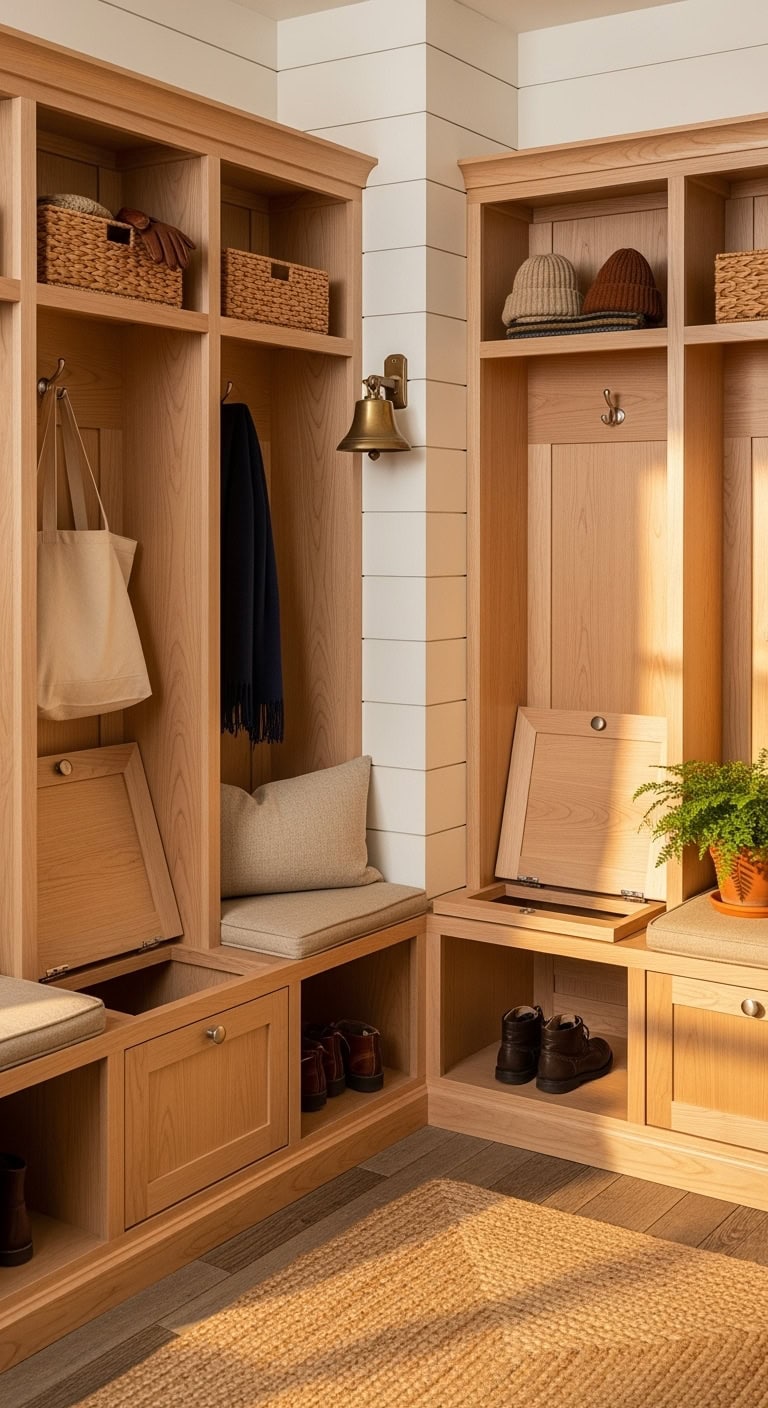
5. Custom Built-In Mudroom Lockers
Imagine transforming your mudroom with built-in lockers that stretch from floor to ceiling, creating a truly personalized and polished look. Think soft sage green shaker-style doors, each section tailored for every family member — complete with upper cubbies for backpacks, sturdy hooks for jackets, and lower cabinets that neatly conceal shoes and sports equipment. A long bench runs beneath it all, cushioned with cozy linen pads that make slipping on boots a breeze.
Key Design Elements
Choose deep, rich hues like navy or charcoal to add bold sophistication
Incorporate brass handles and hooks for a touch of luxury
Line the interiors with LED lighting for bright, functional spaces
Add beadboard panels for a layer of texture and nostalgic appeal
Use adjustable shelving to adapt as your family’s needs change
Pro Tip: Balance the look by pairing open upper cubbies with closed lower cabinets for a light, airy feel that blends display and concealed storage seamlessly.
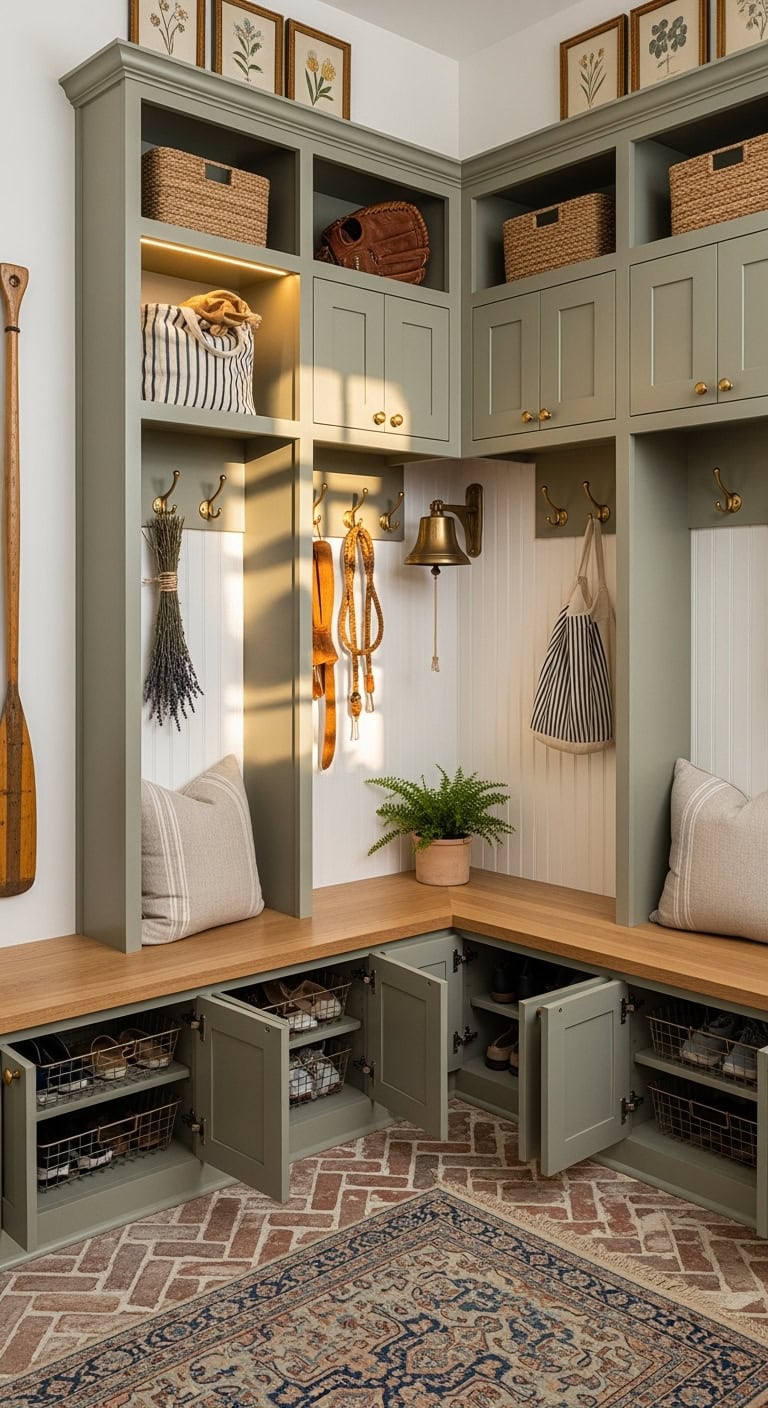
6. Charming French Country Style Mudroom Lockers
Step into a mudroom that instantly transports you to a quaint Parisian home. These creamy, softly painted lockers feature graceful carved accents paired with antiqued brass handles, evoking the rustic elegance of the French countryside. The subtle blue-gray finish adds a refined touch, while vintage-inspired hooks and beadboard backing bring in that cozy, well-loved atmosphere.
Key Design Elements
Select lockers with elegantly curved crown molding and intricate trim work
Go for distressed chalk paints in shades like creamy white, muted gray, or gentle blue
Incorporate antique brass or pewter knobs and handles with decorative backplates
Use beadboard paneling inside the lockers to capture that authentic rustic vibe
Enhance texture with woven baskets and soft linen storage bins
Pro Tip: Mix in a bold, industrial element—such as a dark metal bench or rugged boot tray—to offset the delicate design and add visual interest.
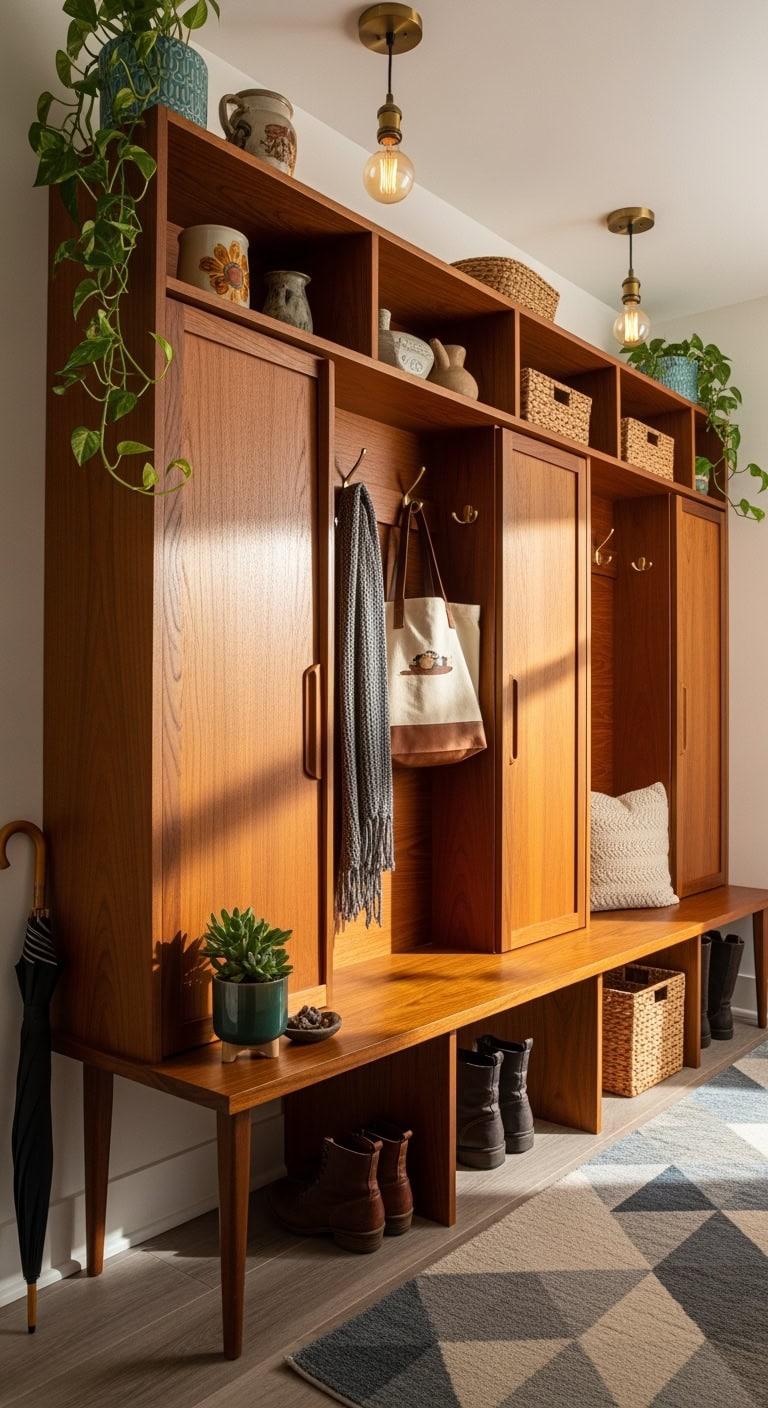
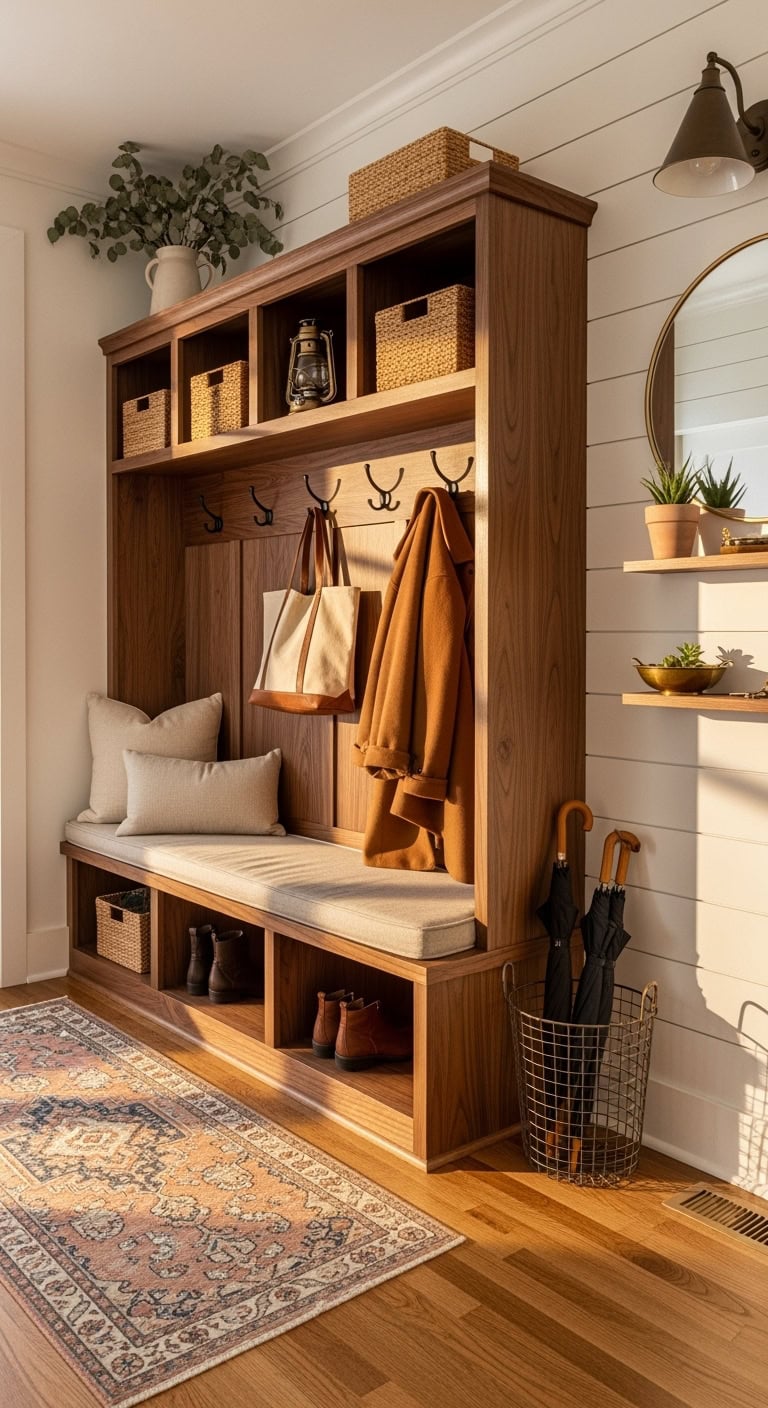
7. Vintage-Inspired Teak Mudroom Lockers
Bring a cozy glow to your entryway with the timeless charm of teak wood. Its warm amber hues combined with slender tapered legs and understated hardware create a perfect blend of retro flair and modern elegance. Imagine custom cubbies featuring sliding doors to keep clutter out of sight, alongside open shelves that proudly showcase your favorite pottery or a lush trailing pothos for a touch of greenery.
Key Design Elements
Opt for lockers that include built-in bench seating to capture that classic mid-century feel
Combine concealed storage with open shelving to balance practicality and display
Use brass or walnut hooks to stylishly hang bags, scarves, and hats
Add soft illumination with Edison-style bulbs mounted above each locker section
Incorporate natural woven baskets to introduce texture and keep smaller items organized
Pro Tip: Soften the richness of teak wood by layering in cool tones—a geometric rug in shades of blue and gray can break up the warmth and create a welcoming, balanced atmosphere.
8. Personalized Lockers for Kids’ Mudroom Magic
Turn your mudroom into a kid-friendly haven with these charming custom lockers, painted in a gentle sage green that adds a calm, inviting touch! Standing at a kid-perfect 48 inches tall, the hooks are set low so even your youngest can easily hang up their backpacks. The bottom compartments are just right for little rain boots and sneakers, while the top shelves offer handy storage for seasonal hats and gloves.
Key Design Elements
Place hooks at 36-40 inches to match preschooler reach
Use picture tags for easy identification before reading skills develop
Opt for bench heights between 12 and 14 inches for comfortable seating
Incorporate adjustable shelving that adapts as your child grows
Customize each locker with your child’s favorite colors for a personal touch
Pro Tip: Add a row of adult-height hooks on the side walls to keep your belongings organized and separate from the kids’ busy zone—because parents deserve neat storage, too!
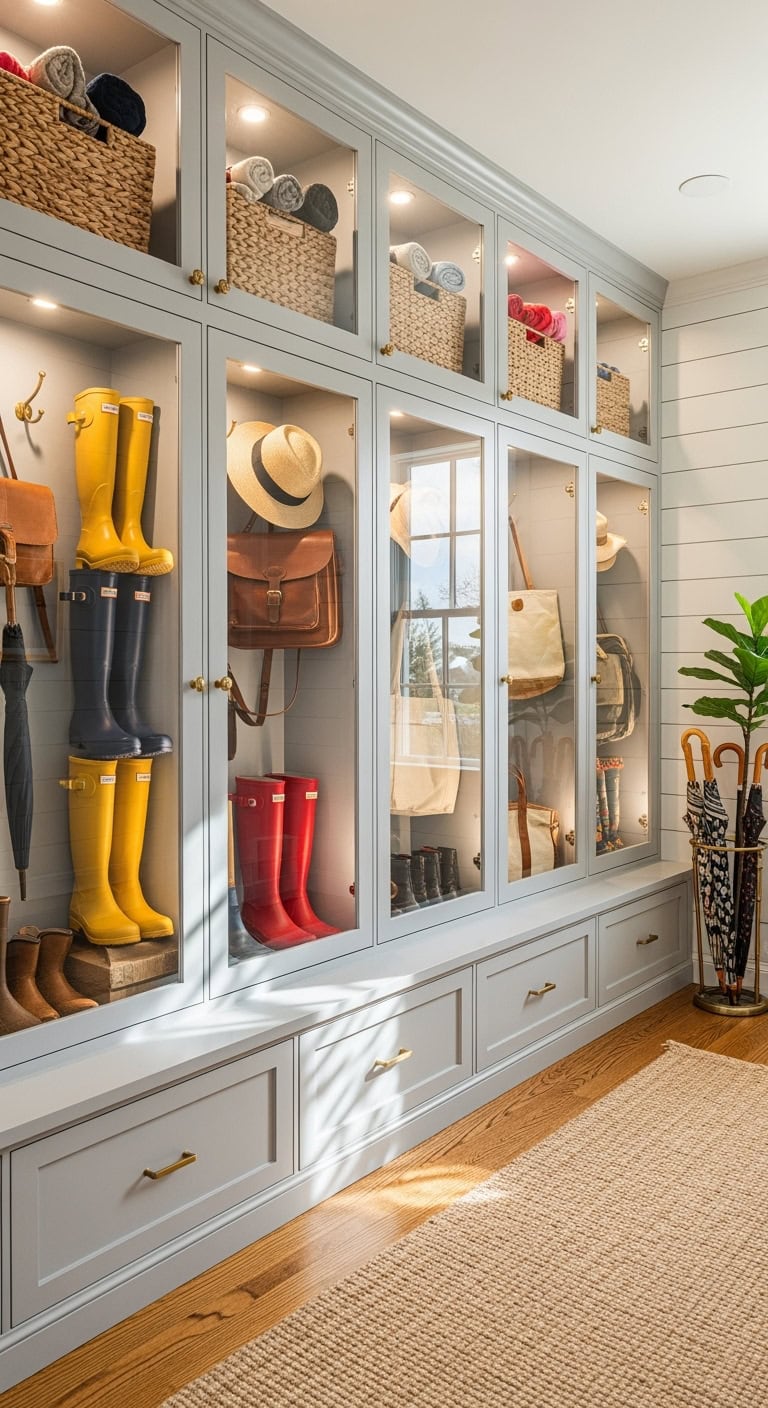
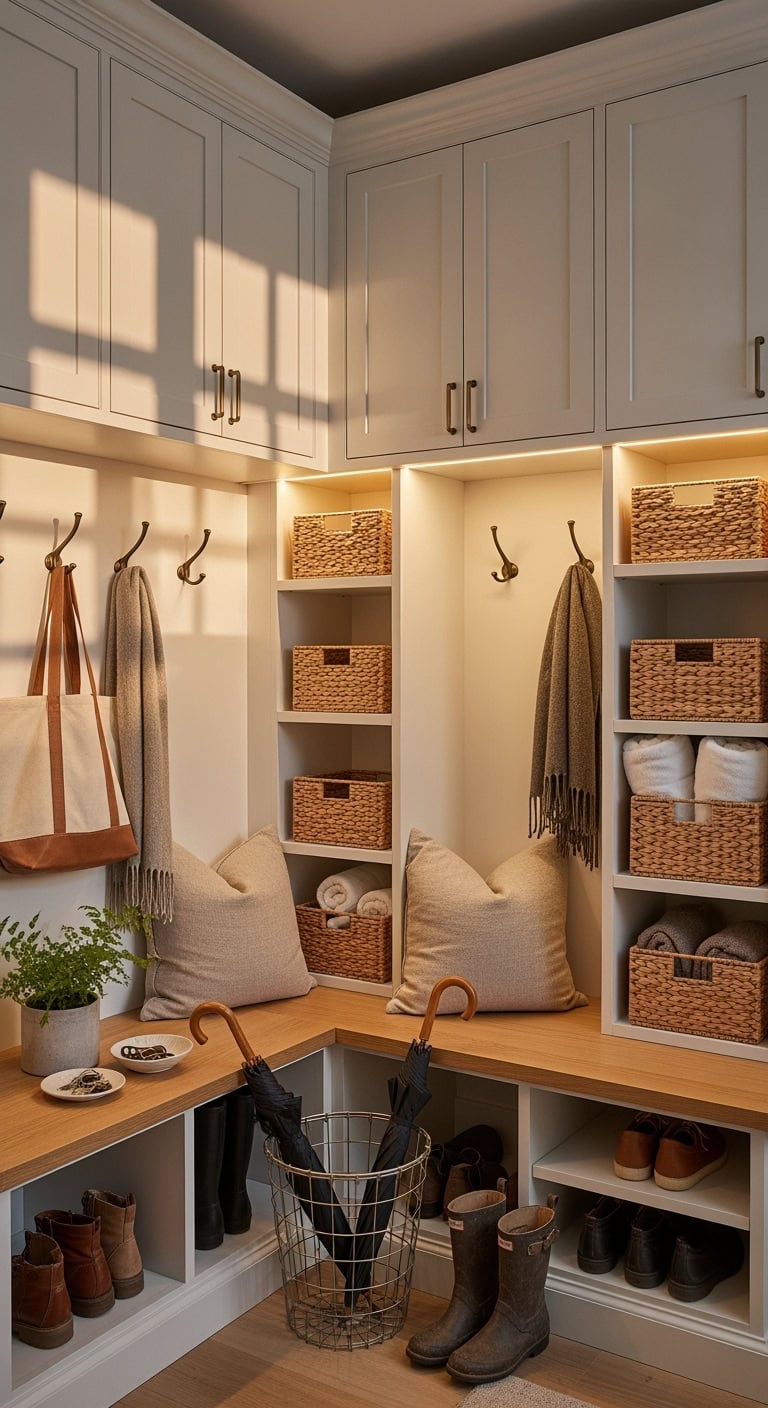
9. Chic Glass-Front Mudroom Lockers
Step into your mudroom and let these glass-front lockers catch your eye—they’re like custom-built showcases for your favorite rain boots and that charming vintage basket collection you found at a weekend market. The soft gray cabinetry beautifully contrasts with crisp white shiplap walls, while sleek brass handles add a subtle touch of elegance without overwhelming the look.
Key Design Elements
Place woven baskets on top shelves to introduce texture and warmth
Turn vibrant rain boots into eye-catching displays that double as decor
Install battery-powered puck lights inside lockers for a cozy glow
Combine everyday essentials with stylish accents—imagine straw hats paired with colorful umbrellas
Use matching hangers to create a neat, cohesive look behind the glass
Pro Tip: Showcase your most attractive pieces at eye level and switch out displays with the seasons—stash your regular shoes in closed lower compartments while letting standout items steal the spotlight.
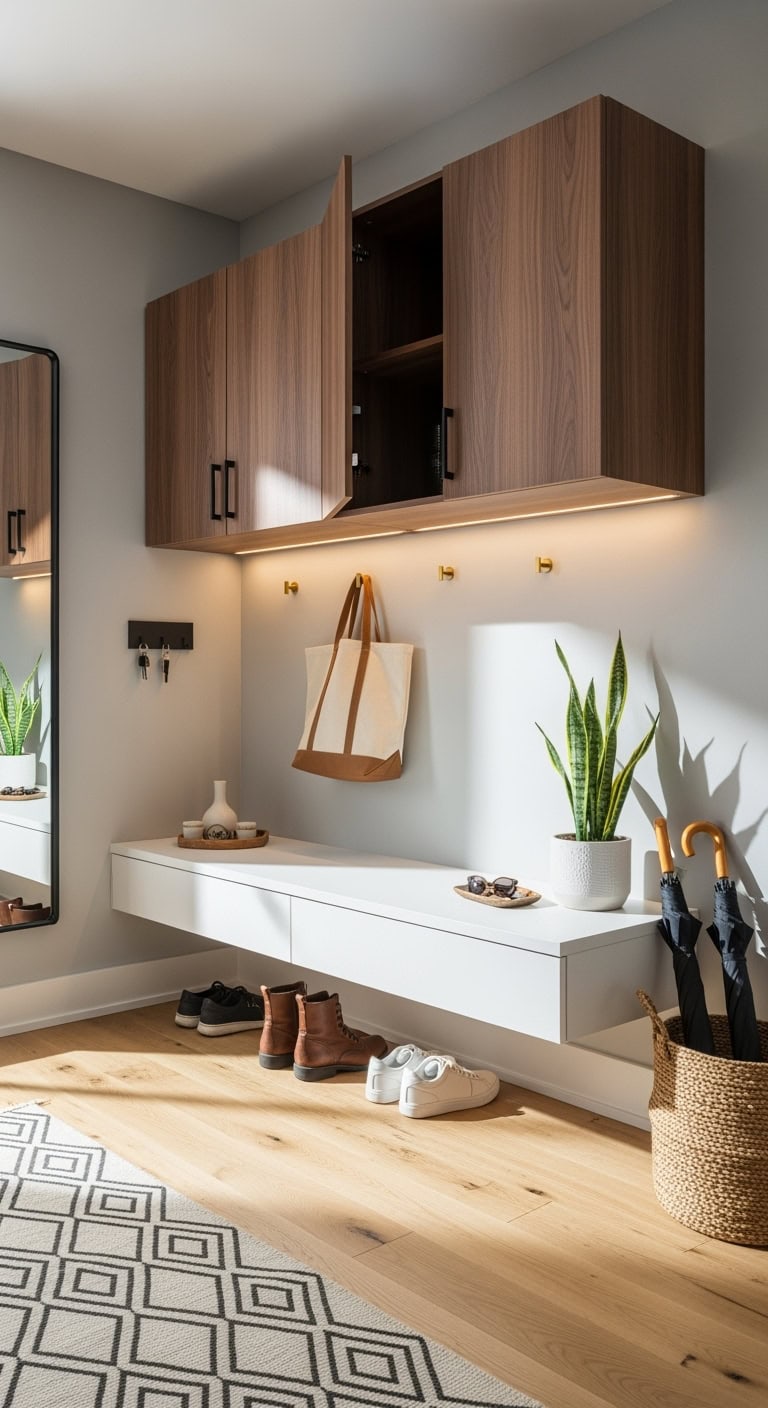
10. Sleek Floating Wall Lockers
These chic floating lockers have completely transformed the entryway vibe! Mounted conveniently at eye level, their rich walnut finish adds a touch of boutique elegance. Just beneath, a stylish floating bench seems to defy gravity, creating designated nooks for the kids’ backpacks and keeping everything effortlessly organized.
Key Design Elements
Position lockers about 18 inches above the bench for easy access
Incorporate LED lighting underneath to add a soft, inviting glow
Opt for handle-free, push-to-open doors to maintain a minimalist look
Include hooks inside each section to hang coats and bags neatly
Stick to a neutral palette—think whites, warm woods, and sleek black hardware
Pro Tip: Make sure to leave around 12 inches of open space beneath the floating bench—this helps with shoe storage, makes cleaning a breeze, and keeps the area feeling light and airy rather than cluttered.
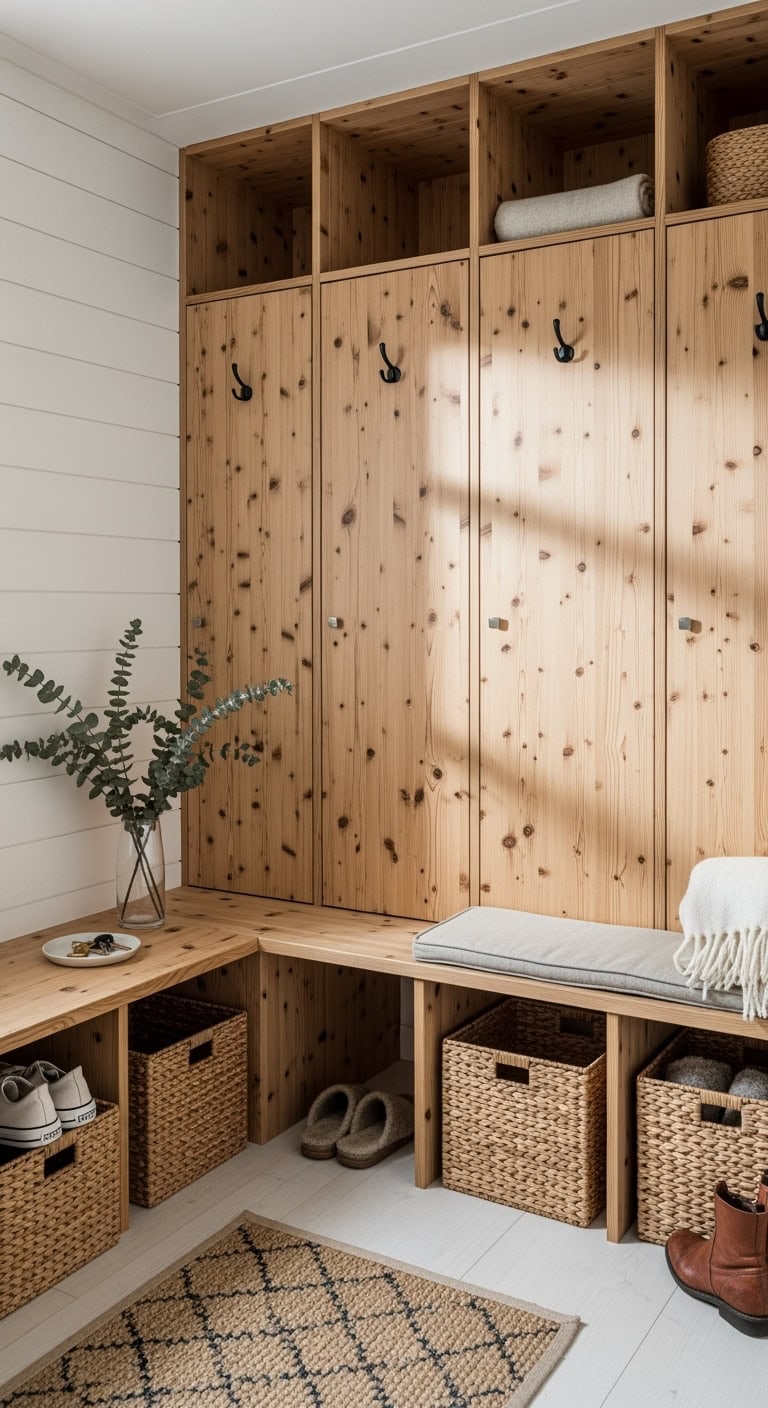
11. Sleek Scandinavian Pine Mudroom Lockers
Step into a mudroom inspired by Nordic simplicity, where natural beauty and function harmonize effortlessly. The pine lockers showcase their stunning grain without heavy finishes, allowing the light wood to open up the space. Each compartment features a streamlined iron hook paired with woven baskets underneath, creating an inviting, clutter-free environment that feels cozy yet effortlessly organized.
Key Design Elements
Opt for lightly treated or raw pine to highlight authentic wood textures
Use single hooks for a clean, understated look
Incorporate neutral-toned, natural fiber baskets for added warmth
Choose subtle hardware finishes like matte black or brushed steel
Add a simple wooden bench beneath lockers for extra seating and convenience
Pro Tip: Enhance the pine’s natural warmth by painting walls a crisp white—this contrast brightens the room and makes those golden wood hues truly pop.
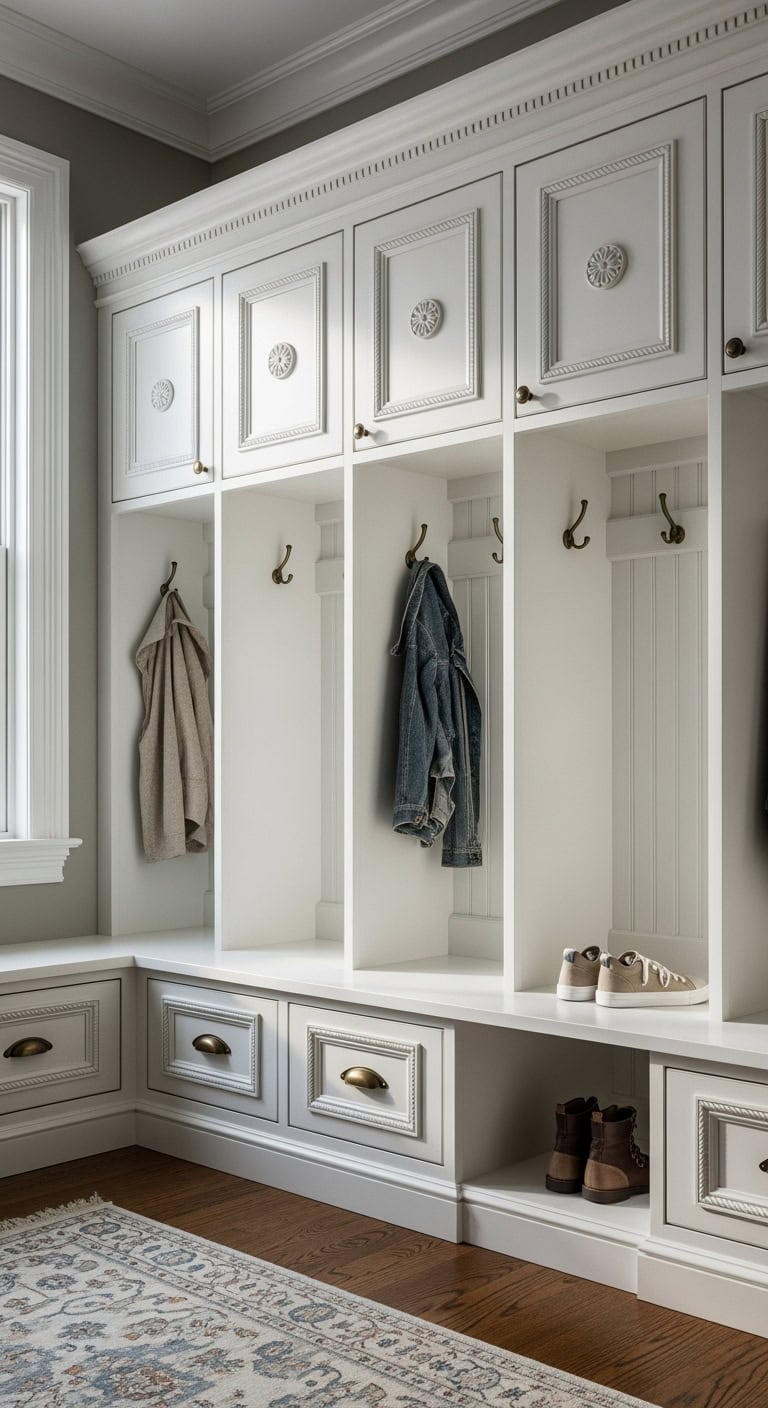
12. Maple Mudroom Lockers with Shaker Charm
Give your entryway a stylish upgrade with these stunning maple lockers inspired by the timeless Shaker design. Each locker features a dedicated space for every family member, complete with sturdy hooks for coats, a cozy bench that cleverly hides extra storage, and handy upper compartments perfect for stashing hats and gloves. The natural wood texture beautifully contrasts the crisp white shiplap walls, creating a warm and inviting atmosphere.
Key Design Elements
Opt for soft-close hinges to keep doors quiet and gentle during busy mornings
Use cushions made from washable fabrics like outdoor linen for easy cleaning
Incorporate adjustable shelving to accommodate your kids’ ever-changing gear
Add woven baskets to keep essentials organized and within quick reach
Install USB charging ports inside lockers to create convenient tech stations
Pro Tip: To stay true to the Shaker style, choose simple, understated hardware like round knobs or cup pulls in brushed nickel or matte black—let the sleek, minimalist design speak for itself.
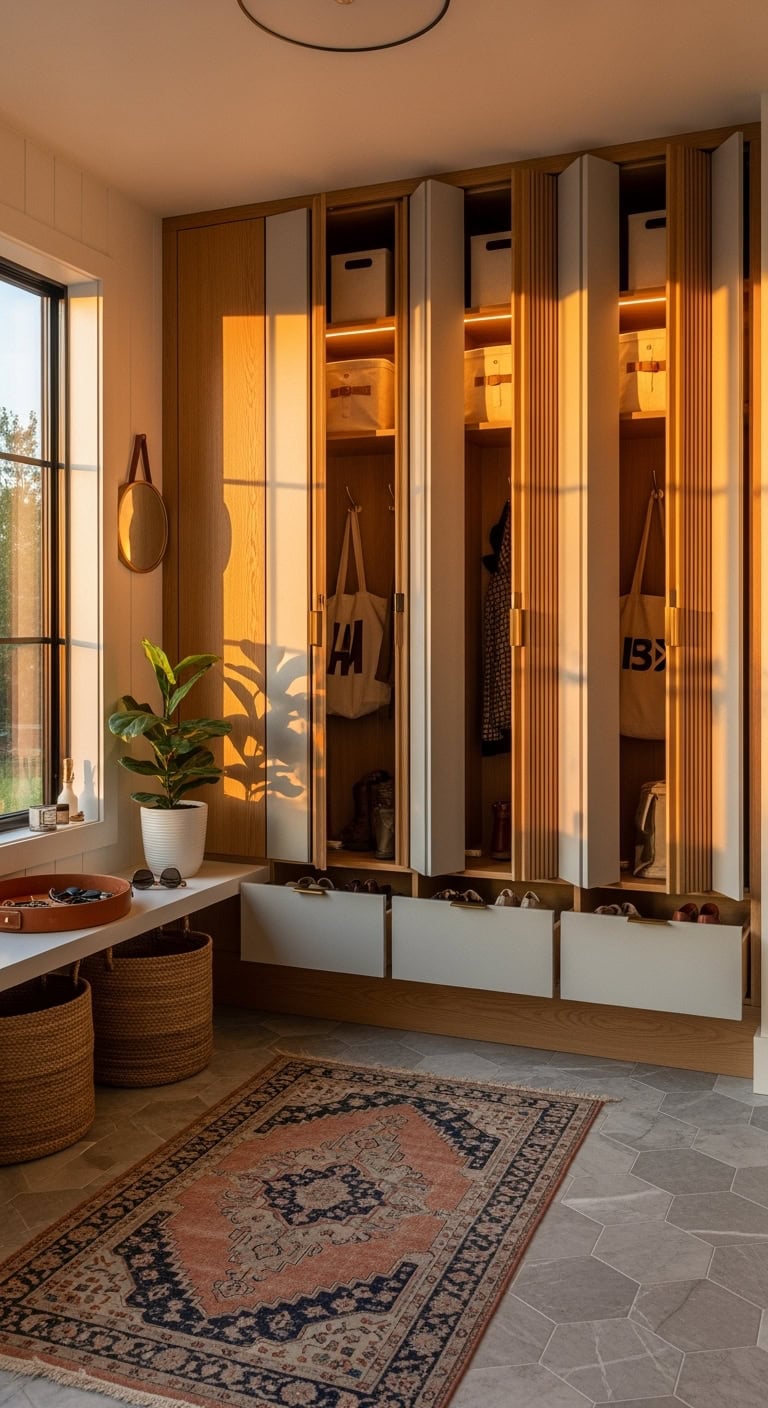
13. Space-Savvy Accordion Door Lockers
Transform your mudroom corner with these clever accordion-door lockers that channel a chic boutique hotel feel! Each family member enjoys a streamlined storage spot that unfolds when you need it and tucks away neatly to save floor space. Plus, the smooth soft-close hinges mean less morning noise and more calm starts to your day.
Key Design Elements
Go for floor-to-ceiling designs to use every inch of vertical space without crowding the area
Opt for light or natural wood tones to maintain a fresh and open atmosphere
Incorporate hooks at different levels inside for coats, backpacks, and kids’ belongings
Add pull-out drawers at the base for organizing shoes and sports gear efficiently
Install battery-powered LED lights inside to brighten dark mornings effortlessly
Pro Tip: Soften the sleek look of accordion doors with cozy touches like woven baskets or a charming vintage rug to keep your mudroom inviting, not sterile.
14. Eco-Chic Bamboo Mudroom Lockers
These bamboo lockers bring a cozy, sun-kissed glow to your entryway, showcasing the wood’s beautiful natural patterns. Each person in the household gets their own stylish compartment, complete with sturdy metal hooks perfect for backpacks, a comfy bench that cleverly hides shoe storage underneath, and clever mesh baskets designed to air out damp gloves effectively.
Key Design Elements
Incorporate woven jute baskets for added texture while staying eco-conscious
Brighten up open shelves with peel-and-stick botanical wallpaper for a fresh touch
Enhance each cubby with subtle LED strip lights to mimic a high-end custom build
Mix in rattan hooks between lockers to boost hanging space with natural charm
Opt for linen cushions in soft sage or warm terracotta hues to introduce gentle color
Pro Tip: To maintain the stunning look of your bamboo lockers, apply natural oil every six months—this helps prevent cracks and enriches that rich golden color you adore.
15. Charming Open Cubby Lockers
Transform your mudroom into an organized oasis with these stylish open cubby lockers! Crisp white frames create neat spots for everyone’s belongings, while hooks below keep bags and jackets within easy reach. The airy, open design not only keeps things fresh by avoiding hidden odors but also ensures everything is in plain sight, so you’ll actually use and enjoy your storage solution.
Key Design Elements
Incorporate woven baskets with different textures for added depth and charm
Use stick-on LED lights beneath shelves for a cozy, illuminated touch
Blend metal accents with wooden elements to bring a sleek yet warm feel
Personalize each cubby with chalkboard labels or leather tags for easy ID
Add a compact mirror in one section for quick, on-the-go touch-ups
Pro Tip: To keep your cubbies looking effortlessly tidy, embrace the 80% rule—fill each space up to about 80%, letting just enough room breathe to maintain a clean and inviting look.
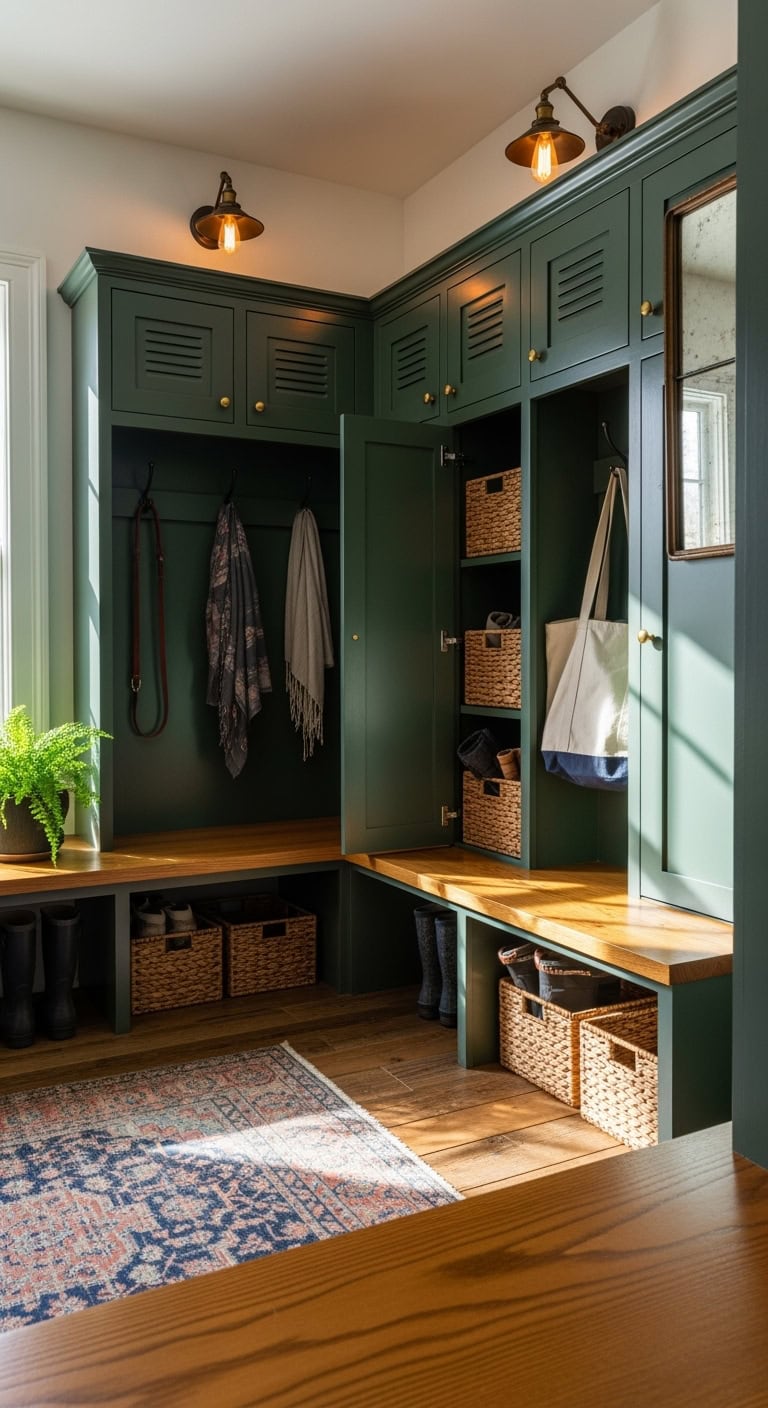
16. Vintage Brass Lockers for Your Mudroom
Give your mudroom a stylish upgrade with these vintage-inspired brass lockers that evoke the charm of classic boarding schools. Imagine rich forest green lockers adorned with beautifully aged brass handles, complete with just the right touch of natural patina. Below, sturdy wooden benches invite you to sit comfortably while slipping on your boots. When sunlight filters through the window, the brass hardware glows warmly, blending timeless elegance with everyday practicality.
Key Design Elements
Pair antique brass handles with matte black hooks for a layered look
Use woven baskets inside lockers to keep clutter out of sight
Add vintage Edison bulb sconces nearby to enhance the nostalgic vibe
Opt for lockers featuring ventilation slots to air out damp items
Place a washable runner beneath in tones that complement the locker color
Pro Tip: Choose unlacquered brass hardware so it develops a natural, authentic patina over time—this way, you’ll avoid that glossy, brand-new appearance that tries too hard to be vintage.
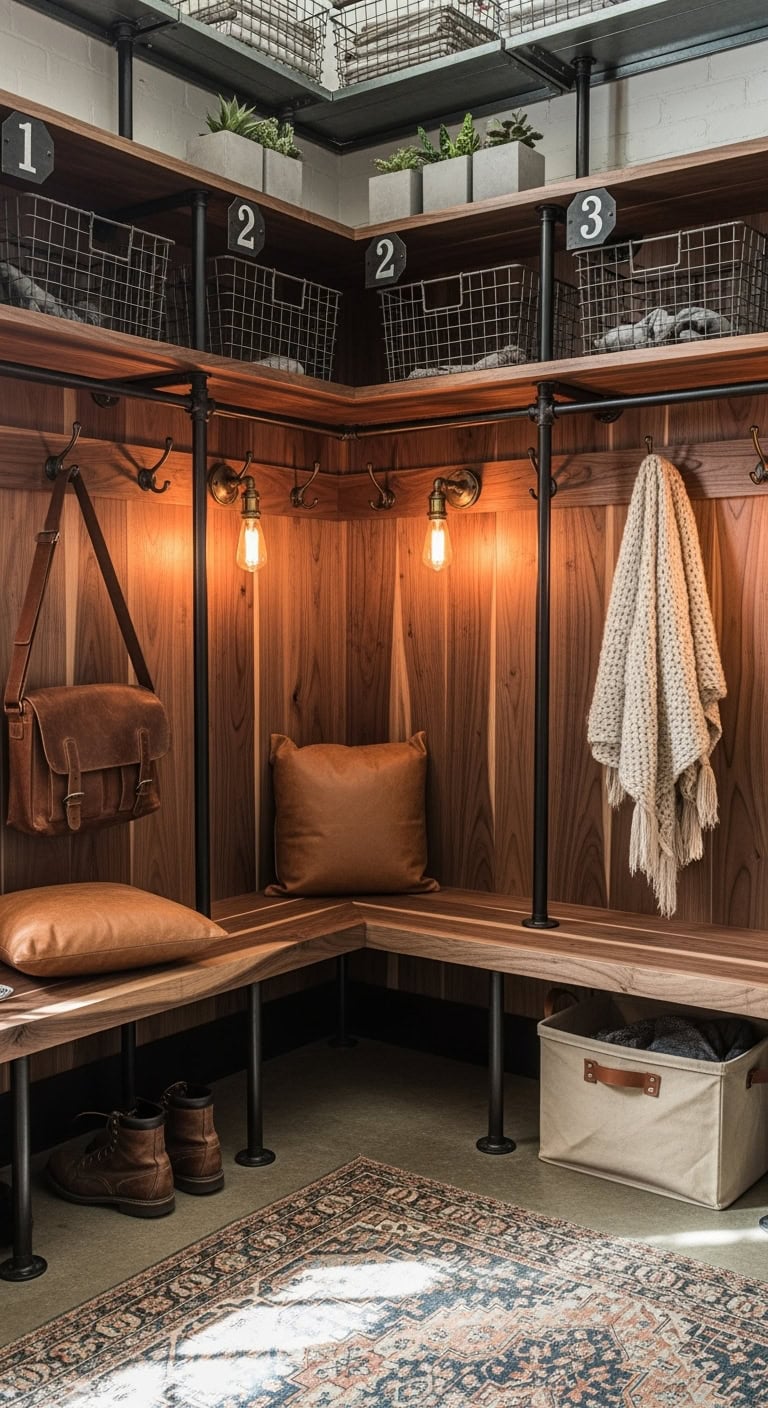
17. Urban Industrial Pipe Lockers
Bring a touch of gritty city style into your home with these industrial pipe lockers. Featuring sturdy black metal piping paired with reclaimed wood benches, they channel the charm of an old factory turned modern loft. The open design, complete with wire mesh baskets and rugged hooks, offers a stylish yet practical way to keep your entryway neat and inviting.
Key Design Elements
Pair sleek matte black piping with rich walnut-toned wood for striking contrast
Incorporate vintage wire baskets to enhance the authentic industrial feel
Mount Edison bulb wall sconces above each cubby to add warm, ambient lighting
Label each locker with numbered metal tags or stenciled graphics for character
Introduce leather cushions to bring warmth and soften the rugged materials
Pro Tip: Soften the tough industrial look by adding a cozy element to each locker—try chunky knit throws, canvas storage bins, or a tiny potted plant to create balance and invite warmth.
18. Customizable Stackable Mudroom Lockers
Transform your entryway into a stylish and super functional space with these adaptable stackable lockers that expand effortlessly as your family grows! Imagine crisp white lockers topped with warm wooden benches, each person having their own spot—backpacks hanging from sturdy double hooks, shoes neatly stored underneath, and charming baskets keeping all those everyday odds and ends perfectly organized.
Key Design Elements
Combine upper closed cabinets with lower open compartments for a smart blend of concealment and accessibility
Enhance bench comfort with cushions made from durable, weatherproof fabrics like Sunbrella
Add LED strip lights inside each locker to brighten early mornings and gloomy days
Opt for soft-close hinges to eliminate loud, abrupt door banging
Include wire baskets designed to hold wet umbrellas and sports equipment for quick drying and easy cleanup
Pro Tip: To keep your lockers looking custom-built, leave a 6 to 8-inch gap between the top unit and the ceiling—this not only avoids a cramped feel but also ensures hassle-free reach and a polished appearance.
19. Space-Savvy Corner Mudroom Lockers
Transform your entryway with corner mudroom lockers that maximize every inch! Their smart L-shaped layout fits snugly into your hallway, bringing order and style together. Imagine smooth white shiplap panels paired with warm wooden benches and sturdy black hooks that keep everyone’s gear neat without any chaos.
Key Design Elements
Add floating shelves above for easy-to-reach seasonal storage bins
Use cushions in durable, washable fabrics like outdoor linen for comfort
Combine open shelves and closed cabinets to keep things tidy and balanced
Incorporate adjustable dividers so each family member has a personalized spot
Install hooks at multiple heights to accommodate both kids and adults
Pro Tip: To avoid a cramped feel, paint your corner lockers a couple of shades lighter than the walls—this subtle contrast adds depth and makes the area feel more spacious and welcoming.
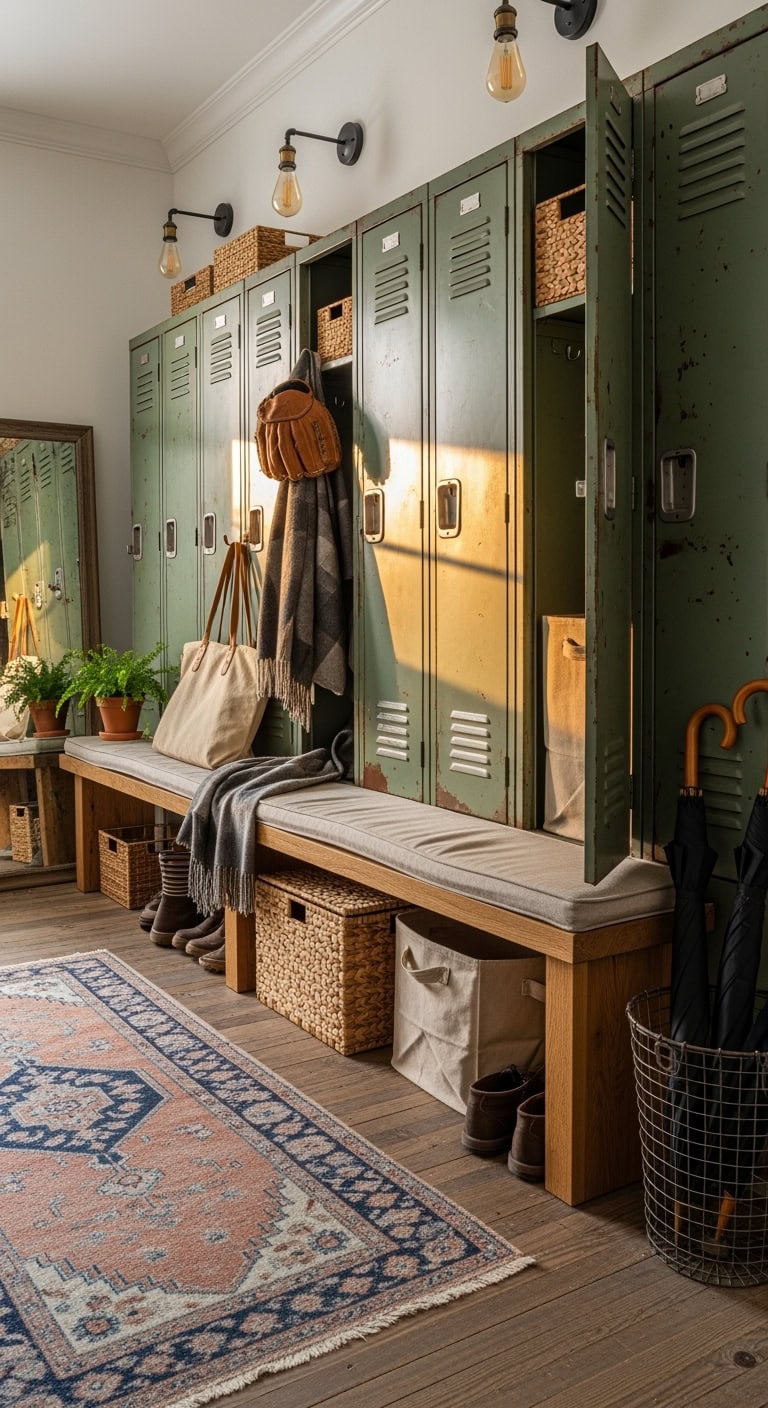
20. Classic Vintage Gym Lockers for Your Mudroom
Imagine stepping into your mudroom and being greeted by a lineup of genuine vintage gym lockers, each one boasting a charming sage-green patina that’s full of character. These timeless metal lockers aren’t just storage—they’re a statement piece, carrying a nostalgic industrial flair while keeping backpacks and shoes neatly stashed inside. Pair them with a cozy Persian-style runner to bring warmth and style into the mix. It’s the perfect blend of old-school cool and modern function!
Key Design Elements
Search salvage yards and antique shops for lockers with authentic aged paint
Preserve the original hardware to keep that rugged, vintage appeal
Add a sturdy wooden bench beneath for a practical and inviting spot to sit
Mount Edison bulb wall sconces overhead for a warm, inviting glow
Incorporate contemporary baskets inside lockers to maximize organization
Pro Tip: Soften the tough, industrial look by introducing cozy elements like woven baskets or a cushioned bench seat—creating a space that’s vintage-inspired but totally livable, not like a gym locker room.
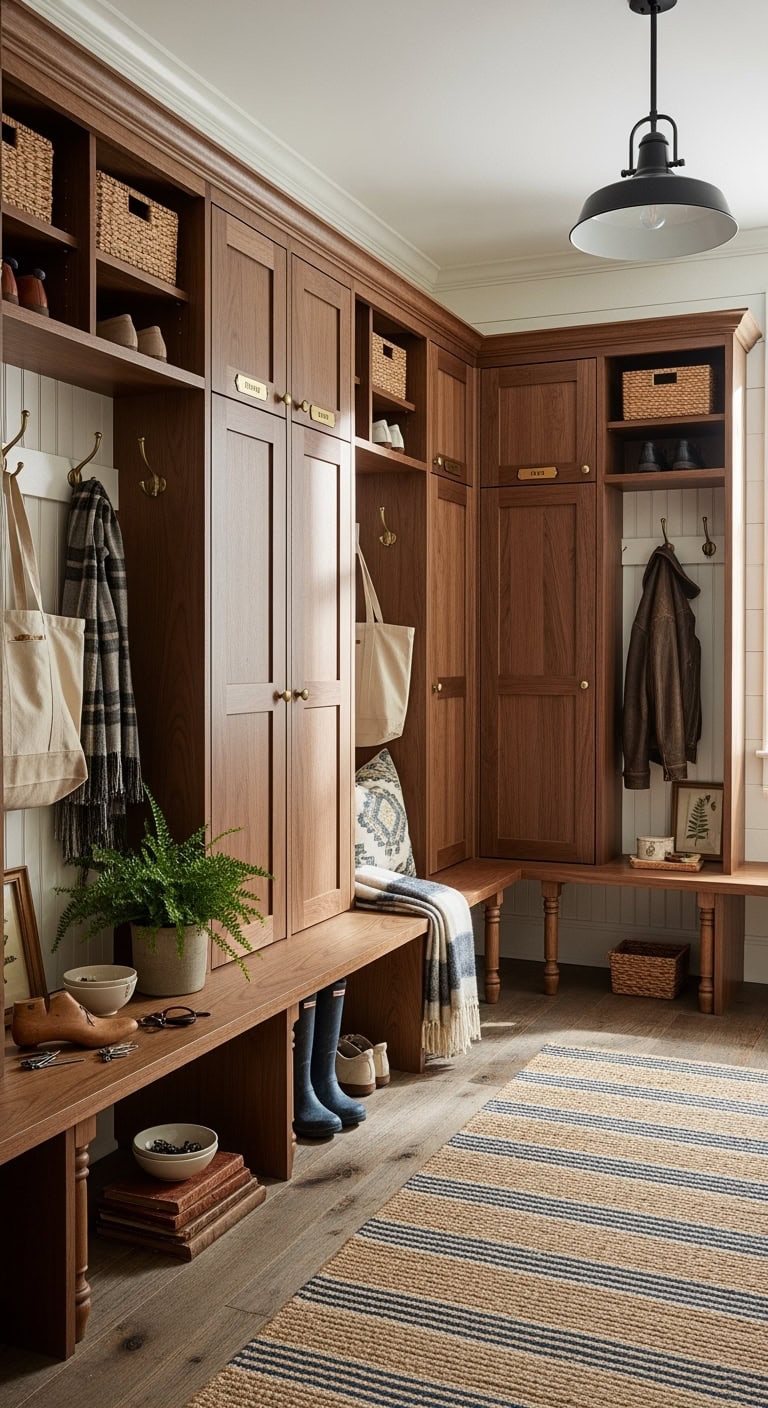
21. Classic Wooden Mudroom Lockers
Imagine entering a mudroom that instantly brings a warm, rustic charm to your home. Picture deep walnut lockers stretching across the wall, each personalized with a charming vintage brass nameplate and paired with a sturdy wooden bench below. The natural glow from the honey-toned oak panels brightens the space, while cozy cubbies neatly store woven baskets and everyone’s go-to shoes.
Key Design Elements
Opt for hardwoods like oak or maple to ensure long-lasting strength
Incorporate shaker-style cabinet doors for an enduring, elegant look
Use beadboard backing to add a touch of authentic farmhouse flair
Combine open shelves with closed cabinets to maximize versatile storage
Choose antique brass or oil-rubbed bronze accents for timeless hardware
Pro Tip: Give your classic wooden lockers a fresh update by mixing in modern elements such as streamlined hooks or minimalist lighting. This blend keeps the space feeling inviting and current without losing its cozy traditional vibe.
22. Charming Farmhouse Bench Lockers
Imagine a cozy nook fashioned from weathered wood planks, setting a warm and inviting scene, while sturdy wrought iron hooks bring in just the right hint of industrial charm. Each cubby is complemented by a solid bench perfect for slipping on your boots as you savor that morning cup of coffee. Soft light from mason jar sconces gently illuminates reclaimed barnwood, showcasing its beautiful, natural grain and rustic character.
Key Design Elements
Add shiplap paneling for genuine farmhouse texture and depth
Opt for distressed wood in soothing honey or soft gray shades
Use woven baskets under the bench to neatly tuck away essentials
Label cubbies with vintage metal number plates for a nostalgic touch
Incorporate galvanized steel bins to keep wet or muddy items organized
Pro Tip: Keep the rustic vibe cohesive by choosing one type of hardware finish—whether matte black iron or brushed bronze—to create a harmonious, well-curated farmhouse look without overwhelming the space.
23. Multi-Purpose Mudroom Lockers
Transform your entryway into a stylish and super practical hub with these versatile mudroom lockers! Imagine stepping inside to discover perfectly placed hooks for your everyday essentials, a cozy bench that makes putting on shoes a breeze, and spacious compartments designed to hold even your tallest umbrellas with ease. The rich wood textures add a touch of thoughtful charm, making the whole setup feel curated rather than thrown together.
Key Design Elements
Combine sleek metal hooks with warm wooden surfaces for a trendy farmhouse look
Use woven baskets in the compartments to keep clutter tucked away
Position it across from a mirror to visually expand your space
Opt for lockers with adjustable shelves to easily swap out seasonal items
Place a runner rug beneath to clearly define and cozy up the area
Pro Tip: Aim for a balance where your mudroom lockers are about 60% practical and 40% stylish—keep countertop displays minimal, showing no more than three attractive items to maintain that effortless vibe.
Conclusion
Choosing the right mudroom locker can completely change how you experience your home’s busiest transition space. Whether you’re drawn to the eco-friendly charm of bamboo lockers or the timeless elegance of French provincial designs, there’s a perfect match waiting to bring both beauty and order to your mudroom. With so many creative options—from industrial pipes to minimalist Scandinavian styles—you can tailor your storage to suit your needs and taste.
So go ahead, embrace the blend of style and smart storage that mudroom lockers offer. Your entryway will thank you, and you’ll enjoy a more organized, inviting home every time you walk in the door.
A white sofa has an effortless way of transforming any living room into a bright, inviting haven—timeless yet totally on-trend for 2026. Whether you’re craving a clean, minimalist retreat or a lavish space filled with texture and sparkle, a white sofa serves as the perfect blank canvas to express your personal style. This year, designers are pushing the boundaries with fresh takes on how to style and live with white sofas that feel both modern and cozy.
If you’ve ever hesitated about white upholstery because of practicality or style doubts, get ready to rethink everything. From sleek Scandinavian-inspired setups to plush, glam lounges, the versatility of a white sofa shines through in every design approach. We’ve gathered 27 standout living room ideas that highlight how this classic piece can effortlessly adapt to contemporary tastes while elevating your space’s overall vibe. Let’s dive into inspiring looks that will make your white sofa the star of your home in 2026 and beyond.
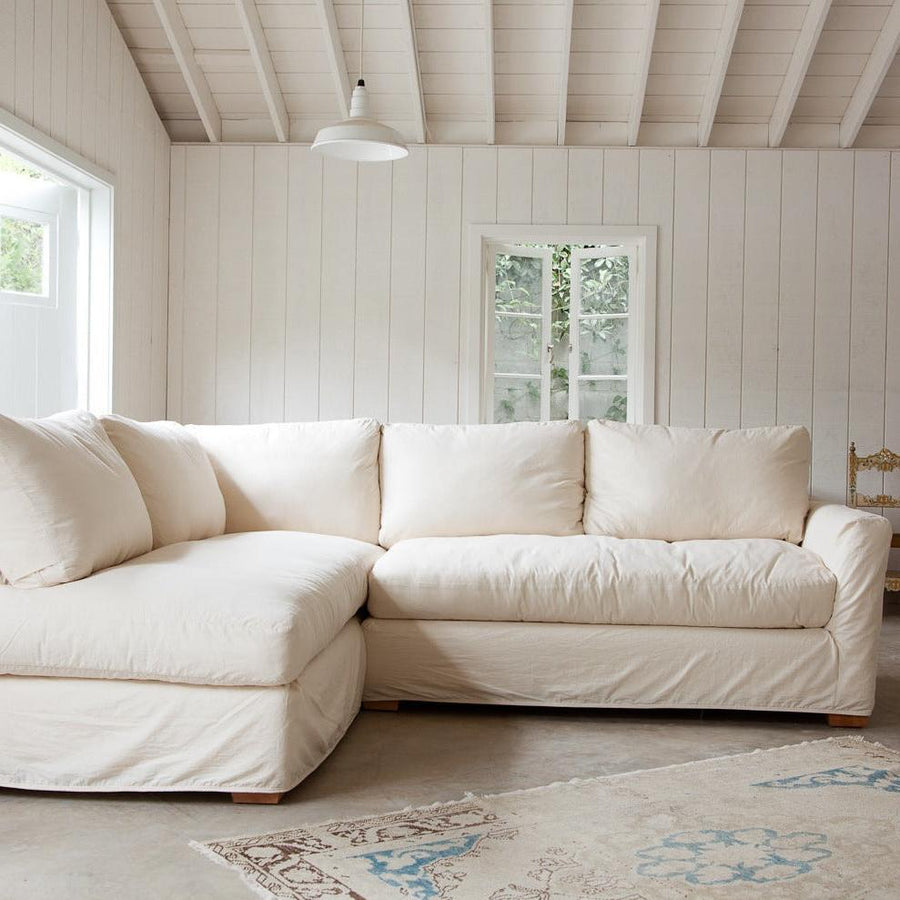
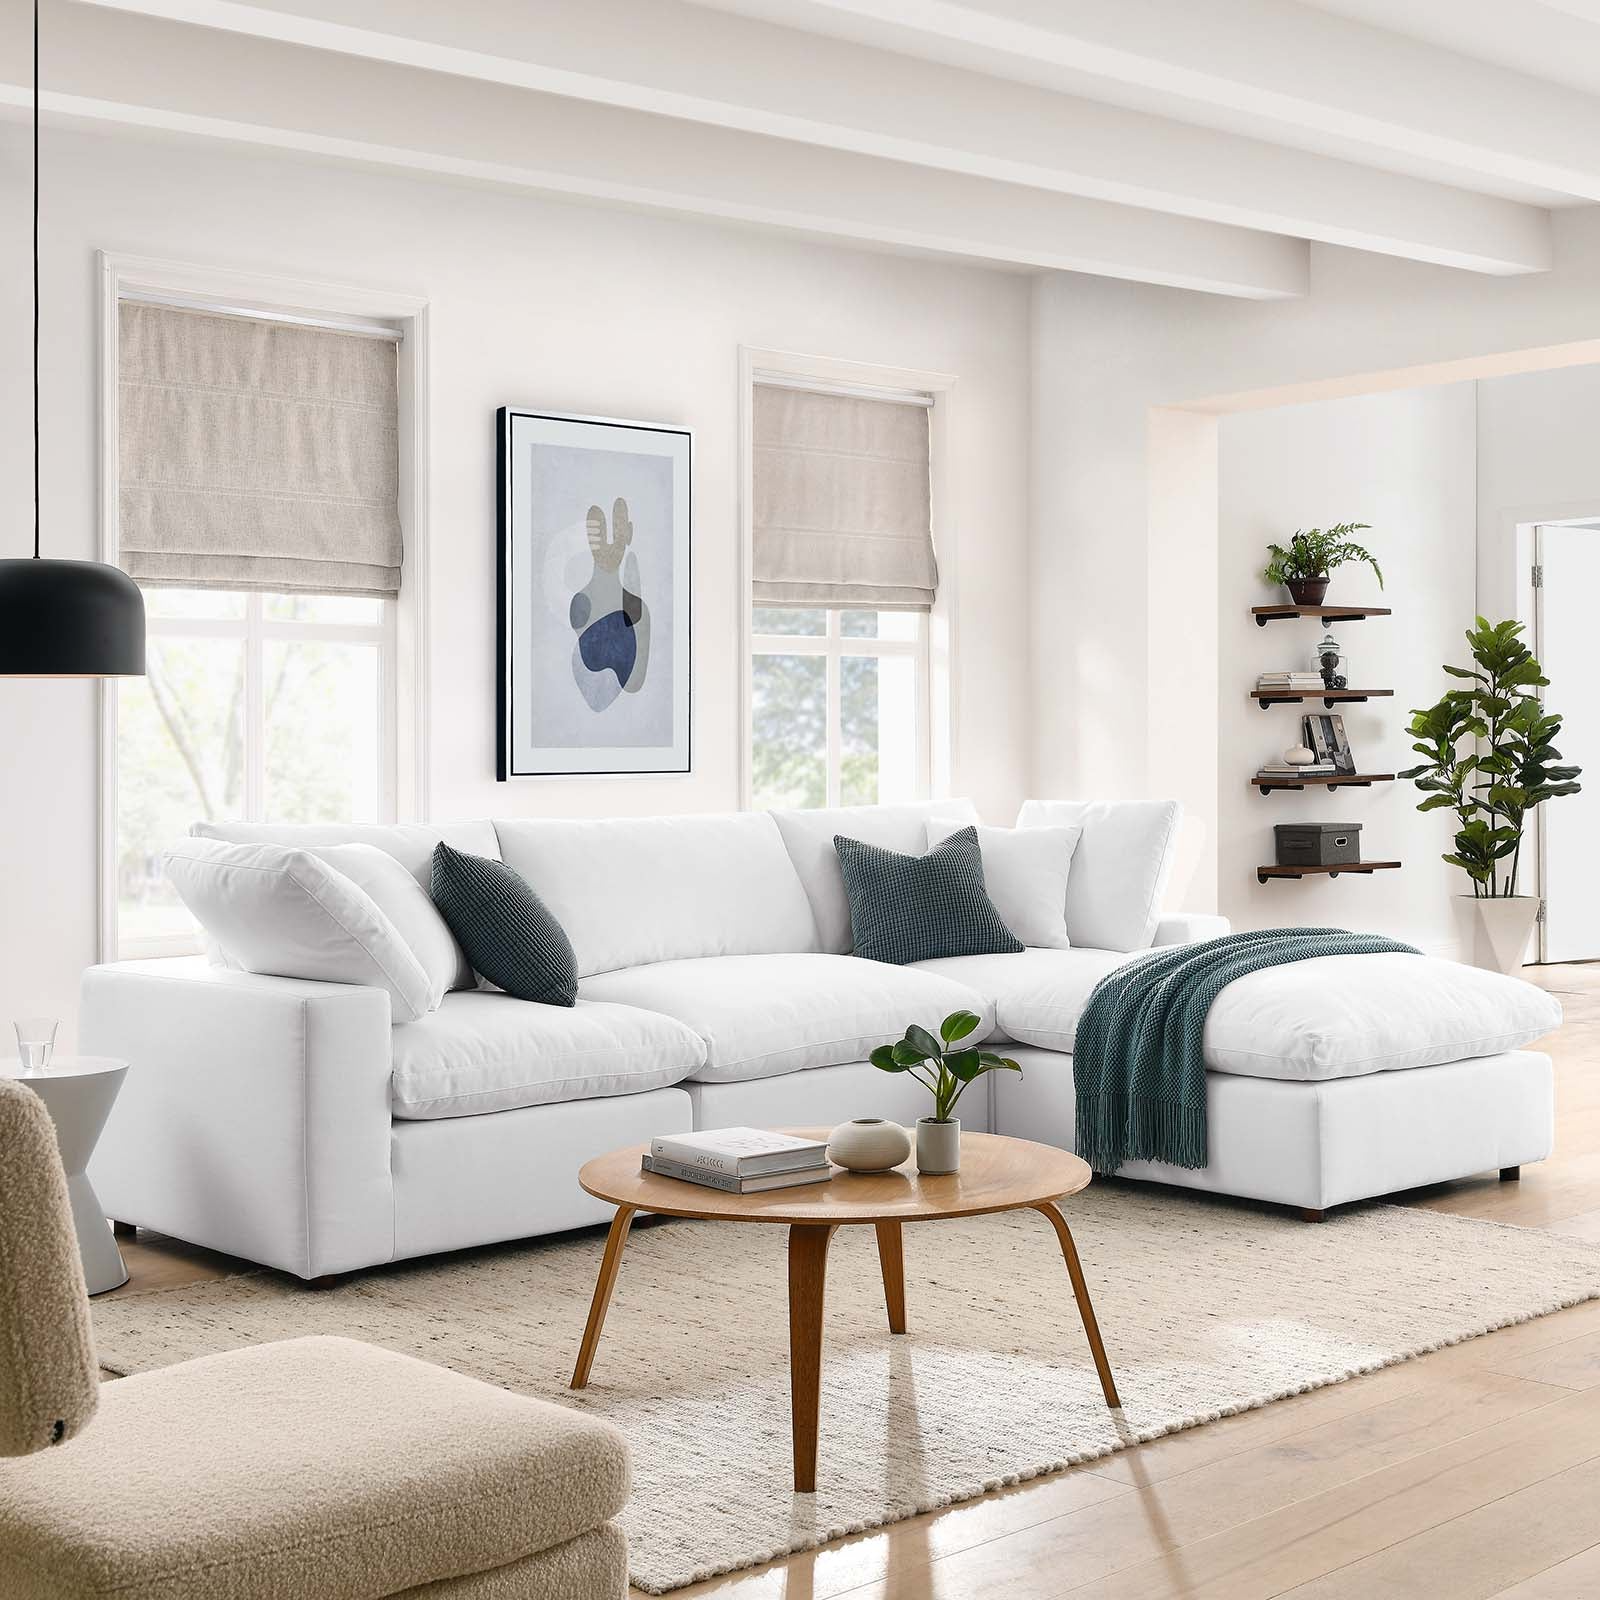
1. Bright White Sectional Meets Rustic Industrial Elegance with Concrete & Beams
This living room effortlessly blends the rugged allure of industrial design with the cozy warmth of farmhouse style. A plush, white slipcovered sectional anchors the space, inviting relaxation against a backdrop of exposed wooden beams and sleek concrete flooring. The contrast between the soft fabric and the raw architectural elements creates a striking balance, perfect for those seeking a modern yet grounded aesthetic. This fusion captures the essence of the ‘Industrial Farmhouse’ trend gaining momentum in 2026, where texture and simplicity harmonize beautifully.
Embrace texture contrast by pairing soft, slipcovered seating with hard surfaces like concrete floors and reclaimed wood beams.
Keep the color palette light and neutral to allow the white sectional to shine as the room’s focal point.
Add warmth with layered textiles such as cozy throws and linen pillows to soften the industrial edges.
Highlight architectural features by installing subtle uplighting along exposed beams or around concrete details.
Pro Tip: To maintain the crispness of a white sofa in a rustic-industrial setting, choose performance fabrics that are easy to clean but still offer that inviting, lived-in look essential to farmhouse charm.
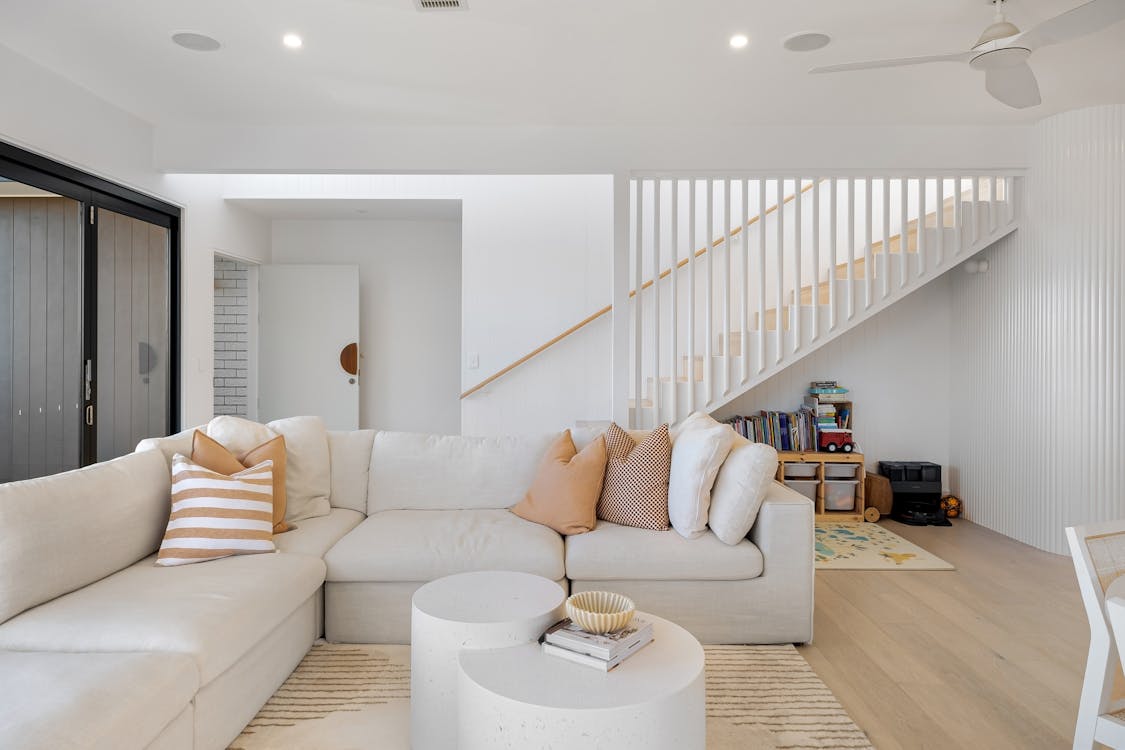
2. Cozy White Sectional Meets Rustic Timber and Earth-Toned Textiles
Embrace the inviting charm of a bright white sectional nestled amid rich, natural textures that instantly warm the space. The soft, expansive sofa invites relaxation, while a handcrafted wooden coffee table and an earth-hued patterned rug anchor the room with organic character. This blend of clean, crisp white and rugged rustic elements creates a harmonious retreat that feels both modern and timeless. It’s the perfect way to bring nature’s warmth indoors without sacrificing sleek sophistication.
Measure your living area carefully to ensure your sectional fits without crowding walkways or key furniture pieces.
Take advantage of natural light to amplify the brightness of the white sofa; supplement with layered lighting in dimmer spaces.
Coordinate wood tones between existing furnishings and your rustic coffee table for a unified, intentional look.
Choose an area rug with earthy patterns and warm hues to ground the seating area and add visual depth.
Pro Tip: When aiming for the modern rustic vibe, prioritize tactile contrast—pair smooth, crisp upholstery with rough-hewn wood and textured fabrics to create a balanced, inviting environment.
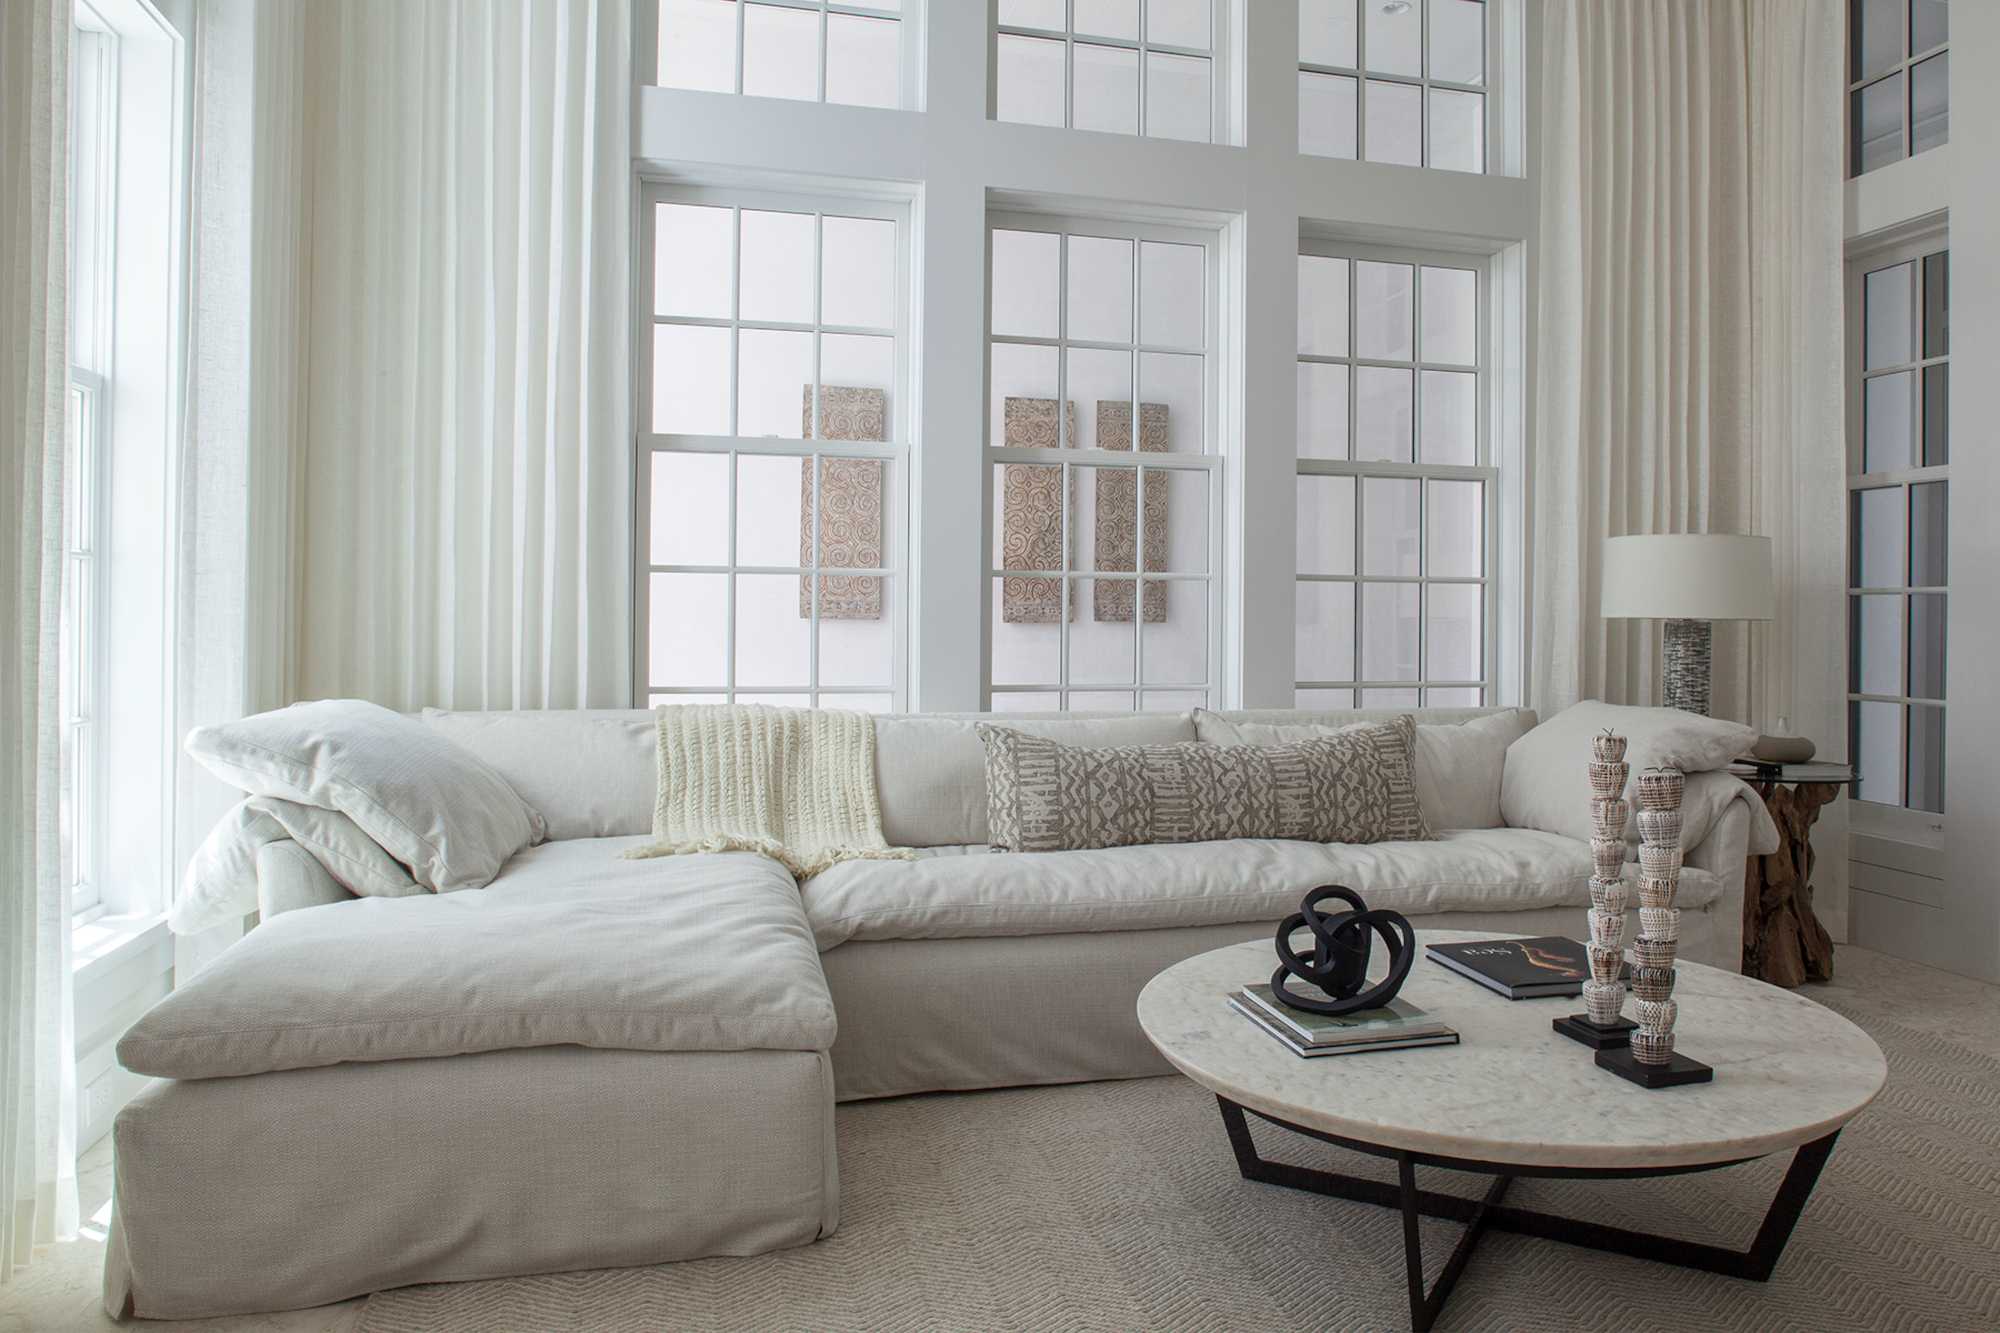
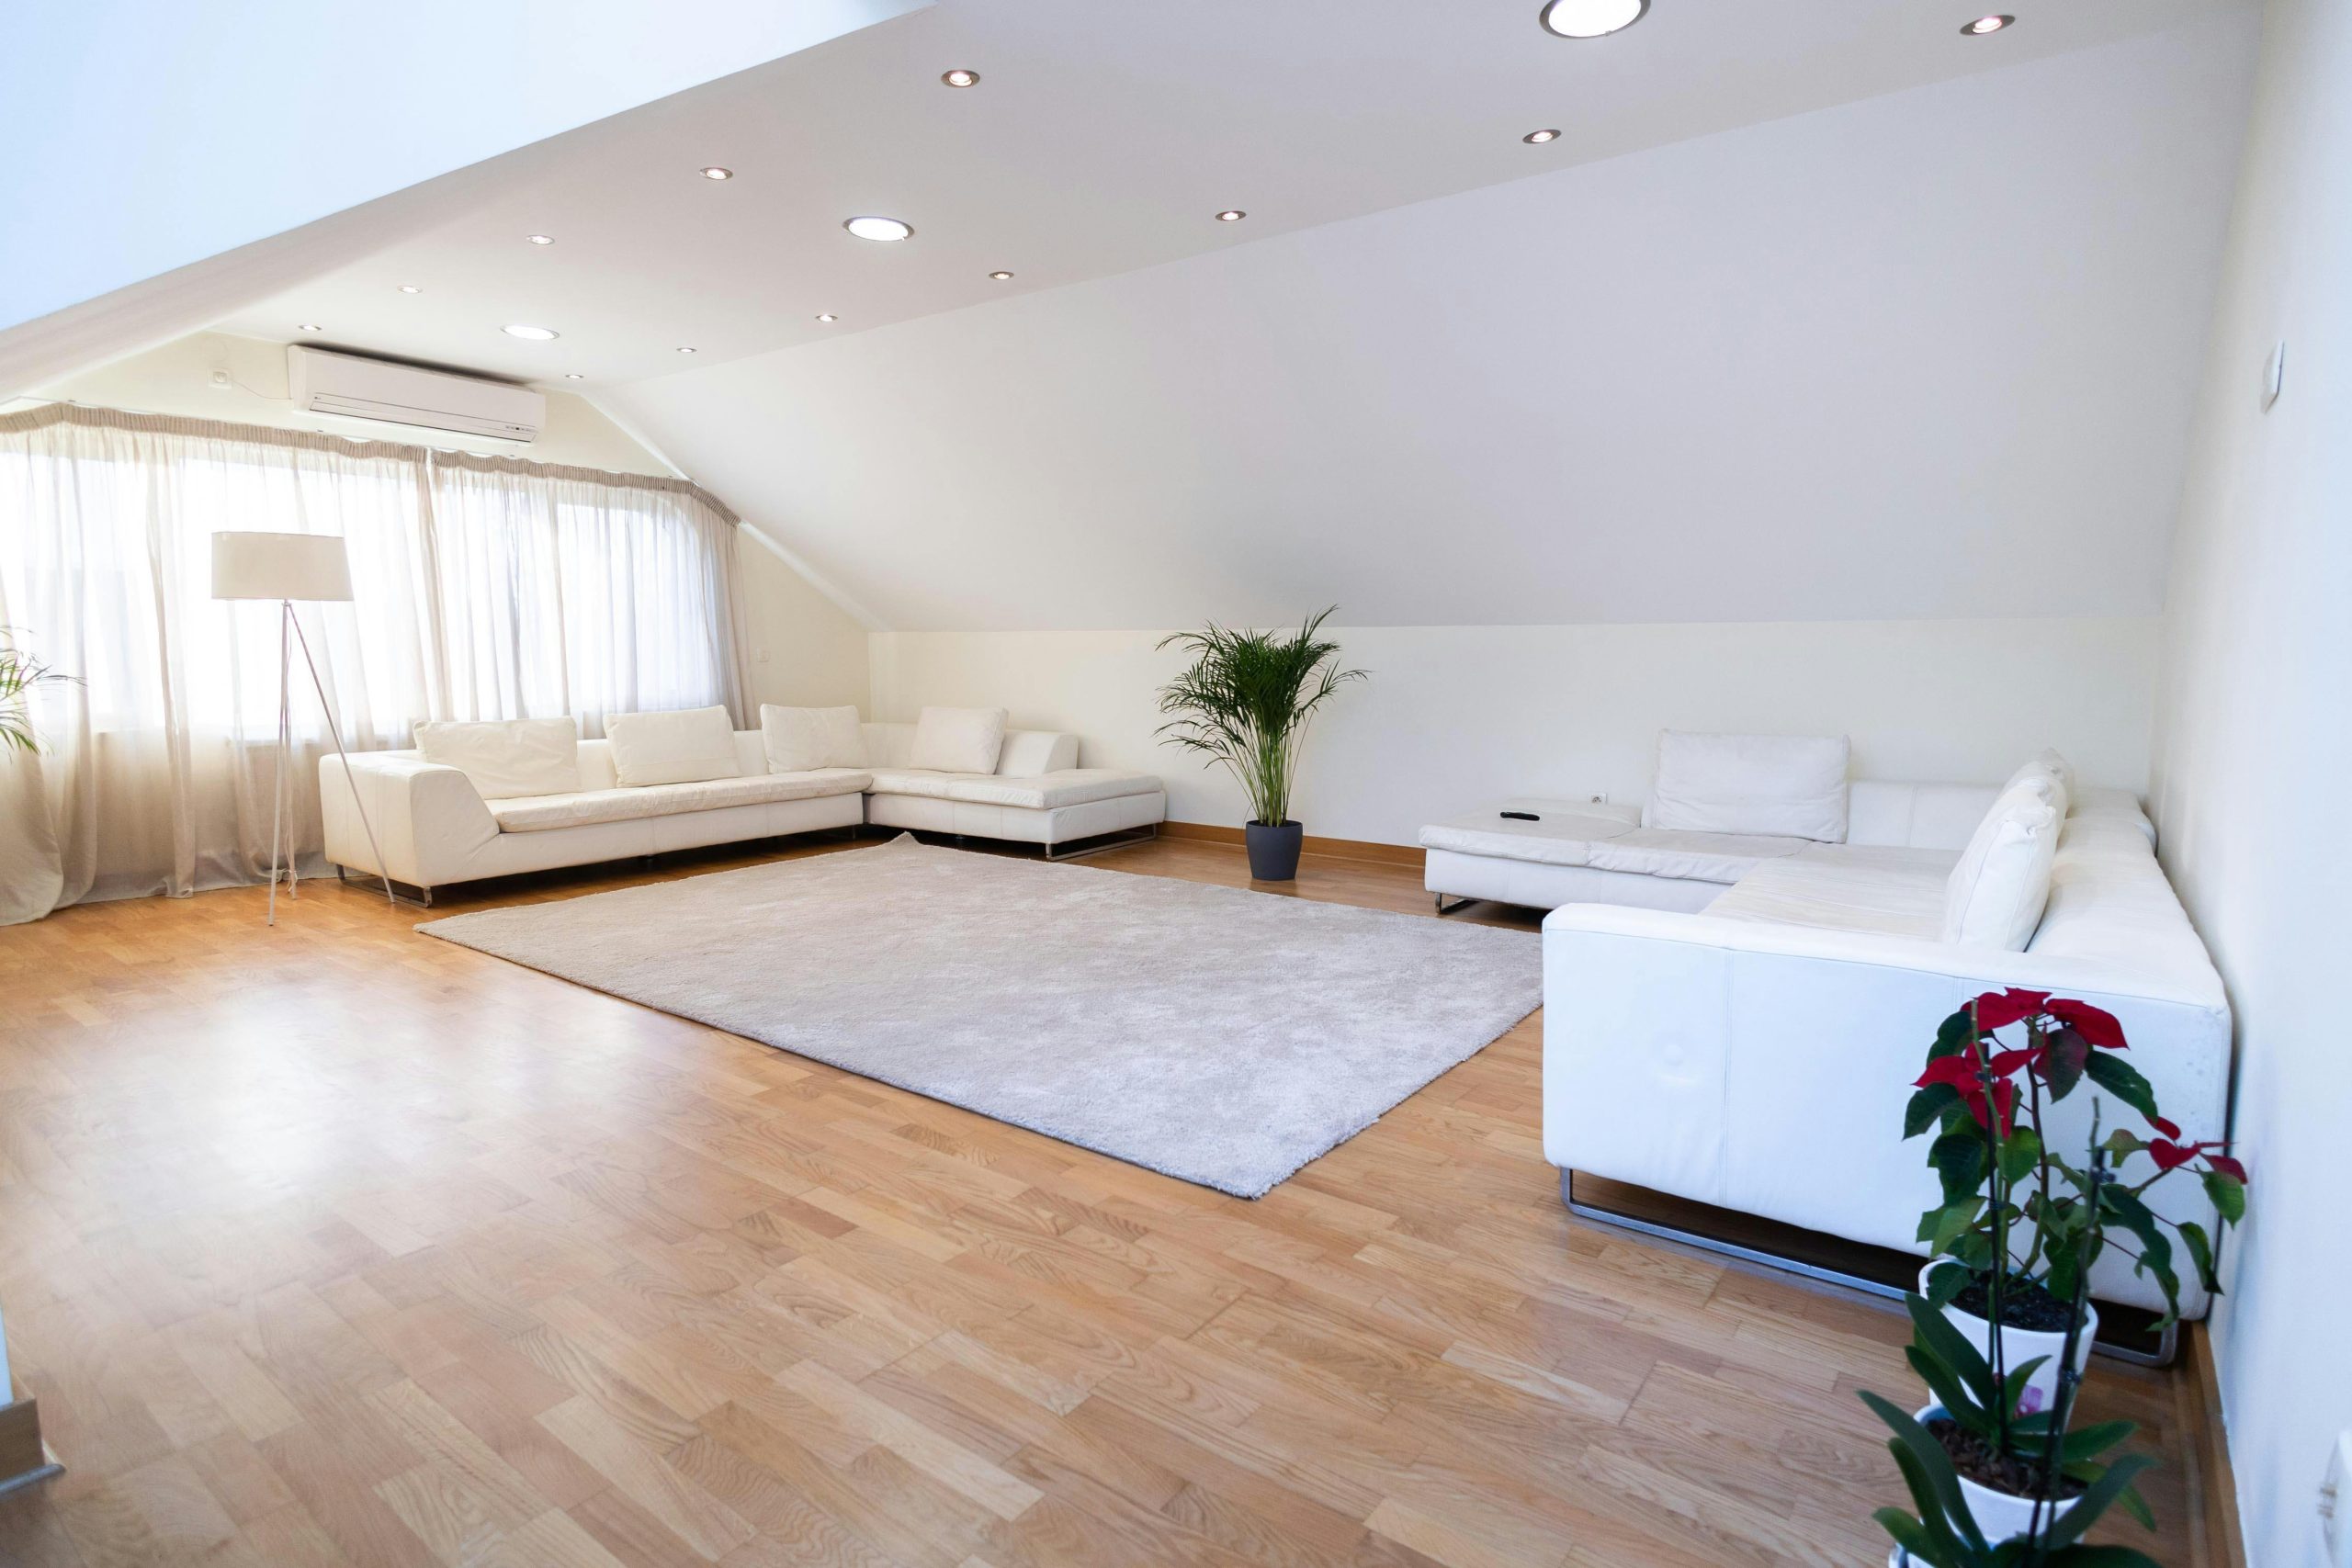
3. Bright Elegance with Floor-to-Ceiling White Sofa Living Rooms
Embrace the beauty of light and space with a white sofa beautifully anchored in front of expansive floor-to-ceiling grid windows. This design elevates serenity through a luminous palette, where natural daylight floods the room, creating an inviting and airy atmosphere. The subtle texture beneath your feet, like a soft chevron rug, adds depth without competing with the panoramic outdoor views. Perfect for generously sized rooms, this look transforms vast spaces into tranquil retreats filled with warmth and openness.
Position a large white sectional to face the windows, maximizing natural light and views.
Incorporate a low-profile area rug with a subtle pattern to add dimension without overpowering the space.
Opt for minimal window treatments—think sheer or no curtains—to maintain the room’s airy feel.
Use light-toned wood or metal accents to complement the crisp white sofa and add warmth.
Pro Tip: To truly enhance the airy vibe, keep ceiling heights at 9 feet or higher and maintain clear, unobstructed sightlines from the sofa to the windows, ensuring the room feels open and inviting.
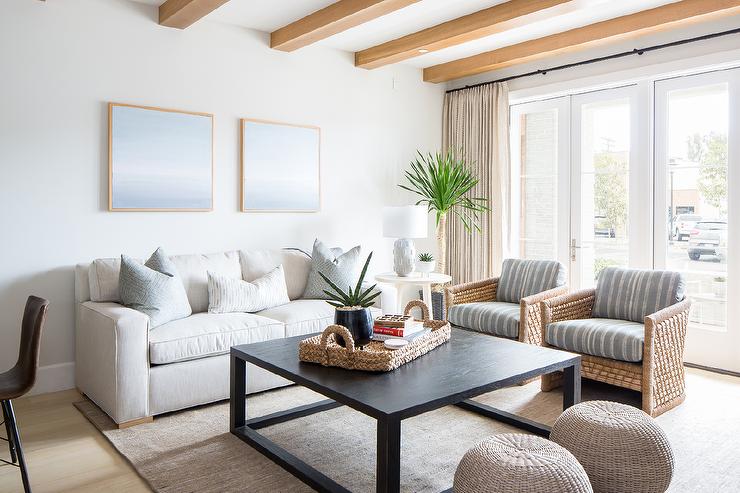
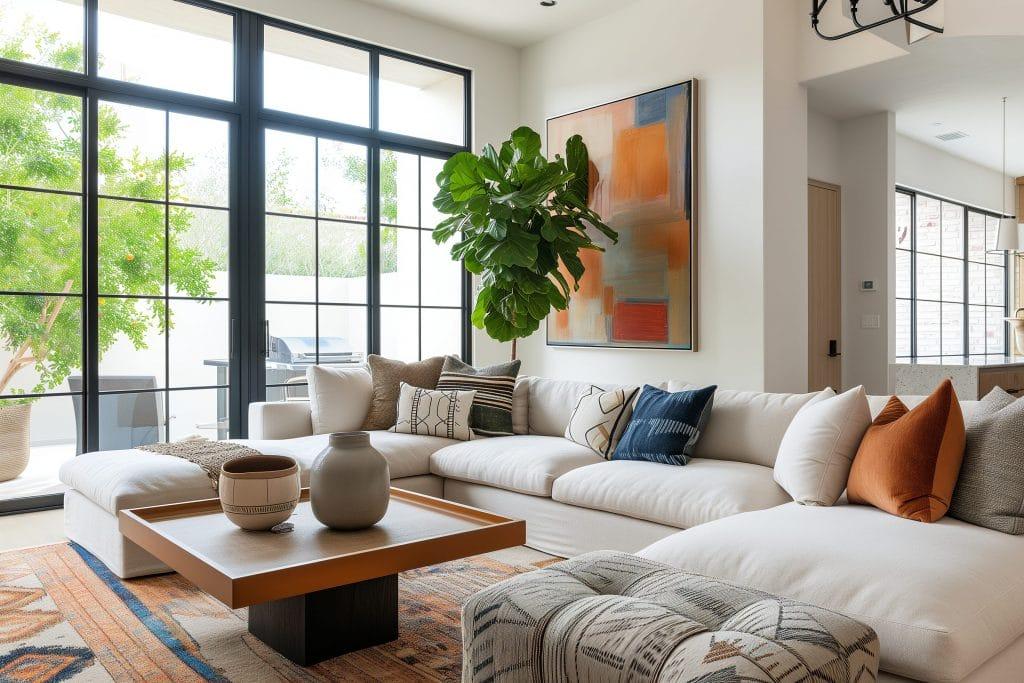
4. Rustic Elegance: White Sofa Living Room with Exposed Wood Beams and Rattan Touches
This living room effortlessly combines airy brightness with natural warmth, anchored by a crisp white sofa that invites relaxation. Accents like rattan armchairs introduce a tactile, organic element that balances the clean lines and soft hues. The standout feature is the exposed light wood beams overhead, which bring subtle rustic charm and architectural depth to the space without overpowering its fresh, open feel. Together, these elements create a harmonious retreat that feels both timeless and inviting.
Pair your white sofa with soft, patterned throw pillows in muted shades to add gentle pops of color and texture.
Incorporate natural materials like rattan or wicker furniture to enhance warmth and introduce an earthy vibe.
Use a dark wood or metal coffee table to provide contrast and ground the light tones in the room.
Highlight architectural details such as exposed ceiling beams by selecting complementary wood finishes that coordinate with your furniture accents.
Pro Tip: The exposed wood beams are the architectural hero here—they add instant character and cozy warmth, transforming a simple white ceiling into a distinctive focal point that elevates the entire room’s ambiance.
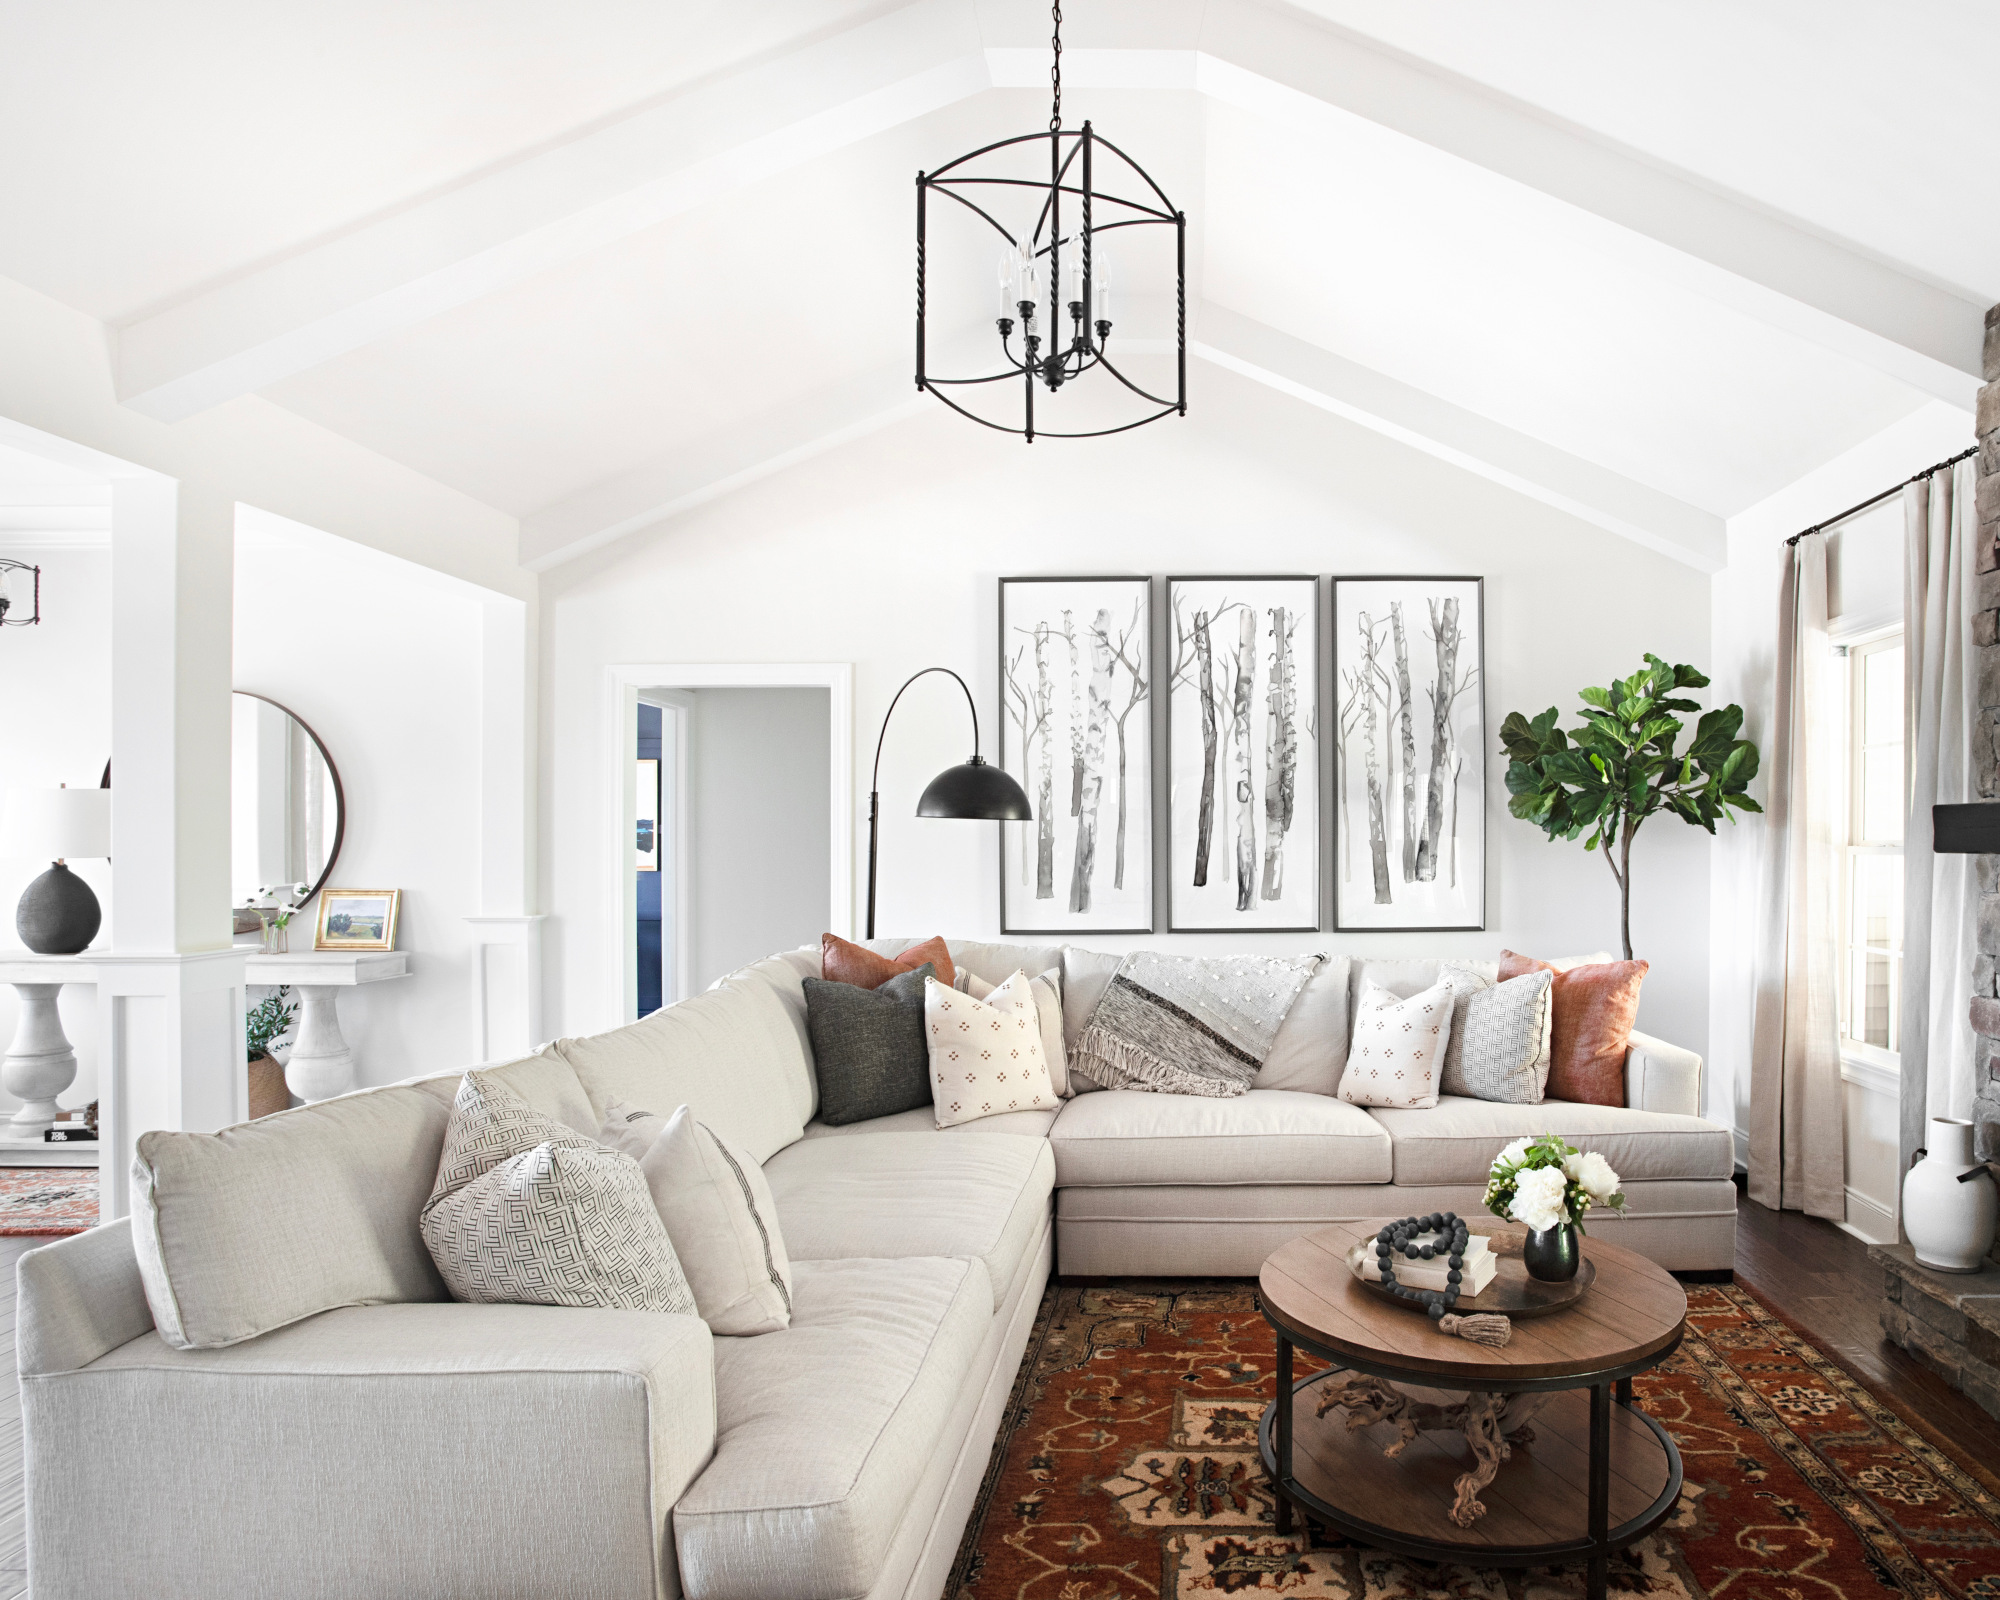
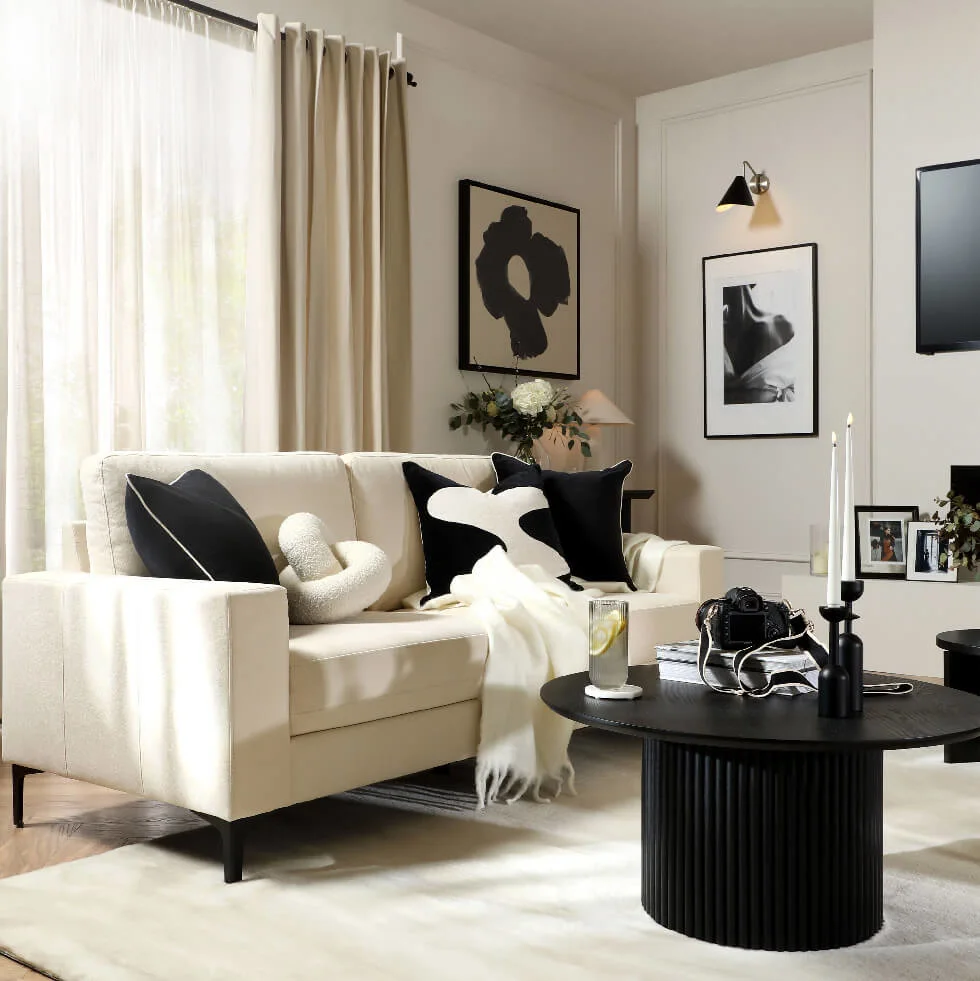
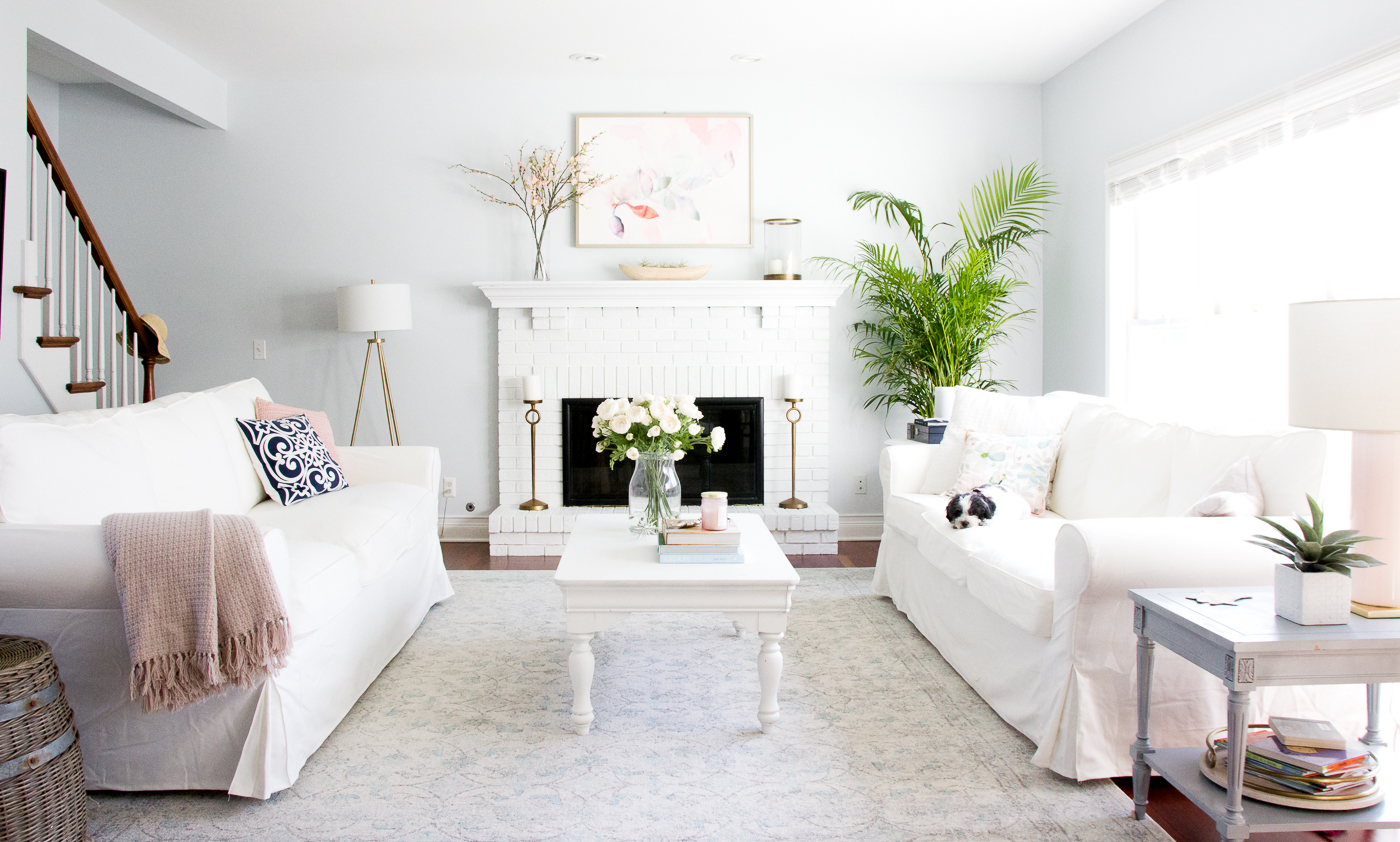
5. Striking Serenity: A Modern Neutral Living Room with Bold Monochrome Details
Embrace the elegance of simplicity with a creamy white sofa serving as the tranquil foundation for bold black and white accents. This living room harmonizes contrasting elements to create a space that’s both visually dynamic and invitingly warm. Graphic black furnishings and art pieces punctuate the soft neutrals, while textured textiles like a plush shag rug add depth and comfort. The result is a thoughtfully curated modern retreat where contrast enhances coziness rather than coldness.
Choose a light, neutral sofa to anchor the room and allow bold black and white accessories to stand out.
Incorporate graphic statement pieces, such as a black fluted coffee table or framed monochrome artwork, to add visual interest.
Layer textures with a soft, shaggy rug and cozy throws to balance the starkness of high-contrast elements.
Keep decorative accents minimal and intentional to maintain the room’s sleek, modern vibe.
Pro Tip: Use contrasting colors thoughtfully by balancing bold black accents with softer neutrals to avoid a harsh or clinical feel—this interplay creates an inviting atmosphere that feels both sophisticated and warm.
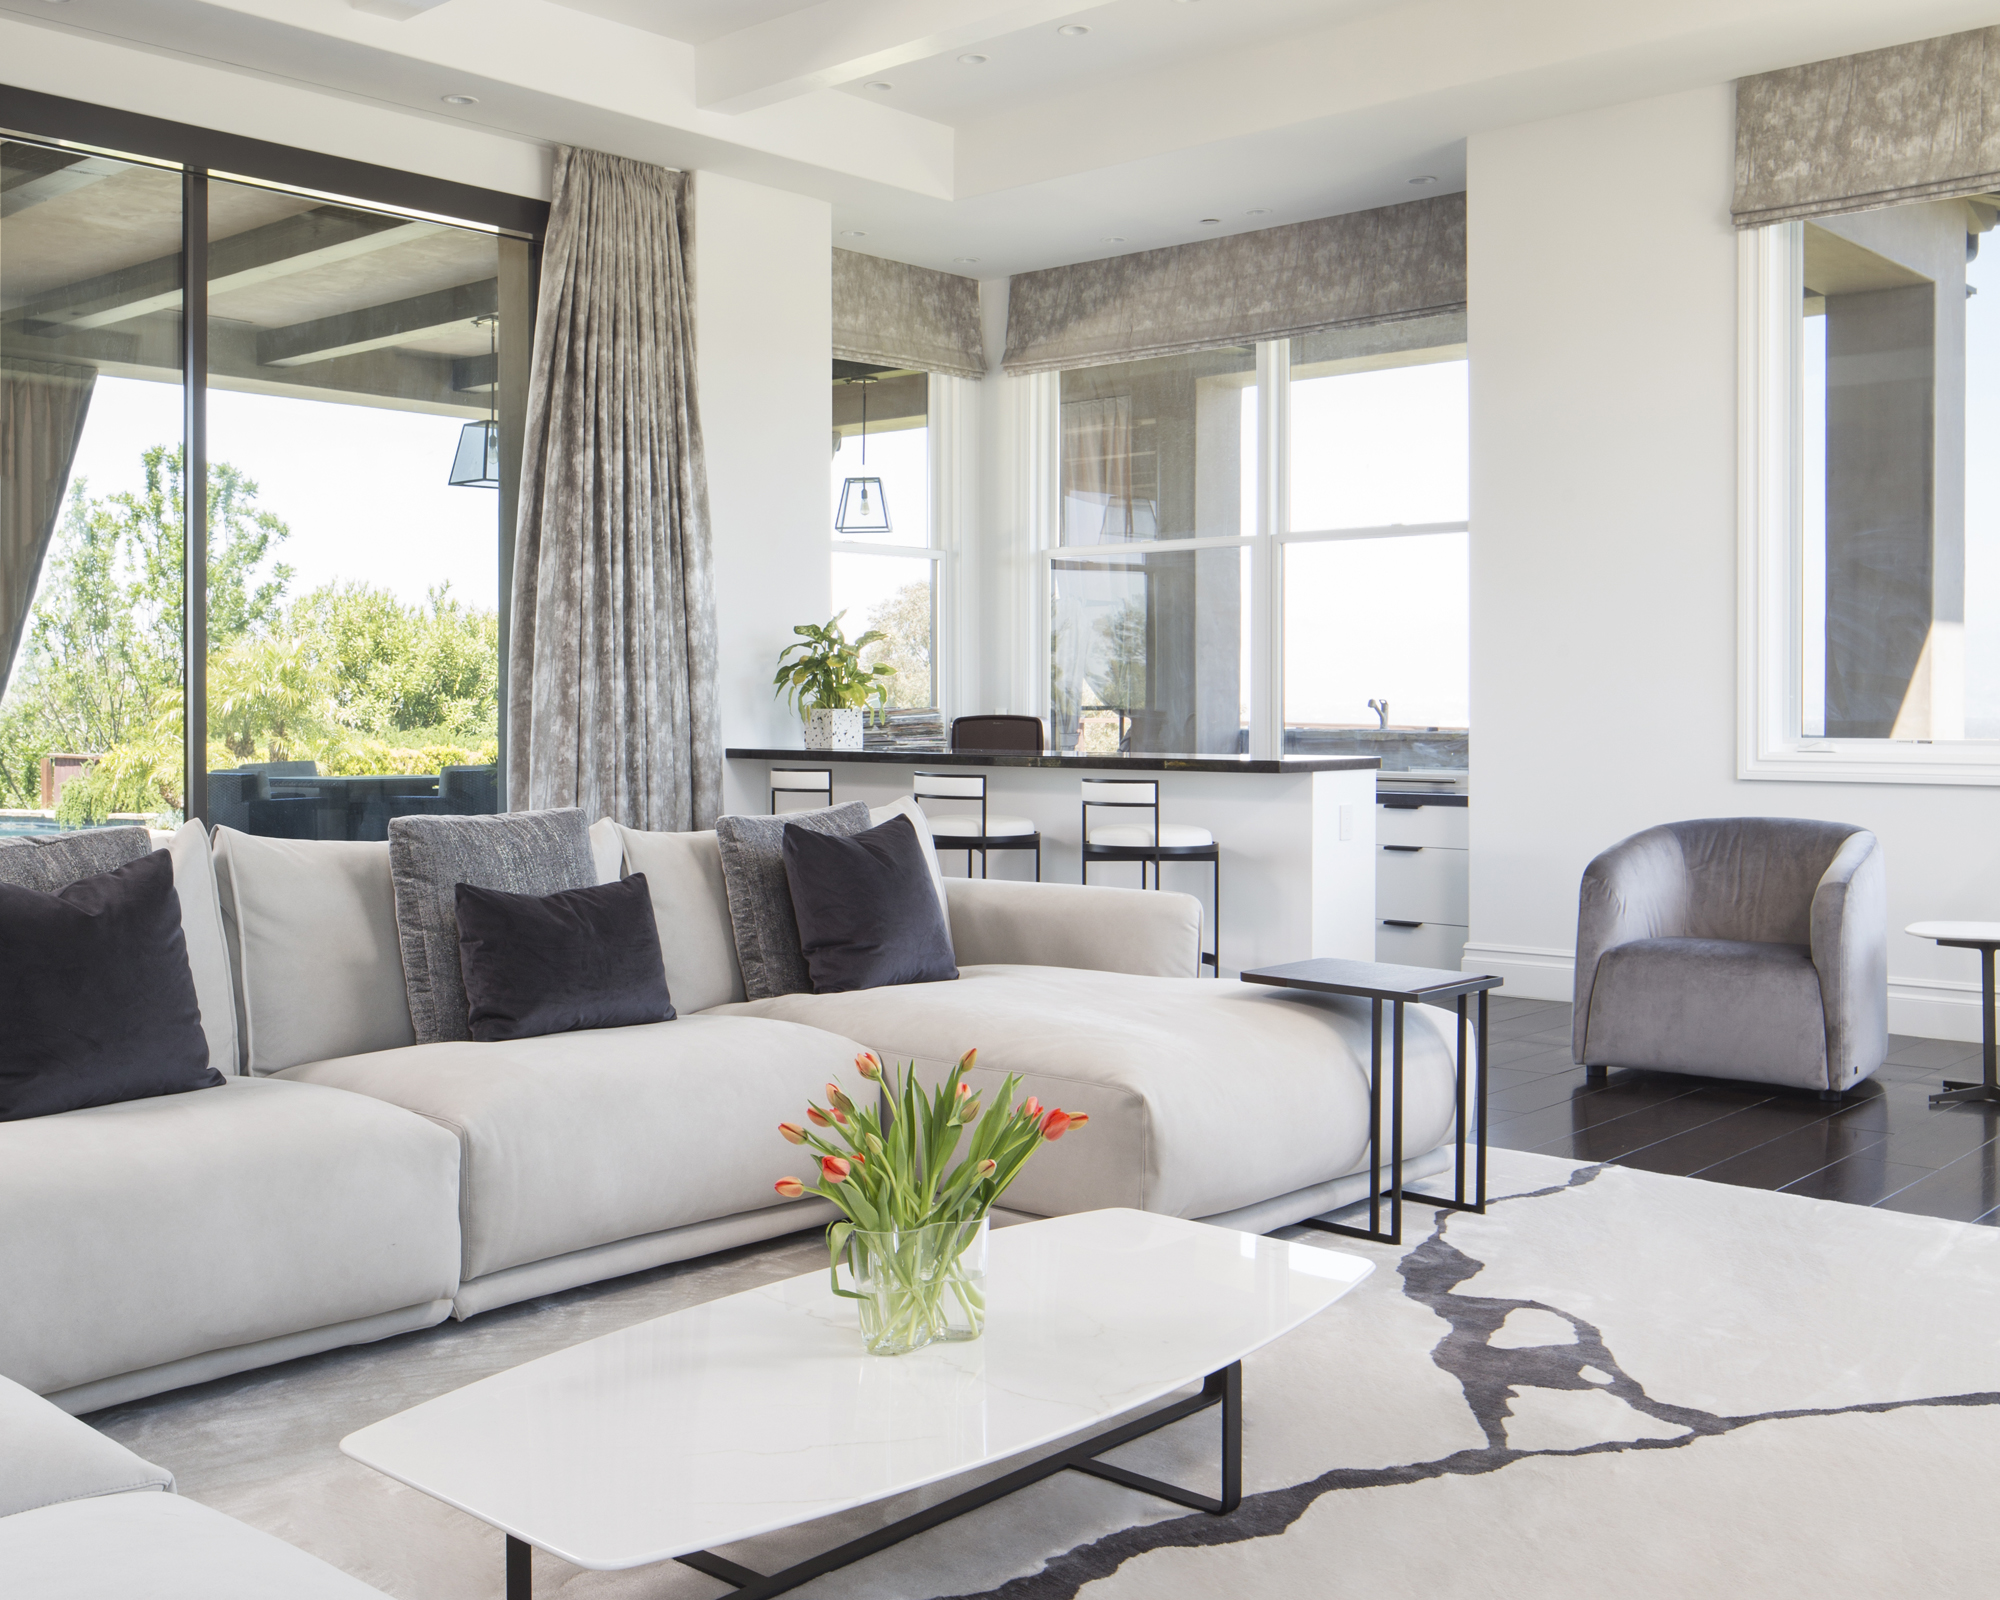
6. Sleek White Sectional Paired with Plaid Ottoman and Luxe Marble Touches
Embrace understated elegance with a crisp white sectional sofa crafted in soft, breathable fabric that invites relaxation. The plaid ottoman, doubling as a cozy coffee table, introduces a warm pattern that grounds the space while maintaining a casual sophistication. Marble accents sprinkled throughout elevate the room with subtle glamour, perfectly balancing modern minimalism and tactile warmth for a living area that feels both chic and welcoming. This design beautifully captures the essence of refined, effortless luxury.
Choose a white sectional with a textured fabric to add visual interest and comfort without overpowering the room.
Use a plaid ottoman as a multifunctional centerpiece to soften the space and bring in pattern without clutter.
Incorporate marble elements like side tables or decorative trays to subtly enhance the room’s elegance.
Layer in neutral-toned throw pillows with varying textures to build depth while keeping the palette serene.
Pro Tip: Opt for low-profile modular sectionals that allow flexibility in layout, ensuring your white sofa remains the focal point while adapting to your living space’s flow and function.
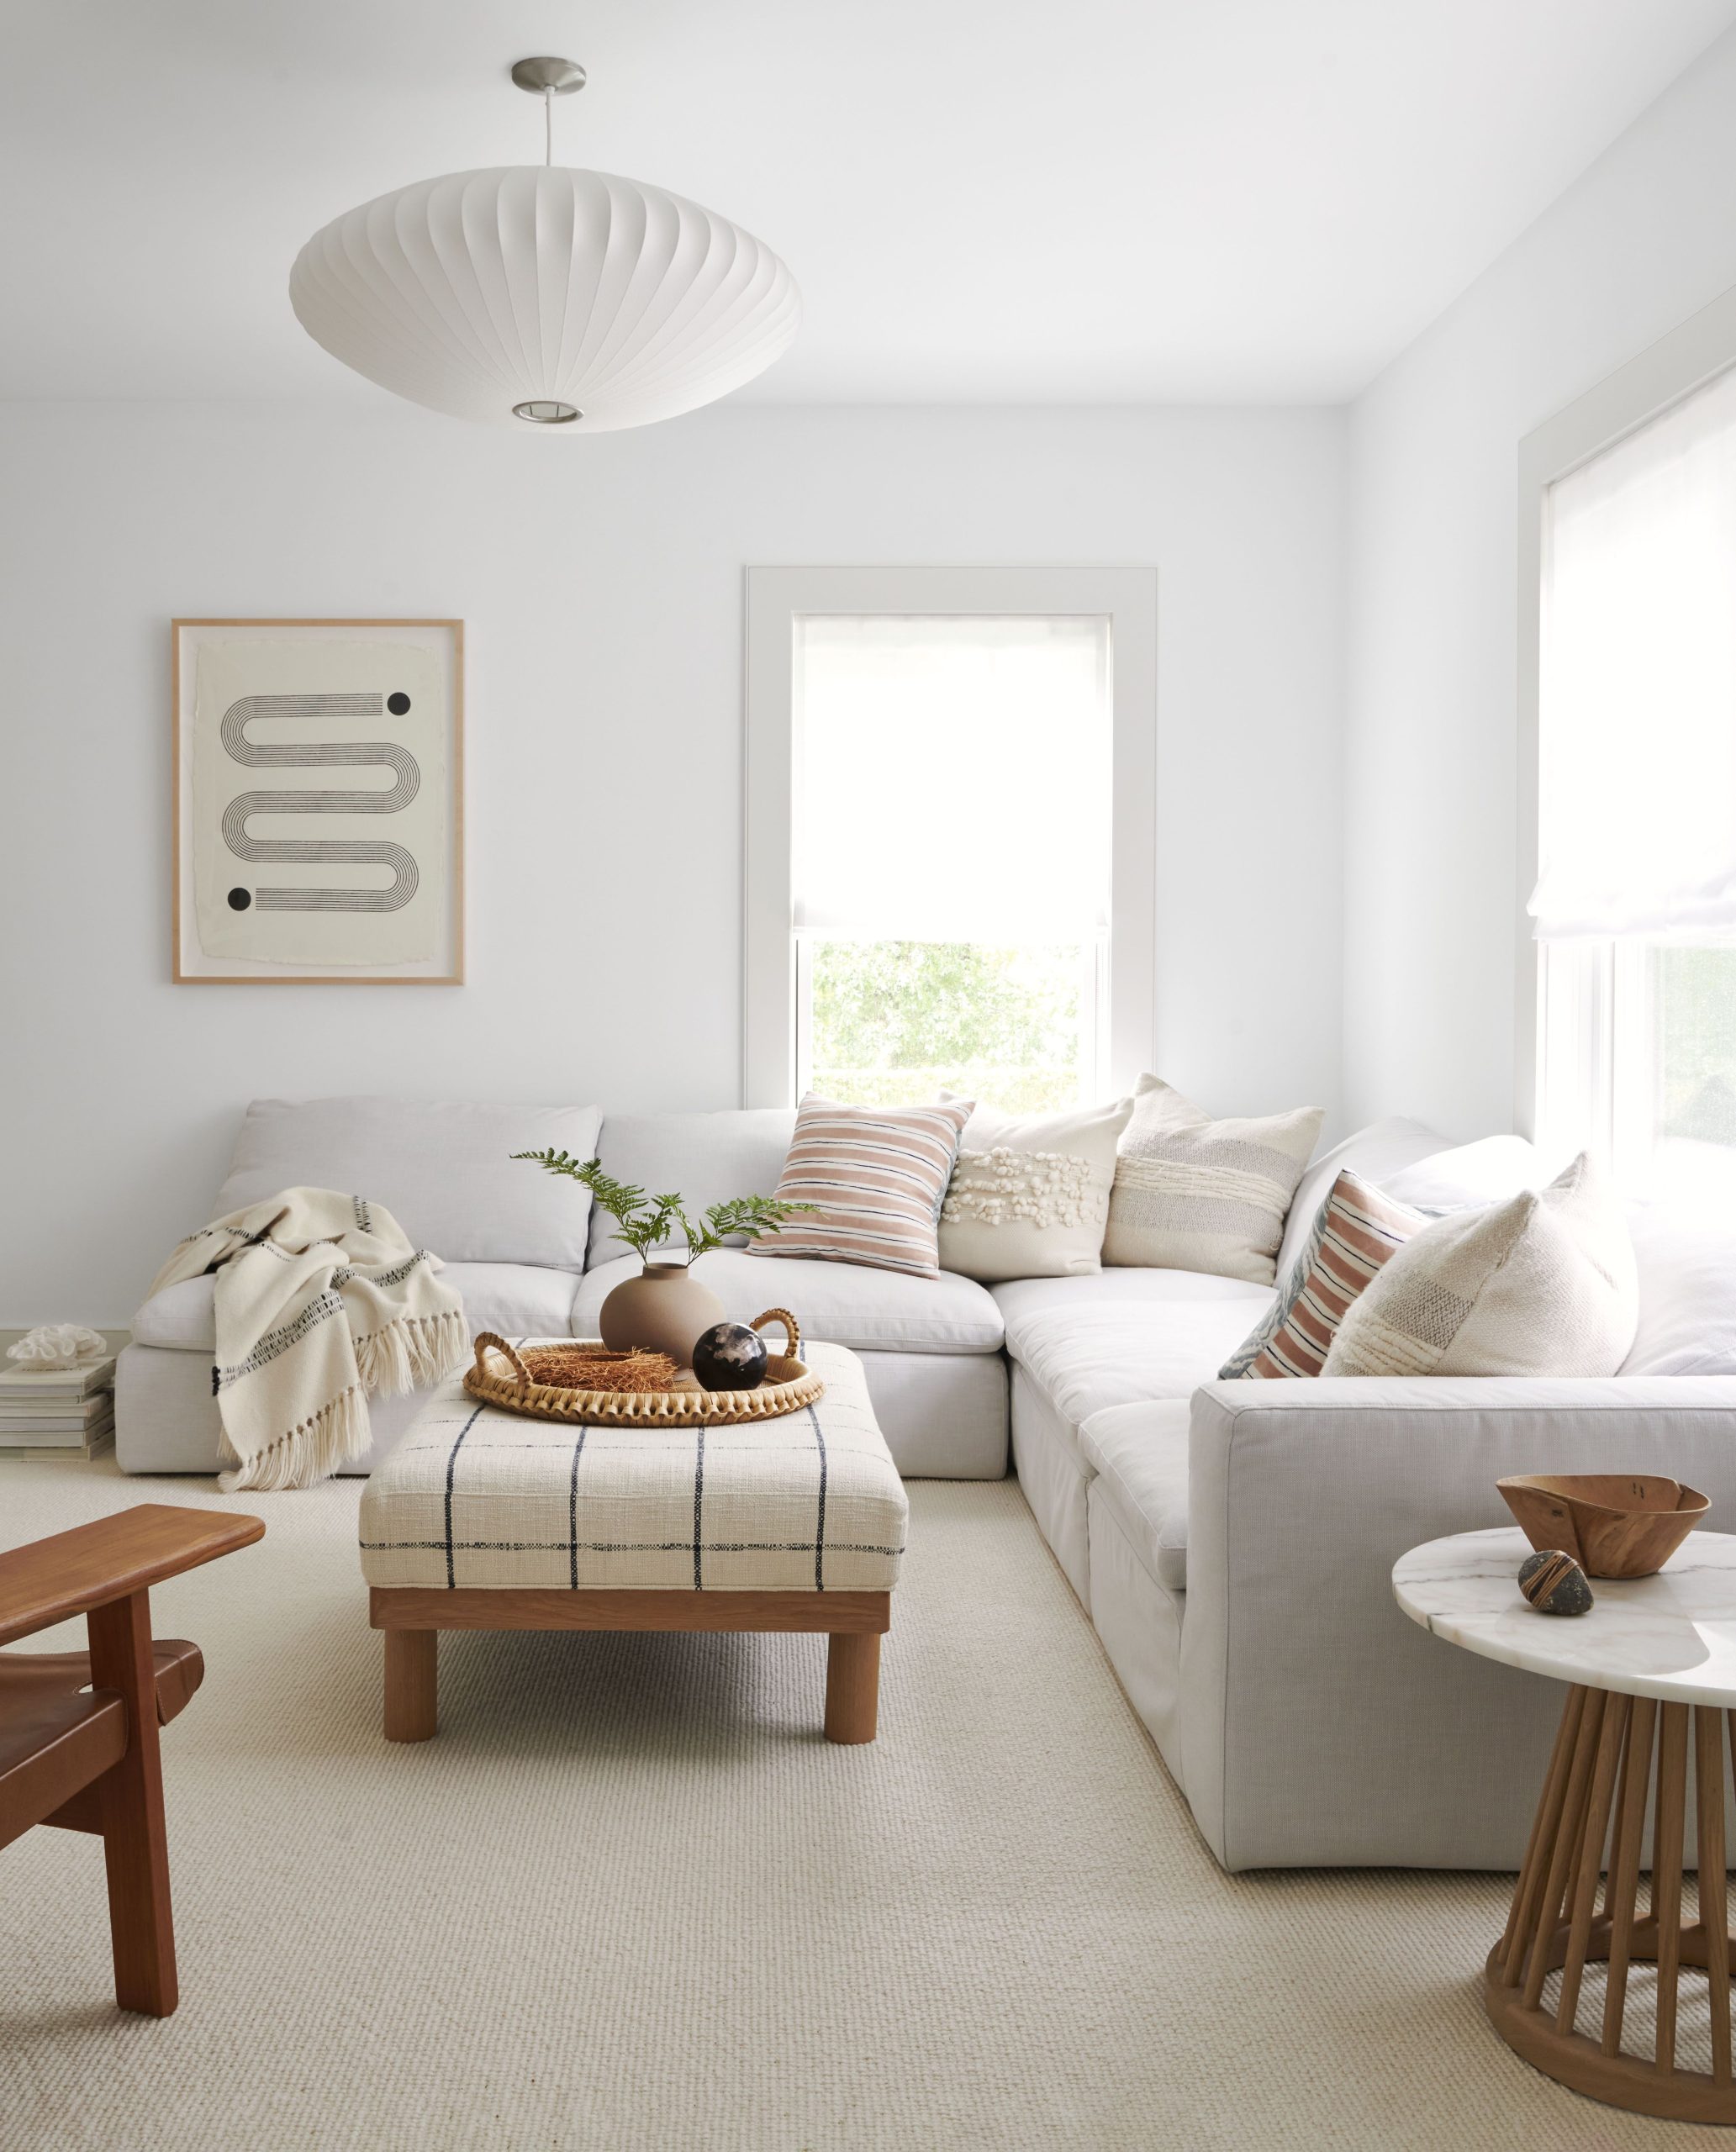
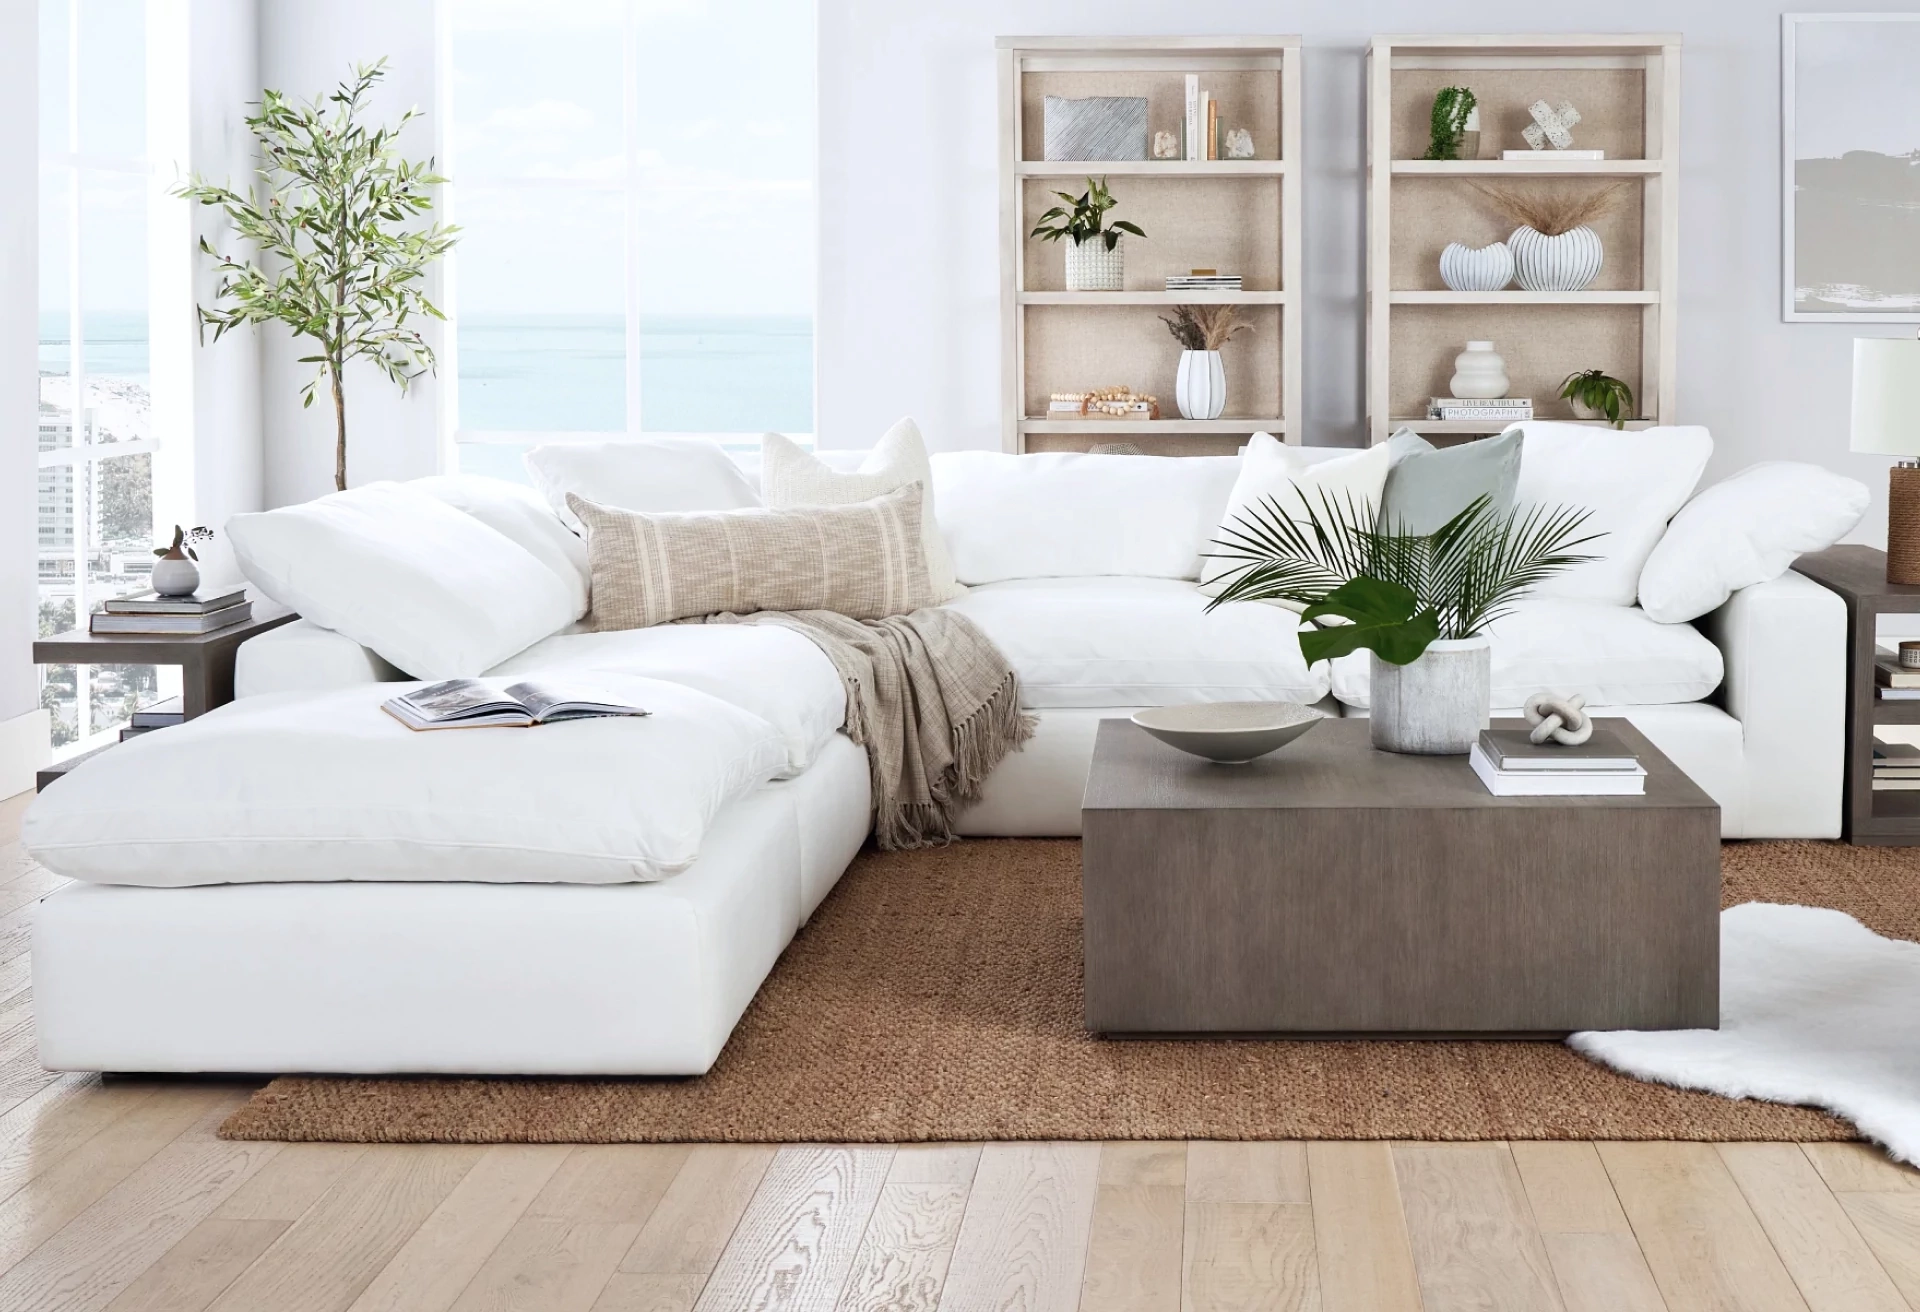
7. Coastal Serenity with a White Sectional, Natural Textures, and Plush Accents
Embracing panoramic ocean vistas, this living room centers around a generous white sectional that effortlessly blends elegance with a laid-back coastal vibe. Warm natural wood elements like rich-toned bookshelves and a sturdy coffee table anchor the space, while the textured layering of a jute rug beneath a soft white faux fur throw rug introduces inviting warmth and tactile contrast. This thoughtful interplay between clean, crisp upholstery and earthy textures creates a serene sanctuary that feels both sophisticated and welcoming.
Anchor your seating area with a natural fiber rug like jute to bring organic texture and earthiness.
Layer a smaller, plush faux fur rug on top to soften the look and add cozy dimension underfoot.
Choose warm-toned wooden furniture to balance the coolness of a white sofa and tie in natural elements.
Maintain a neutral palette with varying textures to keep the space visually interesting yet tranquil.
Pro Tip: To prevent a large white sectional from feeling sterile, always incorporate layered textures and natural materials; this contrast not only adds depth but also enhances the room’s inviting, lived-in appeal.
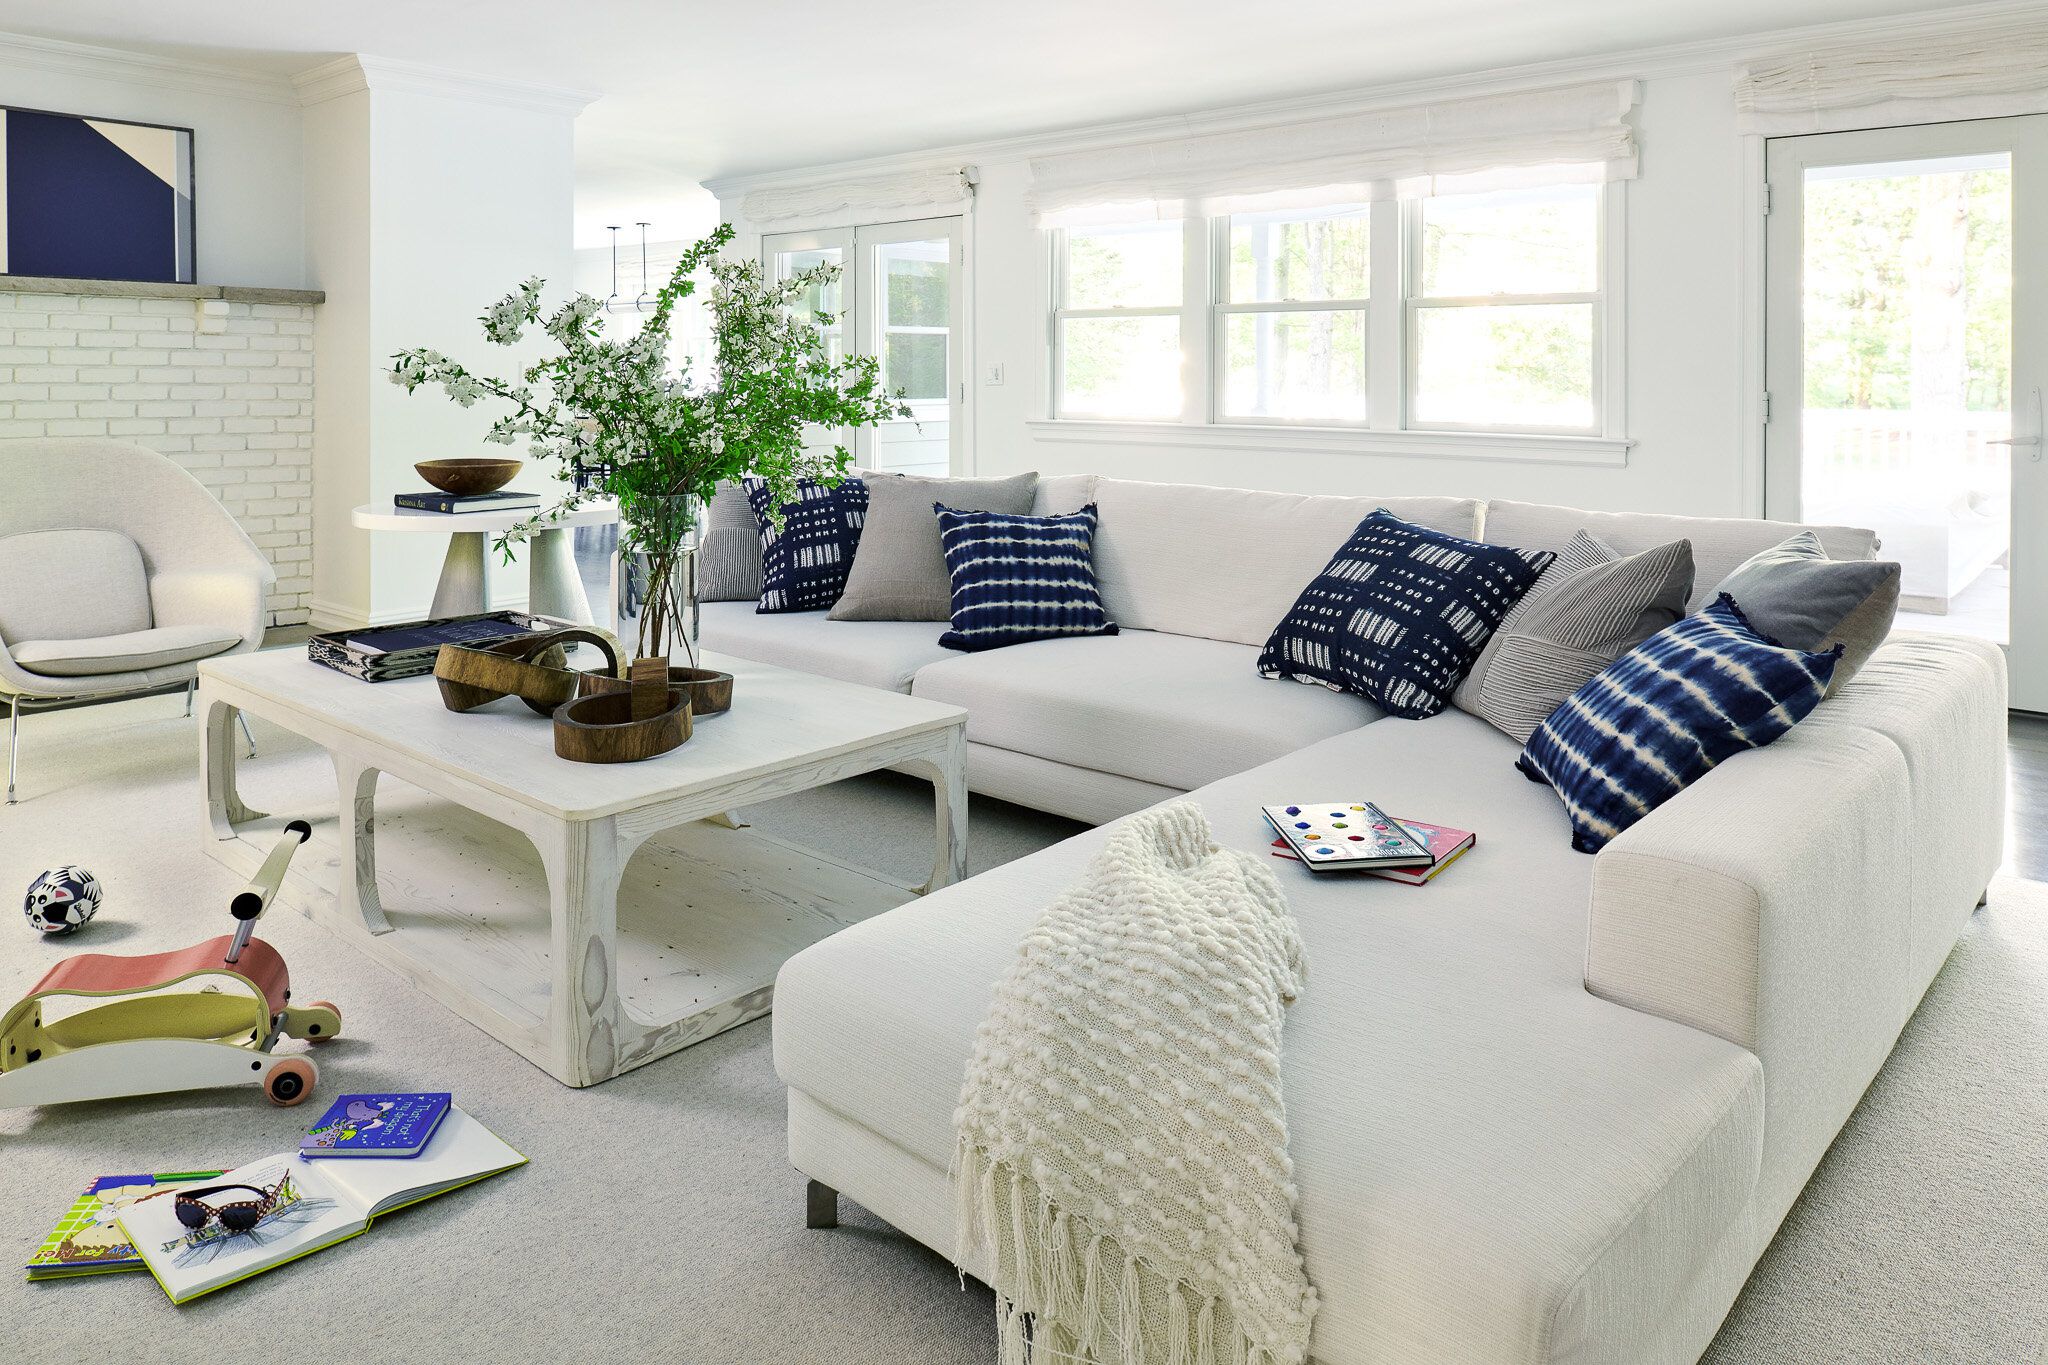
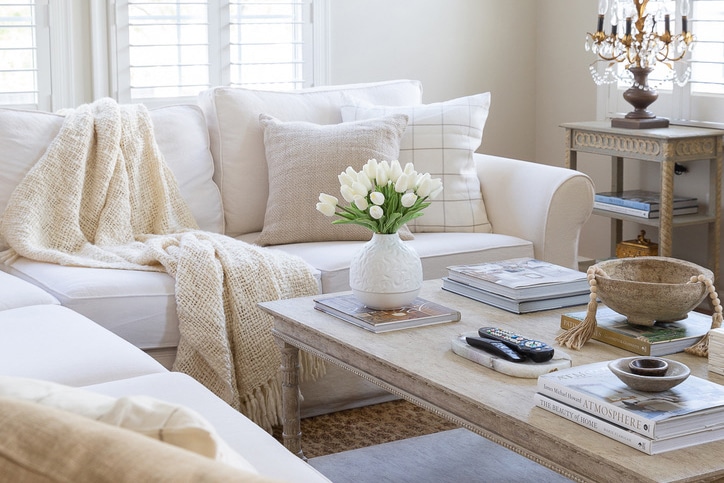
8. Serene White Sectional Paired with Ocean-Inspired Blues and Weathered Wood Accents
This living room effortlessly blends a serene, crisp white sectional with soothing blue and gray hues, creating a peaceful retreat that invites relaxation. The mix of patterned pillows and a cozy textured throw add depth and personality, while the distressed light-wood coffee table introduces a subtle rustic charm, grounding the space in warmth. The combination feels fresh yet lived-in, perfect for those seeking a calm, coastal-inspired vibe without sacrificing comfort.
Layer a variety of blue and gray patterned pillows on your white sofa to bring in color and texture without overwhelming the space.
Incorporate a textured white throw for an added cozy touch that complements the sectional’s clean lines.
Choose a distressed or weathered wood coffee table to introduce organic warmth and a hint of rustic character.
Balance the cool tones with soft natural lighting or a neutral-toned area rug to keep the room inviting and well-rounded.
Pro Tip: For an affordable yet stylish setup, shop versatile white sectionals from retailers like Project 62 at Target or Wayfair, and mix in budget-friendly accent pillows from HomeGoods or customizable covers from Amazon to effortlessly refresh the look.
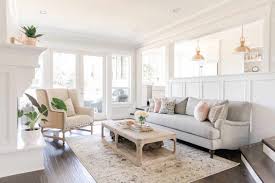
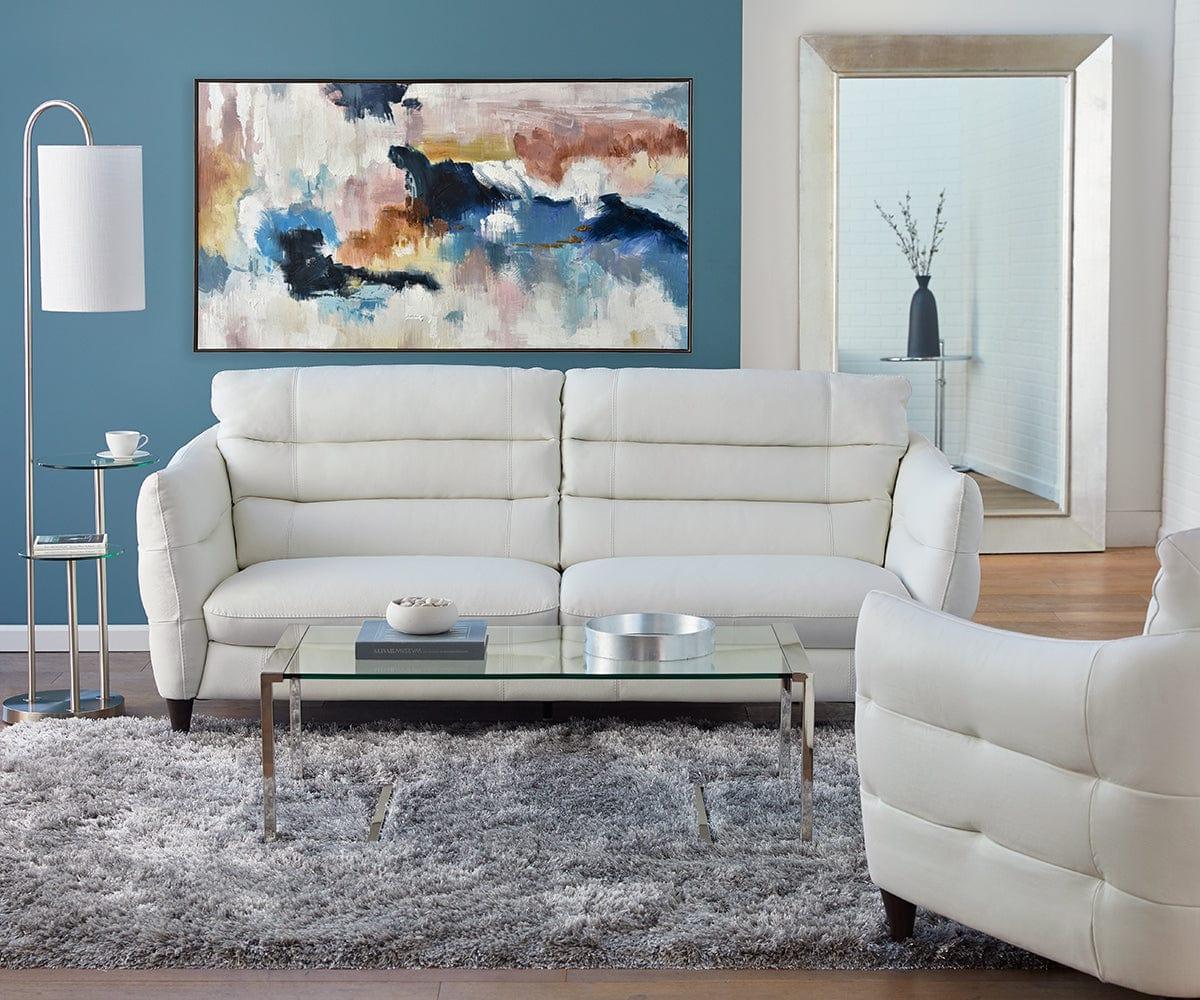
9. Soft Sophistication with a Light Gray Sofa
Embrace the understated elegance of a light gray sofa to create a living room that feels both welcoming and effortlessly chic. This subtle shade offers the clean, bright appeal of white but with added practicality, making it ideal for everyday living. Layered with patterned cushions in muted tones, the space exudes warmth and personality without overwhelming the senses. Complementing classic accents like a light wood coffee table and a creamy wingback chair, the room strikes a perfect balance between timeless charm and modern freshness.
Choose a light gray sofa as a versatile foundation that pairs well with both bold and soft accent colors.
Incorporate a variety of textured and patterned pillows to add depth and prevent the seating area from feeling flat.
Introduce natural wood elements, such as a coffee table or shelving, to bring warmth and organic contrast.
Blend classic furniture pieces like wingback chairs with clean, contemporary lines to keep the room feeling balanced and inviting.
Pro Tip: Opt for washable slipcovers or stain-resistant fabrics in light gray to maintain the sofa’s pristine look while enjoying the ease of everyday use.
10. Earthy Elegance: White Sectional Amid Terracotta and Black Accents
This living room masterfully balances rustic warmth with modern sophistication. The expansive white sectional sofa serves as a luminous centerpiece, beautifully offsetting the rich terracotta floors that bring grounded earthiness into the space. Dramatic black-framed windows stretch across the walls, flooding the room with natural light while introducing striking architectural contrast. Together with dark ceiling beams, these elements create a harmonious interplay of light and shadow, soft and sturdy textures that evoke both comfort and style.
Anchor the room with a large white sectional to brighten and soften the earthy tones of terracotta tile flooring.
Highlight architectural features like black window frames and ceiling beams by keeping surrounding walls and furniture in light, neutral shades.
Introduce natural textures such as woven rugs or linen throw pillows to complement the rustic floor and add tactile warmth.
Balance the strong dark accents with plush textiles and curved furniture lines to maintain an inviting, cozy atmosphere.
Pro Tip: Use the contrast between clean white upholstery and bold black window frames to draw the eye upward and emphasize the room’s height, making the space feel larger and more open.
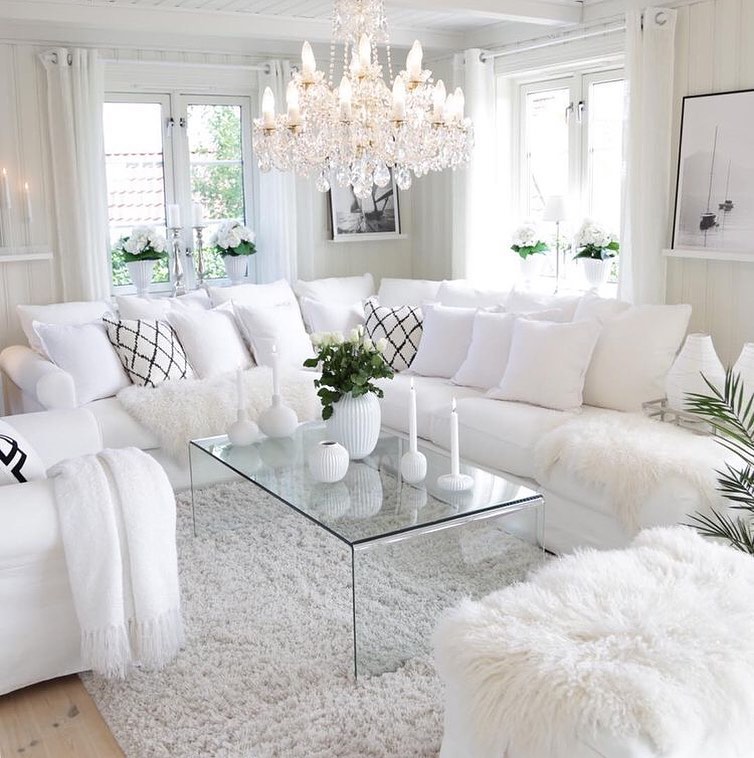
11. Elegant White Sectional Oasis with Glimmering Crystal and Reflective Accents
This living room transforms simplicity into sheer elegance with a sprawling white sectional that invites both comfort and style. Paired with timeless black-and-white patterned pillows and a plush white shag rug, the space feels both fresh and indulgent. The crowning glory is a dazzling crystal chandelier that not only illuminates but also serves as a breathtaking centerpiece, infusing the room with a refined sparkle and an air of classic luxury. Complementing glass elements subtly amplify the light, making the entire setting glow with sophisticated warmth.
Choose a generously sized white sectional with soft, inviting cushions to create a cozy yet elegant seating area.
Incorporate black-and-white patterned throw pillows to add contrast and visual interest without overwhelming the serene palette.
Layer a fluffy white shag rug beneath the sectional for texture and lavish comfort underfoot.
Use glass accents—such as coffee tables or decorative vases—to reflect light and enhance the chandelier’s brilliance throughout the room.
Pro Tip: Position the crystal chandelier above the sectional to serve as a focal point, ensuring it’s at an optimal height to cast light evenly while maintaining a sense of grandeur without overpowering the space.
12. Serene Beige Haven with Creamy Sofa and Vibrant Teal Touches
This intimate living room perfectly balances warmth and freshness, showcasing an off-white sofa that invites relaxation while serving as a versatile canvas. Pops of teal in patterned throw pillows bring an unexpected zest, energizing the space without overwhelming it. Complemented by a subtle checkered wall texture, the room feels thoughtfully curated and effortlessly inviting. It’s a brilliant way to combine softness and personality in a compact layout.
Anchor the room with a creamy off-white sofa as a neutral foundation that brightens and warms the space.
Introduce teal accents through cushions, throws, or small décor pieces to inject lively color contrasts.
Use textured wallpaper or fabric with subtle patterns on one wall to add depth and bespoke character.
Layer natural materials like wood or rattan accessories to enhance the cozy, grounded vibe.
Pro Tip: Choose teal accents in varying shades and patterns to create visual interest—mix solids with prints to achieve a dynamic yet cohesive look without overpowering the neutral base.
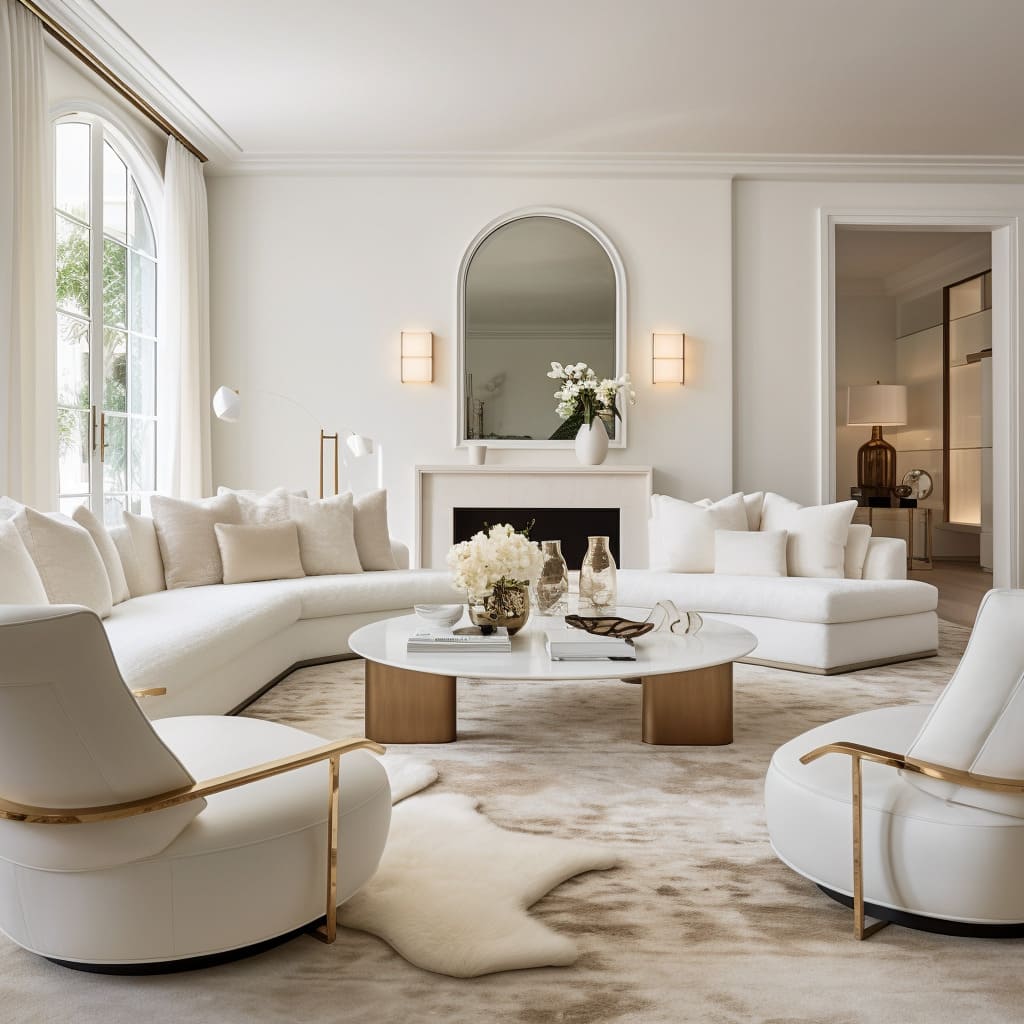
13. Timeless White Sectional Elegance with Gleaming Gold Details and Arched Window Charm
This living room effortlessly combines grandeur with tranquility through a sweeping white curved sectional sofa complemented by sleek white chairs framed in subtle gold. The circular white coffee table, accentuated by gold legs, anchors the space while enhancing its polished appeal. Oversized arched windows flood the room with natural light, mirrored gracefully by an arched fireplace mirror that amplifies the airy ambiance. Soft, sheer white curtains gently diffuse sunlight, completing the look with an ethereal, refined touch.
Choose a curved white sectional to foster a welcoming and balanced seating arrangement that encourages conversation.
Incorporate gold accents in furniture frames and table bases to add warmth and a hint of glamour without overshadowing the room’s serenity.
Use large arched windows as a focal architectural feature, maximizing natural light and creating an open, airy feel.
Opt for sheer white curtains to soften sunlight while maintaining privacy and preserving the room’s light, elegant atmosphere.
Pro Tip: Position an arched mirror above the fireplace to reflect the shape of your windows—this not only doubles the natural light but also enhances the room’s harmonious flow and sophisticated symmetry.
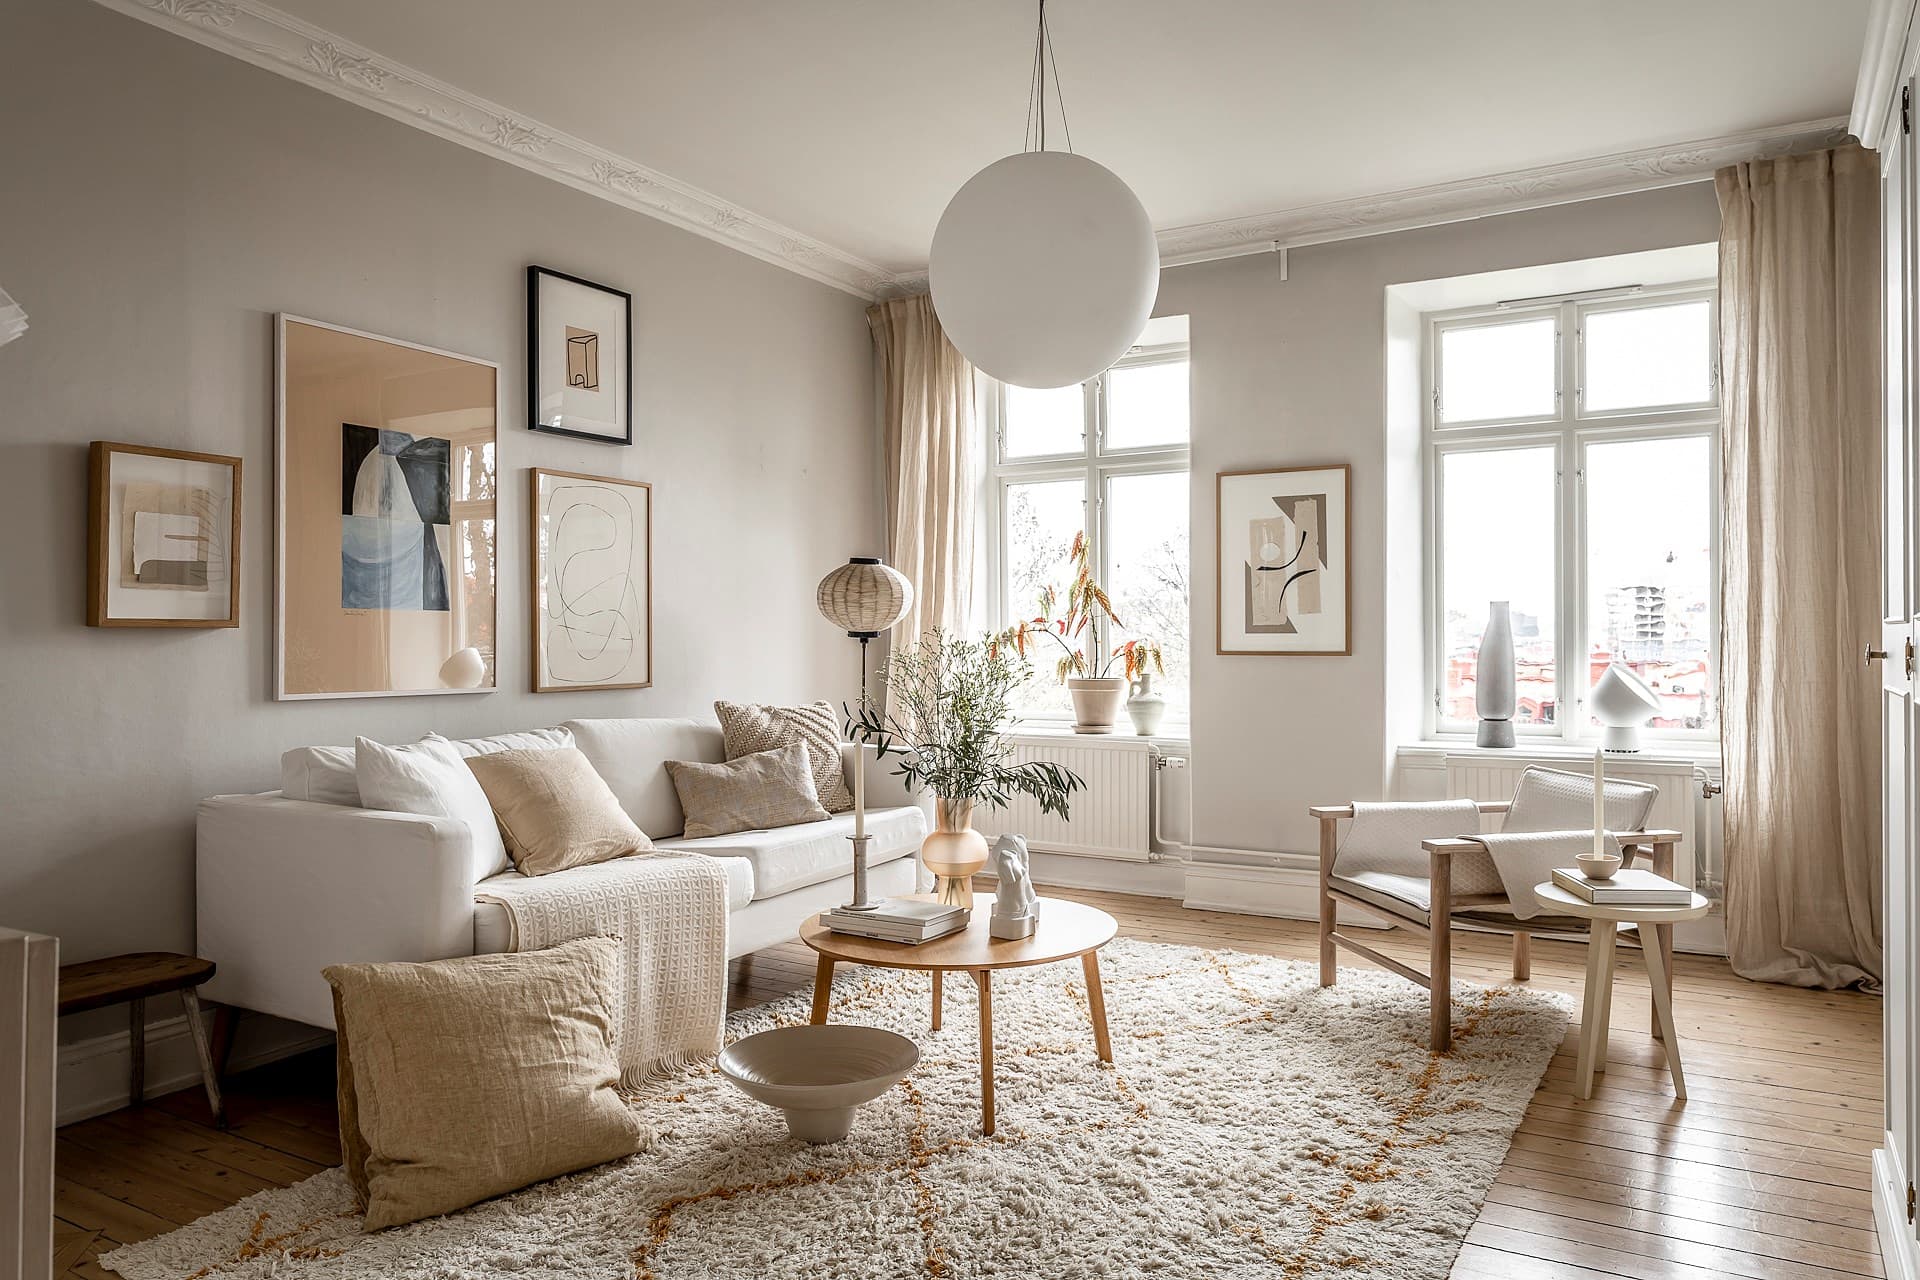
14. Serene Neutrals Featuring a White Sofa and Statement Pendant
This living room exudes tranquility through a harmonious palette of soft neutrals, where a pristine white sofa anchors the space with effortless elegance. Layered with textured cushions and a cozy throw, the sofa invites both relaxation and refined style. Light wood accents and subtle metal details seamlessly complement the pale grey walls, creating a cohesive and airy atmosphere. The oversized round pendant light hangs prominently, introducing a sculptural focal point that elevates the room’s visual interest and brings a dynamic vertical dimension.
Incorporate a mix of textured pillows and throws to add depth and warmth to a white sofa without overwhelming the neutral scheme.
Choose light wood and metal furnishings with clean lines to maintain an airy, minimalist vibe that enhances the calm aesthetic.
Use soft grey or beige tones on walls or rugs to provide subtle contrast and prevent the space from feeling too stark.
Install an oversized pendant light with a sculptural design to create a striking focal point and draw the eye upward, balancing the room’s proportions.
Pro Tip: Selecting a large pendant light not only anchors the room vertically but also introduces an artistic element that transforms a simple neutral space into a thoughtfully curated haven.
15. Regal Radiance: White Sofas Meet Golden Glamour and Smoked Glass Elegance
Embrace a living room that exudes grandeur with a pristine white sofa as the centerpiece, accented by gilded touches and the sultry allure of smoked glass. This design artfully combines the warmth of matte earth-toned walls with dazzling gold elements — from an oversized sunburst mirror to sleek brass floor lamps — crafting an atmosphere of refined opulence. The smoked glass coffee table framed in gold not only adds depth but also ties the luxurious textures together, reflecting a bold shift toward the 2026 ‘New Opulence’ aesthetic.
Layer gold accents through pillows, lighting, and decorative mirrors to amplify the sophisticated vibe around your white sofa.
Incorporate smoked glass surfaces to introduce subtle mystery and contrast without overwhelming the lightness of the white upholstery.
Choose a warm, matte backdrop like deep brown or taupe to ground the space and highlight metallic elements.
Mix plush textures such as velvet throws or cushions to enhance comfort while maintaining a luxe appearance.
Pro Tip: The key to mastering ‘New Opulence’ is balance — pair statement metallics and rich textures with calm, neutral foundations like a white sofa to avoid visual clutter and keep the room feeling inviting yet extravagant.
16. Sleek Serenity: White Sofa Meets Bold Blue Abstract
Embrace the art of modern minimalism with a pristine white sofa that radiates freshness and sophistication. Paired against a stark white backdrop, a vibrant blue abstract artwork commands attention, infusing the space with dynamic energy without overwhelming it. This design perfectly balances simplicity and bold expression, allowing the sofa’s clean lines and the art’s vivid hues to harmonize effortlessly. The result is a living room that feels both tranquil and visually striking.
Opt for a streamlined white sofa with minimal detailing to maintain a crisp, modern silhouette.
Use a large-scale abstract painting in shades of blue to introduce color and create a captivating focal point.
Keep additional decor to a minimum—think a single sculptural vase or a sleek floor lamp to complement, not compete.
Layer textures subtly through soft throws or cushions in neutral tones to add warmth without clutter.
Pro Tip: When aiming for a minimal look, anchor your space with one or two statement pieces rather than multiple small accents; this approach elevates the overall impact and preserves the room’s airy elegance.
17. Embracing Earthy Elegance with a Pristine White Sofa
A pristine white sofa creates a serene centerpiece that effortlessly elevates natural textures and lush greenery in the living room. The interplay of soft, neutral-toned cushions and tactile fabrics invites warmth and comfort, while leafy plants breathe life and freshness into the space. Subtle accents like a statement mirror anchor the room, adding depth and a reflective glow that enhances the calming ambiance. This look proves that simplicity paired with nature-inspired elements can transform a neutral palette into a captivating retreat.
Layer different fabric textures—like linen, wool, and boucle—to add dimension without overwhelming the calm white base.
Incorporate greenery in varied sizes and shapes to create a dynamic, organic feel that complements the sofa’s crispness.
Choose statement décor pieces with contrasting finishes, such as matte black or natural wood, to add visual interest and balance.
Opt for soft, earth-toned cushions that blend seamlessly with white, enhancing warmth and inviting relaxation.
Pro Tip: Positioning a large, round mirror with a dark frame behind the sofa not only introduces a striking focal point but also cleverly reflects natural light and greenery, amplifying the room’s airy and tranquil vibe.
18. Crisp White Modular Sofa Anchored by Textured Ribbed Wall and Elegant Spindle Staircase
This living room effortlessly balances modern minimalism with tactile warmth, centered around a pristine white modular sofa that invites relaxation. Paired with light wood flooring and sleek white cylindrical coffee tables, the space feels airy and sophisticated. The standout feature is the narrow ribbed accent wall, whose subtle vertical grooves introduce depth and rhythm without overwhelming the palette. Complemented by a graceful spindle staircase, the room achieves a dynamic yet harmonious architectural flow.
Choose a modular white sofa to maximize seating flexibility while maintaining a clean, cohesive look.
Incorporate textured wall elements like ribbed panels to add dimension without relying on bold colors.
Use light wood flooring to ground the space with warmth and natural appeal.
Select minimalist coffee tables in white or neutral tones to keep the focus on architectural details.
Pro Tip: To enhance the impact of a ribbed accent wall, pair it with directional lighting—such as recessed spotlights or wall washers—to cast subtle shadows that emphasize texture and create a sense of depth throughout the day.
19. Sleek Elegance: White Sectional Meets Dramatic Black-Framed Windows
This modern living room exudes a captivating energy, anchored by a pristine white L-shaped sectional that invites relaxation and conversation. The expansive black-framed windows serve as bold architectural statements, flooding the space with natural light while creating a striking contrast against the sofa’s crisp upholstery. Complemented by vibrant abstract artwork and warm wooden accents, the design effortlessly blends contemporary edge with cozy, organic textures. The result is a dynamic yet welcoming environment perfect for both lively gatherings and serene moments.
Choose a white sectional with clean lines to enhance the room’s modern aesthetic and maximize seating comfort.
Highlight large black-framed windows by keeping surrounding décor minimal, allowing natural light and architectural details to shine.
Incorporate colorful abstract art to inject personality and balance the monochrome palette with visual interest.
Use natural materials like wood or woven textiles in coffee tables or accessories to add warmth and tactile contrast.
Pro Tip: Emphasize contrast by pairing stark white furnishings with dark window frames to create depth and drama, while layering in organic textures to soften the space and maintain a welcoming atmosphere.
20. Inviting White Slipcover Sofa Paired with Rustic Wooden Charm
This living room setup epitomizes cozy sophistication with a plush white slipcovered sofa that invites you to relax and unwind. Soft, neutral-toned throws and pillows add warmth and depth, transforming the crisp white upholstery into a welcoming centerpiece. Complemented by a distressed wood coffee table, the space effortlessly balances rustic texture with elegant comfort, creating a harmonious retreat. The mix of soft fabrics and weathered wood infuses the room with organic charm and timeless appeal.
Choose a white slipcovered sofa for easy maintenance and a casual yet polished look.
Layer in textured throws and a variety of neutral cushions to soften the sofa’s bright hue and enhance coziness.
Incorporate a distressed wood coffee table to introduce natural warmth and visual interest through its organic grain.
Keep decorative accessories simple and purposeful—think a stack of books, a ceramic bowl, or fresh florals to complement the relaxed vibe.
Pro Tip: To prevent the white slipcover from feeling too sterile, mix in tactile textiles like linen or knit, and anchor the seating area with a natural-fiber rug that echoes the wood tones for a cohesive, inviting space.
21. Crisp White Tufted Leather Sofa Meets Bold Teal Backdrop and Vibrant Abstract Art
This living room exudes a perfect harmony between classic elegance and modern creativity. The pristine white tufted leather sofa stands out brilliantly against a rich teal wall, creating a captivating contrast that instantly draws the eye. Anchoring the space is a striking abstract painting, bursting with dynamic hues of blue, brown, and pink, which injects personality and artistic flair. Together, these elements transform the room into a curated gallery-like retreat that feels both inviting and visually stimulating.
Choose a white tufted leather sofa for a timeless yet contemporary centerpiece that adds texture and sophistication.
Paint one accent wall in a deep teal to create a dramatic backdrop that elevates the sofa’s crispness and enhances color depth.
Select an oversized abstract artwork with complementary colors to serve as the room’s focal point and inspire your color palette.
Incorporate subtle metallic or glass side tables and minimalist lighting to maintain balance without overpowering the bold color scheme.
Pro Tip: To keep the space feeling fresh and balanced, introduce soft, neutral textiles like a plush cream rug or linen throw pillows that add warmth without competing with the vibrant wall and art.
22. Crisp White Sectional Meets Forest Green and Warm Wood Accents
This living room radiates a serene yet vibrant energy, anchored by a pristine white sectional that acts as a perfect neutral backdrop. Rich forest green cushions and a cozy throw inject depth and sophistication, creating a striking contrast that feels both elegant and refreshing. Natural wood elements, from a smooth round coffee table to wall shelves, add inviting warmth and organic texture, balancing the bright whites without overwhelming the space. Lush greenery completes the look, enhancing the connection to nature and making the room feel effortlessly harmonious.
Choose a modular white sectional to maintain a clean and versatile foundation in your living room.
Incorporate deep green textiles like throw pillows and blankets to add rich color without disrupting tranquility.
Use natural wood furniture pieces with soft curves to introduce warmth and tactile interest.
Integrate live plants to soften the space and bring a breath of fresh air indoors.
Pro Tip: When pairing a white sofa with bold accent colors, keep wood tones consistent and minimal to create a balanced, cohesive look that feels polished rather than cluttered.
23. Elegant Cream Sectional Paired with a Lustrous Wood Burl Coffee Table
Elevate your living room with a sleek cream sectional that offers both comfort and understated elegance. Anchoring the space, a glossy wood burl coffee table becomes a stunning centerpiece, its rich swirling grain bringing warmth and organic beauty into the room. Soft textured walls and a delicate patterned rug create a harmonious backdrop, while subtle lighting fixtures add a touch of refined charm. This combination perfectly balances modern sophistication with inviting natural elements.
Choose a sectional in a warm cream tone to create a cozy yet polished foundation.
Select a round wood burl coffee table for a sculptural focal point that adds character and depth.
Layer in light gray or neutral rugs with subtle patterns to ground the furniture without overpowering the space.
Incorporate metallic or sculptural lighting to introduce visual interest and enhance the room’s ambiance.
Pro Tip: Opt for a coffee table finish with a high-gloss lacquer to amplify the natural burl wood’s texture and reflect light, making the centerpiece truly pop in a white sofa setting.
24. Tranquil White Slipcovered Sofas Framed by Blue Walls and a Rustic Brick Hearth
This living room exudes calm sophistication with its pair of crisp white slipcovered sofas, perfectly positioned to invite intimate conversation. The rich blue walls provide a serene, grounding backdrop that beautifully contrasts the clean white upholstery. At the heart of the space, a whitewashed brick fireplace anchors the design, softly accented with understated artwork and flickering candles to enhance the cozy ambiance. The result is a harmonious and inviting gathering spot where simplicity meets timeless elegance.
Position two white slipcovered sofas facing each other with approximately 36 to 42 inches in between to balance comfort and functionality.
Use deep blue or navy walls to create a striking yet soothing contrast against bright white furniture.
Keep fireplace decor minimal with light-toned artwork and subtle candle arrangements to maintain a relaxed, airy feel.
Incorporate a streamlined neutral coffee table centered between the sofas to unify the seating area without overwhelming the space.
Pro Tip: To elevate symmetry and visual flow, hang a balanced gallery wall above one sofa using matching frames and a cohesive color palette that complements both the blue walls and white sofas.
25. Bright Attic Oasis with Crisp White Sectionals
Transform your attic into a luminous retreat by layering multiple white sectional sofas that invite comfort and conversation. The clean, bright upholstery amplifies the natural daylight pouring through skylights, while the open layout highlights the attic’s distinctive angles. Anchoring the space with a soft, neutral-toned rug creates warmth beneath your feet, balancing the room’s airy ambiance with grounded texture. Metallic accents on the sectional legs inject subtle modernity, contrasting elegantly against natural wood flooring for a harmonious blend of contemporary and cozy.
Choose sectional sofas with sleek, low-profile metal legs to keep the space feeling open and modern.
Use light, textured rugs to define seating zones without overwhelming the attic’s natural brightness.
Emphasize architectural features by keeping window treatments minimal or sheer to maximize natural light.
Incorporate warm wood tones in flooring or side tables to add depth and balance to the predominantly white palette.
Pro Tip: Opt for recessed or track lighting to maintain a clean ceiling line, ensuring the attic’s vaulted structure and natural light remain the focal points of your living space.
26. Airy Boho Elegance with White Sectional and Earthy Accents
Embrace a tranquil vibe with a sprawling white sectional set against the warmth of natural wood elements and the soft texture of pampas grass. This living room effortlessly blends bohemian charm with modern simplicity, creating a space that feels both inviting and serene. The interplay of organic materials and muted tones adds depth and dimension while maintaining an open, airy atmosphere perfect for relaxation and connection.
Incorporate natural wood furniture like coffee tables and accent chairs to introduce warmth and grounding contrast to your white sofa.
Use pampas grass in varying heights and textures as sculptural decor to add softness and an organic, boho-inspired flair.
Layer in patterned rugs with subtle earth tones to anchor the space without overpowering the clean, bright aesthetic.
Choose sheer, flowing curtains to maximize natural light and enhance the room’s light, breezy feel.
Pro Tip: To keep your white sectional looking fresh, opt for slipcovers that are easy to remove and wash—this makes maintaining a crisp, bright look stress-free without compromising on style.
27. Airy Contemporary Neutral Living Room with Bold Dark Highlights
This living room effortlessly balances openness and sophistication with its expansive light-toned sectional serving as the centerpiece. Dark accent pillows and a plush grey velvet chair introduce a striking modern contrast that grounds the space, while large windows dressed in subtle patterned curtains invite natural light to dance across the room. The interplay of soft neutrals and deep hues creates a harmonious environment that feels both welcoming and polished. A thoughtfully layered palette ensures visual depth without sacrificing the airy ambiance.
Accurately measure your room to select a sectional sofa that complements, not overwhelms, the living area’s proportions.
Assess natural lighting to determine if darker accents will enhance or weigh down the room’s brightness.
Coordinate dark wood flooring with your furniture and textiles to maintain a cohesive and balanced look.
Budget for custom window treatments carefully, as large-scale curtains or blinds can significantly impact overall costs.
Pro Tip: Incorporate varying textures within your neutral palette—like velvet, wood grain, and woven fabrics—to add dimension and interest without introducing extra color.
Final Thoughts
Choosing a white sofa is more than just a design decision—it’s an invitation to infuse your living room with light, elegance, and endless possibilities. Whether you crave a space that feels airy and tranquil or one that bursts with vibrant accents and textures, a white sofa serves as the perfect foundation for your creativity. Embrace its versatility, play with colors, patterns, and layers, and watch your living room transform into a reflection of your unique style and spirit.
As you explore these 27 inspiring ideas, remember that your home is a canvas waiting for your personal story. Don’t be afraid to experiment, mix and match, and let your imagination guide you. When you bring a white sofa into your space, you’re not just furnishing a room—you’re crafting a warm and welcoming sanctuary that feels authentically yours, ready to welcome both quiet moments and lively gatherings for years to come.
Stepping into a kitchen swathed in shades of dark gray and charcoal is like entering a space where elegance meets comfort in perfect harmony. These rich hues create a dramatic backdrop that elevates everyday moments—from morning coffee to family dinners—into something quietly extraordinary. Far from feeling cold or stark, a well-curated dark gray kitchen invites a sense of intimacy and depth, wrapping the room in a subtle, sophisticated embrace.
For those drawn to the allure of moody interiors but hesitant to sacrifice brightness, this design approach offers the best of both worlds. With thoughtful layering of textures, finishes, and lighting, charcoal tones can transform your kitchen into a sanctuary that feels grounded yet luminous. Whether you’re envisioning sleek modernity or a cozy, layered aesthetic, embracing these deep neutrals brings a timeless, captivating energy that makes the heart of your home truly unforgettable.
1. How Texture Transforms a Dark Gray Kitchen into a Cozy Haven
Incorporating various textures in a dark gray kitchen prevents the space from feeling too stark or chilly. Materials like coarse linens, unglazed pottery, and natural wood surfaces scatter light differently than sleek finishes, adding depth and warmth. Since charcoal tones tend to absorb light, combining at least three distinct textures—such as woven fabrics, matte stoneware, and raw timber—helps create an airy, inviting atmosphere.
Key Design Elements
**Start with woven fabrics:** Placing a sisal or cotton rug on the floor softens the hard surfaces, instantly warming the kitchen’s overall feel.
**Choose matte ceramics instead of shiny ones:** Matte-finish jars and dishware gently diffuse light rather than reflecting it harshly, toning down glare on countertops.
**Incorporate natural wood elements:** Items like an untreated wooden breadboard or floating shelves introduce organic texture and cozy undertones that painted finishes can’t match.
**Mix rough and smooth finishes:** Pairing a knitted dishcloth with a sleek marble soap dispenser creates a tactile contrast that reads as thoughtfully layered, not cluttered.
Pro Tip: For a balanced look, paint an accent wall in ‘Tricorn Black’ (SW 6258) paired with a ceiling in ‘Alabaster’ (SW 7008), allowing textured elements to feel rich and inviting rather than oppressive.
2. Illumination Techniques to Enrich Charcoal Kitchens with Warmth
Selecting bulbs with a warm color temperature around 2700K is crucial for transforming a charcoal kitchen’s atmosphere from stark and uninviting to cozy and sophisticated. Because charcoal surfaces tend to absorb overhead light before it can brighten workspaces, a multi-layered lighting approach at varying heights is essential. Incorporate under-cabinet lighting, pendant fixtures, and accent lamps to create a balanced and welcoming environment that counters the darkness.
Key Design Elements
**Under-cabinet lighting at 2700K:** These fixtures cast a gentle, warm light directly onto countertops, enhancing visibility and softening the intensity of charcoal surroundings in a way ceiling lights cannot.
**Pendant lights as design anchors:** Installing a couple of warm-hued pendant lamps above key areas like the kitchen island or sink provides focused illumination and adds a comforting visual element.
**Steer clear of cool-white LEDs:** Lights exceeding 3000K tend to emphasize cold blue undertones in charcoal finishes, resulting in a sterile, less appealing kitchen vibe.
**Install dimmable controls throughout:** Using dimmer switches lets you effortlessly adjust the lighting from bright and functional for cooking to soft and atmospheric for relaxed evenings.
Pro Tip: Choose a soft, creamy ceiling shade like ‘Origami White’ (SW 7636) paired with a rich terracotta accent wall such as ‘Cavern Clay’ (SW 7701) to enhance the warmth of your lighting and highlight charcoal cabinetry beautifully.
3. Ideal Backsplash Choices for Kitchens with Dark Gray Cabinets
In kitchens featuring dark gray cabinetry, subway tile can be a standout choice when paired with a grout color that offers contrast—pure white grout tends to fade into the tile, but shades like warm taupe or soft greige outline each tile, creating a striking grid effect. The reflective quality of the tile helps brighten the space by bouncing light around, preventing the room from feeling overly shadowed. Opt for straightforward tile layouts, such as classic subway or vertically stacked patterns, allowing grout lines to define the backsplash without overwhelming the design.
Key Design Elements
**Subway tile with warm grout:** Traditional white subway tile paired with beige or greige grout provides clear separation on dark gray walls, delivering a crisp, defined look that white grout alone can’t achieve.
**Textured zellige-inspired tiles:** Use handcrafted or zellige-effect tiles in subtle cream tones to introduce tactile depth and varied light reflections, adding dimension beyond smooth, glossy surfaces.
**Removable backsplash panels:** For those renting or seeking a temporary upgrade, peel-and-stick panels featuring warm marble or neutral stone textures offer an easy way to enhance dark kitchens without permanent changes.
**Vertical tile arrangement:** Installing subway tiles vertically elongates the walls visually, creating the impression of higher ceilings in charcoal kitchens, all without needing additional natural light sources.
Pro Tip: Anchor your backsplash by painting an adjacent wall in Sherwin-Williams ‘Dovetail’ (SW 7018) and the ceiling in ‘Alabaster’ (SW 7008) to balance color depth without competing with the tile’s surface.
4. Choosing Hardware Finishes to Elevate Your Charcoal Kitchen
Matte black, brushed brass, and unlacquered brass stand out beautifully against charcoal cabinetry by providing clear visual contrast without overpowering the dark tone. Warm metallics like brass add richness and a subtle glow that’s hard to achieve with cooler metals such as chrome or polished nickel. For a balanced and polished look, select one primary finish for your cabinet pulls and a secondary finish for fixtures like faucets—using more than two finishes can create a cluttered appearance rather than a cohesive design.
Key Design Elements
**Matte black paired with charcoal:** This combination works because both finishes share similar darkness levels, allowing texture rather than color to create depth and interest.
**Brushed brass adds warmth:** Installing a brushed brass faucet against deep gray cabinetry acts like a warm accent light, drawing the eye and brightening the space.
**Unlacquered brass’s timeless appeal:** Its evolving patina brings character and a sense of history, making the kitchen feel inviting and curated instead of overly pristine.
**Steer clear of cool silver tones:** Finishes like chrome and polished nickel tend to highlight cooler blue-gray hues in charcoal, which can result in a cold, monotonous atmosphere.
Pro Tip: Use ‘Tricorn Black’ (SW 6258) on an accent wall paired with ‘Alabaster’ (SW 7008) on the ceiling to make brass and matte black hardware stand out gracefully without overwhelming the space.
5. Steps to Evolve Your Kitchen with a Charcoal Color Scheme
Introducing charcoal tones into your kitchen is most effective when done gradually—begin with textiles and decorative accents, advance to countertops and smaller surfaces, and finalize with permanent elements. Charcoal only feels intentional when it appears in several spots throughout the space; a single piece can seem accidental rather than thoughtfully placed. Establish a strong charcoal focal point, then repeat the color at least two more times before exploring additional changes.
Key Design Elements
**Begin with easily changeable items:** Swap out small appliances, tea towels, and storage jars to subtly shift the room’s atmosphere without a long-term commitment.
**Use the color trio rule:** A solitary charcoal item can look like an afterthought, but incorporating the tone in at least three different spots and heights reinforces a cohesive design.
**Soften the darkness with warmth:** Incorporate wooden utensils, brass fixtures, or woven textiles to balance charcoal’s depth and keep the kitchen inviting, not stark.
**Tackle permanent updates last:** After the charcoal accents feel balanced, confidently proceed to repaint cabinetry or replace hardware to cement the new palette.
Pro Tip: For a grounded yet airy feel, paint an accent wall in ‘Peppercorn’ (SW 7674) and choose ‘Accessible Beige’ (SW 7036) for the ceiling to create depth without overpowering your kitchen.
6. Expanding Space in a Compact Dark Gray Kitchen
In a small kitchen dominated by dark gray tones, mirrors play a crucial role by reflecting light into shadowy corners that ceiling lights often miss. Since darker cabinets tend to absorb light, every bit of reflected brightness helps visually enlarge the space. Positioning a large mirror opposite the window can effectively double the incoming natural light before it fades against the cabinetry.
Key Design Elements
**Think vertically with shelving:** Installing open shelves from floor to ceiling directs attention upward, creating the illusion of taller walls.
**Choose transparency over opacity:** Cabinets with glass doors and clear containers allow light to flow through, preventing storage areas from looking heavy or closed off.
**Keep lower areas minimal:** Maintaining clear countertops and avoiding clutter near the floor preserves open sightlines, counteracting the visual weight of dark finishes.
**Use seamless flooring:** Extending the same flooring from the kitchen into adjoining rooms eliminates visual breaks, making the kitchen feel like part of a larger, continuous space.
Pro Tip: Opt for a bright white ceiling paint like ‘Extra White’ (SW 7006) paired with a soft off-white accent wall such as ‘Origami White’ (SW 7636) to elevate the ceiling and give intention to charcoal gray hues.
7. Incorporating Greenery and Organic Touches to Enliven a Charcoal Kitchen
Integrating climbing plants, fragrant herbs, and textured branches can transform a charcoal kitchen from stark to inviting. The deep hues of dark cabinetry create a striking contrast that allows vibrant greens to truly stand out, much like foliage in a shadowy garden nook. Position your plants near windows to maximize sunlight, and combine various textures such as leafy greens with woody accents and natural woven containers to add depth and warmth.
Key Design Elements
**Climbing greenery:** Varieties like pothos or string of pearls cascading from open shelving soften the sharp lines of dark gray cabinets with effortless natural charm.
**Herb trio:** Group small pots of basil, rosemary, and mint on a sunny windowsill to infuse the space with fresh aroma and lush green color.
**Textured branches:** Tall vases filled with dried eucalyptus or olive branches introduce rustic, earthy elements that balance the kitchen’s charcoal tones.
**Natural containers:** Using terracotta or woven baskets for plants adds warmth and a tactile layer that complements the cool gray surfaces.
Pro Tip: Choose ‘Evergreen Fog’ (SW 9130) for an accent wall and ‘Aesthetic White’ (SW 7035) on the ceiling to reflect natural greenery and soften the interplay between dark cabinets and organic decor.
8. Rich Warm Tones to Enhance a Charcoal Kitchen
Incorporating shades like terracotta, brass, and ochre into a charcoal kitchen injects inviting warmth without diminishing its bold character. Each hue offers a unique warmth—terracotta gives grounded earthiness, brass adds radiant metallic glow, and ochre brings a soft, artistic touch—allowing them to coexist harmoniously. Use these colors in accessories, fixtures, and fabrics instead of walls to create a curated, layered vibe.
Key Design Elements
**Terracotta’s natural warmth:** A terracotta planter, serving dish, or decorative tile provides an organic contrast against charcoal, infusing the space with rich, earthy tones that avoid coolness.
**Brass’s glowing effect:** Incorporate brass elements such as drawer pulls, a sleek faucet, or pendant lighting to introduce a bright metallic warmth that complements and enlivens matte charcoal finishes.
**Ochre’s subtle textile charm:** Choose textiles like kitchen towels, table runners, or cushions in a muted ochre to add depth and warmth without overpowering the overall look.
**Create a vertical color flow:** Arrange terracotta near countertops, position brass fixtures around eye level, and place ochre accents closer to the floor to establish a welcoming vertical gradient throughout the kitchen.
Pro Tip: Opt for a ceiling painted in ‘Origami White’ (SW 7636) paired with an accent wall in ‘Cavern Clay’ (SW 7701) to enhance warm light reflections and underscore the intentionality of charcoal cabinetry.
9. Distinguishing Between Deep Gray and Soft Charcoal Hues
Though often used interchangeably, deep gray and soft charcoal possess distinct characteristics. Deep gray occupies a middle-to-dark position on the gray spectrum, clearly showing its gray identity with subtle hints of blue, green, or brown. In contrast, soft charcoal leans towards an almost black shade, revealing its gray qualities mainly in direct light, which makes it appear more like a rich neutral than a true color in dim settings.
Key Design Elements
**Check lighting effects:** Deep gray colors tend to shift under warm artificial light, while soft charcoal remains consistent, providing a deliberate look at night.
**Consider undertone visibility:** Deep gray subtly reveals its undertones when hit by direct light, whereas soft charcoal tends to absorb these nuances, making undertone choice less crucial.
**Balance color depth with cabinetry placement:** Use soft charcoal for base cabinets and expansive surfaces to anchor a space, reserving deep gray for upper cabinetry where it feels lighter.
**Combine for layered dimension:** Pairing soft charcoal on lower cabinets with deep gray above creates a smooth tonal transition that enhances perceived ceiling height without stark contrast.
Pro Tip: Try ‘Tricorn Black’ (SW 6258) for your lower cabinets and ‘Peppercorn’ (SW 7674) on upper cabinets to achieve a seamless and natural tonal progression.
10. Kitchen Designs That Complement Charcoal Shades Seamlessly
Charcoal hues truly shine in kitchens where rich, tactile materials take center stage—think natural wood grains, stone surfaces, brushed brass accents, or rough concrete elements. These textures provide the essential contrast that prevents charcoal from feeling like just another dark paint choice. Styles such as modern farmhouse, industrial, and transitional kitchens naturally embrace charcoal’s depth and complexity by balancing light and dark elements.
Key Design Elements
**Modern farmhouse appeal:** Charcoal cabinetry harmonizes with beadboard walls, floating shelves, and warm wood finishes to create a cozy yet sophisticated atmosphere.
**Industrial aesthetics:** The interplay of metal piping, concrete worktops, and matte hardware complements charcoal’s brooding tone without overwhelming the space.
**Transitional elegance:** Charcoal units act as a bridge between classic cabinetry profiles and sleek contemporary pulls, especially when paired with a neutral, uncluttered backdrop.
**Steer clear of stark white contrast:** Using charcoal alongside pure white without introducing warm intermediary shades can lead to a jarring visual effect instead of a layered, inviting feel.
Pro Tip: For a cohesive layered look, paint lower cabinets in Sherwin-Williams ‘Tricorn Black’ (SW 6258) and upper cabinets in ‘Peppercorn’ (SW 7674) to maintain tonal harmony.
11. Simple Updates to Infuse Dark Gray into Your Kitchen Without Major Changes
Incorporating dark gray into your kitchen can be achieved through subtle, strategic touches that avoid the need for extensive remodeling. This deep shade makes a striking accent through accessories, appliances, and textiles before any permanent alterations are considered. Begin by introducing a couple of key dark gray elements to set the tone, allowing the rest of the space to follow naturally.
Key Design Elements
**Swap out textiles first:** Update your kitchen linens like dishcloths and pot holders with dark gray options to refresh your color scheme affordably and effortlessly.
**Use a dark-hued appliance as a focal point:** Place a charcoal or matte black toaster, coffee maker, or blender on your countertop to create a cohesive and deliberate look without any construction.
**Style open shelving with dark gray decor:** Position ceramic mugs, storage jars, or serving dishes in charcoal tones on your shelves to draw attention and unify the space visually.
**Add layered floor coverings:** Lay down a dark gray runner or cushioned mat near your sink or cooking area to anchor the room’s palette subtly at ground level.
Pro Tip: Consider painting a single wall in ‘Peppercorn’ (SW 7674) and the ceiling in ‘Accessible Beige’ (SW 7036) to highlight dark gray accents and create a polished atmosphere without remodeling.
12. Avoiding Common Pitfalls with Dark Gray Kitchens
Many errors with dark gray kitchens occur early in the design process, often during initial purchases. When charcoal tones are scattered in small doses without a main focal point, the overall look can feel incomplete rather than deliberate. Start by choosing one prominent dark gray element, then build complementary accents around it to create a cohesive space.
Key Design Elements
**Overloading with Dark Shades:** Introduce charcoal in stages, layering gradually to prevent the room from feeling too heavy or claustrophobic.
**Neglecting Warm Elements:** Without touches of wood, brass, or cozy fabrics, charcoal can feel stark and cold instead of elegant and inviting.
**Disregarding Light Levels:** In kitchens with limited natural light, opt for matte surfaces and warm lighting to ensure dark gray doesn’t dominate or shrink the room.
**Mixing Conflicting Gray Tones:** Combining cool blue-based grays with warmer brown-based ones creates visual discord; choose one undertone and maintain consistency throughout all charcoal finishes.
Pro Tip: Try painting your upper cabinets in Sherwin-Williams ‘Peppercorn’ (SW 7674) and use ‘Accessible Beige’ (SW 7036) on the ceiling to prevent dark cabinetry from making the space feel closed off.
13. Countertop Choices That Shine Against Deep Charcoal Walls
Quartz and quartzite stand out beautifully against charcoal-colored walls, offering enough depth and pattern to avoid fading into the background or clashing with the dark hue. Their natural veining introduces a dynamic element that flat surfaces simply can’t provide. Opt for slabs featuring warm tones—such as creamy, golden, or taupe streaks—to ensure a striking contrast rather than cooler shades that might merge with the charcoal.
Key Design Elements
**Warm-veined quartz:** Select a quartz countertop with soft white or ivory base tones accented by amber or caramel veins for a durable and eye-catching surface that resists staining and upkeep challenges.
**Textured quartzite:** Embrace quartzite slabs in gentle blush or ivory shades that bring natural patterns and subtle color shifts, adding lively texture to balance charcoal’s intensity.
**Wood accents:** Incorporate a butcher block segment near the sink or food prep area to introduce a touch of natural warmth that stone alone can’t provide in darker kitchens.
**Matte finishes:** Choose honed or matte countertop surfaces to gently diffuse light, reducing harsh reflections and preventing charcoal walls from feeling oppressive or cave-like.
Pro Tip: Use a soft gray like ‘Agreeable Gray’ (SW 7029) on the walls paired with a crisp white ceiling such as ‘Alabaster’ (SW 7008) to create a smooth, inviting transition from dark walls to lighter countertops.
14. Choosing Flooring That Perfectly Anchors a Dark Gray Kitchen
Selecting lighter flooring is a smart strategy to lighten the overall feel of a kitchen with deep gray cabinets without changing the cabinetry itself. Cool shades such as pale concrete, soft white tiles, or light ash wood help bounce natural and artificial light around the space, offsetting the absorbing nature of dark tones. Alternatively, flooring with warm hues like honey oak, terracotta, or creamy limestone introduces contrast that balances the gray and prevents the room from feeling too heavy or somber.
Key Design Elements
**Light wood or wood-inspired floors:** Blonde oak or pale ash planks laid lengthwise can visually expand a small kitchen while ensuring the floor stays subtle alongside the cabinetry.
**Warm-toned stone tiles:** Soft beige or creamy stone tiles provide a neutral base with a touch of warmth, keeping the dark gray kitchen cozy rather than stark or cold.
**Matte finishes over shiny:** Choosing a matte surface scatters light gently, reducing glare and complementing the boldness of dark cabinets without overwhelming the eye.
**Large-format tiles:** Using bigger tiles means fewer grout lines, creating a seamless look that helps the kitchen feel more spacious and streamlined.
Pro Tip: For a harmonious palette, consider painting the ceiling in ‘Alabaster’ (SW 7008) and an accent wall in ‘Accessible Beige’ (SW 7036) to naturally connect cool gray cabinetry with warm flooring tones.
15. How Dark Gray Kitchens Achieve a Warm, Inviting Atmosphere
Dark gray tones create a welcoming ambiance by gently soaking up light instead of bouncing it back sharply, fostering a snug, intimate feel. This effect mimics wrapping the space in a soft embrace, perfect for kitchens used during quiet evenings. Incorporating warm materials like rich woods, golden hardware, and cozy fabrics ensures the space stays inviting rather than stark.
Key Design Elements
**Opt for warm undertones first:** Select dark grays with hints of brown or olive, avoiding blue-based shades that can feel chilly under artificial lighting.
**Introduce warm metallic accents:** Fixtures and handles in brass, bronze, or matte gold add subtle warmth to balance the cooler hues.
**Embrace varied textures:** Incorporate matte finishes, natural fibers like linen, and rough-hewn woods to absorb light and create a softer, more tactile environment.
**Choose soft, low-temperature lighting:** Use warm under-cabinet LEDs and pendant lights around 2700K to cast gentle, amber glows that counteract any coldness from the dark palette.
Pro Tip: For a rich yet cozy dark gray space, paint upper cabinetry in Sherwin-Williams ‘Peppercorn’ (SW 7674) paired with an ‘Inkwell’ (SW 6992) accent wall to add depth and warmth.
16. Ideal Cabinet Shades to Complement Dark Gray Walls
When paired with dark gray walls, cabinets need to bring balance and dimension to the kitchen. Shades like muted whites, soft creams, and rich wood finishes work harmoniously by brightening the space while respecting the wall’s intensity. Instead of matching the gray, opting for cabinets that introduce warmth or striking contrast ensures the room feels thoughtfully composed rather than visually flat.
Key Design Elements
**Muted white cabinets:** A gentle white tone helps reflect natural and artificial light, creating a clean yet inviting contrast against deep gray walls.
**Soft cream finishes:** Cream-colored cabinetry offers a subtle transition between dark walls and lighter elements, making the kitchen feel cozy without overwhelming it.
**Warm wood grains:** Cabinet fronts in medium-toned woods such as walnut or oak introduce natural warmth that counterbalances the coolness of gray, enhancing depth without clashing.
**Two-tone design:** Combining light upper cabinets with warm wood lower units adds layered interest and prevents the dark gray backdrop from feeling too heavy or uniform.
Pro Tip: Try painting upper cabinets in Benjamin Moore’s ‘White Dove’ and lower cabinets in ‘Manchester Tan’ to create a smooth yet striking connection with dark gray walls.
Conclusion
Embracing dark gray and charcoal in your kitchen design opens the door to a space that is both timeless and strikingly modern, offering depth and sophistication that lighter palettes often can’t achieve. These shades create a versatile canvas that beautifully complements various textures, metals, and natural elements, inviting you to craft a kitchen that feels both cozy and effortlessly chic. By stepping into this bold color story, you’re not just choosing a trend—you’re investing in a design that stands strong through seasons and styles, reflecting your unique taste with quiet confidence.
Don’t hesitate to take that first step toward a dark gray or charcoal kitchen; start small with accent walls, cabinetry, or countertops, and watch how these rich hues transform your space into a sanctuary of elegance and warmth. Trust in the palette’s ability to balance drama with comfort, and let your imagination guide you. With a little courage and thoughtful layering, your kitchen will become a beautifully grounded backdrop where every meal and moment feels refined and inviting.
As we step into 2026, American homeowners are reimagining their porches as vibrant, functional extensions of their living spaces. Whether you’re dreaming of a cozy front porch perfect for morning coffee, a budget-friendly refresh for your outdoor entrance, or a dramatic seasonal transformation, inspiration is everywhere. From screened-in sanctuaries that blur the line between indoors and out, to festive holiday displays that delight the whole neighborhood, this guide brings together 48 of the most exciting porch ideas trending right now — helping you craft an outdoor space that’s as unique as your lifestyle.
1. Botanical Gallery Wall with Green Accents
Transform your porch into a serene sanctuary by curating a thoughtfully arranged gallery wall featuring botanical artwork that harmonizes with the surrounding greenery. Select a variety of vintage plant illustrations, pressed foliage, or finely detailed botanical prints, and frame them using an assortment of sizes and orientations to create a dynamic visual tapestry. Incorporate green mats or frames to gently unify the collection, allowing the hues to echo the natural landscape visible through your porch screens. This approach not only introduces an elegant intersection of art and nature but also fosters a sense of calm and connection, making your porch a seamless extension of the outdoors.
To achieve a genuinely personal and collected feel, resist the temptation to use uniformly matching frames. Instead, mix smaller 8×10 pieces with larger 16×20 works, and include varied orientations to add depth and intrigue to the display. Over time, such a collection can evolve into a story-rich ensemble, reflecting your journey and appreciation for botanical beauty rather than appearing as a pre-packaged decor solution. For those mindful of budget, many museum archives provide access to historical botanical prints at little to no cost, offering an authentic and educational touch to your gallery. This curated botanical wall becomes more than decoration—it invites conversation, evokes nostalgia, and celebrates the timeless artistry of nature.
2. Enclosed Porch Fitness and Wellness Zones
Transform your enclosed porch into a serene wellness retreat or a dynamic fitness studio that seamlessly blends the comforts of home with the refreshing ambiance of the outdoors. By harnessing abundant natural light and unobstructed views, you create an inviting environment that elevates your exercise or meditation routine. Thoughtful flooring choices such as cushioned rubber tiles or premium yoga mats provide both comfort and durability, while strategically placed mirrors help refine your form and technique. Integrating a quality sound system allows you to immerse yourself in guided workouts, calming meditation music, or invigorating playlists, enhancing focus and motivation. Clever storage solutions keep your equipment—ranging from free weights and resistance bands to yoga blocks and mats—neatly organized and accessible, ensuring your space remains clutter-free and conducive to wellness.
This dedicated porch sanctuary offers more than just convenience; it fosters a clear separation from everyday distractions, encouraging regular, mindful health practices without the hassle of gym commutes. Ideal for moderate climates, the space can be easily climate-controlled with portable fans or heaters, ensuring year-round comfort. Whether you’re seeking a minimalist setup focused on stretching and mindfulness or a comprehensive gym equipped with cardio machines, this adaptive space can accommodate your lifestyle and budget. Many fitness enthusiasts have found that exercising in a bright, glass-enclosed porch overlooking their garden transforms routine workouts into rejuvenating experiences, boosting consistency and making wellness feel less like a chore and more like a cherished daily ritual. The natural surroundings and daylight not only enhance physical well-being but also nurture mental clarity in ways traditional basement gyms seldom achieve.
3. UK-Inspired Cottage Porch Gardens
Embrace the timeless charm of an English cottage garden to infuse your porch with a sense of nostalgic beauty and inviting warmth. Picture a lush, layered tapestry of plants that combine the romantic allure of climbing roses weaving through trellises, fragrant herbs like lavender and rosemary, and a harmonious blend of perennials and annuals spilling gracefully from vintage containers. This approach encourages a relaxed, slightly untamed look that feels as though it has evolved naturally over years, drawing inspiration from the storied countryside homes of England while thoughtfully adapting to the unique climate and growing conditions found across the United States. Whether you live in the cooler, moist climates of the Pacific Northwest or New England or the warmer, sun-drenched regions of the South, selecting heat-tolerant or hardy varieties ensures your porch garden thrives and blooms vibrantly throughout the seasons. A key to achieving fullness and richness in this style is planting with patience—allowing space for young plants to mature rather than overcrowding, so the garden’s depth and color intensify gracefully as time passes.
In reimagining your porch as a seamless extension of your home’s living space, it’s important to focus on purposeful design that enhances both lifestyle and functionality. Beyond aesthetic appeal, a well-curated porch garden can transform everyday moments—whether it’s savoring a quiet morning coffee, entertaining guests in a cozy gathering spot, or simply enjoying peaceful seasonal transitions. Thoughtful integration of flexible seating arrangements, weather-appropriate textiles, and subtle lighting creates a space that is as practical as it is beautiful, built to endure and adapt through changing trends and weather. Small or large, screened-in or open, your porch can be a versatile sanctuary that reflects your personal rhythms and preferences, evolving at your pace and according to your needs. By prioritizing both comfort and character, you invite a lasting connection to the outdoors that enriches your home and uplifts your spirit year-round.
We invite you to share your porch transformation stories, ideas, and images to inspire a community of outdoor living enthusiasts. Your personal insights and creative adaptations can spark new ideas and encourage others to embark on their own porch garden journeys. Whether you face challenges with planting choices, space limitations, or seasonal upkeep, exchanging experiences fosters a supportive environment where practical solutions and design inspiration flourish hand in hand. Together, we can cultivate porches that aren’t just extensions of the home, but heartfelt expressions of lifestyle and nature’s enduring beauty.
4. Bloxburg-Inspired Modern Minimalist Porches
Drawing inspiration from contemporary design trends that prioritize simplicity and intentionality, modern minimalist porches create an inviting yet refined entryway defined by clean lines and a restrained color palette. Embracing neutral tones like soft grays, warm taupes, and crisp whites, these porches use carefully chosen furniture pieces with geometric shapes—think slender metal-framed chairs or streamlined wooden benches—that balance form and function seamlessly. Complementing this foundation are monochromatic planters housing sculptural plants such as snake plants or fiddle leaf figs, which bring architectural interest without overwhelming the space. The overall effect is a thoughtfully curated outdoor area that feels spacious and serene, perfectly suited to homeowners who value understated elegance and a fresh, contemporary vibe.
This style translates beautifully to urban environments where porch space is often limited but still demands both style and practicality. By reducing visual clutter and focusing on multifunctional elements, minimalist porches maximize usability without sacrificing aesthetic appeal. Each item is selected not only for its design but also for its role in daily living, ensuring that maintenance remains effortless and the atmosphere calm and inviting. This approach resonates strongly with young professionals and design-savvy individuals who appreciate how these clean, uncluttered settings photograph beautifully for social media, offering a modern backdrop that feels both personal and polished. To keep the space from feeling too stark, introducing a single textured throw or a natural material accent adds warmth and depth, softening the minimalism with subtle organic charm.
5. Year-Round Covered Porch Entertaining Stations
Transforming your porch into a versatile, year-round entertaining hub not only elevates your outdoor living experience but also enhances the functionality and appeal of your home. Imagine a thoughtfully designed covered porch that seamlessly blends comfort with convenience, allowing you to host gatherings regardless of the season. By integrating weather-resistant storage solutions, you can keep an array of dishware, serving utensils, and essentials close at hand, eliminating the need for repeated trips to the kitchen. Incorporating a beverage refrigerator or cooler station adds a refreshing touch, while strategically placed electrical outlets support warming trays, portable appliances, and ambient lighting, ensuring every event runs smoothly and effortlessly.
To maximize the potential of your porch, flexible seating arrangements are key. Whether you’re hosting an intimate spring brunch or a festive winter celebration, modular furniture can expand or contract to suit the size of your gathering, providing comfort without sacrificing space. In milder climates or porches equipped with heating elements, these setups truly shine, allowing you to enjoy outdoor entertaining well into cooler months. Experienced hosts often note how such dedicated spaces reduce preparation time and alleviate event-day stress. When planning your electrical layout, it’s essential to anticipate multiple appliances running simultaneously; installing at least two 20-amp circuits will ensure reliable power and prevent any disruptions. This thoughtful approach to porch design is especially popular in regions like the Mid-Atlantic and Pacific Northwest, where weather can be unpredictable yet the desire to entertain outdoors remains strong.
6. Cozy Halloween Porch Displays
Embrace the spirit of autumn with a Halloween porch design that radiates warmth and comfort rather than fright. Ideal for households with young children or neighborhoods favoring lighthearted festivities, this approach centers on inviting decorations that celebrate the season’s charm. Picture a collection of cheerful jack-o’-lanterns carved with friendly smiles, perched alongside rustic hay bales that double as casual seating for visitors. Accentuate the scene with clusters of vibrant mums in rich oranges and deep purples, their blooms adding natural texture and color. Soft, amber-hued string lights drape gently overhead, casting a cozy glow that beckons guests to pause and enjoy the festive atmosphere.
This style of Halloween decorating has become increasingly popular in family-focused communities, offering a refreshing alternative to more intense, spooky displays. Its versatility means it can complement a variety of home styles—from quaint manufactured porches to classic front stoops—without overwhelming the space. By thoughtfully selecting décor that seamlessly transitions from early October through the Thanksgiving holiday, you can create a seasonal vignette that maximizes your investment and reduces the hassle of frequent changeovers. This harmonious blend of comfort, color, and charm invites trick-or-treaters and neighbors alike to experience the magic of fall in a welcoming and joyful way.
7. Kid-Friendly Activity Zone
Transform a corner of your screened porch into a vibrant, kid-friendly retreat that combines safety, fun, and convenience. By creating a designated play area shielded from harsh sunlight and pesky insects, you provide children with a comfortable outdoor environment where they can explore and engage in creative activities without constant supervision. Incorporate durable storage solutions such as low-profile cubes or woven baskets to neatly organize outdoor toys, chalk, bubbles, and art supplies designed to withstand humidity. A child-sized table paired with washable chairs serves as an inviting spot for coloring, puzzles, or snacks, allowing kids to enjoy their own space while you unwind nearby. Anchoring the area with a washable, weather-resistant rug not only visually defines the zone but also simplifies cleanup, making it practical for everyday use.
This thoughtfully designed activity corner not only maximizes your porch’s functionality but also fosters a sense of independence and ownership for your little ones. Parents often praise screened porches as an invaluable summer asset, offering a secure, contained environment that balances the freedom of outdoor play with peace of mind. Position the play zone within clear sightlines from your kitchen or main living area, so you can effortlessly keep an eye on the kids while attending to household tasks or entertaining guests. As your children mature, this versatile nook can seamlessly evolve into a homework station or a cozy teen hangout, ensuring your porch remains a dynamic extension of your home for years to come.
8. Whitewashed Brick Accent Wall
Elevate your porch with the timeless charm of a whitewashed brick accent wall, a design choice that effortlessly balances rustic warmth with modern sophistication. Whether you’re working with existing brick or opting to install faux brick panels, the whitewash technique breathes new life into the surface by softening the brick’s natural hues while preserving its rich texture. This subtle layering of diluted white paint allows the unique character of each brick—its surface irregularities and color nuances—to shine through, creating a captivating backdrop that adds depth and architectural intrigue without overwhelming the space. The result is a versatile canvas that beautifully complements anything from cozy wicker furniture to sleek, contemporary seating, and provides the perfect stage for decorative elements like hanging plants, mirrors, or framed artwork.
Achieving the ideal whitewashed finish is a careful balance of technique and patience. Start by mixing equal parts white latex paint and water to create a translucent wash that won’t mask the brick’s inherent texture. Using a brush, apply the mixture in sections, then immediately soften the coverage with a rag to avoid heavy, opaque spots. This approach allows the natural beauty of the brick to peek through while lending an airy, fresh feel to your porch. For best results, experiment on a discreet area before tackling the entire wall. The entire process is budget-friendly, typically costing between $30 and $50 in materials and can be completed in just a few hours—making it an accessible project with a dramatic visual payoff. Additionally, this technique adapts well to concrete block surfaces, offering a stylish solution for basement porches or older home extensions, and transforming less inviting walls into standout design features.
9. Screened Porch Reading Nooks
Transform a quiet corner of your screened porch into an inviting reading sanctuary where comfort and tranquility merge seamlessly. Begin by selecting a plush lounge chair or a charming hanging egg chair that cradles you in relaxation, accompanied by an adjustable reading lamp that casts just the right glow during dusk or overcast days. Incorporate a compact side table within arm’s reach to hold your favorite beverages and a well-loved book, ensuring every element supports long, leisurely reading sessions. Soft, weather-resistant cushions and cozy throws add layers of warmth and texture, creating an intimate refuge shielded from pesky insects while allowing you to remain immersed in the gentle rhythms of the outdoors.
When designing your porch nook, be mindful of location to maximize both comfort and natural light. Avoid placing your seating in busy walkways or areas exposed to intense afternoon sun, which can disrupt your reading experience. Instead, orient your space toward the east if you savor morning chapters or west if twilight tales are your preference, harnessing the sun’s path to enhance your reading ambiance. For added convenience, consider integrating a small bookshelf or a weatherproof storage ottoman nearby to keep your latest literary adventures within easy reach. This thoughtful arrangement transforms your screened porch into a cherished retreat, fostering a daily habit of reading that many find both restorative and inspiring.
10. Screened-In Dining Porches
Elevate your outdoor living experience by converting your screened porch into a charming dining retreat that combines the joys of alfresco meals with the comfort of insect-free surroundings. Begin with a durable, weather-resistant dining table designed to comfortably accommodate six to eight guests, setting the stage for memorable gatherings. To enhance the atmosphere, consider installing soft string lighting or a striking chandelier specifically rated for damp environments, which not only provides warm illumination but also adds an elegant focal point to your outdoor space. This thoughtful blend of practicality and style allows you to savor fresh air and scenic views while enjoying the convenience of sheltered dining.
Investing in a screened dining porch can range from a straightforward upgrade with basic screening to a more elaborate custom project featuring decorative frames and integrated lighting systems. While the initial costs vary, the long-term benefits are undeniable — many homeowners find themselves extending their outdoor entertaining season from early spring well into the fall months. To further enhance functionality, place a compact beverage station or bar cart within easy reach, reducing unnecessary trips indoors and keeping refreshments close at hand. Opt for seating with cushions that are easy to remove and store quickly, ensuring your space remains inviting and well-maintained regardless of sudden weather changes. This approach not only maximizes comfort but also transforms your porch into a versatile haven for both everyday family meals and special occasions.
11. Cabin-Inspired Wood Plank Ceiling
Elevate your porch with the timeless appeal of a wood plank ceiling, a design choice that effortlessly infuses warmth and rustic charm into your outdoor living space. By installing tongue-and-groove planks made from natural cedar, pine, or high-quality faux wood, you create a rich, textured canopy that draws the eye upward and adds a sense of intentional craftsmanship. Opt for finishes in honeyed amber or weathered gray hues to evoke a cozy, cabin-inspired atmosphere that feels both inviting and refined. This thoughtful upgrade transforms an ordinary painted ceiling into a standout architectural element, enhancing the overall aesthetic while significantly boosting your home’s perceived value.
To complete the look, consider pairing the wood ceiling with exposed wooden beams or understated wrought iron lighting fixtures that complement the lodge-inspired style without overpowering the space. This design approach is particularly popular in mountainous regions such as Colorado, North Carolina, and Vermont, where natural wood elements harmonize beautifully with the surrounding forest landscape. The installation process is surprisingly approachable for DIY enthusiasts familiar with basic woodworking tools, typically achievable over a weekend for a standard 12-by-16-foot porch. With material costs ranging from $3 to $6 per square foot depending on the chosen wood species, this upgrade offers an excellent balance of affordability and visual impact. For lasting durability, apply a clear sealant to guard against moisture and prevent warping, ensuring your porch ceiling remains a stunning focal point season after season.
12. Double-Wide Mobile Home Grand Entrances
Double-wide mobile home porches now serve as striking entryways that redefine curb appeal, blending functionality with refined architectural details often seen in traditional residences. Homeowners are embracing design elements such as robust decorative columns and meticulously crafted railings featuring craftsman-inspired balusters, which lend a sophisticated, timeless character to the façade. When paired with a thoughtfully selected color palette, these enhancements elevate the porch from a simple threshold to a statement of style and warmth, inviting guests with an immediate sense of charm and quality.
Beyond the structural upgrades, integrating well-planned landscaping and durable, stylish outdoor furnishings completes the transformation, cultivating an inviting outdoor living space that enhances both comfort and aesthetic value. These thoughtful improvements have proven to be a wise investment, boosting property values and fostering a sense of pride within neighborhoods, particularly in Sunbelt and rural Midwest communities where long-term homeownership is common. A local example illustrates this perfectly: a homeowner revitalized their porch with composite decking and vinyl railings over a single weekend, all for under two thousand dollars. This modest investment not only refreshed the home’s appearance but also sparked a wave of similar enhancements among neighbors, demonstrating how one inspired upgrade can elevate an entire street’s appeal and create a welcoming community atmosphere.
13. Screened Curtain Panels for Flexible Privacy
Transform your porch into a serene retreat by installing ceiling-mounted curtain rods parallel to your screened enclosure, allowing lightweight outdoor panels to glide effortlessly along the track. Choosing breathable, weather-resistant fabrics in soft hues like ivory, pale blue, or natural linen infuses the space with a gentle glow while maintaining a connection to the outdoors. These curtains offer remarkable versatility: draw them fully closed to create a private, shaded sanctuary during hot afternoons, pull them together to foster an intimate setting for evening gatherings, or sweep them aside entirely to welcome fresh air and unobstructed views. This layered textile approach not only softens the structural lines of your porch but also adds depth and warmth, balancing the openness of the screens with a touch of cozy elegance.
Porches that face west especially reap the rewards of this design, as the curtains effectively mitigate the intense late-day sun, reducing temperatures by several degrees and making the space comfortable even during peak heat. The fabric filters sunlight without sacrificing airflow, ensuring that gentle breezes continue to circulate freely. For a hassle-free installation, opt for grommeted panels hung on tension rods anchored between existing posts or beams—this method eliminates the need for drilling and preserves your porch’s integrity. Typically, four to eight panels will suffice depending on your porch size, with individual panels averaging $20 to $40. To keep these curtains looking fresh and mildew-free in humid environments, plan to launder them twice each season, preserving their beauty and extending their lifespan.
14. Bistro Dining Setup for Intimate Meals
Transform a cozy corner of your screened porch into an inviting retreat by incorporating a petite bistro table paired with two elegantly designed chairs. This intimate arrangement is perfect for smaller porches where space is limited but the desire for a dedicated dining area remains. Opt for durable materials like wrought iron or powder-coated steel to ensure longevity, especially in environments prone to moisture and temperature changes. A tabletop crafted from mosaic tiles or marble not only adds visual interest but also provides a resilient surface that can handle the elements gracefully. To infuse a touch of nature and freshness, place a delicate vase brimming with seasonal blooms or a small pot of aromatic herbs such as basil or rosemary on the table—this subtle greenery enhances the setting without overwhelming the space.
Many homeowners overlook the everyday value of a thoughtfully designed dining nook on their porch, yet this compact setup invites spontaneous moments of connection—whether it’s savoring a morning coffee or sharing an evening cocktail. Unlike larger dining sets that tend to be reserved for special occasions, a bistro ensemble encourages frequent use and fosters a warm, casual atmosphere. For added convenience and ambiance, situate the table close to an electrical outlet. This allows for easy use of a portable speaker or the addition of soft string lights, elevating the mood during twilight hours. The small footprint of a bistro dining area also leaves ample room for extra seating options or a narrow side table, balancing functionality and charm in your outdoor living space.
15. Manufactured Home Covered Porch Upgrades
Enhancing the covered porch of your manufactured home offers both practical benefits and an opportunity to create a welcoming outdoor retreat. By extending the roofline over your entryway, you not only shield the space from sun and rain but also effectively increase your usable living area. Opting for durable, wood-grain composite or weather-resistant vinyl decking that complements your home’s exterior palette ensures a seamless, polished look. Incorporating classic column-style post wraps and thoughtfully chosen outdoor lighting fixtures adds architectural interest and warmth, transforming the porch into an inviting gathering spot for family and friends.
These upgrades carry significant value, particularly in established mobile home communities where residents seek to personalize their homes for the long haul. In sun-drenched regions like Florida and Arizona, covered porches provide essential shade, helping to moderate indoor temperatures and reduce energy costs. While the investment can range from around $1,500 to $5,000 depending on size and materials, the payoff is substantial—not only in expanded living space but also in enhanced curb appeal that resonates throughout the neighborhood. Many community managers actively support these improvements, recognizing how thoughtful porch enhancements contribute to a more attractive, cohesive environment and elevate overall resident satisfaction.
16. Mounted TV Entertainment Hub
Transform your screened porch into a versatile outdoor retreat by installing a weather-resistant television that elevates the space into an inviting entertainment hub. Position the TV thoughtfully, aligning it with your primary seating area—whether that’s a cozy sofa or a sectional—so viewers enjoy a comfortable, eye-level viewing experience. Complement the setup with a sleek media console or a discreet wall-mounted shelf to house streaming devices, sound equipment, or tasteful decor, ensuring that the technology integrates seamlessly into the overall aesthetic. When the screen is off, the goal is for it to harmonize with your porch’s design, avoiding the harsh contrast of a blank black surface.
In regions with warm climates, such as the Sun Belt, screened porches equipped with outdoor TVs have become a hallmark of modern home design, reflecting a shift toward treating these spaces as true extensions of the indoor living area. Investing in a purpose-built outdoor television is essential; its durable construction withstands humidity, temperature fluctuations, and exposure to sunlight, providing peace of mind and longevity that indoor models simply cannot offer—even with protective covers. For added flexibility, consider mounting the TV on an adjustable arm, allowing you to tilt or swivel the screen to reduce glare and optimize viewing angles throughout the day. This thoughtful approach creates a seamless blend of technology and comfort, making your porch the perfect spot for everything from casual background ambiance to spirited game nights.
17. Hanging Daybed for Ultimate Relaxation
Transform your porch into a serene retreat by installing a generously sized hanging daybed that invites pure relaxation. Unlike traditional porch swings, these suspended beds typically span over 60 inches in width, providing ample space to stretch out and unwind. Plush, thick cushions elevate comfort, turning the piece from a charming novelty into a functional extension of your living area. The gentle, rhythmic sway not only soothes the senses but also creates an inviting ambiance ideal for leisurely Sunday naps or intimate evening conversations with friends and family.
To ensure lasting enjoyment and safety, it’s essential to select high-quality materials such as powder-coated chains or marine-grade ropes, both of which stand up to outdoor elements and resist corrosion. Before installation, consult with a structural engineer or experienced contractor to verify that your porch ceiling can support the combined weight of the daybed and its occupants, which often exceeds 400 pounds. Many older homes require reinforcing ceiling joists or adding support beams to handle this load safely. While professional installation may cost between $200 and $500, this investment pays dividends by transforming your porch into a beloved sanctuary where you’ll naturally find yourself spending more time relaxing and connecting.
18. String Light Canopy for Magical Ambiance
Elevate your porch into a captivating retreat by crafting a radiant canopy of string lights overhead. By suspending multiple strands of Edison bulbs or classic globe lights in a gentle zigzag or a structured grid across the ceiling, you can instantly transform the space with a warm, inviting glow. This lighting design not only enhances the aesthetic appeal but also extends the functionality of your porch well beyond daylight hours, making it an ideal setting for intimate dinners, relaxed gatherings, or quiet evenings under the stars. To achieve this effect, secure eye or cup hooks into the ceiling beams at intervals of three to four feet, allowing you to drape the lights in a pattern that complements the architecture and size of your porch.
Opt for dimmable, outdoor-rated LED bulbs to tailor the ambiance to your mood while keeping energy consumption low. This thoughtful lighting upgrade is especially impactful in larger porches where traditional ceiling fixtures often fall short in creating atmosphere. With each strand typically priced between $30 and $80, depending on length and style, most porches require two to four strands for full coverage. For added convenience and efficiency, pair the installation with a timer or smart switch, ensuring your porch softly illuminates at dusk without any effort on your part. The entire project is straightforward, usually completed within an hour using just a drill, hooks, and a ladder—making it a rewarding weekend endeavor that delivers instant, enchanting results.
19. Simple Entrance Focal Point Features
Creating an inviting entrance begins with establishing a clear focal point that sets the tone for your entire porch. Whether it’s a striking planter filled with seasonal blooms or a beautifully crafted welcome mat personalized to greet guests, a singular statement piece can transform your entryway into a warm and memorable space. Thoughtfully chosen accessories—such as an elegant vintage bench or distinctive architectural accents like intricately designed house numbers or a classic door handle—add layers of charm and reflect your unique style without overwhelming the area.
This approach is especially advantageous for homeowners and renters seeking to refresh their porch without committing to extensive renovations. By investing in one standout element, you can elevate the space instantly, creating a cohesive look that feels intentional and polished. Coordinating complementary decor around your chosen focal point not only enhances visual appeal but also allows for effortless seasonal updates. Swapping out planters or textiles with the changing seasons invites versatility and keeps your entryway feeling fresh year-round, all while maintaining a refined and welcoming atmosphere.
20. Cottage-Style Built-In Bench Seating
Incorporating built-in bench seating along your porch walls is a brilliant way to enhance both functionality and charm, all while embracing the timeless appeal of cottage-style design. Opt for a soft, inviting palette—think creamy whites or gentle pastel blues—and complement the benches with beadboard paneling to evoke that quintessential coastal vibe. To ensure comfort and durability, layer the seating with plush cushions crafted from weather-resistant fabrics, ideal for withstanding the elements while adding a pop of color and texture. Beyond aesthetics, these benches cleverly conceal ample storage beneath the seat, providing a perfect hideaway for seasonal cushions, gardening tools, pool accessories, or extra entertaining essentials, keeping your porch neat and organized year-round.
When planning your built-in seating, it’s crucial to consider dimensions that balance comfort with spatial efficiency. A bench depth between 16 and 18 inches strikes the perfect harmony, offering a cozy place to sit without necessitating overly thick cushions or wasting valuable porch space. Going beyond 18 inches often leads to discomfort and cumbersome seating arrangements, so this guideline helps create a practical and inviting environment. Whether you choose to tackle this project yourself or enlist professional help, the investment pays dividends in the form of bespoke craftsmanship and thoughtful design. DIY enthusiasts can complete this upgrade over a weekend with basic carpentry skills and pre-cut lumber, keeping costs between $300 and $700. For those seeking a polished finish, professional carpenters typically charge $1,500 to $3,000, delivering custom detailing that elevates your porch well above standard prefab furniture options.
21. Convertible Daybed to Dining Transformation
In compact porch spaces where every inch counts, selecting multifunctional furniture can transform the way you live and entertain. A versatile daybed paired with a lift-top coffee table or adjustable nesting tables offers a seamless transition from a comfortable lounging area to a practical dining nook. During daylight hours, the daybed invites relaxation with its firm yet cozy cushions, providing ample support for sitting or reclining. When mealtime arrives, simply raise the tabletop to dining height, creating an intimate space perfect for two to four people. This clever combination maximizes usability without sacrificing style or comfort, making it an ideal solution for small balconies or porches where traditional dining sets might feel cramped.
To ensure this dual-purpose setup works effortlessly, opt for a daybed with a supportive mattress or cushion that maintains posture during meals—avoiding overly plush options that compromise back support. Keep additional cushions stored nearby so you can quickly swap them depending on the function, enhancing both comfort and aesthetics. Investing in a high-quality lift-top mechanism is essential; models that operate smoothly with one hand preserve the convenience and appeal of the design, while sturdier tables priced between $200 and $400 typically stand up well to daily use. Positioning the daybed along the longest wall optimizes floor space, allowing the table to comfortably accommodate dining without overwhelming the porch. This smart approach elevates small outdoor areas into multifunctional retreats, blending form and function with effortless grace.
22. Boho Layered Rug Combination
Embrace the effortless charm of bohemian style by thoughtfully layering multiple outdoor rugs to craft a dynamic and inviting foundation for your porch seating area. Begin with a generously sized, neutral-toned jute or sisal rug, which provides a natural, textured base that anchors the space with earthy warmth. Layer atop this a richly patterned rug inspired by Persian or Moroccan designs, introducing intricate motifs and vibrant colors that bring depth and cultural flair. To complete the look, add a smaller accent rug or runner featuring complementary patterns or hues, creating a harmonious yet eclectic mix that feels curated rather than contrived. This layered approach not only enhances visual interest but also helps delineate distinct zones within an open porch layout, subtly organizing areas for lounging, dining, or socializing.
Beyond aesthetics, the layered rug technique offers practical advantages for outdoor living. Managing several smaller rugs is far simpler than maintaining one large piece—each rug can be cleaned individually, rotated seasonally, or swapped out to refresh the space without the expense of replacing a bulky item. When sourcing these rugs, consider exploring discount home retailers and off-price outlets, where quality outdoor rugs often appear at 40% to 60% off standard retail prices. Timing your purchases around end-of-season sales, particularly in late summer and early fall, can yield exceptional deals, allowing you to assemble a striking layered look for under $200. To ensure durability and longevity, prioritize rugs specifically designed for outdoor use, with UV protection and mildew resistance to withstand sun exposure and humidity, preserving both their beauty and functionality year-round.
23. Budget Gallery of Thrifted Mirrors
Transform your porch into a captivating visual haven by assembling a gallery wall of thrifted mirrors that effortlessly blend charm and functionality. By sourcing an array of vintage and secondhand mirrors in diverse shapes, sizes, and finishes, you can amplify natural light and introduce a sense of spaciousness without straining your budget. This strategy is especially effective in porches that receive limited sunlight or face north, as the mirrors reflect and disperse the available light, brightening the area while creating an inviting atmosphere. The key lies in embracing an eclectic mix—combine ornate gilded frames with rustic wooden ones, and balance round mirrors alongside rectangular designs to craft a thoughtfully curated display that feels unique and personal rather than uniform or manufactured.
To achieve this look economically, explore local estate sales, thrift shops, and online marketplaces like Facebook Marketplace, focusing on affordable pieces typically priced under $15. Rather than rushing to collect all your mirrors at once, gather them gradually over time; this approach prevents a “matching set” appearance and allows you to select frames that resonate with your individual style. Should the assortment begin to feel visually overwhelming, consider unifying the collection by spray painting the frames in a single matte tone such as black or white, though many mixed metallics harmonize beautifully without any alteration. When arranging your gallery, anchor the composition with larger mirrors placed at eye level, then artfully fill in the surrounding spaces with smaller pieces. With patience and a strategic eye, you can complete this striking project for under $100, turning your porch into a luminous, artful retreat.
24. Layered Textiles for Cozy Farmhouse Appeal
Elevate your screened porch into a serene farmhouse retreat by thoughtfully layering a variety of textiles that blend pattern and texture with ease. Begin with durable, weather-resistant rugs in timeless neutrals—opt for classic plaids or subtle stripes that anchor the space with understated charm. Complement these foundational pieces with an assortment of throw pillows featuring harmonious patterns such as ticking stripes, buffalo check, and delicate florals. By carefully selecting textiles within a cohesive palette of creams, soft grays, and gentle blues, you cultivate a sense of warmth and depth, ensuring the space feels inviting and authentically rustic without overwhelming the eye.
In regions where three-season porches are common, such as the Midwest and Northeast, it’s practical to adapt your textile choices seasonally. During warmer months, swap lightweight cottons for sturdier canvas or indoor-grade fabrics that can withstand humidity and sun exposure, while offering comfort and durability. As the cooler months approach, these textiles can be rotated out and stored, preserving their quality year after year. To maintain both function and farmhouse charm, incorporate a vintage trunk or a weathered storage bench within your porch ensemble. This multi-purpose addition provides a convenient spot to stow extra pillows and throws, while also reinforcing the cozy, collected aesthetic that defines a welcoming farmhouse porch.
25. Mobile Home Front Porch Privacy Solutions
Creating a sense of seclusion on a mobile home front porch can transform an ordinary outdoor area into a cozy retreat, even within the close quarters of manufactured home communities. Thoughtfully designed privacy solutions, such as lattice screens adorned with climbing plants, provide an elegant balance between openness and intimacy. These natural elements not only soften the visual boundaries but also allow sunlight and gentle breezes to flow freely, enhancing comfort without feeling confined. Alternatively, placing tall planters filled with ornamental grasses or slender evergreens serves as a living partition, offering both greenery and a subtle shield from neighboring views. For those seeking flexibility, outdoor curtains hung on tension rods present an adaptable option, enabling residents to adjust coverage as desired throughout the day or season.
These privacy enhancements are especially relevant in regions like Arizona, Florida, and Southern California, where year-round outdoor living is highly valued. Long-term and seasonal residents alike appreciate how these thoughtful additions create a welcoming haven that respects community proximity while fostering a personal sense of retreat. Budget-conscious homeowners can easily undertake a DIY lattice installation for under two hundred dollars, making it an accessible project with significant impact. On the other hand, more elaborate investments such as retractable screened porches or bespoke ornamental metalwork offer durable, high-end privacy solutions that can become signature features of the home’s exterior. Many residents report that these privacy screens profoundly enhance their enjoyment of outdoor spaces—turning simple morning rituals like coffee on the porch into cherished moments of calm and connection, free from the feeling of exposure. Ultimately, well-executed privacy designs elevate both the function and emotional appeal of mobile home porches, making them inviting extensions of the living space.
26. Budget-Conscious Seasonal Swap Systems
Creating a welcoming and stylish porch doesn’t have to mean a costly seasonal overhaul. By establishing a smart, budget-friendly system that focuses on swapping out key decorative accents, you can effortlessly refresh your outdoor space throughout the year. Begin with a foundation of durable, neutral-toned furniture and weather-resistant rugs that provide a versatile backdrop suitable for any season. This approach allows you to layer in seasonal touches—such as vibrant cushion covers, cozy throws, charming planters, and festive wreaths—that can be changed out easily to reflect the mood and colors of each time of year.
To keep the process both simple and efficient, organize your seasonal items into clearly labeled storage bins, creating a curated collection you can revisit and build upon annually. Many homeowners find great success by investing modestly—often between fifty and one hundred fifty dollars per season—into affordable accessories that breathe new life into their porch without breaking the bank. Taking advantage of clearance sales at the end of each season enables savvy decorators to stockpile pieces at significant discounts, ensuring fresh updates year after year. With this method, transitioning your porch décor can be a quick, enjoyable task, allowing you to embrace the changing seasons with style and ease while maintaining a timeless, inviting foundation.
27. Statement Pendant Light Fixture Cluster
Elevate your porch into a captivating sanctuary by installing a cluster of pendant lights suspended at varied heights above your dining or seating area. This layered arrangement not only creates a striking focal point but also transforms the porch into a thoughtfully curated destination, inviting guests to linger long after sunset. By selecting fixtures that harmonize through complementary finishes—such as mixing the warm glow of brass with the industrial edge of black iron and the rich tones of copper—you introduce both texture and depth. Alternatively, grouping pendants of different sizes from the same design family delivers visual rhythm and cohesion. This approach enhances the architectural features of your porch by drawing attention upward, accentuating ceiling height, and distributing light evenly, which is especially effective in expansive outdoor rooms where a single light would feel lost.
Beyond aesthetics, strategic pendant lighting is crucial for extending the porch’s usability into the evening hours. Proper illumination balances function with ambiance, making your outdoor space suitable for dining, entertaining, or quiet reflection. Since installing multiple pendants often involves new electrical wiring or modifications to existing junction boxes, it’s wise to plan for professional installation costs alongside the fixtures themselves. Investing in dimmer switches adds flexibility, allowing you to tailor lighting intensity from bright, task-focused beams for meals to a gentle, warm glow perfect for relaxing conversations. By thoughtfully layering light, your porch evolves from a daytime-only retreat into a versatile environment that rivals the comfort and style of any interior room.
Your porch holds extraordinary potential as a seamless extension of your living space—a place where indoor comfort meets outdoor charm. Whether you gravitate toward sleek modern minimalism, rustic farmhouse warmth, or eclectic bohemian flair, lighting is one of the most transformative design elements you can introduce. Begin by selecting a pendant cluster that resonates with your personal aesthetic and functional needs, then allow your vision to grow organically from there. This simple yet impactful upgrade not only enhances the atmosphere but also redefines how you experience your home’s outdoor areas. Share your porch lighting projects and insights with your community—your journey might just inspire someone else to embark on their own porch makeover adventure.
28. Multi-Level Plant Display with Stands
Transform your porch into an inviting sanctuary by embracing a multi-level plant display that maximizes vertical space while adding layers of lush greenery. By integrating tiered plant stands, wall-mounted shelving, and elegantly suspended hanging baskets, you can cultivate a vibrant, greenhouse-inspired atmosphere reminiscent of a bohemian sunroom. This vertical strategy is especially valuable for limited porch areas, allowing you to showcase a diverse array of plants without encroaching on precious floor space. Combine cascading vines such as pothos and philodendrons with striking upright specimens like snake plants and palms, and introduce bursts of color through flowering favorites like geraniums or begonias. The resulting tapestry of textures and hues transforms your porch into a captivating retreat that invites relaxation and admiration.
To enhance visual depth and maintain harmony, thoughtfully vary your plant containers by mixing terracotta pots, glazed ceramics, and woven baskets, each lending a distinct tactile quality to the arrangement. Begin your green journey with a manageable collection of around 10 to 15 plants, allowing you to develop a sustainable care routine without feeling overwhelmed. Group plants with similar light and watering needs on shared stands to streamline maintenance, making daily care more intuitive. A screened porch provides an ideal microclimate—offering filtered sunlight, protection from harsh weather, and optimal airflow—which supports the thriving growth of plants that may struggle in conventional indoor or outdoor settings. To safeguard your greenery, consider investing in an affordable moisture meter; this simple tool helps prevent overwatering, a common and often overlooked cause of plant decline. With thoughtful planning and attentive care, your porch can evolve into a verdant haven that elevates your home’s charm and tranquility.
29. Layered Textiles for Cozy Front Porches
Crafting an inviting front porch is all about thoughtfully layering durable, weather-resistant textiles that create an atmosphere of warmth and relaxation. Begin by anchoring your seating area with a vibrant outdoor rug that defines the space while adding a splash of color or texture. Complement this foundation with plush cushions in coordinating patterns and colors, ensuring each piece is designed to endure the elements without sacrificing comfort. Soft throw blankets casually draped over rocking chairs or benches not only enhance the cozy feel but also encourage lingering conversations and quiet moments alike. This method proves especially effective for compact porches, where every textile plays a vital role in turning limited square footage into a welcoming sanctuary.
In regions with fluctuating climates, such as the humid South, adaptability is key to maintaining this layered look year-round. During warmer months, lighter, breathable fabrics replace heavier materials to keep the porch feeling fresh and airy, while still offering that tactile comfort. Selecting textiles with high UV resistance ensures colors remain vibrant despite prolonged sun exposure, preserving the porch’s inviting charm. Many homeowners find success with a seasonal rotation system—storing thicker blankets when summer arrives and reintroducing them as temperatures cool—so the porch effortlessly transitions from one season to the next. This thoughtful attention to textile selection and placement transforms your front porch into a stylish, cozy retreat that welcomes friends, family, and neighbors every day of the year.
30. Fall Harvest Celebration Porches
Embrace the rich warmth of autumn by designing a fall porch that honors the season’s bountiful harvest with thoughtfully curated natural elements and inviting hues. Begin by creating layered seating or display areas using rustic hay or straw bales, which bring an authentic agrarian charm to your outdoor space. Adorn these foundations with a mix of heirloom pumpkins and squash in varying shapes and sizes, artfully stacked to create visual interest. Complement this arrangement with pots brimming with dried corn stalks, wheat sheaves, and robust chrysanthemums in deep rust, golden yellow, and burgundy shades. This organic, textured approach not only celebrates the agricultural roots of the season but also crafts a warm and welcoming vignette that’s perfect for cozy gatherings or capturing seasonal photos.
Timing is key to maximizing the vibrancy and longevity of your harvest-themed porch. Plan your display for early October, once nighttime temperatures consistently dip below 60 degrees, which helps preserve the freshness of pumpkins and gourds throughout the fall months. This window allows your arrangement to shine from late September through Thanksgiving, offering an extended period to enjoy and showcase your handiwork. Sourcing materials from local garden centers or autumn festivals can be both budget-friendly and convenient, often allowing families to assemble a stunning seasonal tableau for under a hundred dollars. By thoughtfully combining textures, colors, and seasonal elements, your porch will become a heartfelt celebration of fall’s natural beauty and a charming entryway that welcomes all who visit.
31. Enclosed Porch Home Office Conversions
Reimagining an enclosed porch as a dedicated home office offers a brilliant way to carve out a peaceful, productive workspace that remains distinct from your primary living areas. This setup allows you to bask in abundant natural light, creating an inviting environment that can boost creativity and focus. To ensure comfort throughout the year, it’s essential to properly winterize the space—adding insulation, weatherstripping, and even upgraded windows to maintain a consistent temperature. Equipping the room with a thoughtfully chosen ergonomic desk and chair supports healthy posture during long work hours, while installing a reliable power source guarantees all your devices stay charged and ready.
Beyond comfort and functionality, the adaptable nature of an enclosed porch enhances the overall experience. Many designs feature removable window panels or screens, allowing you to easily adjust airflow and sunlight exposure to suit the season. This flexibility offers the refreshing sensation of working outdoors without the typical distractions found inside the home. As remote work continues to shape how we live, transforming an underused porch into a focused office retreat has become increasingly popular, particularly in suburban settings. Homeowners often find their productivity soars in this quieter, more private space, free from the usual household interruptions. For climates with more extreme temperatures, integrating an HVAC extension or portable climate control system is a smart investment, ensuring the space remains comfortable year-round and conducive to sustained concentration.
The benefits of converting an enclosed porch into a home office extend well beyond aesthetics and comfort; the tangible impact on work performance can be remarkable. One professional noted a significant uptick in billable hours after making this transition, highlighting how a well-designed, dedicated workspace can justify the initial renovation costs many times over. Whether you’re seeking to enhance your daily workflow or create a serene nook that inspires creativity, this transformation offers a stylish, practical solution that elevates both your home and your work life.
32. Farmhouse Sliding Barn Door Entry
Incorporating a sliding barn door as the transition between your porch and interior living space offers a captivating blend of rustic charm and practical innovation. These doors are not only visually appealing with their robust, handcrafted appeal but also serve as excellent space savers, especially in areas where a traditional swinging door might impede traffic flow or crowd the entryway. Whether your aesthetic leans toward a weathered vintage door reclaimed and revamped for a modern farmhouse vibe, a freshly painted white door adorned with a classic X-brace, or a sleek natural wood finish that highlights grain and texture, there is a style to perfectly complement your home’s interior design. The addition of matte black hardware creates a striking contrast against warm wood tones, lending a timeless, sophisticated edge to the overall look.
From a practical standpoint, sliding barn doors are surprisingly accessible for homeowners interested in a hands-on project. Many kits available today include pre-drilled doors, accompanying hardware, and mounting tracks, making installation straightforward with just basic tools like a drill and level. These systems generally fall within an affordable price range, often between $100 and $300, offering a cost-effective way to elevate your porch entry without professional installation fees. To ensure smooth operation and protect your walls, it’s essential to install floor guides that keep the door securely on track and prevent unwanted swinging. The end result is a beautifully functional focal point that enhances daily living by providing effortless access and a warm, welcoming transition from outdoor charm to indoor comfort.
33. Tiny Front Porch Container Gardens
Maximizing the charm of a compact front porch requires a thoughtful approach to container gardening that embraces verticality and layered dimensions. By combining tall planters with low-profile, wall-mounted shelves and strategically placed hanging baskets, you can create a lush, dynamic display that draws the eye upward and outward, making the most of every inch. Selecting plants that offer multi-season appeal—such as evergreens paired with flowering perennials or aromatic herbs—ensures your porch remains inviting and vibrant throughout the year. This design strategy transforms even the smallest urban entryway into a welcoming, memorable focal point that sets the tone for your home.
For those living in tight city spaces like apartments or condos, it’s essential to prioritize practicality alongside beauty. Opt for containers equipped with self-watering features to combat the rapid drying that small soil volumes often experience, reducing maintenance while supporting healthy growth. Choosing specialty herb varieties or compact plants that won’t quickly outgrow their confines helps maintain a neat, balanced look without overcrowding. This approach has proven popular among urban dwellers in cities like Boston, San Francisco, and Chicago, where residents have crafted impressive green sanctuaries on porches measuring less than 20 square feet—demonstrating that even the smallest outdoor spaces can become stunning garden entrances that rival those of sprawling suburban homes.
34. Vertical Garden Privacy Screen
Transform your screened porch into a verdant sanctuary by integrating a vertical garden along one side, seamlessly blending privacy with natural beauty. By incorporating wall-mounted planters, pocket gardens, or a thoughtfully designed trellis draped with climbing vines, you can craft a living screen that feels effortlessly organic rather than artificially imposed. This creative use of vertical space is especially advantageous for porches facing neighboring homes or bustling streets, as it establishes a serene buffer that softens the view while preserving the open-air ambiance. Selecting resilient, low-maintenance plants such as ferns, ivy, philodendrons, or succulents tailored to your porch’s light exposure ensures your green wall remains vibrant and inviting with minimal upkeep.
For homeowners who desire privacy without the heaviness of traditional barriers, vertical gardens offer an elegant solution that balances function and aesthetic appeal. Prefabricated living wall kits are readily available and vary in price depending on size and complexity, while a DIY approach using affordable wall-mounted planters from local hardware stores can be just as effective and budget-friendly. Regular care typically involves watering twice a week and occasional trimming to maintain lushness and airflow. Positioning your vertical garden strategically to obscure specific sightlines, yet still allow breezes to pass through, creates a sense of seclusion that feels intimate rather than confined—turning your porch into a tranquil retreat that invites relaxation and connection with nature.
35. Rustic Wood Slice Wall Art Display
Transform your porch wall into a captivating natural gallery by arranging an array of wood slices in varying sizes, creating an organic and textured focal point. This approach embraces a warm, rustic charm that seamlessly invites the outdoors inside, evoking the cozy spirit of a woodland retreat. Begin by sourcing wood rounds from local craft shops, lumberyards, or even harvesting fallen branches if you have access to woodworking tools. Select pieces ranging from small 4-inch discs to more substantial 18-inch rounds, allowing the natural rings and grain patterns to form a rhythmic, visually engaging composition that breathes life and depth into an otherwise flat surface.
Before installation, take the time to sand each slice carefully, smoothing rough edges to prevent splinters and ensure a refined finish. Applying a clear polyurethane sealant is essential—not only to protect the wood from moisture and pests but also to enhance the richness of the natural tones. Attach the slices securely using finishing nails or a durable adhesive, arranging them in a loosely clustered design reminiscent of log cabin aesthetics. To elevate this rustic display further, consider integrating subtle LED lighting directed from above or below; the interplay of light and shadow will accentuate the wood’s texture, adding dynamic dimension to your porch. This project offers an accessible, budget-friendly way to introduce handcrafted artistry and organic beauty, perfectly complementing homes inspired by New England or Pacific Northwest landscapes.
36. Farmhouse Front Porch Swing Stations
A farmhouse-inspired front porch becomes an inviting haven when anchored by a spacious, sturdy swing that naturally draws the eye and invites relaxation. Crafted from weathered wood or reclaimed timber, the swing hangs gracefully from robust chains or thick rope, comfortably seating two or three people. This centerpiece transforms the entrance into a lively gathering spot where family and friends can unwind together. Complementing the swing with rustic side tables made of distressed wood adds both charm and functionality, while galvanized metal planters brimming with vibrant seasonal flowers introduce color and texture. Softly glowing vintage lanterns complete the scene, casting a warm, nostalgic ambiance that perfectly captures the timeless farmhouse spirit beloved in both countryside and suburban settings.
To ensure safety and longevity, this design thrives on porches with ceilings at least eight feet high and sturdy overhead beams capable of supporting weights upwards of 500 pounds. This structural consideration is crucial, especially for those looking to create a cozy nook that can withstand years of use. Homeowners in states like Texas and Tennessee often orient their swings to catch the prevailing breeze, enhancing comfort during warm evenings. The gentle sway of the swing not only soothes but also fosters moments of connection—parents can keep an eye on playing children, neighbors can easily stop for a friendly chat, and the porch transforms into a stage for cherished daily rituals. This thoughtfully curated setup embodies the essence of the American suburban lifestyle, inviting cherished memories and a sense of belonging.
37. Black Accent Walls for Modern Drama
Incorporating a matte black accent wall into your screened porch design introduces a striking element that effortlessly elevates the space with modern sophistication. When applied thoughtfully, this deep, dramatic hue serves as a captivating backdrop that beautifully highlights your furnishings and greenery. Positioning the black wall behind a seating arrangement or on the first wall guests encounter creates a sense of intimacy and depth, enriching the porch’s ambiance. The rich contrast between the black surface and natural materials—such as warm wood finishes, white wicker furniture, or vibrant throw pillows—adds visual interest and a layered texture that feels both stylish and inviting.
To maintain a welcoming atmosphere, it’s essential to balance the intensity of the black wall with ample natural light and carefully curated lighting choices. Porches that face south or east benefit most from this approach, as the sunlight softens the darkness, allowing the wall to absorb and reflect light in ways that enhance the room’s warmth without overwhelming it. Adding a variety of lush plants and warm-toned, well-placed lighting fixtures further softens the space, transforming the bold wall into a cozy, enveloping feature rather than a heavy or cavernous one. Before committing to paint, experiment by temporarily placing dark panels against the wall at different times of day to observe how light interacts with the space, ensuring the final design achieves the perfect balance of drama and comfort.
38. Boho Macramé and Woven Textures
Infuse your porch with the effortless charm of bohemian style by layering an array of macramé accents and natural woven textures. Imagine a collection of intricately knotted plant hangers suspended at varied heights, each cradling lush greenery like cascading pothos or delicate string of pearls, which bring life and movement to your outdoor sanctuary. Complement these with a statement macramé wall hanging positioned behind your seating area, featuring subtle wooden beads or driftwood details that add depth and an artisanal touch. Alongside these, incorporate rattan furniture and woven baskets crafted from natural fibers to enhance the tactile richness that defines boho design, creating an inviting space that feels both curated and carefree.
This style thrives on the beauty of handmade craftsmanship and organic materials, making it perfect for those who appreciate a relaxed, worldly vibe without the need for permanent alterations. Its adaptable nature suits renters and homeowners alike, offering decor pieces that can easily move as your lifestyle evolves. For those who enjoy a hands-on approach, DIY macramé kits provide an engaging way to tailor your pieces to fit your space, while countless artisans on platforms like Etsy offer stunning handcrafted options that bring global flair right to your porch. The secret to achieving this look is abundance—surround yourself with multiple macramé creations to cultivate a layered, intentional bohemian retreat that invites you to unwind and savor the moment.
39. Simple Fall Front Porch Vignettes
Celebrate the beauty of autumn on your front porch by creating thoughtfully composed vignettes that honor the season with understated elegance. Begin by arranging a harmonious mix of pumpkins and gourds in warm, earthy hues, thoughtfully varying their heights and shapes to add dimension without clutter. Enhance this natural display with rustic touches such as bundles of corn stalks tied with burlap ribbon, lending texture and a cozy farmhouse charm. To complete the look, select a wreath crafted from preserved leaves and berries, which brings a touch of seasonal color to your entryway while maintaining a refined and timeless aesthetic. This approach embraces the spirit of fall in a way that feels inviting and sophisticated, perfect for homeowners who prefer subtle seasonal transitions over flashy, holiday-specific decorations.
Timing is key to achieving a fresh and vibrant fall porch that endures throughout the season. Begin sourcing your pumpkins, gourds, and mums in early September to secure the best variety and quality, but hold off on decorating until late September or early October to keep your display looking crisp and lively through Thanksgiving. Avoid the common pitfall of going too large or too soon—oversized pumpkins can deteriorate rapidly in warmer climates, which can detract from your overall presentation. Instead, start with smaller, hardier elements such as miniature gourds and resilient mums, and gradually introduce larger pumpkins and additional natural accents as the temperatures cool. This thoughtful, phased decorating strategy ensures your porch remains a welcoming, well-curated space that gracefully evolves with the season.
40. Pink and Brass Feminine Retreat
Transform your screened porch into a refined feminine haven by embracing a palette of gentle pink hues harmonized with the lustrous warmth of brass accents. Begin with plush cushions in shades of blush or muted rose, thoughtfully arranged on white or natural wicker seating to establish a fresh, inviting foundation. Integrate brass planters and gold-rimmed mirrors to introduce subtle metallic shimmer that dances with the natural light, elevating the space with understated glamour. To keep the atmosphere sophisticated and balanced, incorporate generous touches of white, cream, and light wood elements, ensuring the pink tones remain elegant rather than overly sweet or predictable.
To deepen the romantic ambiance, bring in fresh or high-quality faux blooms such as peonies, roses, or hydrangeas in soft whites and complementary pinks, creating lush focal points that enhance the overall aesthetic. The interplay of brass details not only captures sunlight beautifully but also adds warmth and depth, preventing the décor from feeling flat. This design approach is particularly effective in cabin porches or vacation retreats where a break from rustic wood-heavy interiors is desired, offering a chic yet inviting alternative that feels both intentional and personal.
For an authentic, lived-in charm, seek out vintage brass accessories from thrift shops or estate sales, as their natural patina lends character and richness that new pieces often lack. Experiment with a range of pink shades—from delicate blush to richer mauve—to add dimension and avoid monotony within the color scheme. The result is a captivating, Instagram-worthy sanctuary where elegance meets comfort, making every moment spent on your porch a serene and stylish retreat.
41. Christmas Front Porch Wonderlands
Transforming your front porch into a captivating holiday retreat sets the tone for festive celebrations and welcomes guests with undeniable charm. Begin by draping lush evergreen garlands along railings and wrapping sturdy columns, their rich greenery creating a timeless foundation. Accentuate these natural textures with bold red bows that catch the eye, and place glowing wreaths adorned with twinkling lights on doors and windows to invite warmth and cheer. For porches with overhead coverage, string delicate icicle lights from the ceiling to add a sparkling vertical dimension, while carefully positioned battery-operated lanterns with flickering flameless candles cast a cozy, inviting glow that enhances the evening ambiance without the worry of open flames.
Seasonal porch décor thrives when thoughtfully curated, blending festive spirit with refined elegance. Many homeowners invest between one hundred and five hundred dollars annually to refresh their displays with fresh greenery and carefully selected accents that elevate the overall design. To achieve a polished and harmonious look, experts advise choosing a unified color scheme that resonates throughout every element of your porch—whether embracing classic red and green, sleek white and silver, or a more rustic palette inspired by natural wood and pinecones. This intentional consistency not only creates a visually stunning presentation that photographs beautifully but also ensures your holiday display stands out gracefully among neighboring homes, striking the perfect balance between joyful celebration and tasteful restraint.
42. Entrance Interior Transition Zones
The space where your porch seamlessly transitions into your home’s interior often goes unnoticed, yet it holds immense potential to combine practicality with inviting design. By thoughtfully outfitting this entry zone, you create a welcoming buffer that not only enhances the aesthetic flow but also serves as a functional staging area. Consider integrating wall-mounted hooks for hanging coats and bags, paired with a slim bench or a dedicated boot tray to facilitate shoe removal without clutter. Complementing these with a compact console or shelf for keys, mail, and everyday essentials ensures everything stays within easy reach, promoting an organized and clutter-free environment right from the moment you step inside.
This transitional area, often evolving into a modest mudroom, plays a vital role in maintaining cleanliness, particularly in homes where the front door opens directly into living spaces without a formal foyer. It efficiently contains mud, snow, and dirt, preventing unwanted messes from spreading further into your home. Homeowners in colder climates find such setups especially valuable during winter, as they provide a practical spot to shed heavy outerwear and wet footwear. Remarkably, this functional solution requires very little space—just a narrow section of wall, around four feet wide, can accommodate these essential features. Opting for furniture pieces with a shallow depth, ideally no more than twelve inches, ensures the pathway remains open and inviting while maximizing utility in a compact footprint.
43. Multi-Season Flexible Furniture Arrangements
Creating a versatile and inviting three-season porch begins with selecting modular, lightweight furniture that adapts effortlessly to your evolving needs and seasonal changes. Furniture designed to be stackable and nestable allows you to transform your space quickly, whether you’re hosting a lively summer gathering or enjoying a cozy autumn evening. Incorporating practical elements such as rolling beverage carts, foldable chairs, and multifunctional ottomans not only maximizes seating options but also adds convenience and flexibility, making your porch both functional and welcoming throughout the year.
This approach to porch design encourages more frequent use and a deeper appreciation of the space, as it can be tailored to suit a variety of activities and group sizes. Imagine a family in Minnesota who reconfigures their screened porch to accommodate large celebrations by arranging seating along the perimeter, then easily shifts to intimate clusters for quiet conversations during the off-season. This flexibility enhances the overall enjoyment and utility of the porch without requiring a significant investment. By focusing on a cohesive color palette and complementary styles, homeowners ensure that no matter how the furniture is arranged, the porch maintains a polished and intentional look, elevating the outdoor living experience while staying budget-conscious.
44. Back Porch Outdoor Kitchen Zones
Elevate your back porch by creating a thoughtfully designed outdoor kitchen that seamlessly blends functionality with comfort. Begin by establishing clear zones dedicated to food preparation, cooking, and serving, ensuring a smooth flow from start to finish. Installing a durable, weather-resistant countertop equipped with a compact sink provides essential water access, while a high-quality grill or cooktop serves as the centerpiece for culinary creativity. To maximize space, especially on smaller porches, consider clever solutions such as wall-mounted shelves for utensils and foldable work surfaces that can be tucked away when not in use. This setup not only keeps the heat out of your indoor kitchen during warm months but also fosters a welcoming environment where the cook remains engaged with guests, turning meal preparation into a shared, enjoyable experience.
In regions with hot climates, outdoor kitchens have transitioned from indulgent luxuries to smart, practical investments that help maintain a cooler home environment during the summer peak. Budget options might start with a portable grill and a simple prep table, while more elaborate designs incorporate built-in cabinetry, plumbing, and electrical hookups, reflecting a long-term commitment to outdoor living. Many homeowners find it advantageous to begin modestly and expand their outdoor kitchen over time, tailoring it to their evolving needs and lifestyle. One crucial element often overlooked is lighting; strategically placed task lighting above food prep areas combined with soft ambient lighting around the dining space ensures the kitchen remains both functional and inviting well into the evening hours, when outdoor cooking truly shines.
45. Christmas Porch Light Displays
Transforming your porch into a captivating holiday haven begins with thoughtful, layered lighting that welcomes guests and neighbors alike into a warm festive embrace. Begin by draping the roofline with elegant white icicle lights, creating a shimmering cascade that evokes the magic of winter. To add depth and vibrancy, wrap the porch columns in rich, colorful LED strands, which infuse the space with joyful hues and highlight architectural details. Illuminate pathways with glowing yard stakes, guiding visitors safely while enhancing the overall ambiance. For a dynamic finishing touch, install a timer-controlled spotlight on the roof to cast a gentle glow, allowing your display to shine brilliantly throughout the evening without any extra effort.
Choosing the right lighting technology is as important as the design itself. Opt exclusively for LED lights, which are not only energy-efficient—using up to 90% less power than traditional bulbs—but also remarkably durable, promising brilliant illumination for many holiday seasons to come. Incorporating timers ensures your lights operate on a schedule that suits your lifestyle, conserving energy while maintaining that festive sparkle. In communities where holiday light displays have become a cherished tradition, coordinated efforts can even spark friendly competitions, encouraging neighbors to create dazzling, prize-worthy exteriors. Investing in high-quality light strands pays dividends in reliability and brilliance, ensuring your home remains a standout celebration of the season year after year.
46. Enclosed Three-Season Room Conversions
Transforming an open porch into an enclosed three-season room offers a wonderful way to expand your living space, providing a cozy retreat from early spring through late autumn. By incorporating floor-to-ceiling windows or large retractable screens, you gain the flexibility to invite fresh air in while keeping pesky insects outside. This design approach is especially advantageous in regions with brief but pleasant summers, such as the Midwest and Northeast, allowing homeowners to fully savor the changing seasons without sacrificing comfort. Depending on the complexity of the enclosure and structural adjustments needed, the project can range from a moderate upgrade to a more substantial investment.
For those mindful of budget, approaching this conversion in stages can be a practical strategy. Many start by installing high-quality screens to enjoy the immediate benefits, then gradually add insulated panels or glass to enhance weather protection as finances allow. One essential consideration often overlooked is ventilation—without adequate airflow, enclosed porches can quickly become stifling as temperatures rise. Incorporating operable windows on multiple walls promotes effective cross-ventilation, while a well-placed ceiling fan helps circulate air, extending the room’s usability during warmer days without the need for costly HVAC modifications. This thoughtful balance of design and functionality ensures that your three-season room becomes a cherished space for relaxation and entertaining throughout much of the year.
47. Budget-Friendly Backyard Porch Retreats
Transforming a small backyard porch into a cozy and inviting retreat is entirely achievable without a hefty budget, as long as you focus on thoughtful, practical choices. Begin by anchoring the space with a durable outdoor rug that not only defines the seating area but also adds warmth and texture underfoot. Opt for resin wicker furniture equipped with weather-resistant cushions—these pieces strike a perfect balance between style, comfort, and affordability, with the added bonus of easy maintenance. To brighten the ambiance after dusk, incorporate solar-powered lighting options, which are cost-effective, energy-efficient, and simple to install, eliminating the need for complicated wiring.
Successful porch makeovers often evolve over time rather than through a single overhaul, allowing you to spread out expenses and gradually enhance the space. Start by securing comfortable seating and ambient lighting, then introduce greenery and decorative accents as your budget permits, creating layers of personality and charm. Many homeowners find creative ways to repurpose indoor furniture that may no longer fit their interior aesthetic but remains perfectly functional for an outdoor covered porch. Scouting discount outlets and end-of-season sales can yield high-quality patio furnishings at a fraction of the original price, proving that comfort and style need not come with a premium tag. This patient, resourceful approach ensures your backyard porch becomes a welcoming haven for relaxing evenings and intimate gatherings alike.
48. Cozy Reading Nook with Oversized Chair
Transform a quiet corner of your porch into an inviting retreat by incorporating a generously sized chair—whether it’s a plush club chair, a cozy egg chair, or a classic papasan with its enveloping curves. Position this seating arrangement where two screened walls converge to capture gentle cross breezes and offer layered views of your garden or yard, creating a serene atmosphere perfect for uninterrupted reading or peaceful reflection. Accompany the chair with a petite side table to hold your favorite cup of tea or morning coffee, and include a thoughtfully placed reading lamp to extend the nook’s usability into the evening hours. To enhance comfort and functionality, place a compact bookshelf or magazine rack nearby, and drape a soft, weather-resistant throw over the chair for those cooler days.
This carefully crafted sanctuary becomes more than just a seating area; it transforms your porch into a personal haven that invites daily use and meaningful relaxation. Homeowners who invest in a dedicated reading corner often find themselves drawn outside more frequently, as having a definitive “spot” imbues the space with a sense of warmth and intention. When shopping for your oversized chair, consider timing your purchase around end-of-season sales, where deep discounts on quality outdoor furniture can be found. Despite their retro charm, papasan chairs have experienced a resurgence, prized for their cocoon-like comfort that encourages long, leisurely lounging sessions. To ground the nook and add an extra layer of softness, layer a durable outdoor rug beneath the chair—this subtle touch not only defines the space visually but also provides a welcoming cushion for bare feet, completing your cozy porch escape.
Your porch is more than just an entryway — it’s the first impression of your home and a reflection of your personal style. Whether you choose to embrace the warmth of farmhouse charm, the clean lines of modern minimalism, or the festive joy of seasonal displays, the most important thing is that your porch feels like you. Start with one idea that excites you, build from there, and enjoy the process of transforming your outdoor space into a place you’ll love coming home to every single day.
There’s something undeniably captivating about the color red—a hue that effortlessly commands attention while evoking warmth, passion, and energy. When thoughtfully integrated into kitchen design, bold red accents can transform an ordinary space into an extraordinary culinary sanctuary. Whether through cabinetry, backsplashes, or statement accessories, red injects a dynamic vibrancy that enlivens the heart of the home without overwhelming it. For homeowners seeking to elevate their kitchen with a touch of daring sophistication, this color offers a perfect balance of boldness and timeless elegance.
In this collection of 15 stunning kitchens, you’ll discover how to artfully incorporate red accents in ways that feel both inspired and approachable. From sleek, modern environments where red provides an unexpected pop, to classic and rustic settings where it adds a rich, inviting glow, these designs reveal the versatility and depth of this passionate color. Each kitchen showcases thoughtful use of red—whether as a focal point or a complementary element—demonstrating how to create spaces that are not only visually striking but also warm and welcoming.
Join us as we explore these beautifully curated kitchens that celebrate red in all its vibrant glory. Whether you’re dreaming of a complete kitchen overhaul or simply looking for subtle ways to infuse your space with personality, these inspiring examples will guide you toward bold, beautiful design choices that speak to your style and elevate daily living.
1. Red Tile Patterns and Designs
Embrace the captivating allure of red tile accents that bring warmth and sophistication to your kitchen. The true elegance lies in the thoughtful interplay of varied textures, patterns, and finishes, creating a harmonious space that feels both dynamic and refined. Rather than overwhelming, these rich crimson hues are carefully curated to elevate and complement the surrounding elements, resulting in a kitchen that is bold yet gracefully balanced.
Key Design Elements
Lustrous cherry-red subway tiles arranged in an intricate herringbone pattern forming the backsplash
Pristine white quartz countertops delicately veined with subtle hints of red
Sleek matte black pendant lighting suspended above the kitchen island
Brushed stainless steel appliances offering a modern, polished touch
Timeless white shaker cabinetry providing a crisp, clean foundation
Rich dark wood floating shelves adding depth and natural warmth
Striking red mosaic penny tiles serving as a captivating focal point behind the range
Light oak flooring infused with natural sunlight to enhance the airy ambiance
Pro Tip: Limit red tile installations to two or three key areas to maintain visual harmony. Balance these vibrant accents with neutral surfaces and finishes, ensuring the space feels cohesive and inviting while allowing each design element to breathe.
2. Red Kitchen Countertop Decor
Elevate your kitchen’s allure by embracing the bold elegance of red countertops, transforming your culinary space into a radiant centerpiece of style and warmth. Allow the vibrant surfaces to captivate with carefully curated accents that balance vibrancy and refinement. Each element is thoughtfully chosen to complement the glossy red finish, creating an inviting atmosphere where sophistication meets everyday functionality.
Key Design Elements
Elegant white ceramic canisters in varied heights for visual rhythm
Sleek stainless steel fruit bowl with a polished mirror finish
Crystal-clear glass jars showcasing an array of colorful spices
Contemporary matte black knife block offering streamlined utility
Delicate potted herbs nestled in warm copper vessels
Natural bamboo cutting boards artfully leaned against the backsplash
Minimalist chrome paper towel holder with a modern sheen
Refined glass cake stand accented with metallic detailing
Pro Tip: Maintain an uncluttered and purposeful countertop by limiting decorative groupings to no more than three items per area. Prioritize clear workspace to enhance both the aesthetic flow and practical functionality of your kitchen, ensuring your striking red surfaces remain the focal point.
3. Red Glass Cabinet Doors
Infuse your kitchen with a captivating allure through the addition of radiant red glass cabinet doors that exude both sophistication and warmth. These luminous crimson panels catch and refract light beautifully, casting a mesmerizing glow that evolves with the day’s natural light. Beyond mere storage, they transform your cabinetry into a dynamic canvas, elegantly showcasing your treasured dishware with an artistic flair.
Key Design Elements
Polished chrome hardware that enhances the rich red glass with refined contrast
Discreet under-cabinet LED lighting that accentuates the glass’s vibrant translucence
Pristine white quartz countertops offering a sleek, luminous foundation
Contemporary stainless steel appliances that subtly mirror the red hues
Soft gray walls providing a serene backdrop to balance the vivid cabinetry
Minimalist clear glass pendant fixtures preserving an open and airy ambiance
Classic white subway tile backsplash delivering timeless texture and depth
Pro Tip: Strategically incorporate red glass cabinet doors in select areas, such as adjacent to the sink or as accent panels on upper cabinets. This approach ensures the bold color serves as a striking focal point without overpowering the overall design, maintaining a harmonious balance within the space.
4. Red Window Treatments and Valances
Elevate your kitchen’s ambiance with striking red window treatments that effortlessly blend warmth and sophistication. These rich cherry-hued Roman shades not only make a bold visual impact but also offer exquisite control over natural light, casting a radiant glow that transforms your space into a sanctuary for morning rituals. The interplay of sunlight through these vibrant fabrics creates an inviting, cozy atmosphere that feels both timeless and refreshingly modern.
Key Design Elements
Luxurious deep crimson café curtains accented with crisp white edging
Elegant red and white striped valances adorning the area above the sink
Natural woven bamboo blinds enhanced with refined red tape detailing
Gracefully pleated red fabric shades that neatly fold for a tailored look
Delicate red-patterned curtain tiers adding subtle texture and charm
Classic red gingham check panels infusing a touch of nostalgic elegance
Pro Tip: To maintain balance when incorporating red window treatments, opt for neutral wall tones such as soft whites, creams, or light grays that allow the vibrant hues to stand out without overpowering. Introduce no more than two to three complementary red accents throughout the kitchen to create a cohesive and sophisticated color story.
5. Red Storage Solutions and Shelving
Infuse your kitchen with a captivating allure through the strategic use of vibrant red storage solutions. These rich, ruby-hued accents elevate everyday organization into an art form, seamlessly blending functionality with striking sophistication. Let the passionate warmth of red breathe life into your culinary space, transforming it into a haven where practicality meets refined style.
Key Design Elements
Sleek, glossy crimson floating shelves elegantly showcasing pristine white ceramics
Ruby-glass canisters that add a jewel-like glow to your pantry essentials
Deep red metal spice racks thoughtfully mounted for both accessibility and flair
Rich scarlet cabinet handles and drawer pulls that offer a subtle yet impactful contrast
Vibrant wire baskets in a fiery red tone, perfect for fresh produce display
Custom red-trimmed pegboard system designed to keep utensils organized and within reach
Red-accented storage ottomans providing stylish extra seating with hidden practicality
A statement fire-engine red door marking the pantry with bold sophistication
Pro Tip: To maintain a harmonious and inviting kitchen atmosphere, limit bold red storage accents to approximately 30% of your design palette. Complement these vibrant elements with neutral tones throughout the space, ensuring the red features serve as deliberate focal points rather than overwhelming the overall aesthetic.
6. Statement Red Kitchen Appliances
Introduce a captivating splash of sophistication with striking red kitchen appliances that effortlessly elevate your culinary space. Whether it’s a lustrous cherry-hued mixer gracing your countertop or a sleek ruby refrigerator anchoring the room, these vibrant accents infuse warmth and character. Set against understated, neutral tones, these passionate red elements create a harmonious balance of elegance and vivacity, transforming your kitchen into a refined yet inviting haven.
Key Design Elements
A cherry-red KitchenAid mixer serving as the centerpiece of your counter
A commanding fire-engine red Smeg refrigerator that captivates at first glance
A ruby-toned toaster and kettle ensemble adding subtle luxury
A scarlet microwave seamlessly integrated into a bespoke recess
A wine-red coffee maker delivering a vibrant morning flourish
A deep red food processor artfully showcased on open shelving
Pro Tip: Limit red appliances to no more than two or three key pieces to maintain visual harmony. Strategically position these accents throughout the kitchen to create a cohesive yet dynamic aesthetic without overpowering the space.
7. Bold Red Kitchen Backsplash Ideas
Step into a kitchen where vibrant sophistication meets timeless elegance—a bold red backsplash commands attention, infusing the space with warmth and undeniable allure. This striking focal point elevates the culinary environment, creating a dynamic interplay between color and texture that captivates at first glance. By embracing rich crimson hues, the design transforms everyday cooking into an artful experience, balancing passion with refinement.
Key Design Elements
Lustrous cherry-red subway tiles creating a seamless wall-to-wall impact
Contemporary stainless steel appliances with a polished finish
Pristine white quartz countertops offering a sleek contrast
Matte black pendant lighting elegantly suspended above the kitchen island
Soft gray cabinetry adorned with sophisticated brass hardware
Warm natural wood open shelves for curated display
Bright white ceiling accented by subtle recessed lighting
Deep slate flooring grounding the space with rich texture
Pro Tip: To maintain harmony within a space anchored by a vibrant red backsplash, limit its visual dominance to roughly 20% of the overall palette. Surround this bold element with neutral tones and understated finishes to create a balanced composition that celebrates the color without overwhelming the senses.
8. Red Kitchen Cabinet Paint Ideas
Infuse your kitchen with a striking allure through the rich, passionate hues of red cabinetry. This dynamic choice radiates warmth and vitality, transforming your culinary space into an inspiring centerpiece of style and sophistication. By harmonizing bold color with refined accents, the kitchen becomes a captivating blend of energy and elegance, inviting creativity and conversation alike.
Key Design Elements
Pristine white quartz countertops offer a sleek, understated foundation
Polished stainless steel appliances enhance light and add a contemporary edge
Brushed nickel fixtures deliver a subtle, modern sheen
Delicate glass pendant lighting provides a warm, inviting ambiance
Soft gray walls serve as a calming counterbalance to vibrant cabinetry
Timeless white subway tile backsplash introduces classic refinement
Warm natural wood flooring anchors the design with organic texture
Sculptural black bar stools introduce bold contrast and visual interest
Transparent glass-front cabinet doors elegantly interrupt the red’s intensity
Pro Tip: To achieve a harmonious and sophisticated look with red cabinets, adhere to the 60-30-10 principle: allocate 60% of your palette to neutral hues, 30% to the red cabinetry as the focal point, and reserve 10% for metallic or deep-toned accents. This balance ensures vibrancy without overwhelming the senses.
9. Red Kitchen Rugs and Floor Mats
Elevate your kitchen’s ambiance with the timeless allure of red floor accents that blend warmth and sophistication. A carefully chosen rug or mat in rich crimson tones not only adds a vibrant focal point but also offers comfort and durability in your busiest culinary zones. Whether placed beneath your sink or extending gracefully between the stove and prep area, these elegant floor coverings invite both style and practicality into the heart of your home.
Key Design Elements
Runner featuring a refined geometric motif in deep red and soft cream hues
Ergonomic memory foam mat adorned with graceful burgundy swirl patterns
Vintage-inspired Persian rug showcasing intricate red highlights
Handcrafted round braided jute mat threaded with subtle red accents
Soft, washable cotton scatter rugs ideal for sink and food preparation zones
Pro Tip: To ensure your red floorpieces enhance rather than overpower your kitchen, select designs that thoughtfully integrate neutral tones, fostering harmony and depth. Opt for a singular statement rug to maintain visual clarity and avoid competing elements, thereby achieving a cohesive and intentional look.
10. Red Cabinet Hardware and Fixtures
Elevate your kitchen’s aesthetic with hardware that speaks volumes of elegance and charm. Imagine rich red accents—each knob and pull reminiscent of precious gemstones—infusing warmth and vibrancy into your cabinetry. These carefully curated details transform functional elements into captivating focal points, blending sophistication with a spirited splash of color. Allow your kitchen to shine with subtle yet striking ruby-inspired highlights that invite admiration at every glance.
Key Design Elements
Sleek, modern cabinet pulls in a refined cherry-red hue
Striking red pendant lighting artfully suspended above the island
Electrical outlet covers accented with elegant red trim
Deep burgundy curtain rods enhancing window treatments with rich color
Pro Tip: To maintain a harmonious and polished look, select red hardware within a consistent color spectrum while embracing subtle variations in tone. Combine different textures and finishes—such as matte and metallic—to add dimensionality, but ensure the reds complement each other by sticking to either warm or cool undertones throughout the space.
11. Red Kitchen Textiles and Accessories
Infuse your kitchen with a refined burst of vitality through luxurious red textiles that effortlessly elevate the ambiance. These thoughtfully curated accents introduce warmth and sophistication, creating an inviting contrast against sleek stainless steel and crisp white cabinetry. By blending rich crimson hues with subtle patterns and neutrals, you achieve a harmonious balance that enlivens the space without overpowering it.
Key Design Elements
Lush cherry-red dish towels elegantly draped from cabinet handles
Velvety crimson oven mitts artfully arranged on decorative hooks
Opulent ruby placemats delicately layered to enhance the dining setting
Sumptuous scarlet cushions adorning bar stools for a plush touch
Rich deep-red apron showcased as a tasteful wall accent
Sophisticated burgundy window valance crowning the sink area
Floor mats edged with refined red trim positioned near the prep station
Pro Tip: In compact kitchens, limit red textile accents to three or four carefully placed pieces to maintain visual harmony. Distribute these elements thoughtfully—perhaps one near the window, another by the sink, and a final touch within the dining area—to create a cohesive, balanced design without visual clutter.
12. Red Bar Stools and Seating Options
Infuse your kitchen with a bold yet refined touch by introducing red seating that commands attention with effortless elegance. These vibrant accents offer a sophisticated contrast to neutral palettes, transforming your island or breakfast bar into an inviting gathering place. Whether for leisurely mornings or intimate dinners, red seating creates a warm, dynamic focal point that elevates the entire space with a confident splash of color.
Key Design Elements
Luxurious cherry-red leather stools paired with sleek chrome bases
Vintage-inspired swivel seats in a rich candy apple hue
Contemporary acrylic stools featuring translucent red tones
Rustic farmhouse wood stools accented with plush red cushions
Matte burgundy industrial metal stools with a modern edge
Pro Tip: To maintain a harmonious balance, limit red seating to three or four pieces. This ensures the vibrant color acts as a strategic highlight rather than overpowering the room, allowing it to punctuate your kitchen’s design narrative with tasteful impact.
13. Red Pendant Lighting Over Kitchen Islands
Elevate your kitchen ambiance with a trio of vibrant red pendant lights gracefully suspended above your island, serving as captivating focal points that infuse the space with warmth and sophistication. These artful fixtures resemble exquisite jewels, casting a radiant glow that transforms everyday culinary tasks into an inviting experience. Paired with a serene palette and refined textures, the bold red accents create a harmonious balance between energy and elegance.
Key Design Elements
Three cherry-red glass pendants accented with sleek brushed nickel fittings
Pristine white quartz island featuring a sophisticated waterfall edge
Matte black hardware details lending a contemporary edge
Warm natural wood flooring grounding the space with organic texture
Crisp white ceiling enhanced by recessed lighting for ambient illumination
Pro Tip: To maintain the pendants as the centerpiece of your design, limit the use of red to select, understated accents such as a compact stand mixer or a tasteful tea kettle. This approach ensures the vibrant lighting remains the room’s defining feature without overwhelming the overall aesthetic.
14. Red Kitchen Artwork and Wall Decor
Infuse your kitchen with a sophisticated burst of crimson that effortlessly elevates the ambiance. Curated red artwork and wall decor serve as captivating focal points, harmoniously weaving warmth and energy into your culinary space. By thoughtfully blending diverse textures and artistic expressions, you create a visual narrative that is both dynamic and refined, transforming your kitchen walls into a gallery of inspiration.
Key Design Elements
A timeless vintage Coca-Cola poster that evokes nostalgic elegance
Contemporary abstract canvases featuring bold red strokes and fluid forms
A curated arrangement of red and white ceramic plates forming an artful gallery display
Striking food photography highlighting vivid red ingredients with gourmet appeal
Sleek metal wall clock accented with deep red numerals for a modern touch
Framed prints showcasing red-hued kitchen tools and appliances with artistic flair
Delicate botanical illustrations rendered in rich shades of red to soften the space
Pro Tip: Apply the 60-30-10 design principle strategically: reserve approximately 10% of your wall area for red accents to enhance visual interest without overpowering the room, ensuring a balanced and cohesive kitchen environment.
15. Red Accent Walls in Kitchen Spaces
Immerse yourself in the captivating allure of a rich red accent wall that transforms your kitchen into a vibrant epicenter of style and energy. This passionate hue infuses warmth and character, effortlessly elevating the surrounding whites and neutrals with striking contrast. The result is a sophisticated yet inviting space where culinary creativity flourishes against a bold, artful backdrop.
Key Design Elements
Glossy white upper cabinetry that beautifully amplifies natural light
Sleek stainless steel appliances subtly reflecting hints of crimson
Cream-hued granite countertops offering a refined, harmonious balance
Contemporary brushed nickel pendant lighting creating an elegant ambiance
Classic white subway tile backsplash adorning the complementary walls
Rich dark wood lower cabinets anchoring the design with depth
Polished chrome hardware and fixtures lending a modern edge
Warm light oak flooring enhancing the kitchen’s inviting atmosphere
Pro Tip: Limit the red accent wall to a singular, strategic focal area such as behind the range or sink to maximize visual impact. Counterbalance its intensity with ample white and neutral finishes throughout the rest of the kitchen to maintain a fresh, energizing environment without overpowering the senses.
Conclusion
Embracing bold red accents in your kitchen is more than a design choice—it’s an invitation to infuse your space with passion, energy, and personality. As these stunning kitchens demonstrate, red can transform the heart of your home into a vibrant sanctuary where creativity and warmth coexist harmoniously. The key lies in balance: pairing red’s intensity with complementary tones and thoughtful textures ensures a space that feels both dynamic and inviting, rather than overwhelming.
Ultimately, your kitchen should be a reflection of your unique style and spirit. Whether you opt for subtle pops of crimson or striking statement pieces, allowing red to play a starring role empowers you to craft a space that is as bold and beautiful as you are. So take the leap—embrace the allure of red, and watch your kitchen come alive with a new sense of energy and inspiration.
When it comes to baking, a reliable hand mixer can be the difference between perfect dough and frustrating lumps. Whether you’re whipping egg whites to stiff peaks or mixing dense cookie dough, the right hand mixer delivers the power, control, and convenience you need. In 2026, several models stand out for their performance, features, and ease of use, offering everything from multiple speed settings to turbo boost functions and dishwasher-safe parts. This guide reviews the best hand mixers available today, helping you find the perfect kitchen companion to bring your baking projects to life.
KitchenAid 5 Ultra Power Speed Hand Mixer – KHM512 Ice Blue
The KitchenAid KHM512 in Ice Blue is an excellent all-around mixer designed to handle thick batters and delicate mixtures alike. Its 5-speed control lets you mix precisely, while the sturdy stainless steel Turbo Beaters ensure thorough blending every time. Lightweight and ergonomic, the mixer features a lockable swivel cord that prevents tangling and a simple eject button to swap attachments quickly.
Hamilton Beach 6-Speed Electric Hand Mixer (250-Watt)
Offering great value with solid performance, the Hamilton Beach 6-Speed Electric Hand Mixer houses a 250-watt motor that easily manages various mixing tasks. Its six-speed settings paired with a QuickBurst button allow precise control and an extra power boost when needed. The Bowl Rest feature keeps the mixer stable between uses, and the included snap-on storage case keeps attachments and cord neat.
Feature
Specification
Speed Settings
6-speed
Motor Power (Watts)
250 watts
Attachments Included
2 beaters, 1 whisk
Dishwasher Safe
Yes
Weight
2.86 pounds
Controls Type
Manual dial
Special Features
Bowl Rest feature, QuickBurst, Snap-on storage case
Hamilton Beach 6-Speed Electric Hand Mixer (275-Watt)
This Hamilton Beach model steps up the power with a 275-watt motor and a versatile set of seven attachments including dough hooks, whisks, and both Easy Clean and traditional beaters. Its 6-speed control combined with the QuickBurst button makes tackling everything from whipped cream to stiff dough effortless. Lightweight and comfortable to hold, it also features a snap-on storage case for easy organization.
A favorite among baking enthusiasts, the KitchenAid 5-Speed Ultra Power Hand Mixer delivers precise control across five speeds. Its lightweight design and lockable swivel cord make it comfortable and tangle-free to operate, while the Turbo Beaters mix ingredients thoroughly. The quick-release button simplifies changing attachments, and all parts clean easily in the dishwasher.
Feature
Specification
Speed Settings
5-speed
Motor Power (Watts)
Not specified
Attachments Included
2 Turbo Beaters
Dishwasher Safe
Yes
Weight
2 pounds
Controls Type
Push-button
Special Features
Lockable swivel cord, Turbo Beaters, Detachable spindle control
Showvigor Electric Hand Mixer 7-Speed with Steel Accessories
For those seeking affordable reliability, the Showvigor 7-speed hand mixer offers solid performance powered by a 180-watt motor. Its multiple speeds and turbo boost handle everything from light whipping to kneading thick dough. The mixer is ergonomically built for extended use and comes with five stainless steel accessories, all dishwasher safe for easy cleanup.
The Lord Eagle hand mixer impresses with its 400-watt motor housing pure copper components for durability and power. It features five speeds and a turbo boost, perfect for dense dough or thick batters. The ergonomic grip and splash-proof design add comfort during long mixing sessions, and its stainless steel attachments are dishwasher safe for easy maintenance.
Feature
Specification
Speed Settings
5-speed
Motor Power (Watts)
400 watts
Attachments Included
2 beaters, 2 dough hooks, 1 whisk
Dishwasher Safe
Yes
Weight
1.9 pounds
Controls Type
Push-button
Special Features
Pure copper motor, Overheat protection, Splash-proof design
The Cuisinart HM-90BCS blends power with advanced control via its 220-watt motor and nine adjustable speeds. It features SmoothStart technology to prevent splatters and automatic feedback to maintain consistent mixing power. The extra-long beaters improve mixing efficiency, and the included spatula adds versatility. Dishwasher-safe parts and an intuitive beater-eject lever enhance ease of use.
KitchenAid 5 Ultra Power Speed Hand Mixer – KHM512 White
Identical in performance to its Ice Blue counterpart, the KitchenAid KHM512 in White combines powerful mixing with user-friendly features. Its 5-speed motor and Turbo Beaters work efficiently on a wide range of mixing needs. The lockable swivel cord and quick attachment release contribute to a smooth baking experience.
For maximum versatility, the KitchenAid KHM926 Onyx Black offers nine speeds and a comprehensive accessory kit including two Turbo Beater II attachments, a professional whisk, two dough hooks, and a blending rod. This mixer effortlessly transitions from whipping egg whites to kneading dough, ensuring smooth results with its powerful motor and ergonomic design.
Feature
Specification
Speed Settings
9-speed
Motor Power (Watts)
Not specified
Attachments Included
2 Turbo Beater II, 1 Pro Whisk, 2 Dough Hooks, 1 Blending Rod
Dishwasher Safe
Yes
Weight
Not specified
Controls Type
Push-button
Special Features
Large accessory set, Multiple speed options, Ergonomic design
Choosing the right hand mixer depends on your baking style, kitchen space, and budget. Here are key factors to consider:
Power: Motors range from around 180 to 400 watts. Higher wattage means better handling of tough doughs and thicker batters.
Speed Settings: More speeds allow delicate control for whipping and folding. Look for mixers with at least 5 speeds, up to 9 for the most precise results.
Attachments: Common accessories include beaters, whisks, and dough hooks. Dishwasher-safe options minimize cleanup time.
Turbo/Boost Feature: Handy for stirring stubborn mixtures or giving extra power when needed.
Ergonomics: Lightweight models with comfortable grips and swivel cords reduce fatigue during prolonged mixing.
Storage: Mixers with storage cases or snap-on compartments help keep cords and attachments organized.
Ease of Use: Simple button or dial controls and quick-release attachments save time in the kitchen.
Conclusion
A quality hand mixer is an indispensable tool that can simplify your baking projects and help you achieve professional results at home. From the all-around reliability of KitchenAid models to the budget-friendly but powerful options from Hamilton Beach and Showvigor, this 2026 roundup offers choices tailored to every baker’s needs. Consider your typical uses, desired features, and storage preferences to select the perfect hand mixer—and make your baking sessions smoother, faster, and more enjoyable.
Access to clean, great-tasting water is an essential part of everyday life. While tap water can sometimes carry unpleasant flavors or invisible impurities, a trusted water filter pitcher can make all the difference. Compact and convenient, these pitchers fit neatly on your countertop or inside your fridge, delivering purified water without the hassle of bulky systems or expensive bottled water. With so many options available, it can be tricky to know which filter pitcher genuinely improves your water quality and is worth your investment. This guide highlights the top water filter pitchers for 2026, helping you choose the right model for your household.
Brita Large Water Filter Pitcher (10-Cup Capacity)
Best Overall
Perfectly sized for families, the Brita Large Water Filter Pitcher offers a 10-cup capacity and a straightforward design that fits most refrigerator doors. It reduces chlorine, heavy metals like mercury and cadmium, and unpleasant tastes, refreshing your tap water in just minutes. The filter lasts about two months with the standard option or up to six months using the Longlast filter, making it a dependable and economical choice for daily hydration.
Feature
Specification
Capacity
10 cups
Filter Lifespan
40 gallons (Standard) / 120 gallons (Longlast)
Contaminants Reduced
Chlorine, mercury, copper, zinc, cadmium
Filter Indicator
Filter indicator sticker
Additional Features
Easy-fill locking lid, compatible with Standard and Longlast filters
Ideal for bigger families or office spaces, the Brita UltraMax offers an impressive 27-cup capacity with a two-part design (9-cup reservoir + 18-cup body). It features a precision pour spigot to prevent spills and reduces common contaminants such as chlorine and heavy metals. Its no-soak filters last up to 120 gallons with the Elite option, ensuring hassle-free filtration without frequent replacements.
This Waterdrop pitcher stands out for its extended 200-gallon filter life, cutting replacement costs and cutting down on waste. Certified by NSF for safety and performance, it not only removes chlorine and odors but also targets PFOA, PFOS, iron, mercury, and other heavy metals. The pitcher’s innovative hands-free lid allows one-handed pouring, while its LED display keeps you informed about filter status and water quality in real time.
Feature
Specification
Capacity
10 cups
Filter Lifespan
200 gallons or 3 months
Contaminants Reduced
PFOA, PFOS, chlorine, odor, iron, mercury, copper, metal ions
Designed for small kitchens or individual use, the Brita Metro holds 6 cups but still packs a filtering punch. This compact, BPA-free pitcher significantly reduces chlorine, copper, cadmium, and mercury, all while saving countertop space. The convenient SmartLight indicator electronically notifies you when it’s time to replace the filter, with options lasting from 40 to 120 gallons depending on the cartridge chosen.
This stylish all-black Brita pitcher uses the BritaPlus filter, which doubles the contaminant reduction power compared to standard filters. It effectively eliminates chlorine, mercury, cadmium, copper, and zinc, while keeping essential minerals intact for better-tasting water. Filter life lasts around two months or 40 gallons, ideal for families who want enhanced purification without sacrificing style or space.
Feature
Specification
Capacity
10 cups
Filter Lifespan
40 gallons or approximately 2 months
Contaminants Reduced
Chlorine, mercury, cadmium, copper, zinc
Filter Indicator
Not specified
Additional Features
Retains beneficial minerals, high density filtration
Waterdrop 200-Gallon NSF Certified Water Filter Pitcher
Best Value
Backed by stringent NSF certifications, this Waterdrop pitcher impresses with its 200-gallon filter capacity, outperforming most competitors in value and performance. It uses activated carbon fiber loaded with silver for effective removal of chlorine, heavy metals, iron, calcium, magnesium, and more. Its 7-cup design is ergonomically crafted with a BPA-free body and a manual life recorder to keep track of filter longevity, making it a great sustainable option for health-conscious buyers.
For shoppers prioritizing affordability without sacrificing filtration quality, the Amazon Basics 10-Cup pitcher is a solid contender. It effectively reduces chlorine, zinc, copper, cadmium, mercury, and even some synthetic compounds like benzene. With a 40-gallon filter life and simple design, this pitcher offers easy access to cleaner water without breaking the bank, making it ideal for budget-conscious households.
The PUR 7-Cup Filter Pitcher is an excellent choice for those with limited space, comfortably fitting in smaller fridges and countertops. It reduces chlorine taste and odor, mercury, microplastics, and a broad range of chemical contaminants. Filters last up to 40 gallons or about two months, with a compact design that keeps clean water always within reach.
Feature
Specification
Capacity
7 cups
Filter Lifespan
40 gallons or up to 2 months
Contaminants Reduced
Chlorine, mercury, microplastics, chemical and physical contaminants
This updated Brita pitcher blends usability and smart technology, offering a 10-cup capacity alongside the SmartLight filter replacement indicator. It efficiently removes chlorine, copper, mercury, and cadmium for crisp, clean flavors. A perfect fit for everyday use, it helps reduce plastic bottle reliance by signaling timely filter replacements.
For those seeking a high-capacity pitcher with advanced filtration, ZeroWater provides an impressive 32-cup capacity and a notable 5-stage filter system. It removes virtually all total dissolved solids (TDS), heavy metals like lead and mercury, PFOA, PFOS, minerals, salts, and more, making it a top choice for serious water purification needs. The filter should be replaced according to TDS meter readings for optimal water quality.
Buying Guide: Choosing the Right Water Filter Pitcher for Your Home
Picking the ideal water filter pitcher requires balancing capacity, filtration quality, convenience, and budget. Here are the key considerations:
1. Capacity
Choose a pitcher size that fits your household’s daily water consumption and available fridge or counter space. Pitchers range from compact 6-cup models for individuals to large 32-cup dispensers for families or offices.
2. Filter Life and Cost
Longer filter lifespans reduce replacement frequency and cost. Advanced filters like those in Waterdrop pitchers can last up to 200 gallons, often saving money in the long run despite a higher upfront price.
3. Contaminants Removed
Ensure your pitcher targets the impurities common in your water supply. Most pitchers reduce chlorine and heavy metals, but some also remove PFAS compounds, microplastics, and other chemical contaminants.
4. Certification
Look for NSF/ANSI certifications which verify the pitcher’s effectiveness in contaminant reduction, ensuring safety and performance claims are backed by independent labs.
5. Ease of Use
Features such as filter indicators, hands-free lids, and spill-proof pouring make everyday use simpler. SmartLight indicators and built-in LED displays provide timely reminders to replace filters, maintaining water quality.
6. Build and Design
Consider BPA-free materials, dishwasher-safe components, and ergonomic designs. If aesthetics matter, options like the sleek Brita 10 Cup Black pitcher combine style with substance.
7. Environmental Impact
Switching to filtered water can reduce plastic bottle waste by thousands annually. Choose pitchers that offer long filter lives and eco-friendly materials to minimize environmental footprint.
Conclusion
Investing in a high-quality water filter pitcher is a smart, cost-effective way to enjoy fresh, clean water every day. Whether you need a compact solution for tight spaces or a large dispenser for the entire family, there’s an option that fits your lifestyle and budget. Models like the Brita Large and Waterdrop 10-Cup offer trusted filtration with easy upkeep, while advanced pitchers such as ZeroWater or Waterdrop’s high-capacity version provide professional-grade purification for those with more specific needs. Whichever you choose, filtering your tap water at home supports both your health and the planet—making it a decision you won’t regret.
Discover cleaner water and happier hydration today—explore our top picks, and find the perfect water filter pitcher to suit your home.
Waffles are making a big comeback this year, and it’s easy to see why. Whether you enjoy a quick weekday breakfast or a leisurely weekend brunch, the right waffle maker elevates your mornings with perfectly crispy, golden waffles every time. As waffle makers flood the market in 2026, choosing one that fits your kitchen space, cooking preferences, and family size is key. We’ve tested and reviewed the latest models to bring you ten top picks that combine power, ease of use, and consistent results.
Cuisinart Round Waffle Maker with Browning Control (WMR-CANAS)
Best Overall
The Cuisinart WMR-CANAS strikes a fine balance between simplicity and precision. Equipped with 1250 watts of power and five browning settings, it allows you to dial in your preferred waffle crispness, from lightly golden to deeply crisp. Its generous 1-inch deep pockets yield thick waffles that crisp up perfectly on the outside while staying tender inside. Thanks to PFAS-free ceramic nonstick plates, waffles release effortlessly, and cleanup is a breeze.
Designed with convenience in mind, this waffle maker also features indicator lights to show when it’s ready to cook and when the waffle is done. Its sleek brushed stainless steel exterior and upright storage with cord wrap make it a stylish, space-saving option. A 3-year limited warranty ensures you have peace of mind for years to come.
Cuisinart Round Flip Belgian Waffle Maker (WAF-F30NAS)
Premium Flip Design
For fans of Belgian waffles, the Cuisinart WAF-F30NAS stands out with its innovative 180° flip mechanism. This design ensures even batter distribution and helps create waffles with deep pockets that are golden and fluffy. Powered by 1000 watts and featuring five browning settings, it provides excellent control for your preferred waffle texture.
The ceramic nonstick plates help with easy waffle removal and effortless cleaning. Its brushed stainless steel body not only looks sleek but also wipes clean quickly. This model enjoys high customer satisfaction, boasting a 4.6-star average from nearly 3,000 reviews.
Cuisinart Round Waffle Maker with Browning Control (WMR-CAP2)
Classic Choice
The WMR-CAP2 offers a classic waffle-making experience with the reliability Cuisinart is known for. Its 1250-watt heating element and deep 1-inch pockets craft waffles with a delightful mix of crisp exterior and soft interior. You have five browning settings to pick exactly how browned you prefer your waffle, complemented by indicator lights for simple operation.
This compact appliance features easy-to-clean nonstick plates and an upright storage design with cord wrap, perfect for kitchens with limited counter space. Its timeless stainless steel finish fits in beautifully with any décor.
Cuisinart Double Flip Belgian Waffle Maker (WAF-F40NAS)
Best for Families
Need to serve waffles for a crowd? The Cuisinart Double Flip Belgian Waffle Maker doubles the capacity with its ability to cook two thick Belgian waffles simultaneously. Running at 1400 watts, it heats quickly and maintains consistent temperature for even browning. The double 180-degree flip feature ensures uniform waffle texture and visually appealing results.
PFAS-free ceramic nonstick plates allow waffles to release cleanly, and audible ready-to-bake and ready-to-eat alerts keep you on track. Its polished stainless steel finish is both durable and stylish, making this one of the best choices for busy family mornings.
Cuisinart 4 Slice Belgian Waffle Maker – Square (WAF-150NAS)
High-Capacity Option
If a large batch of waffles is what you’re after, the Cuisinart WAF-150NAS serves up four square Belgian-style waffles at once. Its 1200-watt heating system and five browning levels deliver customizable results that range from soft to crispy. Deep pockets are perfect for holding your favorite syrup, fruits, or whipped cream.
The PFAS-free ceramic nonstick coating ensures waffles slide right out and cleanup is straightforward. Equipped with audible alerts and green indicator lights, this reliable model makes whipping up breakfast for families a breeze.